Tutorials
Learn new skills with our bite sized lessons
Requirements
3DS Max 2010, Forest Pack Lite, RailClone Lite
Featured Products
Get Products
Forest Pack is incredibly easy to use, this series of tutorials is designed to get you up and running quickly and give you the skills you need to create fantastic scenes with Forest Pack Pro.
There are a number of forest objects in the scene, each designed to demonstrate a different aspect of the Plugin. For ease this tutorial is split into 3 parts.
- Part 1. Trees and Bushes: Introduction to key Forest Pack features and using splines to control the placement of objects
- Part 2. Grass and Flowers: Introducing distribution on mesh surfaces and how to set up include and exclude distribution areas
- Part 3. Randomising Colour: Easily add simple colour variation using the optimise materials tool and Forest Color's tint by gradient feature.
The starter files are compatible with 3DS Max 2010 and later. You should also have the most recent version of Forest Pack and RailClone installed. The majority of this tutorial can be completed with the free lite version. The exercise files contain all the objects necessary to complete this tutorial, they are compatible with Mental Ray and V-Ray, please download the appropriate version from our download page.
Part 1. Workflow
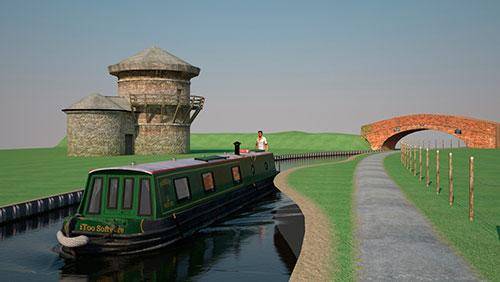
In the first tutorial we'll look at a typical workflow for Forest Pack. We'll start by selecting distribution areas to control where items are created in the scene, choose the geometry, control the density and finally add randomised transforms to create variety. Below shows a render before Forest Pack has been used.
Creating new Forest Objects
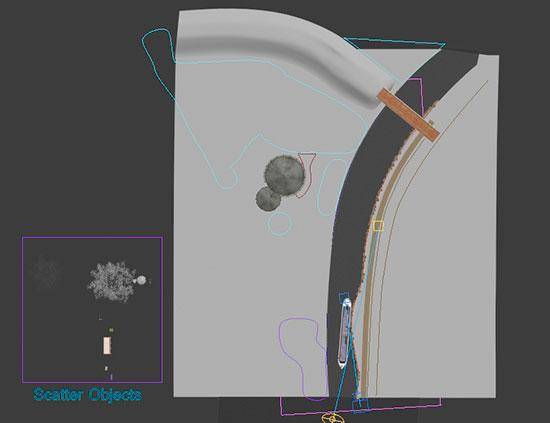
- Open either vray_start.max or mr_start.max depending on your renderer. The base scene is fairly simple. In addition to a building, boat, a couple of ground planes and canal edgings there are splines we can use to help distribute the trees and bushes. These are easy to create but for simplicity they have been included in the scene file. All the objects we will be using can be found in the rectangle to the left of the scene.
- To get started we'll create the trees on the left of the canal. Create a new forest object by going to the Create panel>Itoo Software and select Forest Pro. There are two creation modes available, Generate and Custom Edit.
Creation techniques: Generate and Custom Edit
When creating a new forest it defaults to Generate mode, and expects you to click on a spline or surface to start defining an area to scatter trees. Alternatively it is possible to individually place or edit trees using Custom Edit. In this example we'll use the Generate mode throughout.
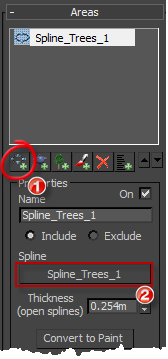
- The default setting is Generate which expects you to select a spline or surface to start the scatter. select the spline called Spline_Trees_1 found behind the building. The area contained within the spline will fill with planes. Rename this Forest_trees_left.
Setting the Geometry
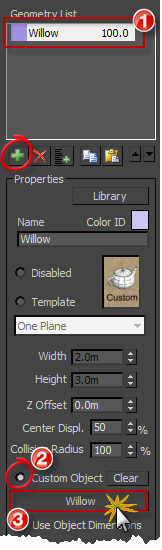
- To change the objects being scattered, go to the Modify panel and find the Geometry rollout. From here you can use low polygon templates, load objects from the library, or select an object from the scene. At the top of the rollout is the Geometry List that shows a default object that was generated when we added the forest object to the scene.
- Make sure this is selected then change the type of Geometry from Template to Custom Object. Click on the box that says "none" and pick the Willow proxy from the scene. The Forest will update so that it now scatters the selected object.
- Forest Pack Pro supports unlimited objects while the lite version supports up to 3. In this example we will add one more tree by clicking on the + symbol below the Geometry List.
- There will now be a New Item, ensure this is selected then activate Custom Object, click on the box that says "none" and select the Oak proxy from the scene. Forest is now randomly distributing two models.
Geometry items can easily be added, deleted, and copied using the controls below:
 Adds a new item to the geometry list
 Delets an item from the geometry list
 Adds multiple custom objects to the geometry list
 Copies all the settings from the selected item.
 Pastes values to the selected item
Adding more areas
Forest Pack Pro supports unlimited scatter areas and the lite version will allow you to use up to 4. In this section we'll add 2 more spline areas to add trees along the edge of the canal, leaving a sight line to the building.
- Making sure you have Forest_Trees_left selected navigate to the areas rollout. At the top of the rollout is a list of all the areas being used in the scatter. To add a new area select the Add Spline Area button (
![Tree-Lined Canal-addSplineArea.png]() )below the list and select Spline_Trees_2. Press
)below the list and select Spline_Trees_2. Press ![Tree-Lined Canal-addSplineArea.png]() again and select Spline_Trees_3.
again and select Spline_Trees_3. - If you edit any of the spline objects now, Forest will adjust the distribution automatically.
 )below the list and select Spline_Trees_2. Press
 Areas
- Forest pack supports five different area types, added by selecting the buttons under the Area List. From left to right these are splines, objects, forest objects, and paint areas. As we will see later in the tutorial it is also possible to use a surface to scatter trees, but this is handled from a different rollout.
- Splines are interactive. If a spline is edited Forest will automatically adjust the tree distribution. If a spline is deleted.
- Areas can be either include objects or exclude objects and some types like splines and paint areas are capable of both. To set the mode simply select the appropriate radio button.
- When using splines the Z location of the scattered objects is set by the highest vertex in the splines. This is why in this example we separate the trees on either side of the canal into two different objects, since the right side is higher and would leave the other trees floating well above the ground.

Adding variety by randomising transformations
Forest pack can add a great deal of variety and help prevent the eye from spotting repetition by randomising rotation, scale and position.
Transforms
- Translation will random transpose a tree from its scattered position based on a percentage of its width. Each axis can be controlled separately but note that Z should be left at 0% if you want to your objects to remain anchored to the ground
- Each axis can be rotated separately by setting a minimum and maximum value in degrees.
- Scale is set as a percentage of the the original size. By default the XYZ axis are scaled equally but it is possible to constrain only the XY axis or even control each completely separately.
- With Forest_Trees_Left selected, open the transform rollout.
- Enable rotation and set the following settings:
X minimum: -5 | X Maximum: 5
Y minimum: -5 | Y Maximum: 5
Z minimum: 0 | Z Maximum: 359 - Enable scale and leave the defaults as they are at 80% - 120%, this gives a believable range in the majority of circumstances.
This completes the trees on the right side of the canal, next we'll add the trees on the the right.
Using Open Splines
When an open spline is picked as a distribution area Forest Pack uses a width either side of the spline to scatter objects. This distance is controlled by the thickness parameter found under the Pick spline/object box
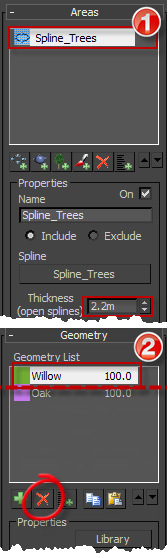
- Since all we really need to change are the areas clone Forest_Trees_Left by hitting CTRL+V, ensure it's not an instance and rename it Forest_Trees_Right.
- Go to the Areas list and delete the areas.
- Click on
![Tree-Lined Canal-addSplineArea.png]() to add a new area and select Spline_Trees. A few trees will appear along the spline.
to add a new area and select Spline_Trees. A few trees will appear along the spline. - Set the splines thickness to 2.2m, the number of trees will increase alongside the path.
- The willow tree's leaves hang too low and obscure the view, so for this object we'll delete them. Go to the Geometry rollout and delete the Willow item. Only the oak is now used next to the path.
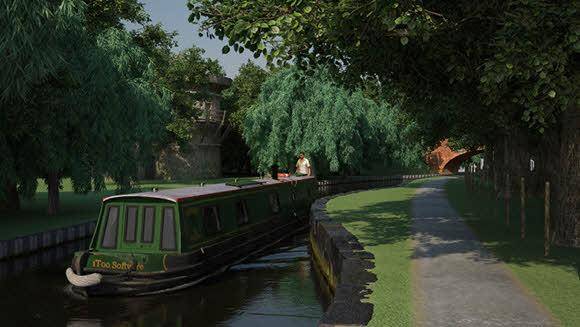
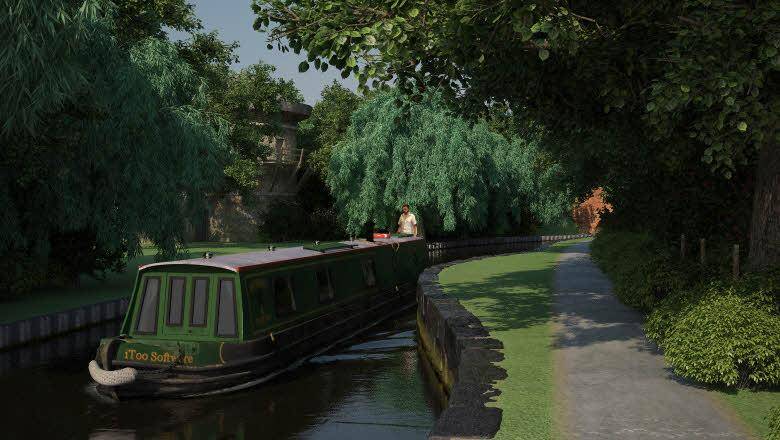
If you render the scene now you should see something similar to the image below. In the next step we'll add some bushes to the scene under the trees and alongside the fence.
Using The Library
The Library
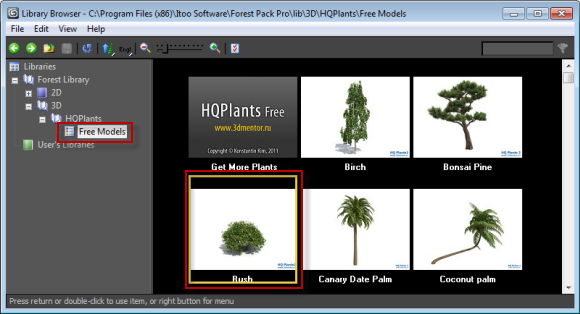
- In addition to selecting objects from the scene, objects can be selected from Forest's built in library. This comes with a number of sample plants but can be expanded by purchasing HQ Plant and XFrog plant collections or by creating your own library objects (pro version only).
- Create a new Forest object by selecting Spline_Trees_1. Rename this Forest_Bushes_1.
- Go to the Areas rollout and add Spline_Trees_3 and Spline_Bushes_1 to the list.
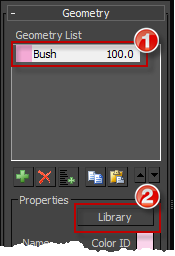
- Go to the Geometry rollout and select the default item.
- Click on the Library button and the browser will open. From the directory on the left select 3D>HQPlants>Free Models and double click on the model named "Bush".
- Next we'll add a couple of other models from the scene so that we have a randomised selection of bushes. In the Geometry rollout, click on the Add Multiple Custom Objects button and select Bush Medium and Bush Large from the list. Click on Add to use them.
- The bushes are too spread out. In the next step we'll control the density and distribution patterns to add more bushes.
Using Basic Distribution
- The distribution of objects is defined by a bitmap in which any pixel is a potential tree position. If a pixel is white, a tree is created; for black pixels the position is empty. In this way, we can create any desired distribution pattern simply by painting a custom bitmap.
- The plug-in comes with a default list of sample images. By selecting these from the drop-down list, the distribution of trees will immediately update in the viewport.
- The size of the bitmap in the scene is determined by the density parameters. This scales the image in scene units which then tiles in all directions. Offset can be used to move the image along the x and Y axis, useful for precise control
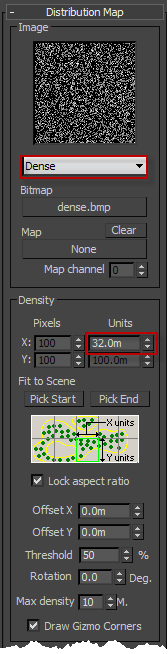
- Go to the distribution Rollout
- In the drop down list under the image select Dense.To increase the density further change the Density dimension to 32m
- Add some transform randomisation by activating rotation and setting the following settings
- Activate scale transform, leave the minimum at 80% but increase the maximum to 140% for a larger range.
- The bushes are now done! We'll add some under the trees using the open spline method demonstrated earlier. First duplicate the bushes using CTRL+V and rename the new object Forest_Bushes_2
- Go to the Area rollout and delete all the existing areas.
- Click + to add a new area and select Spline_Trees, the curved spline used earlier for the trees.
- Increase the thickness of the spline to 2.3m.
If you render now the bushes provide some effective undergrowth and really flesh out the scene. To finish up, we'll add some smaller bushes in front of the fence too.
- Start a new Forest object by selecting the open spline to the left of the fence called Spline_Small_Hedge and set the spline thickness to 0.25m
- From the Geometry rollout, change the default item to the bush from the built in library.
- In the Distribution rollout set the map to Spread 1 and the density size to 24m
- Finally in the transform rollout, activate scale and set the minimum to 40% and maximum to 100%. Turn on rotation and set the X and Y minimum to -5 and maximum to 5. Leave the Z settings as they are.
That Concludes this part. In the second section we will look at scattering objects on surfaces to create the grass, and paint modes to position some flowers and expose the path.
By the end of this section you have created all the trees and bushes seen in the scene