Requirements
- info 3DS Max 2010, Forest Pack Lite
Chapters
- toc Introduction
- toc Forest Pack Intermediate Course: Rendering a Modern Barn Scene - Part 1
- toc Forest Pack Intermediate Course: Rendering a Modern Barn Scene - Part 2
- toc Forest Pack Intermediate Course: Rendering a Modern Barn Scene - Part 3
- toc Forest Pack Intermediate Course: Rendering a Modern Barn Scene - Part 4
- toc Forest Pack Intermediate Course: Rendering a Modern Barn Scene - Part 5
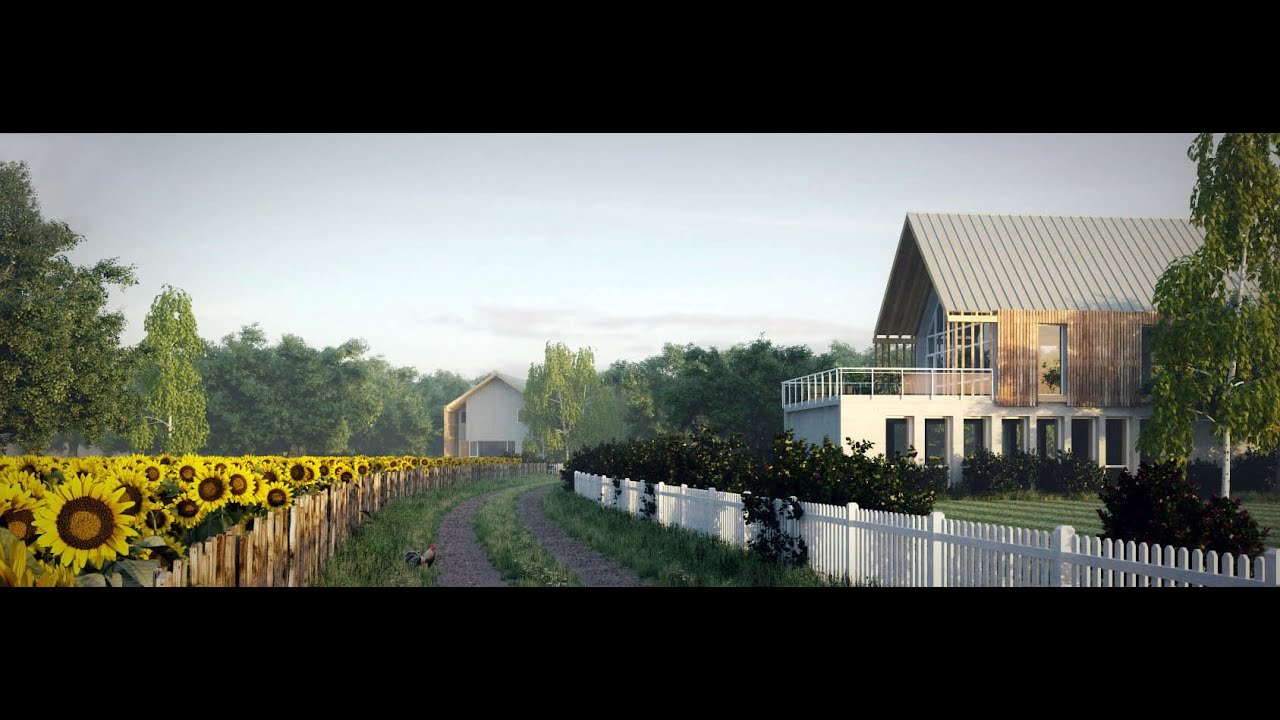
Creating the fence, overgrowth and bushes.
In this series of tutorials we will create the fence on the left hand side of the scene, the surrounding overgrowth, and the bushes. This section covers the following features of Forest Pack:
- Distributing items along splines using create mode
- Using inverted falloff maps
- Using the new Forest Object areas
- Pen painting areas
- Parametrisation by area
Creating the fence
The scene already has a RailClone fence surrounding the buildings, but for the perimeter of the fields something more dilapidated is called for. Using Forest Pack’s custom edit modes we can create a fence where the planks have subtly varied transforms and holes where some are missing.
Note: this section of the tutorial requires Forest Pack Pro, since the Creation Tools are not available in the Lite version.
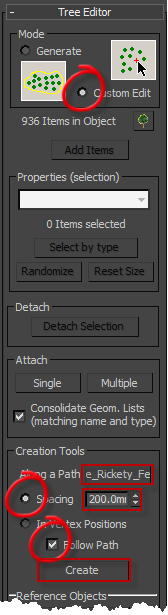
- Start by creating a new Forest Object, set the mode to Custom Edit and click anywhere in the scene to add an item.
- Add "plank1", "plank2", and "plank3" as custom objects.
- Open the Tree Editor rollout and turn on Custom Edit. Click OK to accept the warning that you will disable area/distribution parameters.
- Under Creation Tools, in the Along a Path setting select "Spline_Rickety_Fences.
- Set the Spacing to 200mm
- Ensure that Follow Path is activated
- Click Create to generate the fence.
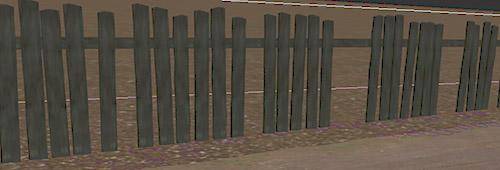
You should now see an even distribution of planks along the spline. Next we'll add a little variety.
- Open the Transform rollout and change the settings as follows. Not that the items update live allowing you to see your changes immediately.
Translation
X: 0%
Y: 17%
Z: 0%
Rotation
X minimum: 0 | X Maximum: 2
y minimum: -2 | y Maximum: 2
Z minimum: 0 | Z Maximum: 0
Scale
X minimum: 96 | X Maximum: 104
Y minimum: 96 | Y Maximum: 104
Z minimum: 98 | Z Maximum: 105 - To add the occasional missing plank we need only disable one of the Custom Objects. Go to the Geometry rollout and click Disable for one of the items in the Geometry List. You should see a number of planks disappear. To make the gaps fewer, turn down the Probability of the disabled geometry.
In a later tutorial we will use Forest Color to randomly allocate wood textures.
Disabling geometry does not remove it from the scattering calculation. That is why in this example the gaps in the fence occur.
In Custom Edit mode, changing the probability of the disabled geometry does not automatically update the forest object. To see the effects of changing the probability it is necessary to click Create again in the Creation Tools rollout.
Repeatedly clicking Create will give you different variations using the existing parameters.
Creating the overgrowth
In this tutorial we will create some unruly overgrowth around the fences, the trees and foreground barn. The aim is to enable the overgrowth to automatically grow around selected objects without needing to create the areas manually.
- Start a new Forest Object called "Forest_overgrowth", ensure you are back in Generate mode and select "spline_overgrowth" as the distribution area.
- Add "tall grasses", "ground cover", and "canes" as Custom Geometry Objects
- Set the Distribution Map to "dense" and the Density to about 2350mm. Turn on Clusters and set the size to 385mm.
- Set the Transform settings as follows:
Translation
X: 20%
Y: 20%
Z: 0%
Rotation
X minimum: -10 | X Maximum: 10
y minimum: -10 | y Maximum: 10
Z minimum: 0 | Z Maximum: 359
Scale
X minimum: 80 | X Maximum: 150
At this point you will have a field full of overgrowth. We will now constrain it to just the boundaries of certain scene objects.
- Go to the Areas rollout and set the Exclude values of the Falloff for both Density and Scale to 1300mm. Ensure both are turned on.
- Select Add New Object Area and select the foreground barn. The overgrowth will leave an empty perimeter around the object. We want to flip this so that the plants only grow in that space.
- With the barn still selected in the Areas rollout, turn on Invert Curve.
Invert Curve creates growth around the boundaries of areas.
- Now do the same thing for the RailClone fence. If you find that areas around the fence are missing or patchy, you may need to turn the Resolution up.
- Add "forest_rickety_fence" as an excluding area. The overgrowth starts some distance from the fence. To remedy this, turn the Scale down to 10% and for greater accuracy use a Resolution of 1024px.
- Finally, add the "forest_trees" as an excluding area, and set the Scale to 20%.
This concludes the overgrowth tutorial. Any other object you wish to have overgrowth surrounding need only be added as a exclude area. All the areas can be edited on the fly and Forest Pack will automatically update the distribution.
Creating the hedges
For maximum control we will create hedges that are distributed using 4 Paint areas, one for each of the 3 sizes of bush and another that combines and randomly selects all 3. This setup will give us maximum flexibility when position items.
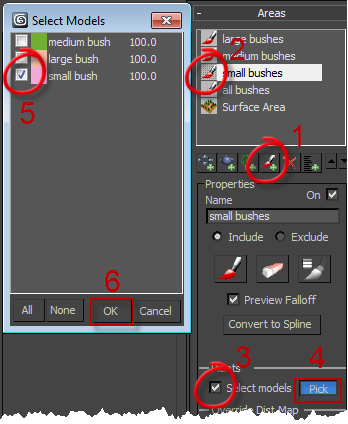
Areas can now distribute specific geometry items. This is controlled by the Plants section of the Areas menu. To use it enable Select Models and click on Pick to bring up the list of models. Tick the ones you wish to use and select OK
It is possible to control the Density and Threshold of the distribution map on a per-area basis.
Note that you will not be able to see the results of selecting specific objects per area if you have set Diversity in the Distribution Map menu to anything other than random.
- To start create a new forest object and name it "forest_hedges". Select "ground" from the scene as the distribution surface and add "bush_small", "bush_medium", and "bush_large" as Custom Geometry Objects.
- From the Transformation rollout enable Translation, Rotation, and Scale and use the default settings.
- From the Distribution rollout change the Density to 22000mm
- Create a new paint area and name it "all bushes"
- Create a 3 more paint areas called "small bushes", "medium bushes", and "large bushes".
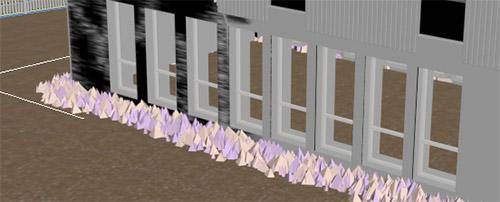
- For "small bushes" turn on Select Models and click on Pick. This will bring up a list of objects to be scattered by this paint area. Pick "bush_small" and click OK (see image right).
- Do the same thing for the other two individual paint areas, selecting the corresponding geometry object.
- Select the "all bushes" paint area, activate Paint and brush in some brushes on the other side of the foreground fence. Try to leave the area nearest the camera clear to avoid obscuring the views of the barn and the lawn. You may also wish to paint in some bushes around the background barn. If you make a mistake it is easy to rectify with the Erase tool.
- Continue to create bushes around the foreground barn.
- Select the "small bushes" area and paint in some bushes in the foreground, this will fill in the area left by the previous operation without blocking the view of the barn.
- You will notice that the small bushes are spaced too far apart. Remedy this by setting the Scale to 70%
- Add more bushes to the scene as you see fit. Try a couple along the track or around the trees. Feel free to experiment!
This concludes this section. If we do a quick preview render now we can see most of the scene is compete. To finish we will add a lawn around the foreground barn and some Ivy on the walls.
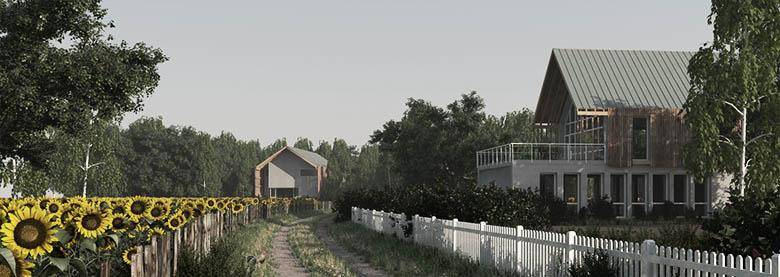
Nearly there! The scene without the lawn