Tutorials
Learn new skills with our bite sized lessons
Requirements
3DS Max 2010, RailClone Lite 2.0, Forest Pack Lite
Featured Products
Get ProductsSeaside Promenade Part 2
Creating Two Dimensional Arrays
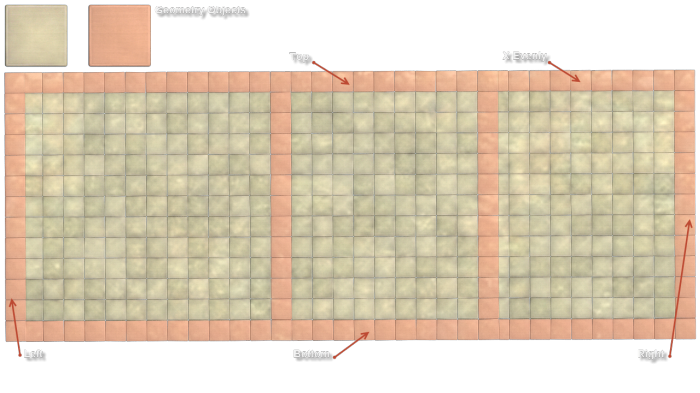
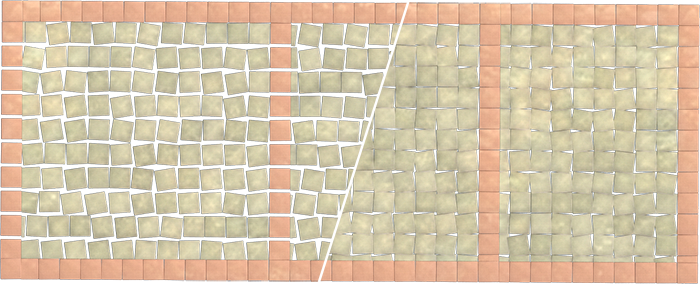
To create 2D arrays, RailClone uses the A2S Generator. In the Seaside Promenade scene this is used to create a paved revetment, using individual paving slabs as segments as shown below. This diagram identifes some of the parts of the Array that can be targeted when using this generator. For more information on the A2S generator, please see our detailed reference.
By creating this object you will learn how to:
- Create a new A2S Generator
- Attach a splines to control the length and path of the array
- Use the Y Size value to to control the width.
- Randomise transform to create variations in scale and rotation
- Randomise material IDs to create texture variations
- Create evenly spaced segments
- Start by creating a new RailClone object, rename it RC_Floor
Before connecting "Floor1" we'll randomise the textures to create greater variation. The provided material has 3 different stone maps assigned to material IDs 1 to 3. To randomise an objects material IDs use a Material operator:
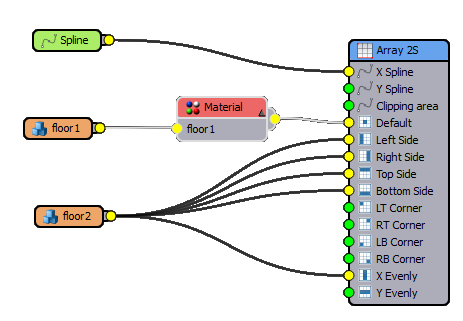
- Let's take a look at the node tree we are going to create. There are only two segments and one spline in this style used to construct the entire pathway. A material node adds some texture randomisation while the Y dimension is provided by a parameter set from the A2S generator itself.
![Second Part-sp_p3_node_tree.png]()
- From the Style rollout, open the Style Editor and create an A2S Generator (
![Second Part-sp_p3_a2sgen.png]() )by dragging from the Items List to the Construction View.
)by dragging from the Items List to the Construction View. - Create a new Spline Object and use the Base Objects rollout to allocate "BaseLine" from the scene. Attach to the X Spline input of the Array 2S node
- Create a new Segment Object and select the mesh named "Floor1", This the grey stone coloured paving slab
- No geometry will display yet because we have not established a width . Go to General>Y Size and set the value to 4m, if no object is attached to the Y Spline input, this value determines the Y dimension of the array.
![Second Part-sp_p3_4.png]()
- Limit the distribution along the Baseline by turning off Full Length from the Base Objects rollout. Set the Start value to 40m and the Length to 20m.
- Go to the Display Rollout and set the mode to Mesh.
- In the Segment's Properties>Deform> settings turn on Apply Box Mapping and Real-World Map Size, and change the map channel to 2. The material provided uses a second channel to map the bump textures.
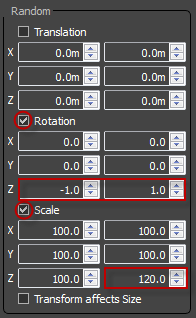
- Randomise the rotation slightly by going to Properties>Transform>Random Rotation and changing the Z minimum to -1 and maximum to 1
![Second Part-sp_p3_8.png]()
- Randomise the height of each slab changing the Random Scale Z Minimum to 100 and Maximum to 120
- Turn off Tranform Affects Size. This will prevent the randomisation affecting the size of the bounding box used to calculate the position of adjacent segments.
![Second Part-sp_p3_9.png]()
Left: Transform Affects Size is on, note how the rows adjust to compensate for the new sise of the rotated segments. Right: Transform Affects Size is off, segment's rotation does not affect the size of the box used to calculate the position of adjacent segments.
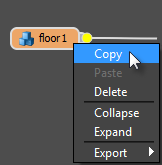
- Next we need to create a new Segment object for the red slab. To do this, copy and paste the existing segment. This will retain the settings we just created.
![Second Part-sp_p3_11.png]()
- With the new segment selected, from the Properties editor, change the referenced geometry and select "Floor2" from the scene.
- Connect the "Floor2" segment to the Top, Side, Bottom, and X Evenly input slots of the generator.
- Drag a new Material Operator in the Construction View.
- From the Parameters Editor, set the Replace Material ID to 1, leave the mode at random and set the range From=1 To=3
- Wire the "Floor1" segment to the input slot of the Material operator and connect this to the Default slot of the generator.
- From the A2S generator create a column of red paving slabs every 3m by entering this value in the Properties>Rules>X Evenly>Distance value and turn on extend to side.
- To display the full length of the spline go to the Display Rollout and set the mode to Points-Cloud, then go to Base Objects and turn back on Full Length.
 )by dragging from the Items List to the Construction View.
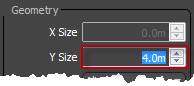
The 3 RalClone objects created so far.
In this section we have covered the basics of creating 2D arrays with an A2S generator. Next we'll extend this technique to create the sea wall.
Creating Two Dimensional Arrays from two splines
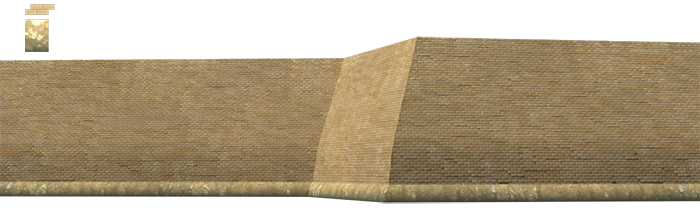
The sea wall is created from two small segments.
The seawall is constructed from individual bricks. Though this could be achieved using textures this example demonstrates the power of RailClone to effortlessly create and render massive amounts of instanced geometry. In this section you'll learn how to:
- Create 2 dimensional arrays distorted using two splines
- Use the Top Side input slot
- Use the display parameters to speed up viewport performance
- Overlap segments using padding
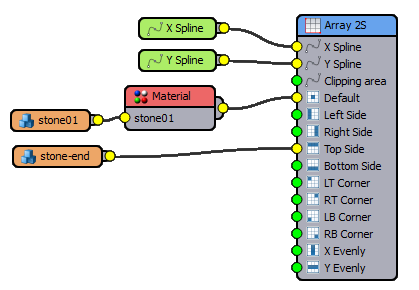
- This is the node tree for the Sea Wall, it's very similar to the pathwat except that this style uses two splines, one for the path, and another to define the shape on the Y axis.
![Second Part-sp_p4_tree.png]()
The 3 RalClone objects created so far.
- Create a new RailClone object and rename it "RC_Wall".
- Open the Style Editor and create a new A2S Generator.
- Create two new Spline Objects, name one "Length" and the other "Profile". Wire "Length" to the X Spline input and "Profile" to the Y Spline input of the A2S Generator.
- From the Base Objects rollout, Select the "Length" from the list and pick the "BaseLine" spline from the scene. Next select "Profile" from the list and pick the spline named "WallProfile" from the scene.
- Add two new segments and select Stone01 and Stone-End, connect the latter to the Top Side input slot.
- Limit the distribution along the Baseline by turning off Full Length from the Base Objects rollout. Leave the Start value at 0m and set the Length to 20m. Go to the display rollout and turn on Display>Mesh.
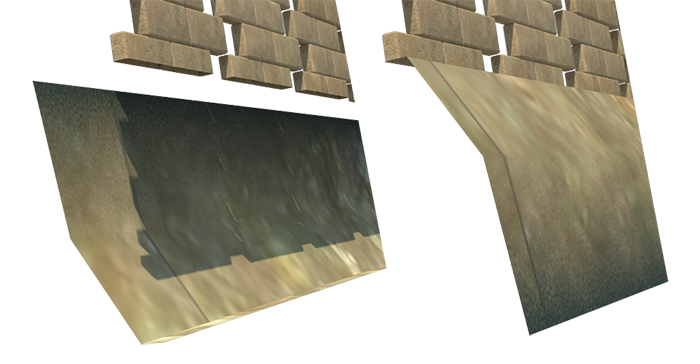
- The stone end is facing the wrong way and is set back from the main wall. Fix this by changing the Stone-end's Z position to -0.6m and Y rotation to 180 degrees. Turn on Deform>Mapping>Apply Box Mapping and Real World Map Size.
![Second Part-sp_p4_7a.png]()
Left: Bottom stone before rotation. Right: Rotated and moved on the Z axis into the correct position.
- Create a new Material Operator. Set the Replace Material ID to 1, leave the mode at random and set the range From=1 To=3.
- Wire "Stone01" to the Material node and then connect the output to the Default slot of the generator.
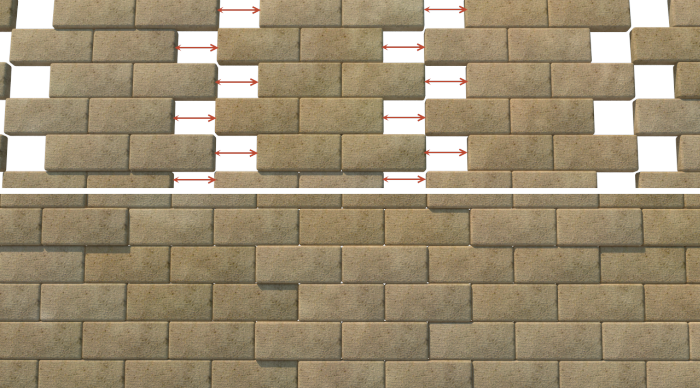
- The wall is now working but there is no overlap between bricks. To fix this, adjust the Right Padding of the "Stone01" node to -0.321m
![Second Part-sp_p4_10b.png]()
The 3 RalClone objects created so far.
- Add some position randomisation by going to Transform>Random>Translation>Z and set the Minimum value to 0m and Maximum -0.03m. This will give the wall a more natural uneven appearance.
- Turn on Deform>Mapping>Apply Box Mapping and Real World Map Size, Change the Map Channel to 2.
- The wall is created but needs some adjustment, from the A2S generator rotate it by going to General>X Rotation and setting the value to -90 degrees
- Move it slightly away from the balustrade by setting the Y Offset value to -0.3m
- To display the full length of the spline go to the Display Rollout and set the mode to Points-Cloud, this will enable RailClone point display mode that will allow for a good visualisation of geometry viewport in viewport whilst maintaining performance. Go to Base Objects and turn back on Full Length.
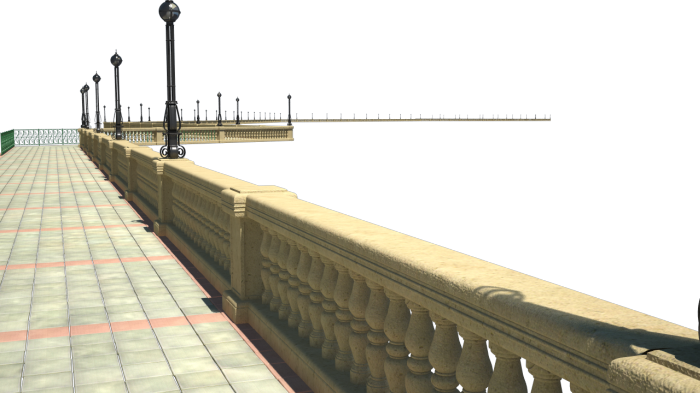
Having completed this tutorial you should be able to create double curved 2d arrays using splines to control the profile and path.
Conclusion

Once you have completed this tutorial you should be able to create new RailClone objects, load styles from the library, use the Style Editor, create a number of styles using the L1S and A2S generators, have a good understanding of commonly used operators, and be able to optimise viewport display. If you have further questions about these tutorials or any of the techniques demonstrated here. For more tutorials please see the RailClone tutorials page, or our YouTube channel.