- Inicio
- Tutoriales
- Adapting RailClone's built in presets
Requerimientos
- info RailClone Lite, RailClone Pro

In the last episode of this course, we looked at how to use existing RailClone presets, but after a while you’re going to want to create your own custom objects. Before you start creating things from scratch, it can be really helpful to adapt and reverse engineer the built-in styles. Using the existing presets as a springboard for your own designs is not only a great way to learn, it can save you time as a lot of the work may already have been done.
First of all, once you have an idea of how RailClone works, the graphs that you’ll see used by the presets should make a lot more sense and be easier to read. To illustrate I’m going to add and deconstruct a curtain wall from the library for the ground floor of the central building.
Create a new RailClone object and go to the Architecture>Exterior>Facade category and go to Curtain Wall. Pick Curtain Wall 6 and click Import Selected so that loads up the style.
Go to the Base Objects rollout and assign the path, just like we did in the previous lesson.
As we can see that the height between the floors on our building is actually taller than our current style. So how do we make this a little bit taller? Well, the way you do that is to extract the geometry out of this RailClone object and then edit it using Max's standard tools.
To do that we open the Style Editor using the  button in the Style rollout. This opens the graph view, which is basically RailClone's brain, and it's how you’ll create and edit all your parametric objects.
Before we make any changes, let’s take a look at the categories of nodes that RailClone uses so that you can start to understand how these styles are built.
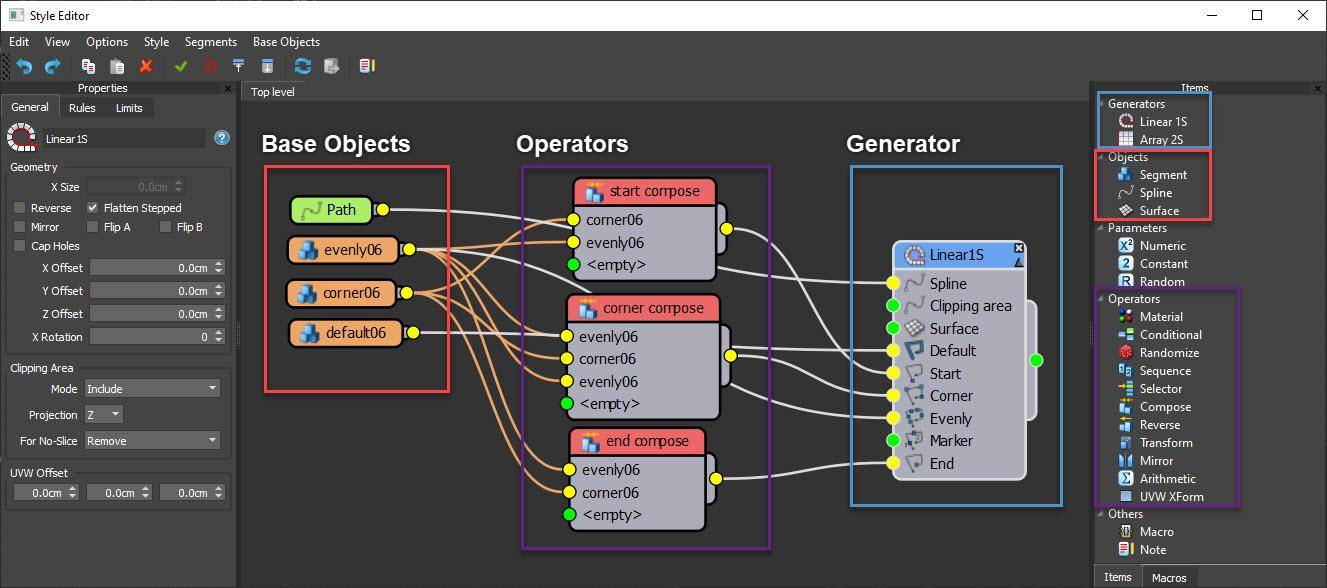
First of all, RailClone doesn’t construct an object fully programmatically, it works using a path to assemble and repeat existing modular pieces of geometry. To do this it needs to import scene objects into the graph. We call these Base Objects and in this graph, there are two types - a Path to import the spline and of course, some geometry which we call Segments.
Secondly, the way the geometry is assembled along the path is defined with a set of rules created using a Generator.
Thirdly and finally, just like Max, RailClone has its own modifiers, called Operators, that are used to do manipulate geometry. You can do things like switch between items, mirror geometry so you can reuse it, manipulate UVWs, randomise materials IDs or even create sequences, randomise geometry and create patterns along the spline and of course much much more.
Divided between these 3 categories there are only 21 nodes, and a parametric object can be as simple as just 2 nodes. Don’t be deceived though, this handful of options belies the enormous power of RailClone to recreate nearly any object that features repeating geometry.
Now let’s look at editing the geometry. If you click on a segment node, you'll notice there's no reference to an object in the scene, and that's because it's embedded.
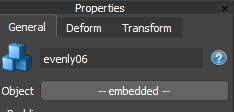
RailClone, unlike Forest Pack, doesn't need the geometry to remain in the scene. If you delete the source objects, a copy is simply stored internally. In fact, all the built-in presets will appear this way, but here's the thing: You can easily restore the geometry back into the scene and edit it.
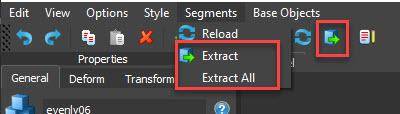
There are two ways of doing this. You can click the toolbar button to extract the selected segment, basically one at a time. Alternatively, if you go to the Segment drop-down menu you'll find an option to extract all the segments in one click. Whichever you choose, a live link is maintained between the geometry and the RailClone object, so you can easily add an edit poly modifier to the top of these objects, and then change the size by selecting the top vertices and moving them. You can also change the proportions of the panels by moving their vertices.
Swapping geometry
So far we've taken an existing library style and modified it slightly, and that's usually the first step for people learning RailClone. The next step is to use the built-in presets as a springboard to create your own unique styles.
To learn what a Segment contributes to the final model, it can be useful to toggle it on and off using the X button in the top-right corner. Toggle the nodes on and off and see if you can find which segments add the corner, the geometry spaced at regular intervals along the spline, and the geometry that fills in the remaining gaps.
Not that we’ve identified the role of the segments, let’s add new sorners. Simply select the appropriate segment node, click the object picker button and then select the substitute geometry from the scene. Next, do the same thing with the evenly spaced inputs, and finally for the geometry to fill in between.
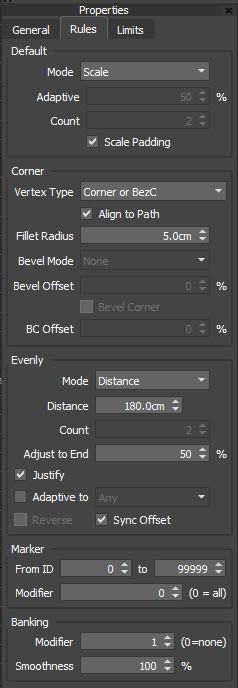
Each one of the parts of an array, called inputs, has a set of rules that govern its behaviour. You’ll find these in the Generator’s settings. Let’s look at how these work by going to the Rules tab and finding the Evenly section. The setting called Distance changes the spacing between these elements. Let’s increase it slightly to change the spacing.
If you’re ever looking for settings that change the rules for how a particular input is assembled along the array, you’ll find it in this rules tab. There are different rules for default segments, corners, evenly placed segments and markers. We’ll talk more about each of these in the next lesson.
In this lesson, we've taken a library preset and customised it in two ways. First of all by editing the existing geometry, and secondly by completely replacing the segments with our own geometry to create something new. In the next session, we’ll learn all about the L1S generator and start creating new styles from scratch.