- Inicio
- Tutoriales
- Making it Snow with Forest Pack
Requerimientos
- info Forest Pack Pro, V-Ray

Introduction
In this special seasonal instalment of our regular tips and tricks episodes, we're going to look at a rather unusual use for Forest Pack - adding snow to trees. It might not be the obvious choice of plugin for this task - after all snow normally forms a continuous blanket-like mesh, and Forest Pack scatters hundreds of thousands of individual objects - but when coupled with a metaballs plugin, Forest Pack can be used to add a covering of snow to high polygon objects really quickly.
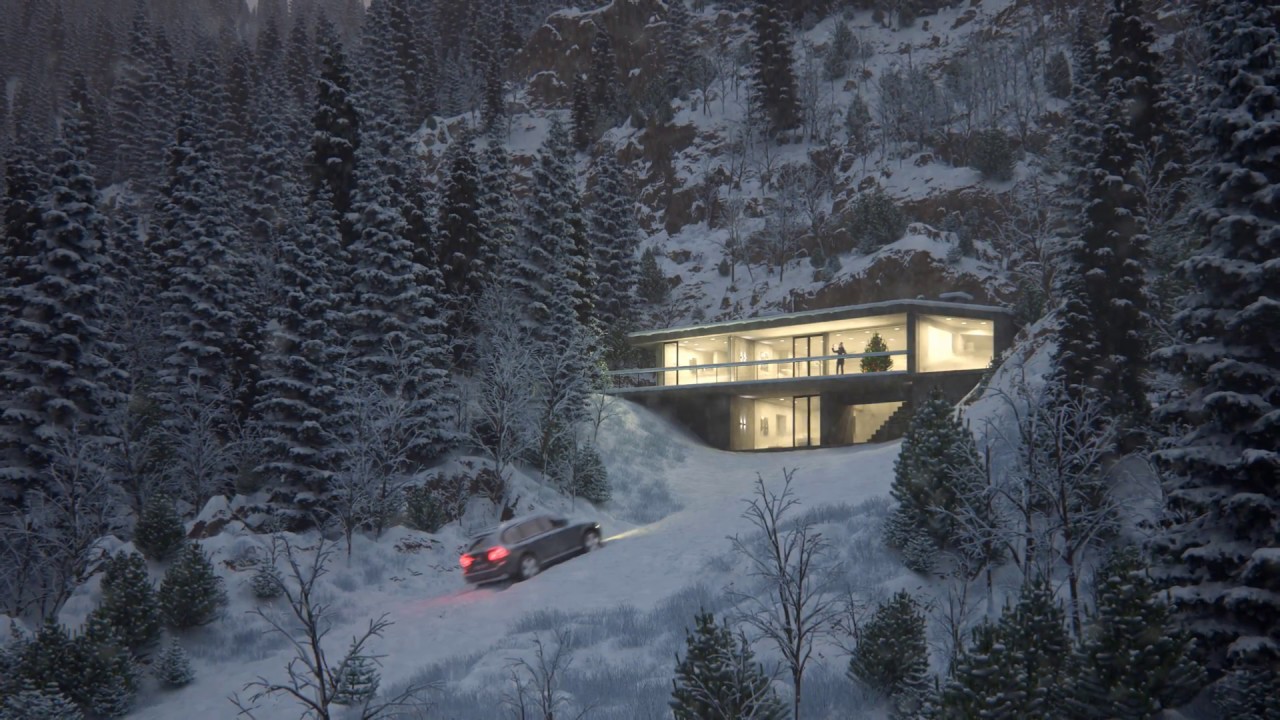
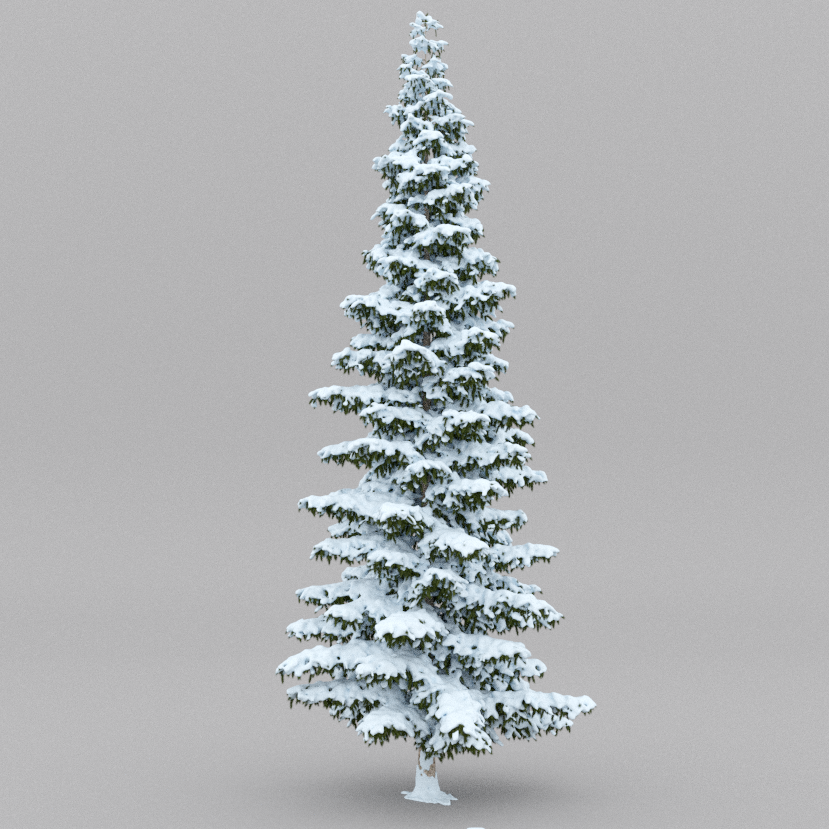
In this tutorial we'll examine two techniques for adding realistic snow to a tree, starting with covering only the branches that are visible to the sky and not obstructed by one another. We'll then build upon these foundations to add a denser coating of snow by covering all the tree's upwards facing polygons. Finally we'll use our new snow covered tree assets to populate the small environment shown above.
In this tutorial we'll be using a free mature Cedrus from our new Summer Trees Collection, which features 6 species of trees in 3 ages with 4 variations per age. With over 70 trees in total, the collection includes:
- 12 Acacia trees
- 12 Birch trees
- 12 Maple trees
- 12 Oak trees
- 12 Walnut trees
- 12 Cedrus trees
You can find out more about this collection, see previews of the trees and download the free 17m Cedrus tree used in this tutorial by clicking on the button below.
The exercise files for this tutorial also includes the complete scene (except the car and furniture) so you can easily follow along.
1 - Scattering on non-occluded geometry
The free sample is for a new summer collection of plants, but we're creating a winter scene. Fortunately the Cedrus tree is evergreen, retains it's leaves and doesn't look substantially different in the winter. All we need to do is cover it in snow.
There are a number of approaches used by artists for modelling snow, a few plugins are available specifically for this purpose, some people like to create snow by hand, but probably most common is the use of PFlow or another particle system to simulate snow accumulation. All of these techniques are perfectly fine, but they can be very slow when applied to high poly meshes like a tree. the PFlow technique in particular takes a long time to simulate.
So why not use Forest Pack?
It might not be an obvious choice, but Forest Pack is fully multi-threaded and has the ability to scatter on surfaces. Best of all we can control the distribution so that it only scatters on polygons which are facing upwards in world space, and are not occluded by the geometry above them. This means you can get a natural distribution where only branches that are visible to the sky receive snow. Here's how it's done.
- Duplicate the tree mesh. We're going to demonstrate two different techniques.
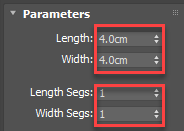
- We need something to scatter. Since we can't scatter particles, we'll use a simple plane object instead. You should create a plane in the scene that is small enough to pick up enough of the detail in the tree, but without being so small that it creates and unmanageable amount of geometry. This take a little experimentation, but for a tree of this size a 4cm x 4cm plane works well. For smaller objects you can use a smaller plane, and for larger objects, buildings, or a whole scene you may need to go bigger.
- Make sure you set the Plane's Length and Width segments to 1. This is to avoid unnecessarily increasing the polycount.
![Making it Snow with Forest Pack-image2017-12-14_10-18-24.png]()
- Create a new Forest Pack object by picking the tree as a surface. A message may appear asking if you want to limit the display to the camera view. Click no, we need to see all the objects for this technique to work.
- In the Geometry rollout, add a new Item and pick the plane from the scene. A few objects will be added to the tree, but we need more - a lot more!
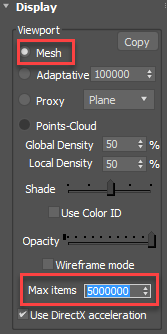
- Forest Pack optimises the viewport display when the polygon count exceeds a certain value by switching to a proxy or points-cloud display mode, but in this example we need to see the full mesh. To fix this, go to the Display rollout and enable Viewport > Mesh. While we're here let's add a zero or two to the Max Items value so that can create a sufficient number of planes for the snow effect. You can also just replace this value with a 0 to remove the restriction completely, but you may end up accidentally creating more items than your system can handle, so it's not recommended.
![Making it Snow with Forest Pack-image2017-12-14_10-31-21.png]()
- Now lets add enough planes so that from the top view they make a continuous grid. Because we know the size of the plane we can work out exactly which distribution map and size is needed. This is a good excuse to explain how Forest Pack's distribution maps work. No guesswork required!
Forest Pack ships with a selection of black and white distribution maps. Internally these are used to create planting patterns and the principle is pretty simple. If a pixel in the map's value is above the Threshold value an item is generated, and conversely if a pixel is below the threshold value, nothing is scattered.
Each pixel therefore represents the possibility of one scattered object and that tells us how many trees a distribution pattern is capable of scattering before it repeats. For example, the resolution the built in maps is 100 x 100 pixels, so they have the potential to create 10,000 trees. These maps are projected onto the scene using the Density > Units value to determine the size. So it's 10,000 possible trees distributed from above in a rectangle with the dimensions specified by this value. (UV Mode works differently but we'll come to that later).
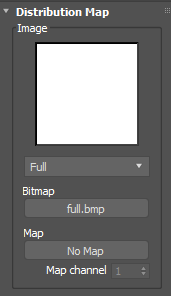
Let's take this theory and use it to create an unbroken grid of planes. - Go to the Distribution rollout and change the Distribution Map to Full. This map is fully white so it creates an item on every pixel. We know the plane is 4cm per side, and we know there will be 100 per side scattered by the Distribution map so by multiplying these two values together we can find out the size needed to create and grid with no spacing between the planes. 4cm x 100 is 400cm, enter this for the Size value. Of course if you're not a lover of maths you can just do this by eye.
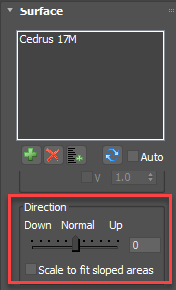
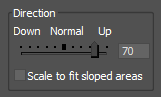
- At present all of the planes are facing straight up, if you'd prefer they rotate to follow the mesh, go to the Surfaces rollout and change the Normal slider to the middle (0). After meshing you'll get slightly different results my playing with this slider, there's no right or wrong, just feel free to experiment.
![Making it Snow with Forest Pack-image2017-12-14_11-1-43.png]()
At this point you will have planes resting on the branches that visible to the sky, there are probably more of them at the top of the tree than the bottom, which you'd expect as the lower branches become obscured by those above them. Once this step is completed we're ready to turn our collection of planes into a continuous mesh, and for that we turn to BlobMesh.
2 - Meshing using BlobMesh
3ds Max has a built-in compound object called BlobMesh that can take a particle or poly input and turn it into continous mesh. When applied to a Forest Pack object it will creates a set of spheres, one for each vertex, and connect them together as if they were made of a soft fluid material. Blobmesh is notoriously slow whether applied to a mesh or particles, so be patient with this section of the tutorial. A little later we'll look at using Frost for meshing, a commercial alternative that's multi threaded and much much faster.
- First, let's isolate a portion of the Forest Pack object to experiment with the Blobmesh values. It's too slow otherwise to allow for speedy updates. In the Areas rollout disable the surface, add a Paint area and paint a spline to reveal just a little bit of the mesh, enough to get an idea of how the snow will look on a branch or two.
- Go to Create > Geometry > Compound objects. Choose BlobMesh and click in the scene to create a new BlobMesh object.
- Go to the Modify panel. There are three important parameters that determine the appearance of our snow: Size, Tension and Evaluation Courseness.
- Size determines the size of each metaball create per vertex. It should be large enough so that it intersects with its immediate neighbours. A size similar to the size of the plane or slightly larger tends to work well.
- Tension determines how relaxed the resultant surface will be. Smaller values are more relaxed.
- Finally, Evaluation Courseness sets the mesh resolution of the resultant mesh. Smaller sizes produce smoother, more dense meshes but also longer calculation times.
- Turn on Large Data Optimisation.
- Now you're ready to pick the Forest Pack object. In the Blob Objects section, click Pick and select the FP object (be careful not to pick the tree or your computer won't recover until 2020).
- When the simulation is complete you can add a Relax modifier to reduce the lumpiness slightly and create a more convincing appearance of snow.
- Experiment with the settings until you get a nice covering of snow on your scattered planes. When you're happy with how it looks on you sample branches, go back to the Forest Pack Object, disable the paint area and re-enable the Surface
- Wait. It might take a while.
Tips for speeding up meshing
As mentioned, blobmesh is slow so you'll probably want to go and make a cup of tea while this is calculating. Also there are a couple of things you can do to make this faster
- Increase the size of the planes, the distribution and the Metaball size. This will create fewer metaballs that can substantially improve the speed of mesh calculation
- Activate MetaBall's Large Data Optimisation option. This can improve efficiency when over 2000 metaballs are created.
- Increase Evaluation Courseness and use Turbosmooth and Relax instead to improve resolution.
- Use Frost (we'll come to this later)
Once the Blobmesh is complete all that remains is to apply a snow material, select the tree and attach the snow mesh. We've now created a snowy tree with no particles or 3rd party plugins! Save the file.
3 - Scattering on all upward facing geometry
The previous example only adds snow on unoccluded branches. When snow fall is persistent or it snows in breezy conditions, it tends to get into the nooks and crannys a little more. In these instances, it may be more approriate to place snow on all of the parts of the branches that face upwards. Forest Pack can help you here too.
Start with the same setup as before, a 4cm plane with a 400cm Distribution size and a full map.
This time we're going to use the UVW coordinates of the mesh, but because the texel density may vary between the branches, leaves and other parts of the tree, in order to have a consisted size we'll temporarilly add a UVW modifier to the tree.
- Apply a UVW Map modifier to the tree. Set the type to Box and the size for all three axes so that they are the same to give an even distribution over the tree. The actual size is not important.
- Before applying Forest pack to the tree, go to the Surfaces rollout and enable Limit by Slope Range. This will prevent the creation of objects on the underside of branches and leaves. You can adjust the angles to control to what extend object are added to vertical polygons.
- Go to the Forest Pack object and change the Surface Mode to UV.
- Still in the Surfaces rollout, add the tree to the Surfaces list. It may take a minute or two to process if it is a high poly object.
- You will now get planes on the tops of all the branches. You can further refine this by adjusting the Normal Direction and Slope Range.
- This creates a lot of planes, several of which are overlapping and close together. To refine this a little bit so that the meshing tools don't have so much work to do, apply a Vertex Weld modifier to the Forest Pack object. Set the distance to slightly less than the size of each plane to make sure that the vertices on each planes are not welded to themselves. Apply a few of these stacked up to keep refining the mesh. It doesn't matter if the topology is horrible because it's only the vertex positions that matter.
- Once you are happy, you can Collapse to an editable poly objects if you're worried about accidentally triggering meshing updates later. I find it makes the whole thing a little more stable. We're now ready to mesh.
4 - Meshing using Frost
In the previous example we used Max's native BlobMesh tool, and you can use it again here but do be prepared to wait a while due to the increased number of vertices. As an alternative you can use other meshing tools like ThinkBox's Frost, which is extremely powerful and very fast. Here's how it works:
- Go to Create > Geometry > Thinkbox > Frost and create a new Frost object in the scene.
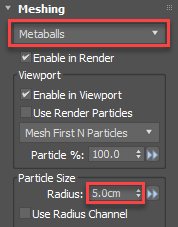
- Frost gives you a lot more control compared to BlobMesh. For this tutorial we'll keep it simple. Change the mode to Metaballs from the Meshing rollout, but feel free to experiment with the other modes to get different effects.
- The size of the metaballs is controlled using the Particle Size > Radius setting. Change this to 4cm to match the size of our plane. If you prefer a less bumpy effect you can try slightly larger sizes, but you'll lose the contours of the original tree.
![Making it Snow with Forest Pack-image2017-12-14_15-10-39.png]()
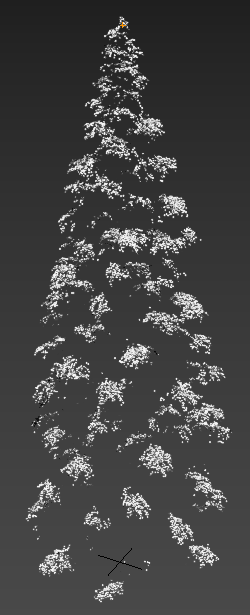
- You can now pick the Forest Pack object, there's no need to preview a section with Frost. It's fast enough to see your changes quickly, even when applied to the whole tree.
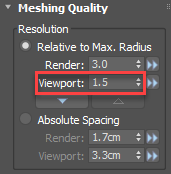
- Once you're happy with the coverage, to change the resolution of the mesh in Frost, you use the Meshing Quality settings. Increase or decrease the Relative to Maximum Radius value to get the mesh density you need.
![Making it Snow with Forest Pack-image2017-12-14_15-9-47.png]()
- When the simulation is complete you can add a Relax modifier to reduce the lumpiness slightly and create a more convincing appearance of snow.
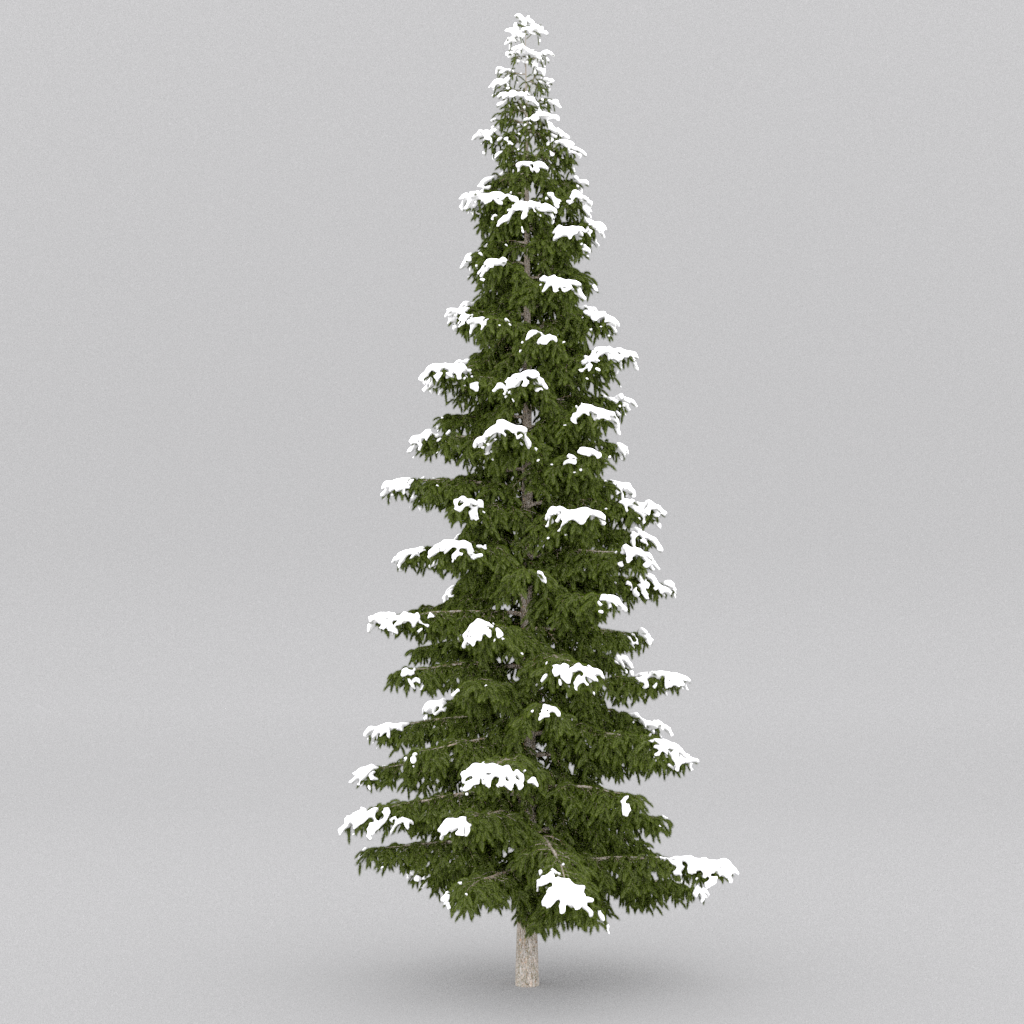
- Finally, apply a snow material, select the tree, make sure you remove the UVW map modifier, and attach the snow mesh.
As you can see, this is really quick. You don't get the slow simulation times associated with PFlow or some of the other dedicated plugins.
5- Scattering on multiple objects
So far we've only looked at scattering snow on individual objects, how about if you want to place snow on multiple objects at the same time. Take the example of a car on a street. The car, the pavement and the road are all separate objects. Here's how to place snow onto all 3 using 1 Forest Pack object.
- Go to the Forest Pack Surfaces rollout and add all the objects you'd like to scatter snow on.
- You'll notice that the snow is scattered on the road underneath the car, this is because Forest Pack treats each surface we just added to the list separately. Fortunately this is easy to fix. Just draw a rectangular spline that's large enough to encompass the scene.
- Go to the Areas rollout and turn off the Surface area.
- Now add a new include Spline area and pick the spline we just created, and that's it you can now apply your Blobmesh object as before and you've got a snowy car.
When you use a spline combined with surfaces, only the topmost polygons are scattered on. This is really useful when you have a scene with objects that fall from the sky and shield whatever is below. It's particularly useful for leaves falling onto buildings and much more.
6 - Putting it all together.
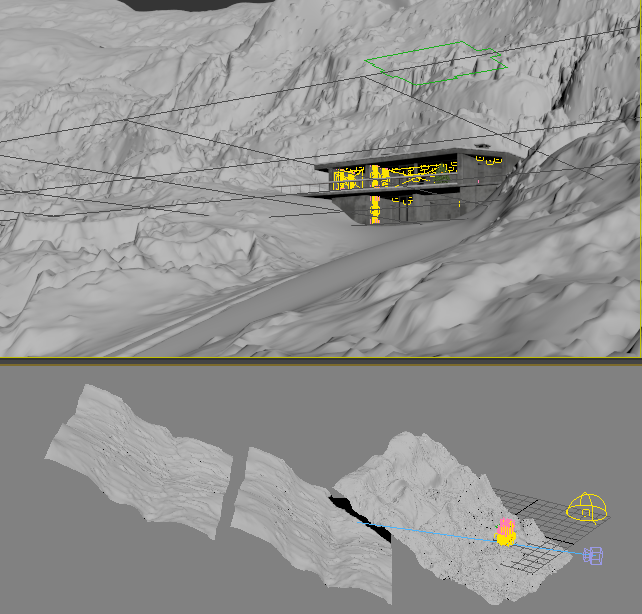
To finish up this tutorial, we'll add these trees along with some other assets created using the same technique to complete a full scene. If you want to follow along, open fp_snow.max. This scene contains a house and a terrain. All we need to do is add the trees.

- First of all we need to import the snow covered Cedrus trees we created earlier (the others are already in the scene). These tree are quite high poly, so ideally we won't merge them into the scene, instead we can either convert them to proxies, or simply use XRefs. Be aware that Forest Colour's randomise by element features aren't compatible with proxies, so if that's important - use XRefs instead. In this example we'll use X Refs.
- Go to the File menu and select Reference > XRef Objects.
- Click the Create XRef Recordfrom File button and select the file containing your trees and click Open.
Now we have all our assets, we're ready to create the first scatter.
Adding the large Cedrus trees.
- Create a new Forest Pack object by picking the terrain. Go to the Surface rollout and add the other 3 terrains from the scene. As you can see, terains don's necessarily need to be continuous, as long as they fill in the gaps that can be seen from the camera view.
![Making it Snow with Forest Pack-image2017-12-18_14-52-31.png]()
- Go to the Geometry rollout and add the two snow covered trees we just referenced to the Items list.
- With only a couple of trees, repetition might become obvious. Let's disguise that by randomising the rotation and scale. Go to the Transform rollout and enable Rotation and Scale. Set the Scale's Minimum value to 30% and set the Maximum value to 100%. These are already tall trees, we don't need them any bigger.
- To change the number of trees, adjust the Distribution Map > Density > Size property. A value of about 150m works well for me.
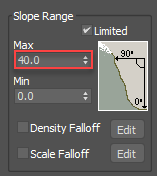
- At the moment some of the trees are growing on the cliff faces, let's limit where they can grow based on the angle of the surface. To do this, go to the Surfaces rollout and enable Slope Range > Limited.
- Lower the Maximum angle until you've removed the trees from the steep cliff faces. I went with about 40 degrees.
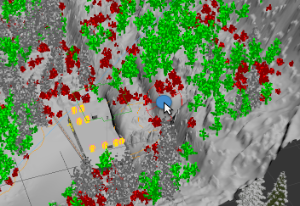
![Making it Snow with Forest Pack-image2017-12-18_11-55-13.png]()
- Finally to clear the trees from the area in front of the house so that it's visible to the camera, go to the Areas rollout and add a new Paint area. Change the mode to Exclude, activate the brush by clicking
![Making it Snow with Forest Pack-image2017-12-15_14-34-6.png]() and paint in the scene to remove trees. If you need to adjust the size of the brush, just click on
and paint in the scene to remove trees. If you need to adjust the size of the brush, just click on ![Making it Snow with Forest Pack-image2017-12-15_14-34-54.png]() to open the brush options. You can also remove the trees from the cliff behind the house, they look too large to grow here.
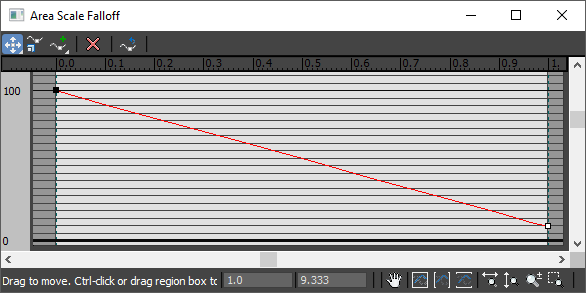
to open the brush options. You can also remove the trees from the cliff behind the house, they look too large to grow here. - Finally, to shrink the trees as the get closer to the clearing, enable Scale Falloff and change the Exclude Distance to 500cm. This will stop them from becoming too overbearing near the camera.
![Making it Snow with Forest Pack-image2017-12-15_14-41-47.png]()
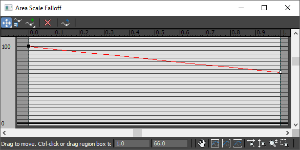
At the moment the trees shrink to nothing as they get closer to the Exclude spline. To make it so that they only decrease to about a 2/3 of their size, edit the Falloff Curve and reduce the scale on the right hand side of the graph as show below.![Making it Snow with Forest Pack-image2017-12-15_14-43-41.png]()
- Finally, to optimise the scene, go to the Camera rollout and check that the V-Ray camera is assigned. This will automtically remove any trees that are not visible in the render.
 and paint in the scene to remove trees. If you need to adjust the size of the brush, just click on
  to open the brush options. You can also remove the trees from the cliff behind the house, they look too large to grow here.
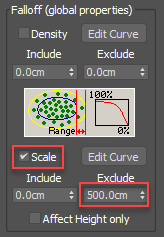
Our Cedrus trees are now done, next we'll fill in the gaps and add interest with some smaller trees.
Adding the small trees
To save time we can duplicate the existing Forest Pack object, swap the scattered geometry and adjust the settings to add smaller trees.
- With the existing Forest object selected, hit Ctrl+V to create a duplicate and make sure you choose Copy.
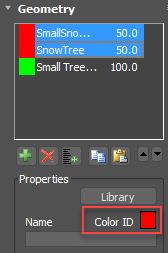
- Go to the Geometry rollout and swap the existing trees for the two small Christmas trees and the tree without leaves.
- The scatter doesn't quite look right with a totally random scattering of trees. Instead we'll create small clusters of trees of the same species. To do this, change the ID colour of the two Christmas trees so that it is the same. This will allow us to group them together using Diversity modes. To preview the colours in the viewport, go to the Display rollout and enable View Color IDs.
![Making it Snow with Forest Pack-image2017-12-18_11-58-5.png]()
- Go to the Distribution Map rollout and reduce the Density Size to add more trees. About 58m works for me.
- Disable the Scale falloff options. We don't need it for the small trees.
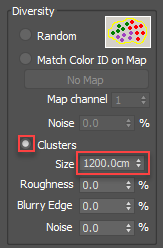
- To create groups of the same types of trees, change the Diversity mode to Clusters. To create smaller groups change the size to 12m.
![Making it Snow with Forest Pack-image2017-12-18_12-3-52.png]()
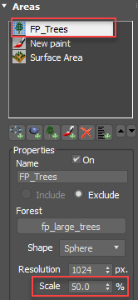
- To prevent the new trees from intersecting the Cedrus trees we can add the first Forest Pack object as an Exclude area. Go to the Areas rollout and click on the button to add a new Forest Area. Then pick the existing Forest Pack object from the scene.
- To exclude objects a collision sphere is calculated using the bounding box of the nested items. We really only want to exclude the trunk, so reduce the Scale to reduce the size of the collision volume.
![Making it Snow with Forest Pack-image2017-12-18_12-10-16.png]()
- Finally let's adjust the Paint area so that the small trees occupy the space immediately in front of the camera. Select the existing paint area and pick the Eraser brush. Paint the area in front of the camera, framing the view of the building.
- Unlike the massive Cedrus', these small trees won't look out of place on the cliff. To add them, using the eraser again delete the parts of the spline that cover the area behind the house.
![Making it Snow with Forest Pack-image2017-12-18_13-56-40.png]()
- You can also experiment with the surface settings, for example changing the Maximum surface angle adds a few more trees to the steep sections of the terrain, and adjusting the direction slider you can make the trees slightly follow the Normal direction of the terrain.
![Making it Snow with Forest Pack-image2017-12-18_13-53-37.png]()
- Finally, to add more variety in the tree size, change the Scale Minimum size to 50% and the Maximum to 150%.
Adding the shrubs
To finish this scene we'll add some ground cover using small snow covered shrub like plants inbetween the existing trees.
- Start by duplicating the previous Forest Pack object.
- In the Geometry rollout remove the existing trees and add the small shrub model. There's only 1.
- In the Transform rollout, change the Maximum Size to 120%. We don't need these plants to be so large. Enable Translation Rotation to help break up the grid like effect you can get with using dense patches for ground cover.
- In the Surfaces rollout, change the Direction to 0 so that the plants follow the terrain's surface normal direction. Delete all the surfaces except the terrain nearest the camera. We can't see these small plants in the backgound so we can optimise the scene a little by removing them from those areas.
- Go to the Distributionrollout and change the map type to Full to create more plants.
![Making it Snow with Forest Pack-image2017-12-18_14-14-1.png]()
- Change the Density Size to 42m.
- Let's stop the plants from growing through the small trees. In the Areas rollout add a new Forest Area then pick the existing small trees Forest object from the scene. Reduce the collision Size to roughly 10% so that only the trunks are excluding objects.
- Select the existing paint layer and use the Paint and Erase brushes to distrbute plants in front of the camera.
- Finally, to reduce the size of the plants as they approach the edges of the paint areas, enable Scale Falloff for Include and Exclude areas and set the distances for both to 1m.
- Edit the Falloff Curve so that the plant's reduce to about 10% of their original size as they approach the perimeter. It will help to make it look as though they are becoming slowly submerged in the snow.
![Making it Snow with Forest Pack-image2017-12-18_14-23-31.png]()
That's the scene finishes. We've created our own snow covered assets and used Forest Pack to distribute them using a combination of techniques for scattering including surfaces, slope angle, hand painted areas, and falloff curves. Here's how the final render looks with a couple of other assets added to ring the scene to life.

This is a very quick technique for applying snow to high polygon trees, but you can really use if for anything. The snow was also placed on the building using the same technique and as we've seen it's useful for cars too, in fat anything that would normally take too long to simulate and is seen in the midground to background is a great candidate for this technique. If you need more detail we'll soon be releasing a winter version of these trees which uses a more advanced particle technique for proper snow accumulation.
This is our final tutorial for 2017, we hope you've enjoyed our training this year and we look forward to bringing you more very soon. Until then you can see all our existing tutorials on the website and If you use these tutorial files, or the techniques shown in this tutoral for your work, we'd love to see them on our forum.