
In this tutorial, we’re going to take a tour of all of RailClone’s Operators in less than 15 minutes. To make it easy to understand the function of each operator, we’ll use a basic graph with simple alpha-numeric source geometry. In the next tutorial, we’ll take all this theory and apply it to a real style.
Randomise
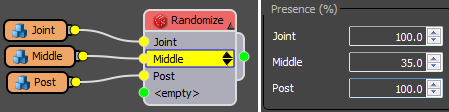
The randomise operator does exactly what you’d imagine, it randomly selects a segment from the available inputs. Edit the Probability percentages to control the likelihood of an input being selected. These values are normalised so there is no need to ensure they add up to 100%

Sequence
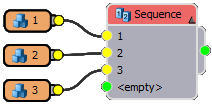
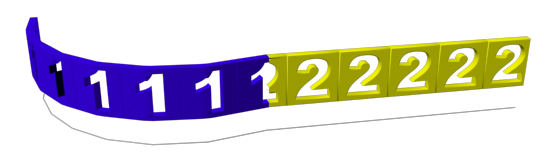
The Sequence operator is invaluable for creating repeating patterns. It simply starts assigning segments from the top of the list and works downward. Each segment can be repeated using a counter. When the sequence reaches the end of the list, it starts again from the beginning.

The sequence counter can be reset at either the start of each spline or the start of a new section.
Selector and Random Number
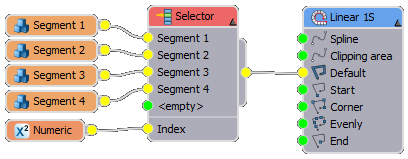
The Selector operator is used to choose from a list of segments using a numerical index or an attribute of the graph or markers.
As a simple switch, it can be helpful to create easy to edit styles. Wire segments to the Selector operator’s inputs. The order is important - the index numbering is built from the top of the list with an origin of 1. If you need to change the order, use the up and down arrows that appear when you select the segment name on the Selector node.
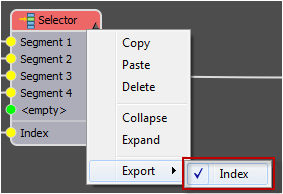
It can also be really useful to export the Index parameter to make changes without opening the style editor. To do that:
- Right-click on the Selector node and choose Export>Index.
![Exporting a parameter]()
- Create a new Numeric node and wire it to the Index input.
- You can now control the selection from the Parameters rollout of the plugin without opening the style editor.
![Selector]()
- Another option is to use a Constant node, this works in the same way, but the number is only accessible from the graph, It can be useful for synchronising the same value between multiple nodes.

Another really handy tip that we recommend learning early on is to use a Random number node with the exported Index parameter. Using this you have a lot more control over when a new random number is generated compared to the Randomize operator. To use it
- Wire a Random number node to the Index property.
- Leave the Type set to Integer and set the Range to match the number of inputs on the Selector operator, in this case from 1 to 4.
- Now you can control when a new random number is created using the Generate On mode, choices are:
Start generates a new random number once for each instance of the RailClone object.
Segment generates a new random number for each individual segment.
X Spline Start generates a new random number for each spline sub-object found in the X Spline input of the Generator.
X Spline Section generates a new random number for each spline segment. For the purposes of this calculation, a segment is the section of spline between two Corners or Evenly segments.
Array Y Row generates a random number at the start of each new Row. It only works in conjunction with 2D arrays
Generator generates a new random number per generator. It is particularly useful for advanced techniques like nesting arrays.
The Selector Operator can also be used with material IDs assigned to the spline to change the geometry. To set it up:
- Change the mode to X Spline Material ID.
- Go to the Spline’s segment sub-object level.
- Select the sections you wish to change and go to the Surface Properties rollout. Enter a new Material ID in the Set ID field.
- If you’re using a 2D array, you have the same options to do the same thing for the Y spline too!
Another alternative to using the spline itself is to use markers.
- Just change the Selector node’s mode to X Spline Marker ID.
- Select the Spline and add an RC Spline modifier.
- Add a few markers. You can now control the geometry using the Marker’s User Data > ID value. This also works on the Y Spline for A2S Arrays.
The Conditional Operator
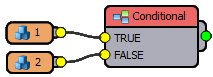
The final operator that can be used to select segments is the conditional node. It’s used to choose between two inputs based on the result of certain tests.
To use it, wire your two options to the True and False inputs. Your conditional tests can then be enabled as follows:

Spline checks if the length of the underlying spline is greater or less than a specified value. The condition can be checked over the full length of the spline, or only for the current section which is defined as the section between two segments of the type Start, End, Corner or Evenly.

Position checks if the position of the segment along the spline is greater or less than a certain value. This can also be measured as a percentage of the full path or for each individual section.
Type checks if the current spline segment is either a line or curve. To change the type, you’d need to click on the spline, select a section and right-click to change the type. For most Max spline objects, it defaults to a curve irrespective of the type of vertex you create.
Material ID checks the current paths material ID to see if it is equal to, not, greater than, less than or a multiple of the specified value. It’s a really handy way to quickly swap geometry using attributes assigned to the base spline.

Segment counts the number of segments placed on the path, before the current position. Returns true or false if the values entered in this node meets certain conditions, i.e. Equal, Not Equal, Greater Than, Less Than, or a Multiple of the value.

Finally. Vertex checks whether the type of vertex is a certain type, either: Corner, Bezier, Bezier-Corner or Smooth.
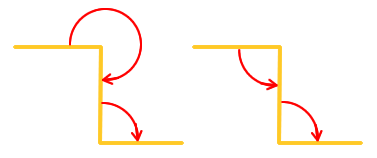
The Angle condition checks the angle formed by the spline at this vertex. There are two modes, When Enable Wide Angle is enabled it tests the spline according to a full 360-degree rotation, this can be useful for detecting internal or external corners. However, If this option is disabled, the angle is measured from both sides up to 180 degrees which will treat internal and external corners the same way.
Note that you can enable multiple tests, in which case an OR logic is applied.
Transform
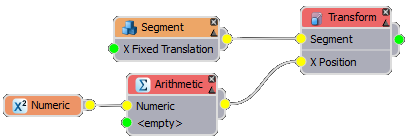
The Transform node replicates many of the parameters found in a Segment node. It’s a useful way to be able to make changes to several segments at once and it can also be useful where you wish to reuse a segment multiple times but with different properties.
It is also necessary to use the Transform operator when dynamically controlling a segment’s properties using arithmetic expressions, as shown in the graph above.
The Transform node can also be used to generate an empty segment when no input is connected and Fixed-Size is enabled. We’re using
The Mirror Operator

The mirror operator doesn’t need a lot of explanation, it simply allows you to flip geometry on the X.Y, and Z axis.
The Compose Operator
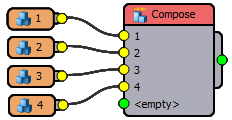
The compose node allows you to group together existing segments and RailClone will then treat them as a single object. It can be used to force several segments to be treated as one object, and allows you to add multiple segments to inputs that would normally only display a single object like the Corners, Start, End, Evenly etc.
To use it, you wire segments to the input slots of the Compose Node and the geometry is placed one after another, similar to a miniature linear array. You can easily adjust the order using the up and down arrows that appear when you select the segment name on the Compose Node.
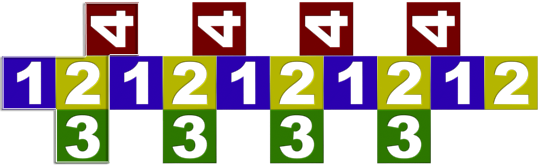
One thing to be aware of is how compose nodes are aligned on corners. You’ll get different behaviour depending on whether you have an odd or even number of segments attached.
When using an even number of segments in the Compose operator, RailClone centres the composed geometry to the segment immediately before the corner. This means that using an even number of segments always creates an asymmetric corner composition.
On the other hand, when an odd number of segments is used, the middle segment is centred to the corner. This means that using an odd number of segments always creates a symmetrical corner composition.
If you only want two segments (one on each side of the corner), you can cheat by creating an even number of inputs adding a new empty Segment to the centre of the Compose node.
So far we’ve only discussed the Compose operator’s Sequence mode. The operator has a second mode called Grouped that aligns all the segments using their original pivot points.
The Reverse Operator
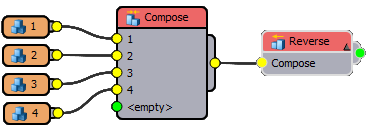
The reverse operator only works with Compose nodes that are using Sequence mode. It reverses the order of elements. For example, here we’ll change our Compose node back to Sequence and wire a Reverse operator to the End input. As you can see, the order is reversed.
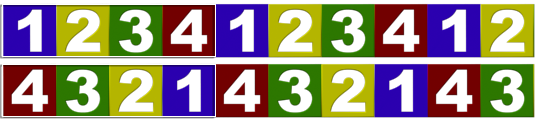
You also have the option to "Mirror Segments on X" which, as the name suggest, creates a mirror copy of each segment on the X axis. This node is ideal for reusing Start geometry in the End input.

The Material Operator
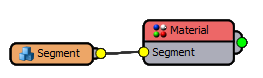
Our next two operators can be used to manipulate material IDs and UVWs. The Material operator uses a designated Material ID from the input segment and replaces it with a new value identified in the From/To range. If the From and To value are identical, the ID is simply swapped for a single value. If the From/To values form a range, then the operator can either replace the IDs in a looping sequence ...

... or pick values at random.

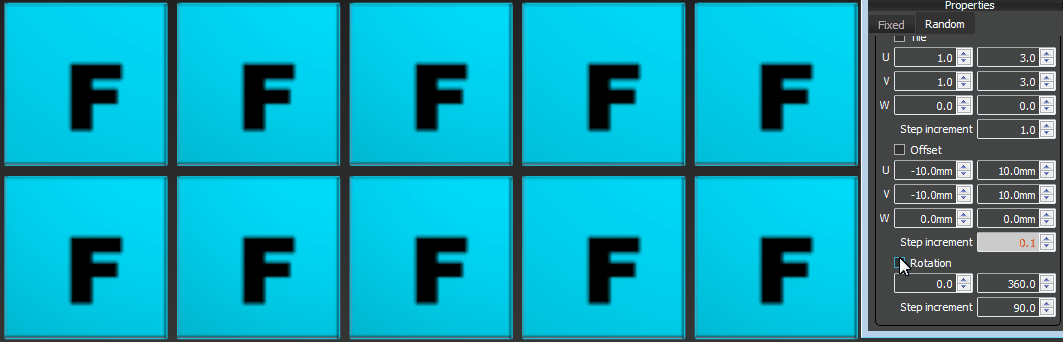
The UVW Offset Operator
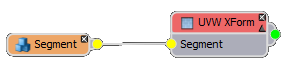
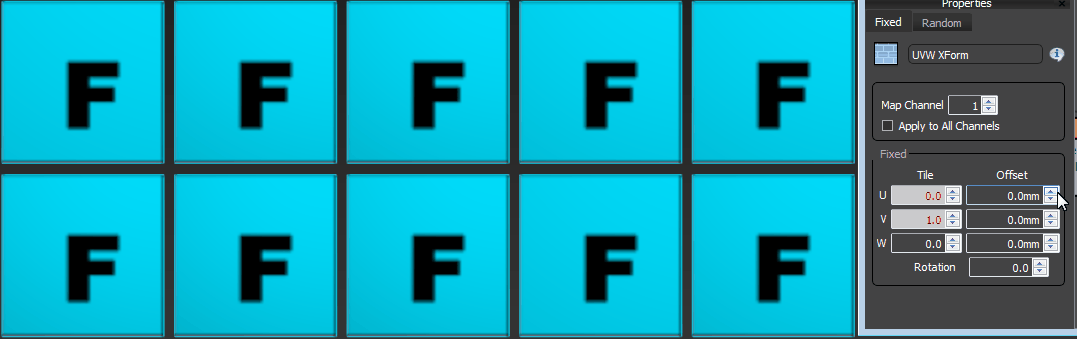
The UVW XForm operator allows you to manipulate the mapping coordinates already applied to a segment. There are two modes available: Fixed mode enables you to adjust the tiling, offset and rotation of UVW coordinates, in this case all segment's will have the same results.
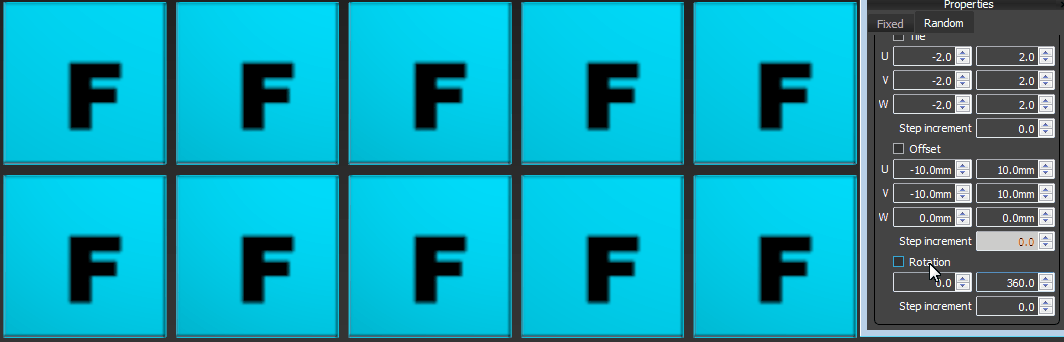
On the other hand Random mode allows you to randomise within a range the tiling, offset and rotation of UVW coordinate to create unlimited variations. There are also stepped increments for the randomisation controls so that you can sample individual parts of a map and add rotations at regular intervals.
The Arithmetic Operator
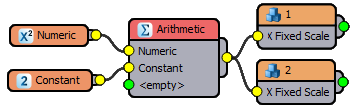
Finally, there’s the Arithmetic node which can be used with any numerical value for common mathematical functions like add, subtract, multiply and more.
And that’s it! In this video we went through all 11 of RailClone’s available operators. Stay tuned for the next session where we’ll take this theory and combine it all togethery to improve our building style with some sequences, randomisation and grouped geometry.