Файлы ресурсов
Требования
- info RailClone 6 Lite or Pro
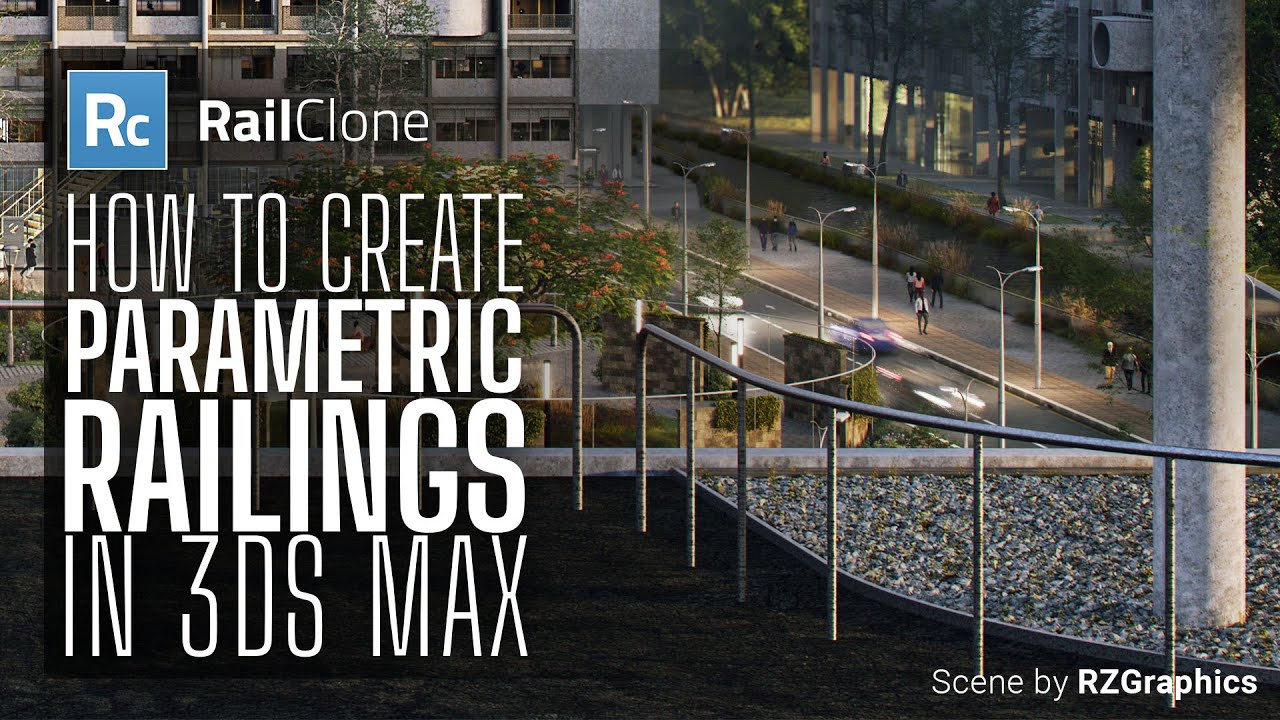
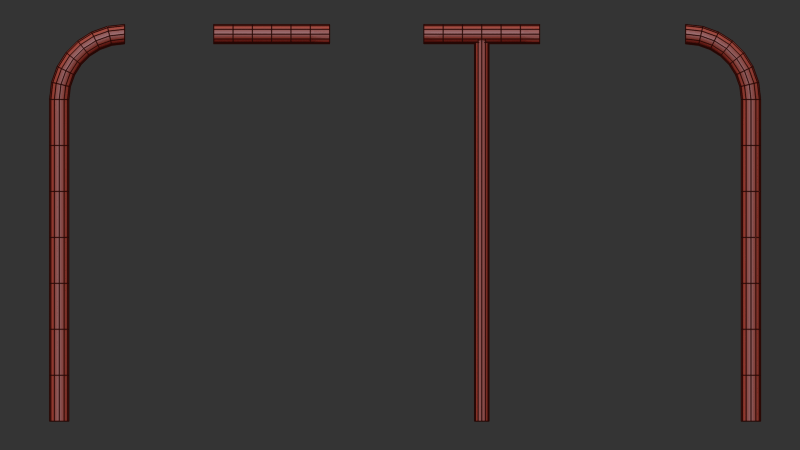
In this tutorial, we'll learn how to create a RailClone style from the ground up. We'll work with a railing model like the one used in the foreground of our RailClone 6 release image (shown above).
Geometry

Start with a mesh, which could be an asset you've purchased, a model you've created, or imported from a library like Chaos Cosmos. Our aim is to convert this static “dumb” mesh into a smart parametric RailClone object.
Step 1: Add RailClone to the Scene
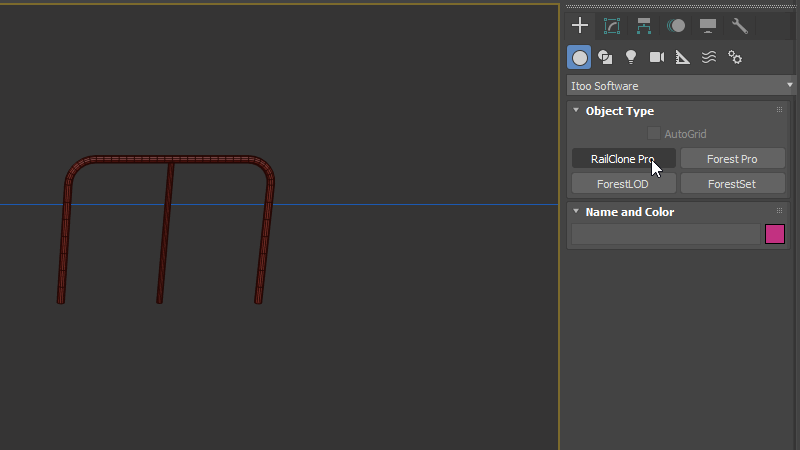
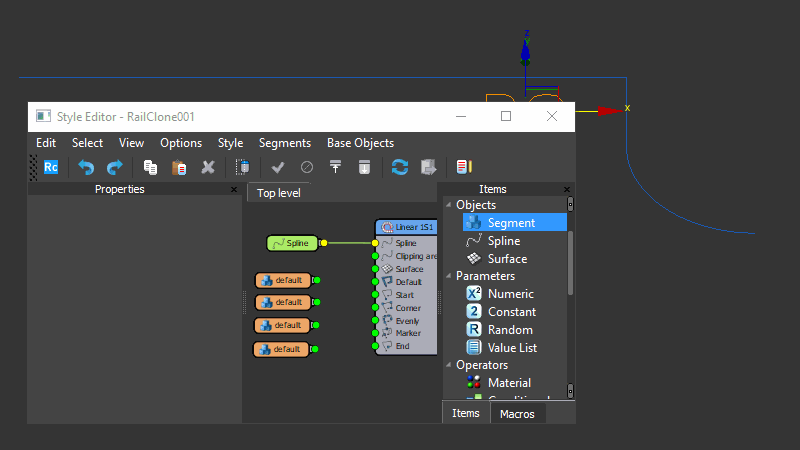
First, add a new RailClone Pro object to the scene. Go to the Style rollout and open the style editor. For a RailClone style that uses a path, you will need a minimum of three nodes.
Step 2: Set up the Generator
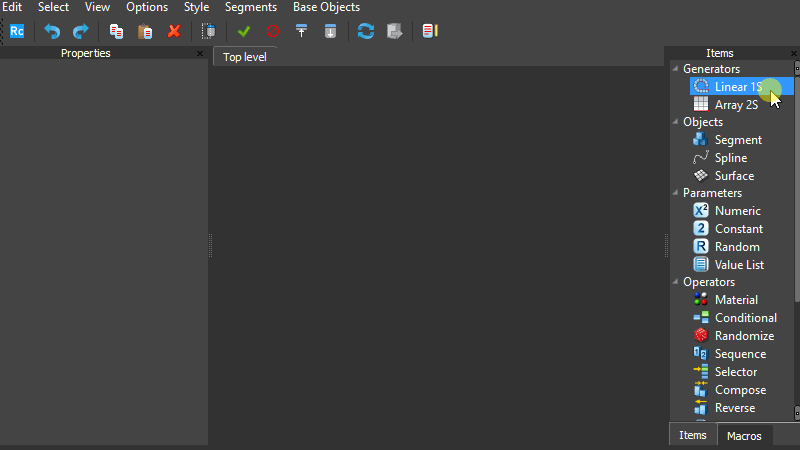
The first node you need is a generator, essentially the rule set that determines how you distribute geometry along a spline in an array. There are two types of generators:
- L1S (Linear 1 Spline) - For a 1D array along a single spline.
- A2S (Array 2 Spline) - For 2D arrays, when you want to parametrise the height as well as the path.
In this tutorial, we'll use the Linear generator.
Step 3: Define the path
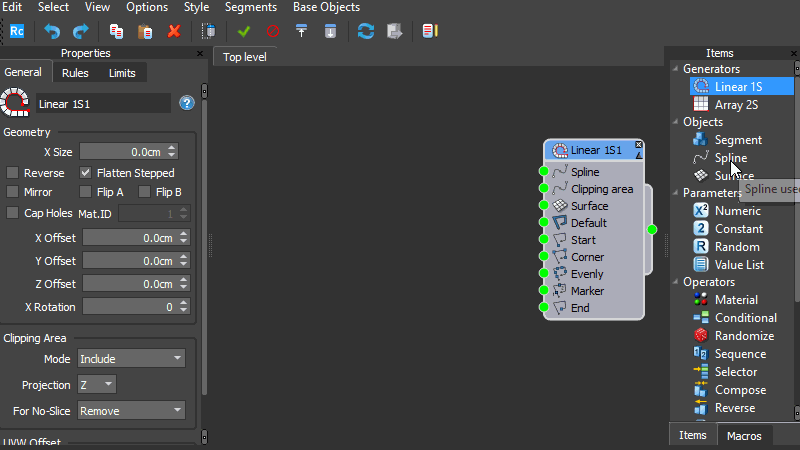
The second node defines the path for placing your geometry. You do this by using a spline node. Wire this spline node to the spline input of the generator and then select a path from the scene.
Step 4: Add geometry
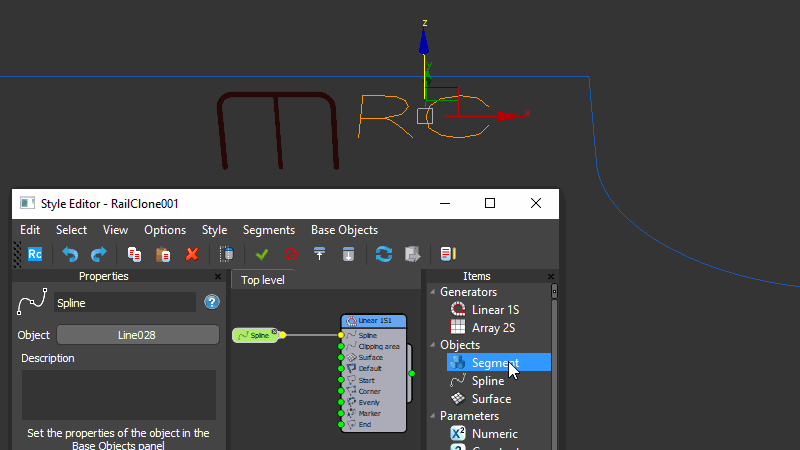
The third node is used to assign some geometry from the scene to the spline. We’ll start by distributing a single object along the path. To do this, add a Segment node then pick the railing object from the scene and wire it to the Default input of the generator.
At this stage, your RailClone object will distribute the chosen geometry along the spline. A simple style is complete!
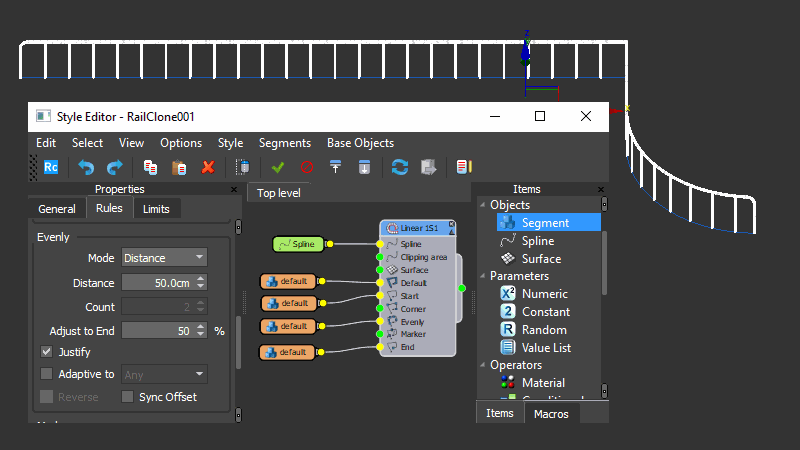
Step 5: Customize distribution rules
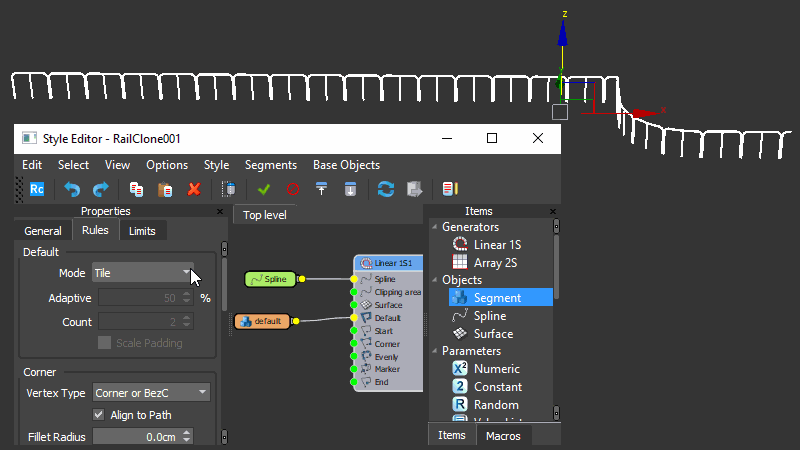
To customize how this Default geometry is distributed along the spline, head over to the Generator's properties, and find the rules tab. Here, you'll find several options:
- Tile - The default mode, which places the geometry along the spline without adjusting its size. When it reaches the end, it cuts off the excess.
- Adaptive - This subtly rescales the geometry to ensure that only whole segments fit along the spline.
- Scale - This stretches one segment across the entire length of each sub-spline.
- Count - This allows you to specify exactly how many objects you want along each spline.
In this case, we'll use the Adaptive option to avoid slicing.
Step 6: Create a more complex RailClone style
So far it’s fine, but not really a very parametric style. If you want to create a more sophisticated RailClone style where you can adjust the spacing between posts with a continuous welded handrail, then you'll need to slice your original mesh into pieces that the generator can reconstruct like a jigsaw. This can be done using the new RailClone Slice modifier in RailClone 6.
To do this, select the model and apply the RailClone Slice modifier. This modifier is specifically designed to work with the 2 generators found in RailClone by using the same terminology and creating all the necessary components.
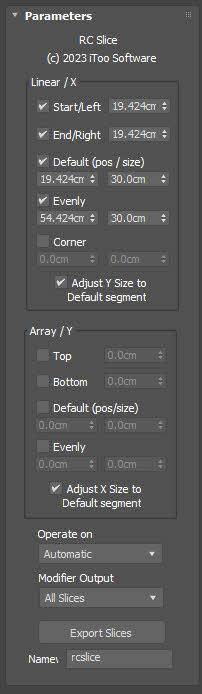
Step 7: Defining slice planes
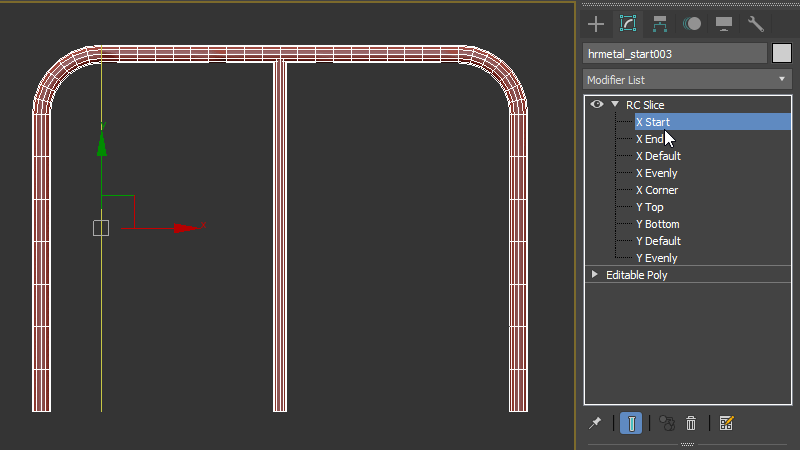
To use RailClone Slice, start by defining a slice plane at the beginning of your railing model. This can be done numerically, or you can go into sub-objects and select X start to adjust it using the mouse. Repeat this process to create an end slice. You will also need additional slices in the middle to isolate the vertical posts. You adjust these using the Evenly slice plane and adjusting the width setting. Finally, you’ll need a Default section to fill in between all the others. This is a simple section of handrail.
Step 8: Previewing slices
After defining all your slices, you have the option of previewing them. This can be done at the bottom of the slice modifier menu by clicking 'export slices' button. These are the components that will be used to recreate the mesh, parametrically, but actually there’s no need to have individual objects. RailClone can extract them automatically from the source geometry thanks to the new modifier.
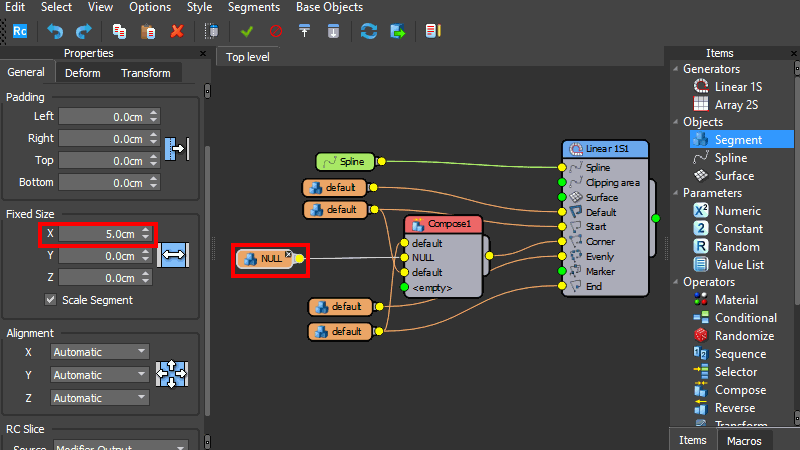
Step 9: Assigning slices to RailClone
In the RailClone style editor, pick the segment, and in the properties, change the Z Alignment to Pivot. This is to ensure the pieces jigsaw together correctly. Detach the node from the Default input and wire it to Start. In the properties, select the original mesh with the RailClone Slice modifier applied. Scroll to the bottom of the interface to find a new option called RC Slice. Here you can select which slice to output from this node. For instance, select Start to only output the beginning of your railing. Clone the node and wire it to the end input, then change the source to End. Repeat this process for the default input and the evenly input. You will now have a much more flexible parametric railing.
Step 10: Adjusting the railing
With your railing created, you can adjust the width between verticals by changing the Evenly distance in the rules tab.
Step 11: Creating corners

As you can see, corners are created by default by bevelling the Default geometry. You have several options here which are best illustrated if you temporarily add the whole railing segment back to the default input, remove the Evenly input, and set default mode back to tiling. Now we can see the more clearly the options we have to determine how this segment wraps around the corner.
- Reset - This slices the segment before the corner and starts again after the corner
- Extend - Continues the segment around the corner, maintaining the segment’s original length
- Symmetric - Ensures the size of the segment after the corner is the same as that before the corner.
- None - turns of bevelling completely and instead tries to bend the geometry around the corner.
To those are our corner options for the Default geometry, but you can also add geometry specifically to the corner. To illustrate, lets put the style back how it was with Adaptive distribution, Default slices and the Evenly input reattached.
Now, our source model didn’t specifically have a corner included, but we can use some of the slices we already have. For example, you could add the Evenly segment to the Corner. It looks a bit odd, and that’s because it’s trying to bend the geometry around the corner. Let’s bevel it instead by enabling Bevel Corner. Now the geometry is applied to each side of the corner and bevelled where they meet. You can adjust the bevel’s location using the BC Offset parameter.
A final thing I want to mention about corners is the use of Compose operators with Bevel. Let’s imagine you want to end the railing before the corner, create a gap, and then start it again after the corner. To do that you can add a Compose operator, which combines segments to form new geometry, to the Corner input, wire the End Segment to its first input and the Start segment to its second. This creates the correct geometry, but it’s not aligned to the corner how you’d imagine . This is because there’s an even number of inputs, so RailClone centres the geometry to the 1st segment in the Compose node. To take more control. Add an empty Segment to the 2nd input of the Compose operator. With an odd number of inputs, the centre geometry is always now used to align to the vertex, and the positioning is correct. You can even change the X size of the empty segment to control the size of the gap.
That completes your parametric railing. We hope you found this introductory tutorial useful. As well as a basic overview of how to use RailClone we introduced RailClone Slice and the new Library features that were added in version 6. To stay up to date with new RailClone news and tutorials, please feel free to subscribe to our YouTube channel.