Требования
- info Forest Pack 8
Forest Pack 8 introduced the ability to add Spline parameters to the effects panel. In the next few tutorials, we’ll take a look at some of the effects that ship with Forest Pack 8 that use this new feature.
We’ll start with a simple effect that allows you to swap the geometry inside a spline to a subset of the items list. To illustrate what this means, we’ll scatter 3 objects: a mature pine, a young pine and a stump. As expected, by default Forest Pack will randomise between all 3.
Let’s imagine that a clearing is being cut into a forest, and we want to change the trees inside this clearing to stumps, but without changing their positions or transforms.
To do that we can use the new Swap Geometry by Spline effect, as follow:
- Go to the Effects rollout, and click on the plus button to add a new effect. Click the wand to open the browser and locate Swap Geometry by Spline from the Item Effects category.
- The effect will load and display several parameters. Let’s take a look at what they do.
![]()
- First of all, we need to assign a spline to define the clearing. Click on the Spline parameter and pick a closed path from the scene.
- Inside/Outside is a toggle that allows you to choose whether the effect applies to items inside or outside the spline. In our example we want it to affect the items inside the spline, so we’ll set the value to 0
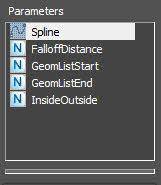
- GeomListStart and GeomListEnd define the range of models that you want to swap the items inside the spline to. The number refers to the item's index in the Geometry List starting from 0 at the top and counting downwards.
![]()
Using this logic, to change all the trees to a stump, we set both the Start and the End values to 2. - The final setting is called Falloff Distance. This allows you to gradually blend the effect at the boundary instead of having a hard cut-off.
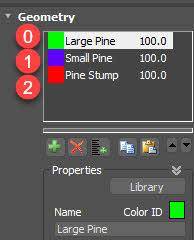
And that’s it. There’s just one more feature that was added in FP8 we wan t to mention called Apply to Models and found just above the parameters window.
You can use this with any effect, and it acts as a filter that allows you to control which types of items you want to be affected by the effect.
For example, let’s imagine we only want to swap the mature pines for stumps, leaving the young pines as they are.
To do that, we activate the Apply To Models option, open the Picker and tick the models you want to be affected. Check Large pine and then click OK and only the selected items will be swapped for stumps, leaving the young pines unaffected.
Keep and eye our for more tutorials about Effects coming soon, just one of the many invaluable features of Forest Pack you won’t find anywhere else.