Файлы ресурсов
Требования
- info 3DS Max 2010, Forest Pack Lite
Разделы
- toc Вступление
- toc Forest Pack Intermediate Course: Rendering a Modern Barn Scene - Part 1
- toc Forest Pack Intermediate Course: Rendering a Modern Barn Scene - Part 2
- toc Forest Pack Intermediate Course: Rendering a Modern Barn Scene - Part 3
- toc Forest Pack Intermediate Course: Rendering a Modern Barn Scene - Part 4
- toc Forest Pack Intermediate Course: Rendering a Modern Barn Scene - Part 5
Material optimisation and forest color
Once the scene is finalised and ready to render it's time to create some texture variations and optimise our materials. By the end of this tutorial you should be able to:
- Automatically optimise materials
- Create variations using tint
- Create variations by randomly applying maps
Optimising maps and applying Forest Color.
- Select any forest object in the scene
- Open the Materials Rollout
- Click on Optimise Materials
- Select the correct target renderer
- In this case the default settings are fine. As the scene has materials that use transparency, ensure Disable Filtering for Opacity Mapping is switched on.
- Click Optimise!
Using a simple tint
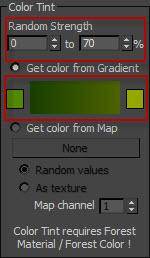
Once forest color has been applied some simple color variations can be applied from within the forest object itself using the Color Tint options in the Material rollout. These settings can be overridden from the Forest Color map for more control. Let's add a subtle variation to the hedges.
- Select the "forest_bushes" forest object
- Open the Material rollout and set the Random Strength at 0% to 70%
- Choose some appropriate colours, I've changed mine to shades of green but the defaults yield some nice results and it pays to experiment.
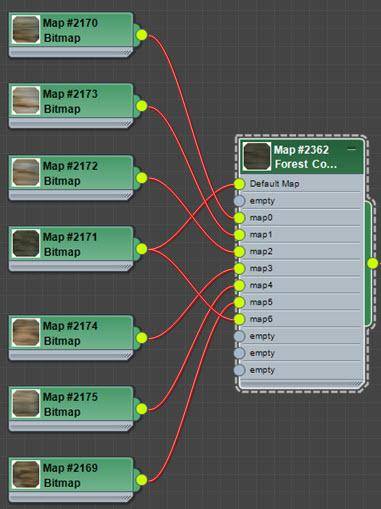
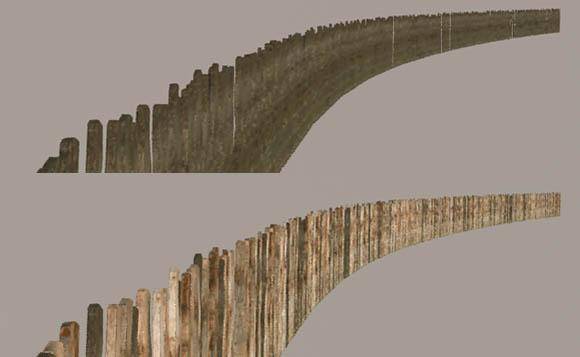
Using multiple maps
At present the left hand fence has a single texture applied to each plank. To add variety we will create a material that randomly assigns 1 of 7 wood textures.
- Select the "forest_rickety_fence" object.
- Open the Geometry rollout and pick one of the planks. With the material editor open drag the assigned material into the editor ensuring it is an instance.
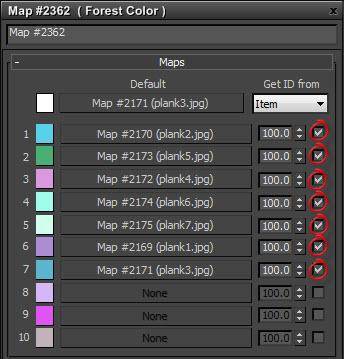
- You should see a Forest Color map applied to the diffuse channel with a single bitmap texture in slot 1.
- Create new Bitmap maps from the following textures: "plank 1", "plank 2", "plank 4", "plank 5", and "plank 6" (plank 3 is already loaded).
- "Plank 3" should be in the default map slot - connect it to map slot 0 and the remaining bitmaps in slots 1 - 6.
- Render the fence. You should see a random distribution of wood textures on the planks.
Using multiple maps and tint in combination
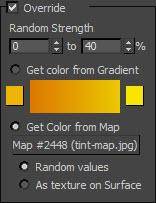
For the final example we will add some variety to the Birch trees using both the techniques outlined above.
- Select the "forest_trees" object.
- From the Geometry rollout select "treeTall" and drag the assigned material into the editor.
- As before the material has a Forest Color map applied to the leaf material. Firstly let’s drag the default material so that it is also attached to map0
- Import the following textures as Bitmap maps: "leaf_birch_color1", "leaf_birch_color3", "leaf_birch_color3".
- Attach the materials to map slots 1 - 3.
- Import the tint-map.jpg texture and assign it to the Color Tint Map slot of the Forest Color map
- From the tint rollout turn on Override and set the Random Strength from 0% to 40%
- Activate Get Color From Map and ensure Random Values is selected.
- Render the scene. The trees now exhibit color variations caused by the interplay of randomised bitmaps and tints selected from the tint-map jpeg.
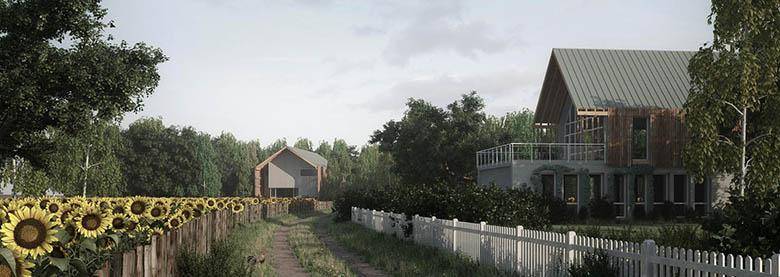
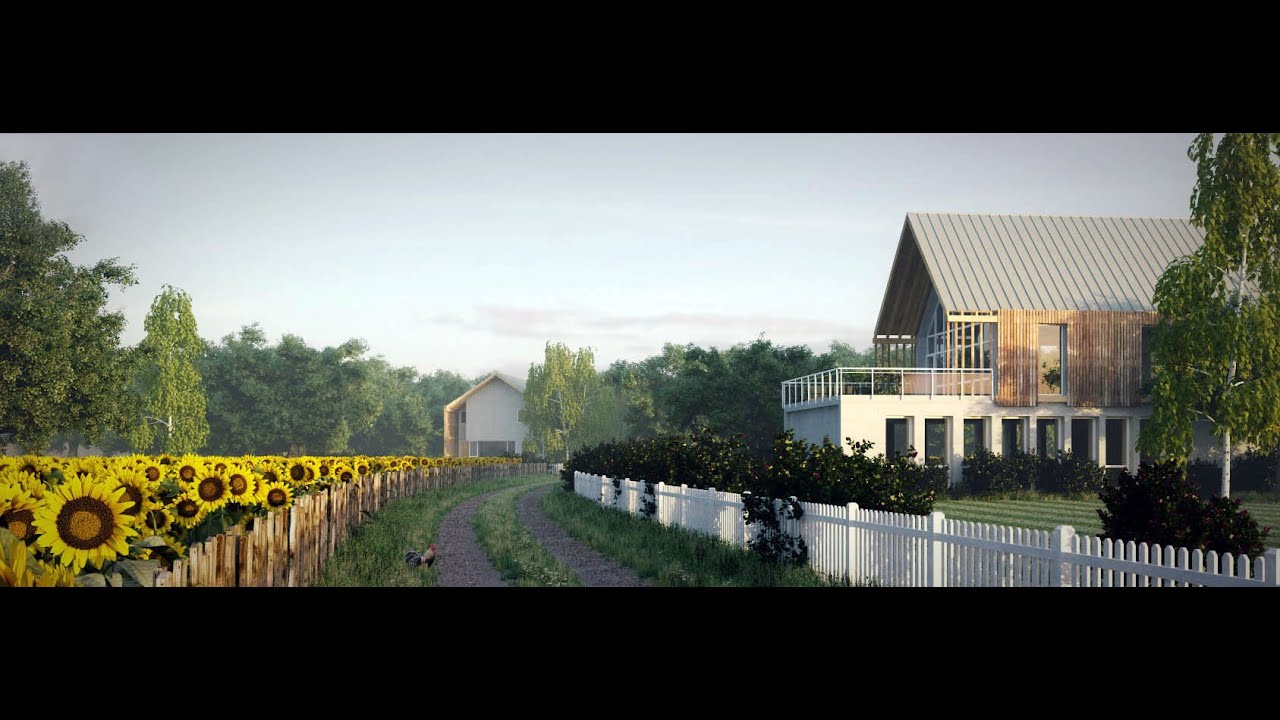
A final render of the scene
Conclusion
This tutorial has explored some of the great new features of Forest Pack including multiple include and exclude areas using surfaces, splines, objects, forests and pen areas. We explored Custom Edit modes, falloff curves, probability curves, inverted falloff maps and parametrisation by area. Finally we looked briefly at Forest Color and controlling transforms using maps. If you have any questions about these tutorials or any of the techniques demonstrated here, please feel free to ask on our forums. For more instruction on Forest Pack please visit our tutorials page.