Resources
Requirements
- info 3DS Max 2011, Forest Pack Pro
In this tutorial we share tips and tricks for creating your own libraries and presets for Forest Pack. If you regularly use the same objects in your renders, it makes sense to add them to the library browser for easy access, and If you work in a studio you can easily save library configuration files in a networked location so that artists can share and collaborate on a central repository. In the first half of this tutorial we focus on the the essentials of using the library browser to create and edit libraries.
In the second half we'll demonstrate advanced tips that show how to support multiple renderers and trigger maxscript events to extend the functionality of the library. This section is aimed at users that would like to share their libraries either in the same studio or even for distribution online. We'll explain how to package assets and make them more accessible for users with different configurations.
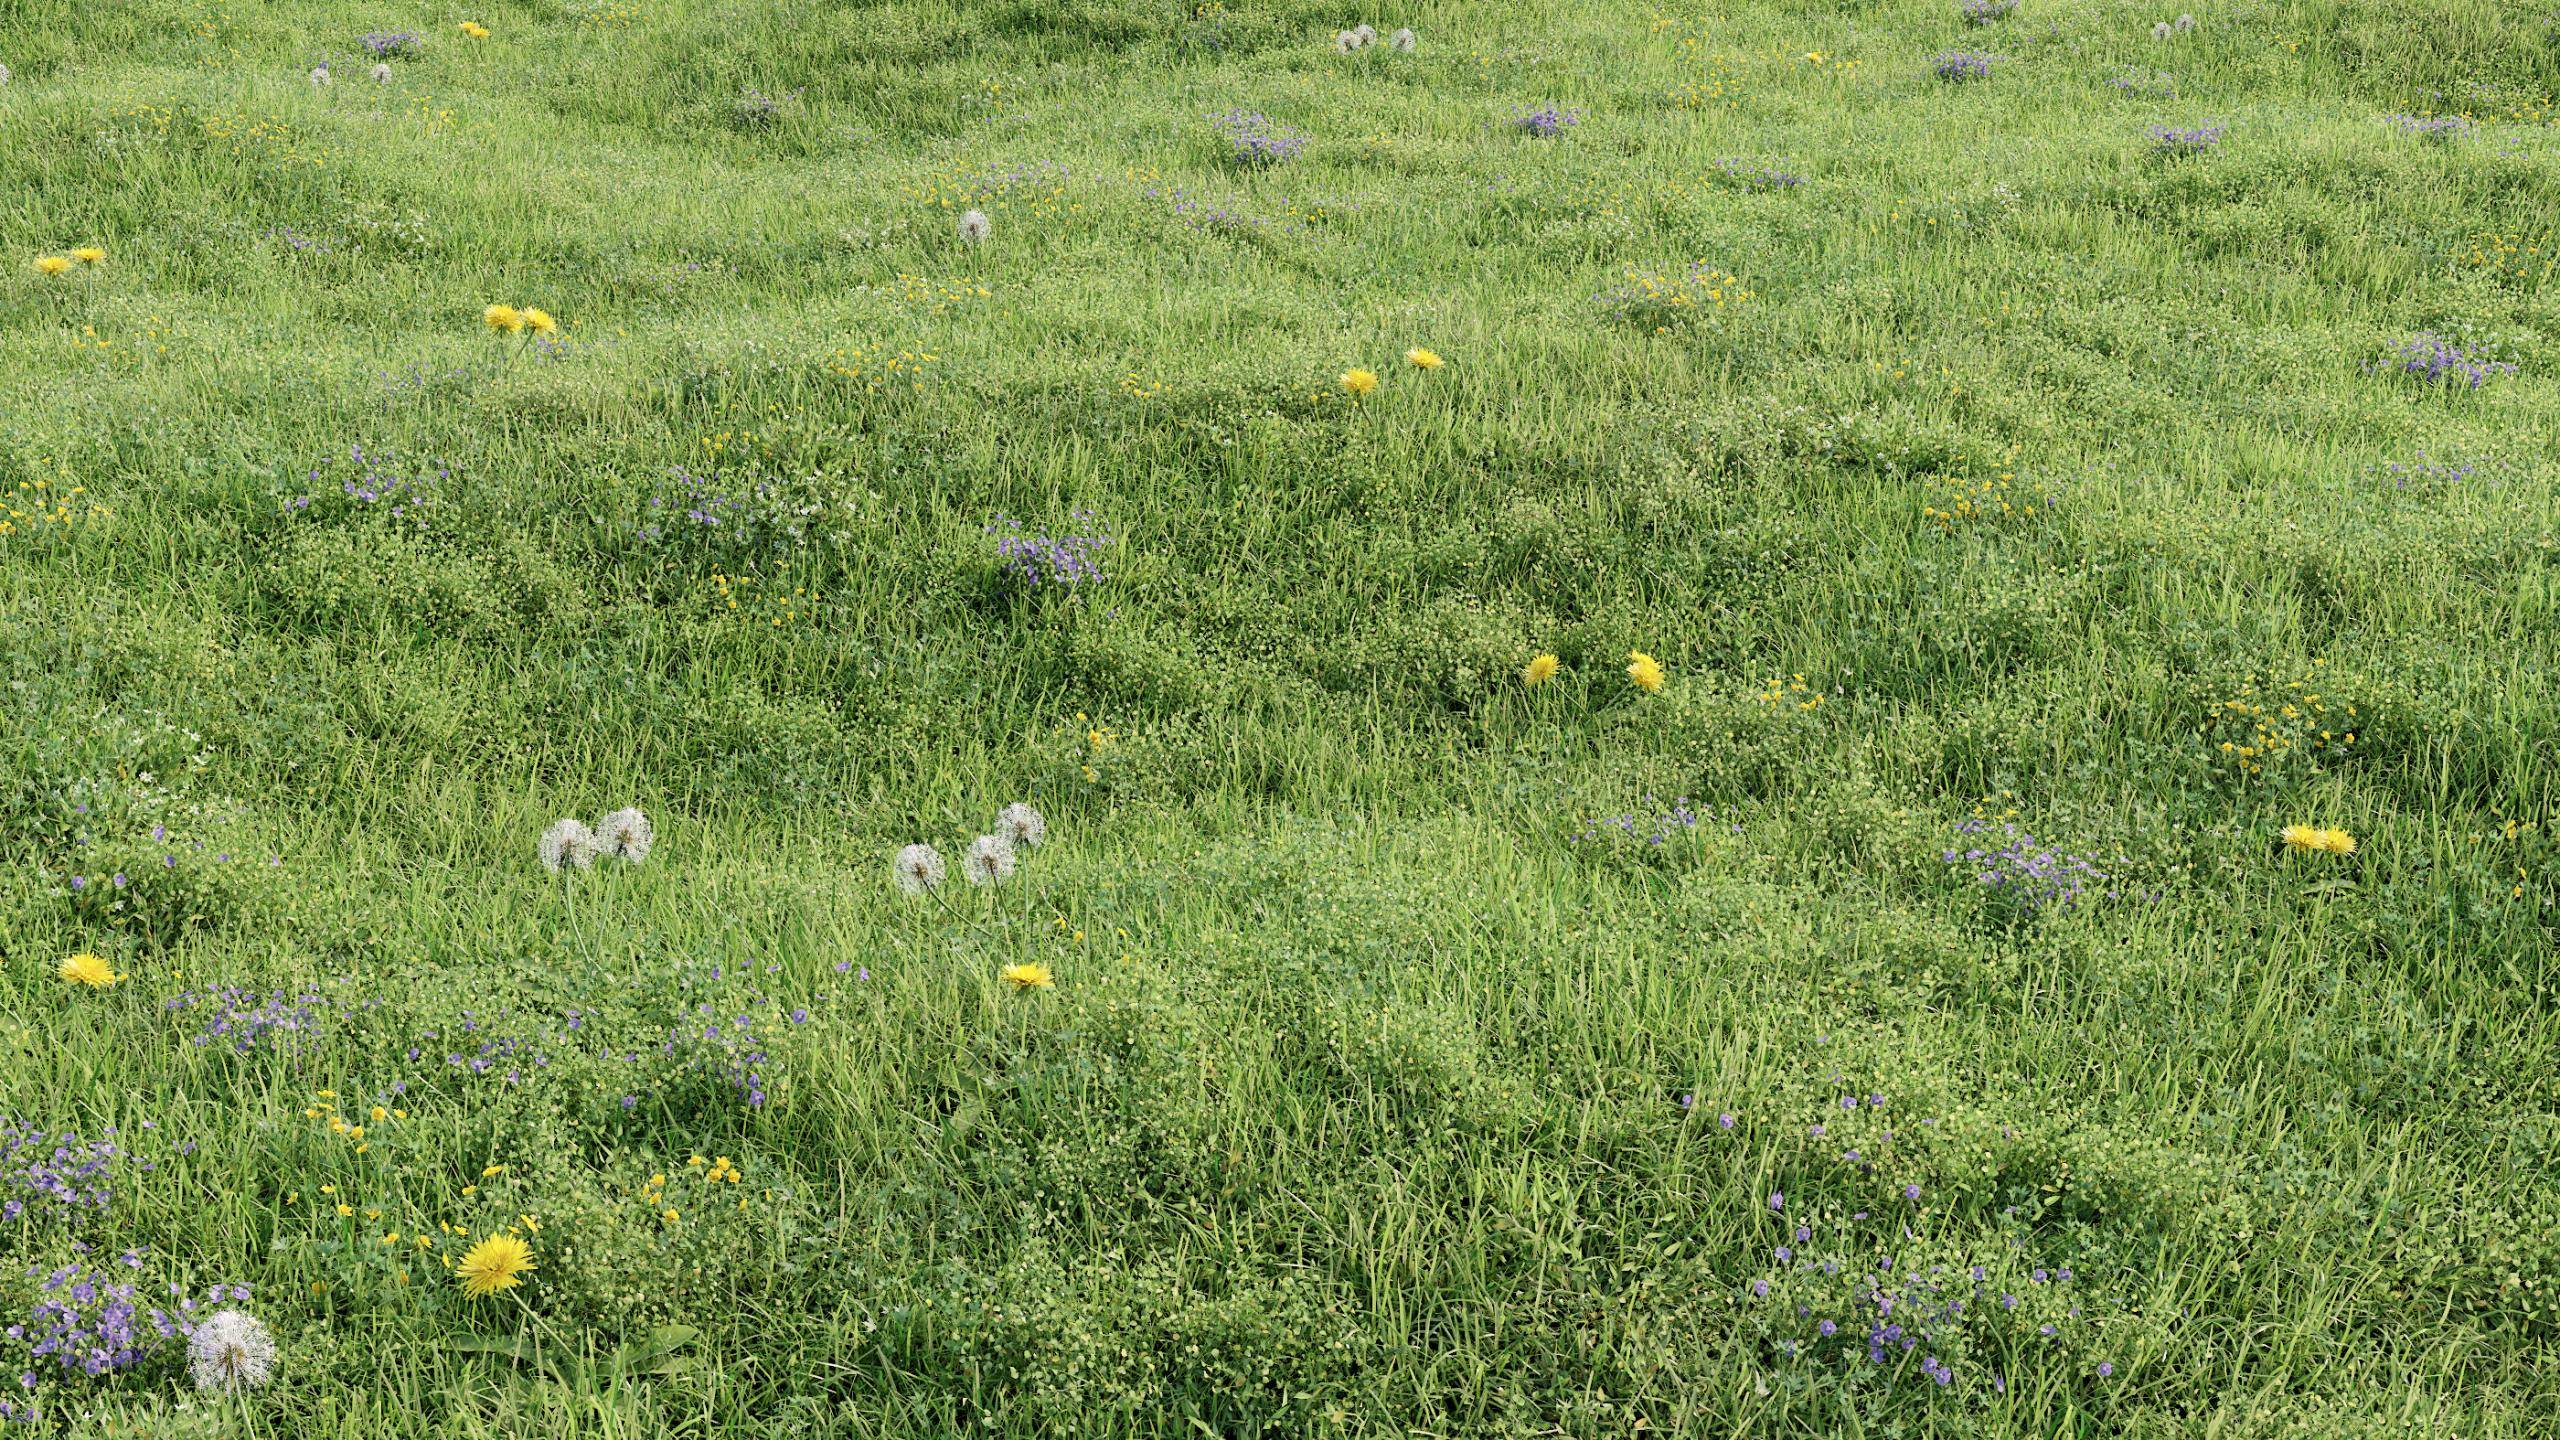
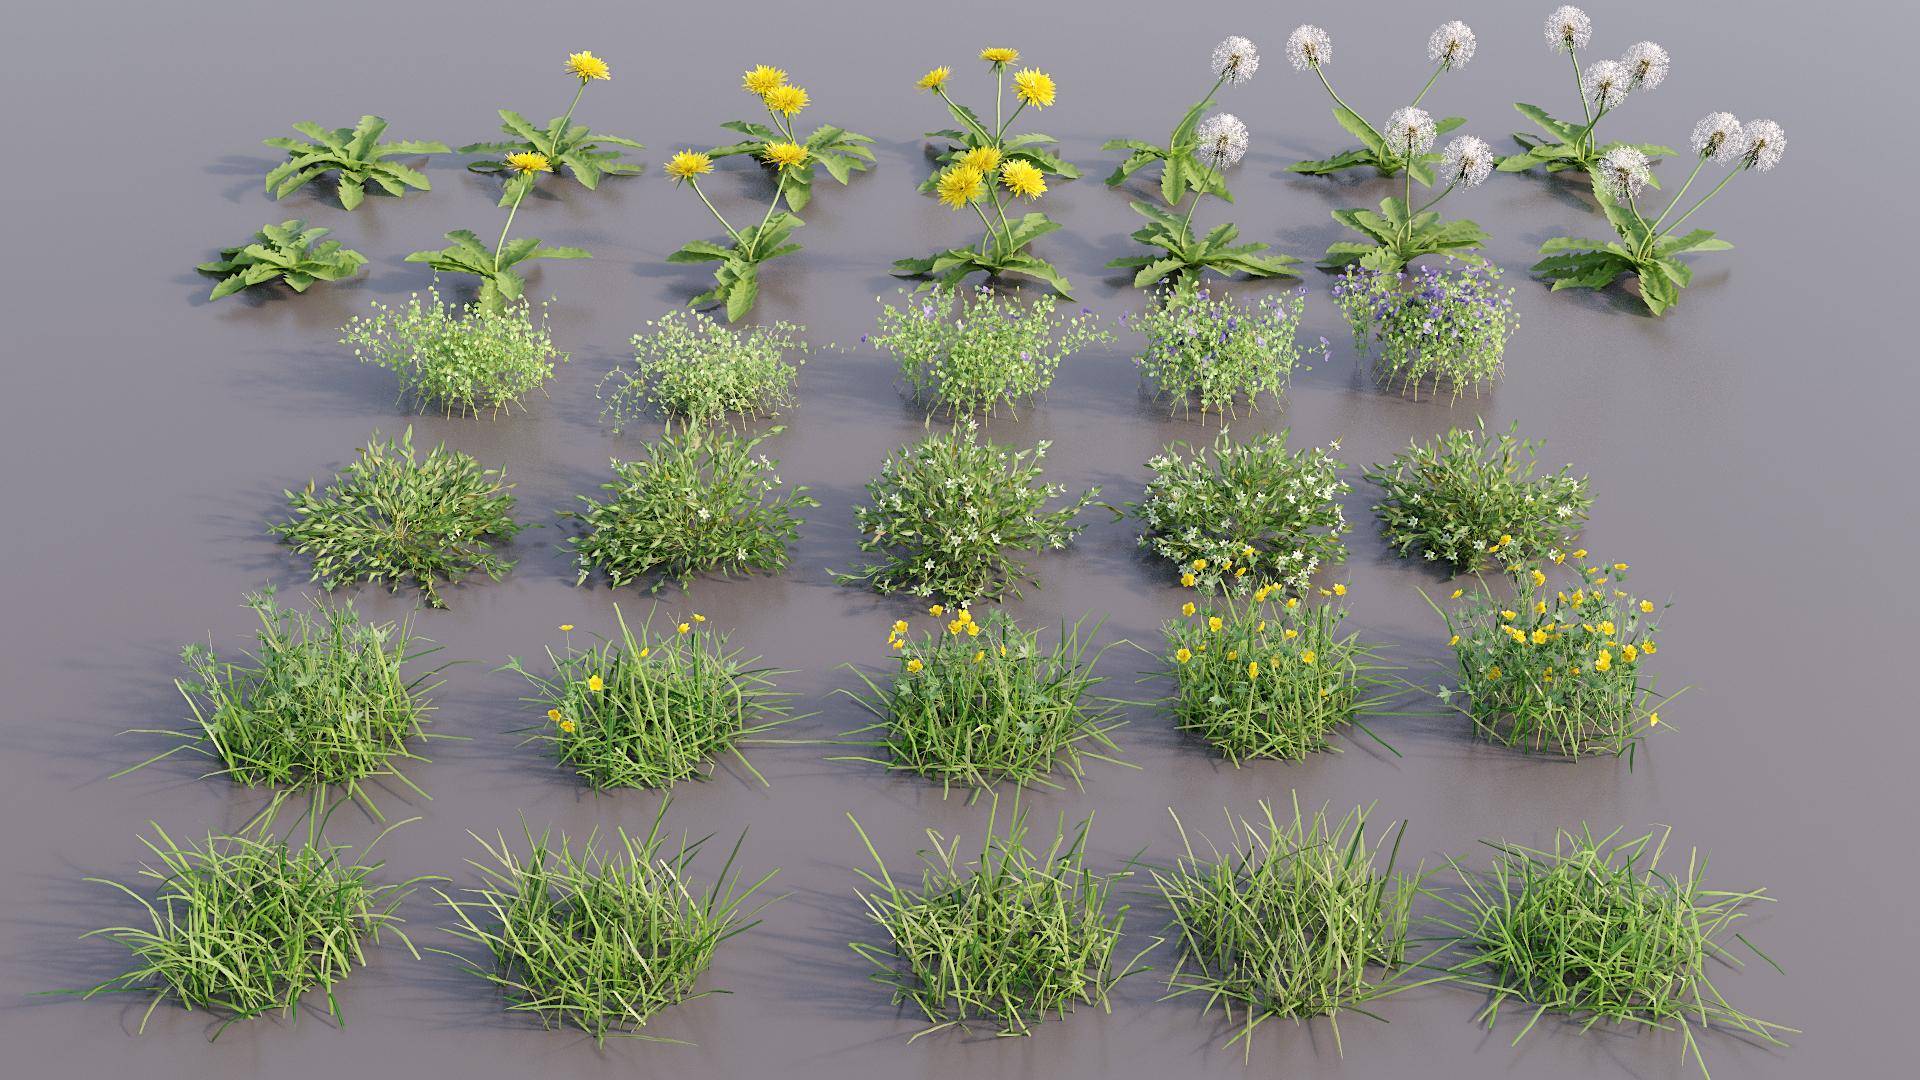
Throughout this tutorial we will demonstrate the creation of a library called "unkempt lawns" that consist of over 30 individual items plus a few presets to get you going. The final library, including all the plant assets is available to download below in Max 2011 format with material libraries for V-Ray, Mental Ray and Corona.
Though this tutorial focuses on Forest Pack, most of the techniques are equally applicable to creating libraries for RailClone.
By completing this tutorial you will be able to:
- Add individual plants to the library.
- Automate the addition of multiple plants to the library.
- Create and add Presets to the library.
- Creating grass patches for presets that cover a large area.
- Creating and modifying a library's XML.
- Create a drop down list to select materials for a range of renderers.
- Add a script to automatically select a library based on the current renderer.
- Add Maxscript functions to the library.
- Install a downloaded library.
Download Contents
The scene files for this tutorial include the pre-built "unkempt lawns" library . This library contains over 30 plants plus presets and sample maxscript functions. It is designed to illustrates how a library might be packaged for distribution.
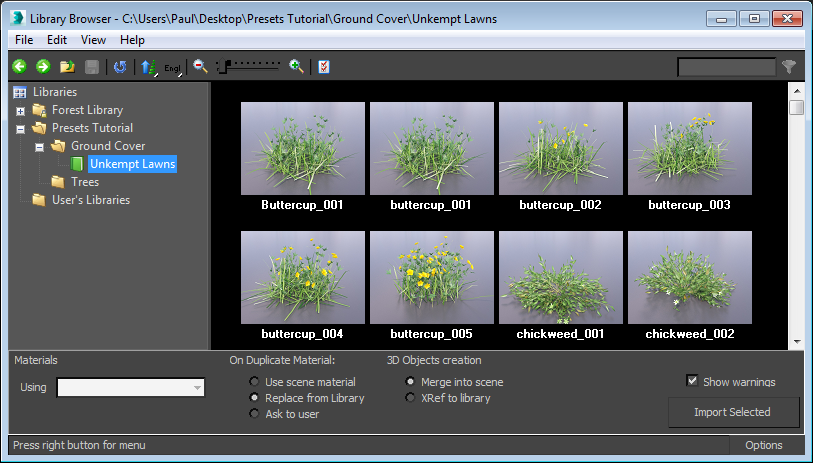
The library interface
If you're new to Forest Pack, before creating your own libraries it's worth taking some time to recap the library interface. To open the library click on  in the Geometry rollout.
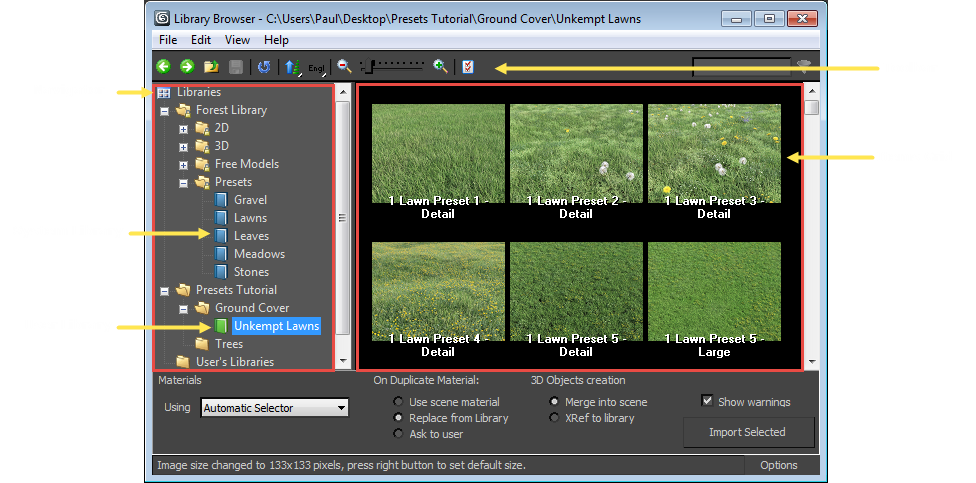
On the left of the interface is the navigator, use this to select, edit and open your libraries. You'll notice that there are two types of folder. System folders, which are represented in blue, denote the libraries that come packaged with Forest Pack or RailClone. These are read-only and can't be modified from the library browser. Below these are the editable user folders represented by a green folder. This is where your custom libraries can be found.
After a fresh install of Forest Pack or RailClone you'll have one location already added called User's librarys. The default location for this is C:\Users\<username>\Documents\Forest Pack\libs but you can save libraries on any local or network drive in any folder. We'll look at how to edit and add locations a little later in this tutorial.
On the right is the Items grid. This view previews the contents of the selected library and allows you to selects individual objects, multiple objects by holding down shift or control, and presets. Along the top is the toolbar, with several command buttons to navigate, save and refresh the library as well as changing the size of the thumbnail images.
There may be times when you'd like to make a copy of an exisiting library. To do this select a library and then dragging it to any user folder while holding down CTRL. All the neccesary files are copied to the new location and you can now edit this version. You can also move files between folders just by clicking and dragging in the navigator view, theres no need to open Explorer for basic file operations!
So that's the basics, let's add a new library!
Creating a new Library
The first thing you need is a root folder. This is the path that Forest Pack or RailClone's library browser will search in for library configuration files. As mentioned above, there's already a User folder set up, but for the purposes of this tutorial we'll add a new directory. In this example the path is created locally, but there's no reason why this can't be shared network location so that assets can be easily accessed by multiple artists in a studio environment. To add a new library location:
- With the library editor still open go to File > Preferences… or click
![Creating Libraries-image2015-5-28 18:3:29.png]() from the top toolbar.
from the top toolbar. - The Library Paths rollout shows a list of locations in which Forest Pack or RailClone will search for libraries. To add a new location click the Add button.
![Creating Libraries-library_add_paths.gif]()
- In the Add New Library Path window, navigate to a folder in which you wish to save your libraries. If necessary click
![Creating Libraries-image2015-5-26 11:7:23.png]() to create a new folder.
to create a new folder. - In the Label field enter the name to display in the tree navigator.
![Creating Libraries-image2015-5-26 11:11:2.png]()
- Click
![Creating Libraries-image2015-5-26 11:11:25.png]() to add the location to the library and return to the preferences.
to add the location to the library and return to the preferences. - Click OK and you should now see the new location displayed in the tree navigator on the left hand side of the library browser.
![Creating Libraries-image2015-5-26 11:12:6.png]()
 from the top toolbar.
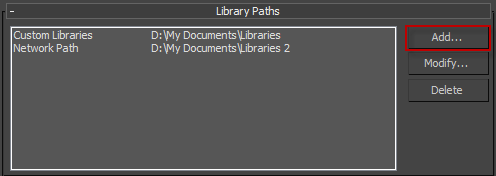
 to create a new folder.
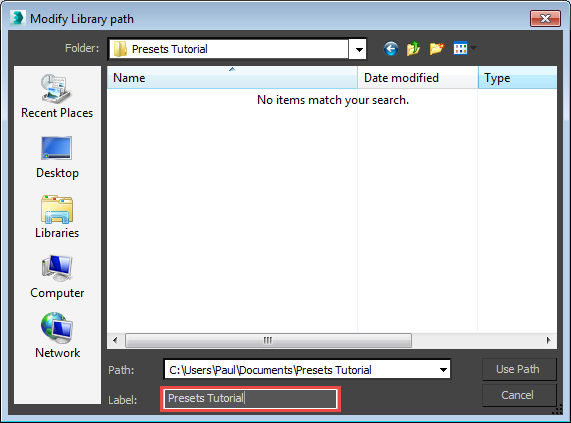
 to add the location to the library and return to the preferences.
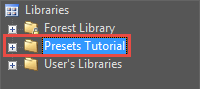
Now that we have a new folder created, we can add a library, but it's worth mentioning that it's also possible to add additional sub-directories to this folder directly within the Library Browser. To do this
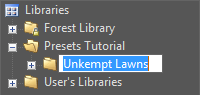
- In the tree navigator, right click on the new location name and select Create Folder.
- A new path will be created and the name is highlighted for you to enter a name. If you are planning a large library this makes it easy to organise your content.
![Creating Libraries-image2015-5-26 11:34:3.png]()
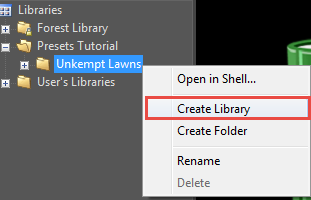
Finally let's add the library itself.
- In the tree navigator, right-click on the folder where you would like to save your new library and select Create Library.
![Creating Libraries-image2015-5-26 11:38:0.png]()
- A new library is created and the name will be highlighted, enter a title and press return.
When you create a library, a new folder is added that includes an XML file and a sub-folder for thumbnails. This and any other folders found in the same location as an index.xml file are not displayed in the Library navigator. This allows you to organise your assets by adding additional directories to separate models, maps and materials.
Although you can easily create libraries entirely from the library browser interface, if you plan to share library files with colleagues, other users, or offer them for sale, it is helpful to understand how library files are stored behind the scenes. Fortunately it's not complicated, and the Library browser does most of the work for you. Let's look at how a library is organised:
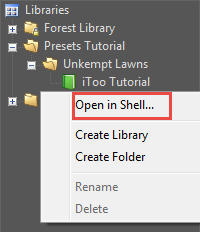
- To open the location of a library's files, right click on the name of the library and select Open In Shell.
![Creating Libraries-image2015-5-26 11:41:47.png]()
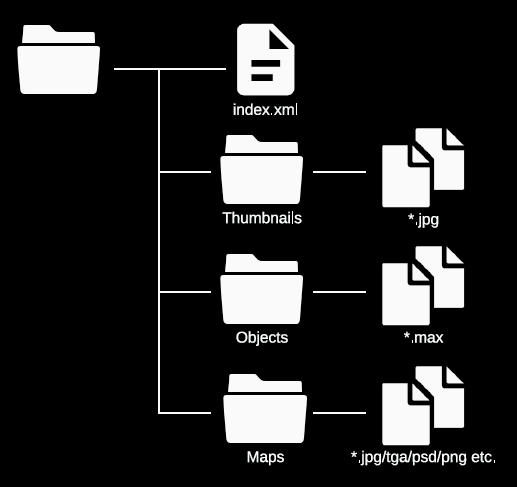
- Windows Explorer will open showing the contents of the library's folder. In here you'll see an index.xml file that contains all the libraries settings, and a folder named thumbnails that is used for the the preview images show in the items view.
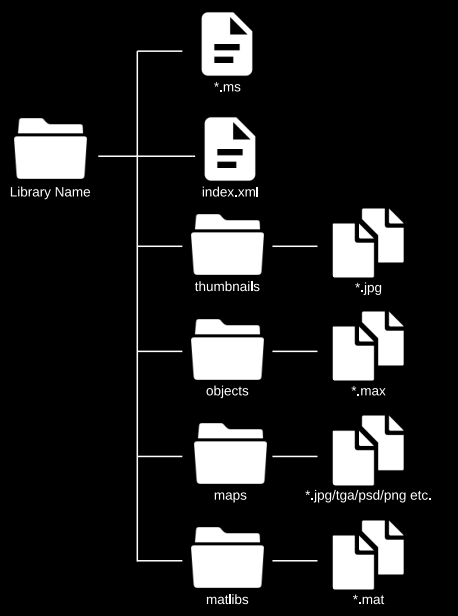
- To organise things further create a new folder for the .max files, and another for textures . You can use any names, but we recommend adding a folder called objects for the .max files and maps foryour textures. The diagram below illustrates a typical library setup.
![Creating Libraries-image2015-5-27 17:30:58.png]()
The XML file itself contains the configuration for the current library, including the location and name of the max files and objects referenced, the materials to use, which thumbnail to display and much more. As we'll see later, it's also possible to trigger maxscript events from the XML file to add additional functionality to the library such as detecting the current renderer, adding new user paths and much more.
Never save your own libraries in the same location as Forest or RailClone's built in presets. This directory will be wiped whenever you update the software and you'll lose anything saved there.
To create the "Unkempt Lawns" library we need to add the files to the folders we just created. To do this:
- Add the preview renders to the /thumbnails folder. The thumbnails are all named after their corresponding object in the .max scene. If the names match, the library will automatically load the thumbnail. If the names are different you will have to add the thumbnails manually.
- Add the lawnPresets.max files to the /objects folder
- Add the textures to the /maps folder.
Adding individual plants to the library
Now that the source files have been moved to correct locations we're ready to add some objects. To start with let's look at how to add a single item:
- Open the library browser by clicking
![Creating Libraries-image2015-5-27 17:45:14.png]()
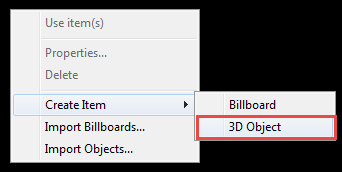
- Select the Unkempt Library from the Navigator and right-click in the items view. Click Create Item > 3D Object.
![Creating Libraries-image2015-5-27 17:44:35.png]()
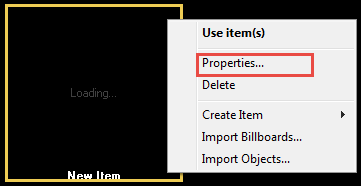
- This creates a new empty item. Right-click on the item and select Properties...
![Creating Libraries-image2015-5-27 17:47:14.png]()
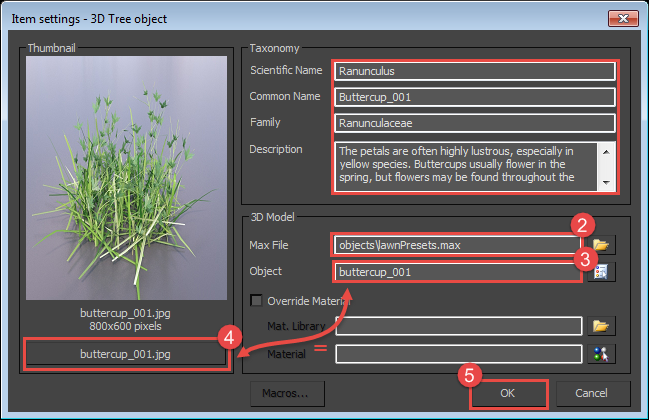
- Fill in the Taxonomy values, note that the common name is the text displayed by default in the library browser though this can be changed to display the scientific name if you prefer. Other values can be left blank if not required
- Click on the folder item
![Creating Libraries-image2015-5-27 15:51:35.png]() next to the Max File field and select the lawnPresets.max scene file.
next to the Max File field and select the lawnPresets.max scene file. - A list will open containing the objects in the scene, pick the item you wish to add to the library, in this case we'll add buttercup_001
![Creating Libraries-image2015-5-27 17:52:50.png]()
- You'll notice that the thumbnail appears automatically. This is because there is an image in the thumbnails folder that shares the name buttercup_001 - the name of the object we just selected. If you prefer to select the thumbnail manually, just click on the Thumbnail Name button below the preview window.
- Click OK.
![Creating Libraries-image2015-5-27 18:5:51.png]()
- Click
![Creating Libraries-image2015-5-27 18:7:41.png]() from the top toolbar to save the changes to the library.
from the top toolbar to save the changes to the library.

 next to the Max File field and select the lawnPresets.max scene file.
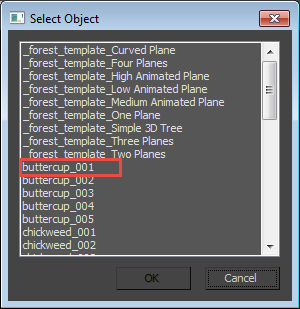
 from the top toolbar to save the changes to the library.
Once you've added an object to the library you can open the XML to see how Forest pack saves this information. Even if you're not familiar with XML syntax, this mark-up is fairly self-explanatory:
<?xml version="1.0" encoding="utf-8"?>

<library version="100" order="1" masterScale="3.93700787402e-002" xref="1" bitmap="">

    <item class="maxobject">

        <name lang="english">Buttercup_001</name>

        <name lang="latin">Ranunculus</name>

        <family>Ranunculaceae</family>

        <description>The petals are often highly lustrous, especially in yellow species. Buttercups usually flower in the spring, but flowers may be found throughout the summer, especially where the plants are growing as opportunistic colonizers, as in the case of garden weeds.</description>

        <bitmap>buttercup_001.jpg</bitmap>

        <maxfile>objects\lawnPresets.max</maxfile>

        <object>buttercup_001</object>

    </item>

</library>
The details for each item are stored between <item></item> tags with the class "Max Object". Inside this there are tags for the fields that we just entered in the library browser. If you look at the <maxfile> tag you can see that paths are relative to the index.xml file.
If you prefer to create libraries purely by editing the XML, it's a simple case of duplicating the <item></item> tags plus their contents, and changing the values.
Adding multiple plants to the library
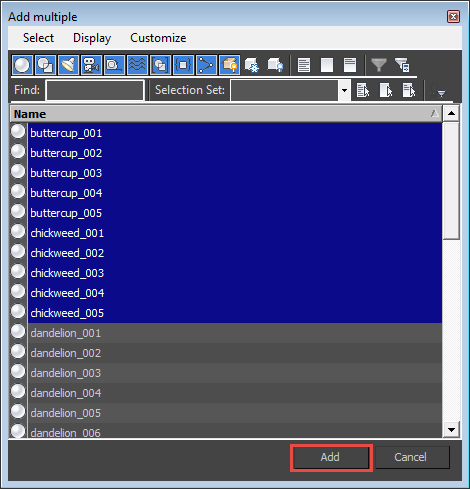
Adding items one at a time like this can be time-consuming, fortunately the Library browser allows you to automate the addition of multiple objects that are contained in a single .max file. To do this:
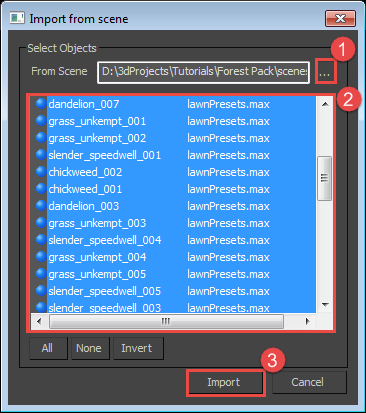
- Right-click in the Items view and click Import Objects.
- The Import from Scene window will open. Click on the ellipsis and select the lawnPresets.max file in the /objects folder.
- Select the items you wish to import. Use CTRL and/or SHIFT to select multiple objects.
![Creating Libraries-image2015-5-27 19:19:21.png]()
- Click Import. A new library item will be added for each object. The English names and descriptions are derived from the names of the objects. If there are thumbnails that share the same name as these objects, they will be loaded automatically too
![Creating Libraries-image2015-5-28 10:3:19.png]()
- Finally, save the library by going to File>Save… or clicking
![Creating Libraries-savechanges.png]() from the top toolbar.
from the top toolbar.
 from the top toolbar.
As you can see, using the import objects tool you can very quickly populate an entire library in a couple of clicks.
Creating Presets
Presets allow you to import a whole Forest Pack style, including all the necessary geometry, the distribution and transform settings and more. Once a user has loaded a preset it should only be necessary to assign the scatter areas and they're ready to go. We provide our presets in two size, a detail preset that uses individual plants and is suitable for small areas, and a large preset that uses pre-combined "patches" of plants and is designed to cover much larger areas of a scene. The only real difference between the two is the geometry used.
Creating detail presets.
There are a 4 detail presets already included in the download but we'll create a 5th that combines the grass, chickweed and buttercup models to illustrate how it's done.
- Open LawnPresets.max from the objects folder.
- Create a new rectangular spline roughly 6m x 6m. We use this spline as a typical area size for a detail preset.
- Create a new Forest Object by clicking on the spline created in the previous step.
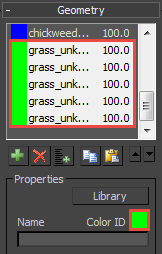
- Go to the Geometry rollout and click
![Creating Libraries-image2015-5-28 11:25:57.png]() to add multiple items. Select all the grass, buttercup, and chickweed objects.
to add multiple items. Select all the grass, buttercup, and chickweed objects.
![Creating Libraries-image2015-5-28 11:30:11.png]()
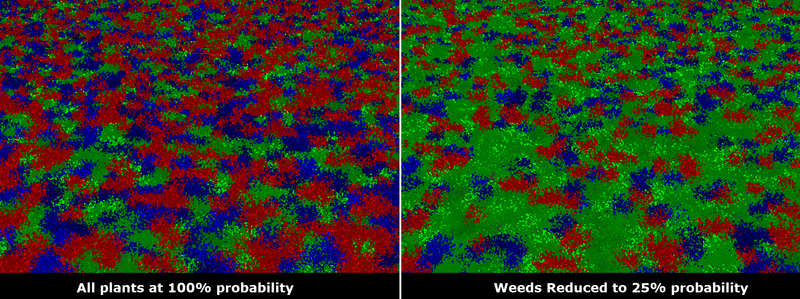
- To help see the distribution I like to change the Colour ID of each type of plant. To do this select all of the buttercups and change the colour ID to Red, change the Chickweed's colour to blue and the grass to green.
![Creating Libraries-image2015-5-28 11:36:2.png]()
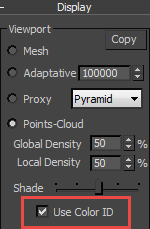
- To ensure you can preview these colours in the viewports, turn on Use Color ID in the Display rollout
![Creating Libraries-image2015-5-28 11:37:27.png]()
- Now go to the Distribution rollout, set the map type to Full and decrease the Density size. A value of 850cm works for this preset.
- Go to the Transform rollout and turn on Translate, Rotate and Scale. Set the Translate X and Y Min values to -5%and Max to 5%.
- The Color IDs give you a good indication of the distribution of each type of plant. At the moment there's an equal amount of grass and weeds. For this preset we want to decrease the number of weeds. To do this, go to the geometry rollout and select all the Buttercup and Chickweed objects. Decrease the Probability for these plants to 25%. You'll see that the balance has changed so that there's now more grass in the preset than weeds. You can easily create and save a number of variations on a preset just by duplicating the forest object and adjusting the probability values.
![Creating Libraries-image2015-5-28 12:39:38.png]()
- Rename the Forest object fp_ukl_preset_chickweed_buttercup_detail.
- Finally render a preview. Name it fp_ukl_preset_chickweed_buttercup_detail.jpg and save it to the thumbnails folder.
 to add multiple items. Select all the grass, buttercup, and chickweed objects.
Adding presets to the library
Adding this preset to the library uses the same procedure as adding a regular item.
- Open the library browser and from the navigator on the left, select the Unkempt Lawns library.
- Right click in the items grid and select Create Item > 3d Object.
- A new blank item will be created. To edit, right click on the item and select Properties…
- In the Taxonomy settings, Give the new preset the name 1 Lawn Preset 5 - Detail.
- Click on the folder icon next to the Max File field and select the lawnPresets.max file.
- A list will open containing the objects in the scene, pick fp_ukl_preset_chickweed_buttercup_detail.
- The thumbnail should be added automatically. If not, add a thumbnail by clicking the image file button below the thumbnail preview window. Select an image file and click OK.
- Click OK to accept the changes.
- Save the library by going to File>Save… or clicking
![Creating Libraries-savechanges.png]() from the top toolbar.
from the top toolbar.
Creating large area presets.
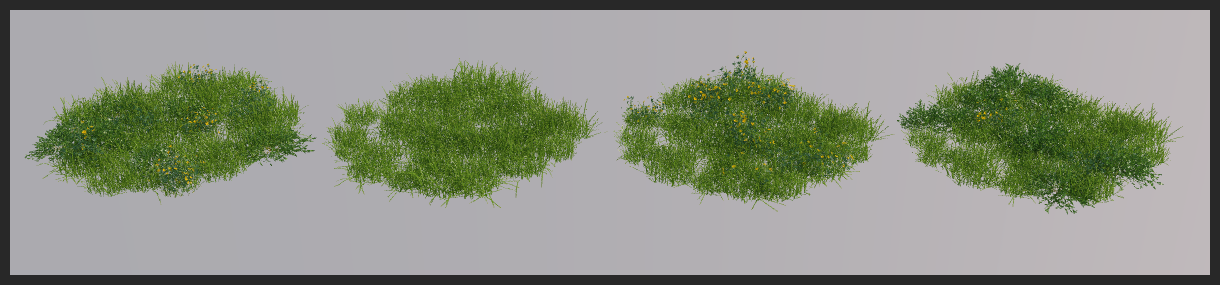
Next let's create a large area version of this preset. Because the geometry used for large area presets can have high polygon counts, it is good practice to create each preset in a new file .max file:
- Create a new scene and save it in the Objects folder. Name it preset_005_large_area.max
- Create a new rectangular spline roughly 25m x 25m. We'll use this spline as a typically sized area for a large preset.
- Create a circular spline with a 30cm radius. This is the size of grass patch we use to create the source geometry for a large area preset.
- Next we'll fill the circle spline with plants. You could do this manually, using GrowFX if you have it, or using Forest Pack. The crucial thing is that the patch will need to be collapsed to a single poly object. The library browser will not import nested forest objects.
- In this example I'm going to cheat a little and use the detail preset we just created. Create a new Forest Object using the circle and load 1 Lawn Preset 5 - Detail using the library browser.
- Set the Display mode to Mesh.
Large presets use "patches" that consist of a combination of many plants in a single collapsed object. Consequently, you'll need to use a multi-sub object material that combines all the materials needed for all the plants in the preset. Because we knew that the plants in this tutorial would be combined, they already share a single common sub-object material. If this is not the case because you're using plants from different sources you may need to edit the plants so that they share a single material. There are a couple of ways to make this easier. Firstly you could attach the plants, creating a multi-sub automatically, and then detach them again (and adjust the pivots). Alternatively there are a number of scripts on offer that can automate the process for you. Personally I use RappaTools as it has the ability to create materials and assign IDs automatically without attaching and detaching the objects. - In normal use Forest pack automatically creates a multi-sub object material on the fly. This is one of the rare occasions where I don't want it to do that, so I'm going to turn off ConsolidateMaterials in the Geometry rollout. Next pick one of any of the materials from the objects in the geometry list and apply it directly to the forest object. Finally clear all the materials from the geometry rollout.
- That's one patch done, next we'll create a few variations. Select the Forest object and the spline and clone three more copies.
- To create simple variations just change the seed value in the General rollout. Additionally you can adjust the probability values so to achieve different densities of plant. For example we could have one patch mixed, one patch grass, one patch predominantly Buttercups and another predominantly Chickweed.
- Finally, convert the 4 patches to a poly object. You now have the items ready to create a large area preset.
![Creating Libraries-image2015-5-28 13:36:53.png]()
- Using this source geometry, we can make the preset. Create a new Forest Object by clicking on the 25m x 25m spline created earlier.
- Go to the Geometry rollout and click
![Creating Libraries-image2015-5-28 11:25:57.png]() to add multiple items. Select the large 4 patches.
to add multiple items. Select the large 4 patches. - Go to the Distribution rollout, set the map type to Full and set the density value to 3800cm.
- Go to the Transform rollout and turn on Translate, Rotate and Scale. Set the Translate X and Y Min values to -5%and Max to 5%.
- In this preset we'll add some clustering to simulate naturalistic growth patterns. In the Distribution rollout change the Diversity type from random to Clusters. Change the Size to 300cm and the Noise to 30%
![Creating Libraries-2015-05-28_13-54-57.png]()
- Rename the Forest object fp_ukl_preset_chickweed_buttercup_large
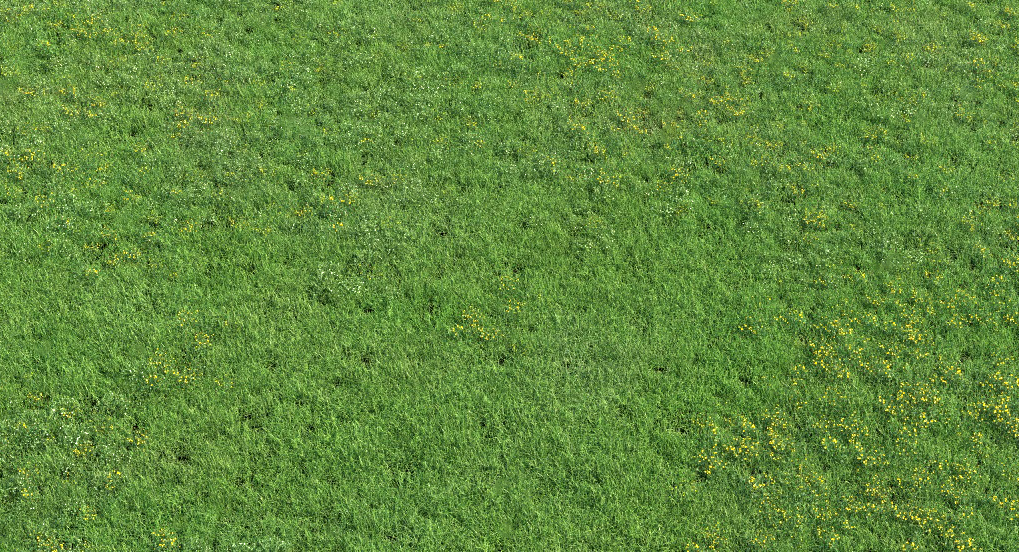
- Finally render a preview at 800px x 600px, name it fp_ukl_preset_chickweed_buttercup_large.jpg and save it to the thumbnails folder.
![Creating Libraries-image2015-5-28 15:4:58.png]()

- Right-click in the items grid and select Create Item > 3d Object.
- A new blank item will be created in the item browser. To edit, right click on the item and select Properties…
- In the Taxonomy settings, Give the new preset the name 1 Lawn Preset 5 - Large.
- Click on the folder icon next to the Max File field and select the preset_005_large_area.max file.
- A list will open containing the objects in the scene, pick fp_ukl_preset_chickweed_buttercup_large.
- The thumbnail should be added automatically. If not, add a thumbnail by clicking the image file button below the thumbnail preview window. Select an image file and click OK.
- Click OK to accept the changes.
- Finally, save the library by going to File>Save… or clicking
![Creating Libraries-savechanges.png]() from the top toolbar.
from the top toolbar.
Managing Materials
Unless you specify otherwise, the materials applied to the original source objects will be imported along with the geometry, so if your only supporting a single renderer or you don't plan to distribute the library there's probably no need to go through the following steps and your library is done!
If however you would like to add the ability to select materials to support multiple renderers, here how this works.
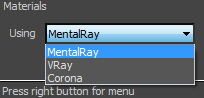
You may have noticed our built in libraries have the option to select a different material library for each supported renderer using a drop down list. This is achieved using a macro that inserts a different name into a material library's path depending on the option selected in the material selector dropdown. For this to work you need 3 ingredients:
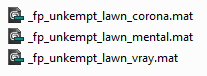
- A material Library for each renderer you wish to support. We recommend saving them in a new matlib folder in the library's directory. The file names should be structured so that they share a common section that is the same for every file, plus a variable suffix. In the examples shown below the common portion is _fp_unkempt_lawn_ and the variable portion is corona, mental, or vray
![Creating Libraries-image2015-5-27 12:48:38.png]()
The names of the materials in the material library must be identical to those applied to the source objects. The library will search the library for a material of the same name as the one currently applied to the object.
- A code snippet added to the XML to create a macro that can be used to tell the library browser which matlib to use. Note that the contents of the value attribute match the variable suffix used in the matlib's file names.
			<select class="material" setmacro="UNKEMPT_LAWNS_RENDERER">

			<option value="mental">MentalRay</option>

			<option value="vray">VRay</option>

			<option value="corona">Corona</option>

			</select>
- For each item in the library, a material override with a path to a matlib that uses the macro value in its file name. You can add this either in the library browser or in the XML. The name is based on the material library's folder name + it's filename + the name of the macro, for this example is should read matlibs\_fp_unkempt_lawn_$(UNKEMPT_LAWNS_RENDERER).mat
Using these 3 ingredients, we'll demonstrate how to add the ability to select materials to our unkempt lawns library for Mental Ray, Corona and V-Ray:
- First, in the library root, create a new folder called matlibs and copy the 3 provided material libraries. Note that each file's name is identical except for a renderer suffix. This value is arbitrary, but we recommend you maintain consistency by using the naming conventions shown in the table below. The first column shows the value returned by the macro and the second column is the renderer to which it relates.
Value | Renderer |
|---|---|
| standard | Scanline |
| vray | V-Ray and V-Ray RT |
| corona | Corona |
| mental | Mental Ray and IRay |
| octane | Octane |
| thea | Thea |
Using these we create material libraries with identical names except for a prefix or suffix that contains the renderer value. For example in this tutorial the matlibs are named _fp_unkempt_lawn_corona.mat, _fp_unkempt_lawn_mental.mat, and _fp_unkempt_lawn_vray.mat. You'll find these in the the Matlibs folder in the downloads for this tutorial.
- Now we need to create a macro that returns the values shown in the table above depending on the selection in the material dropdown menu. To do this open the library's index.xml file in your favourite text editor and underneath the opening <library ...> tag add:
<select class="material" setmacro="UNKEMPT_LAWNS_RENDERER">
The important part of this is the setmacro attribute which is used to name the macro. To call this macro from the library browser you just use this name in the format $(UNKEMPT_LAWNS_RENDERER). - Next we add the renderer choices using the <option></option> tag.
<option value="mental">MentalRay</option>
<option value="vray">VRay</option>
<option value="corona">Corona</option>
In each case the text between the opening and closing tags displays in the drop down list and the value is the text that the macro returns when called. Finally, add a closing </select> tag.
Save the file and open the library browser. You should now see the 3 options in the Material drop down menu.
![Creating Libraries-image2015-5-27 14:15:58.png]()
Now that the options are working we must override the materials currently applied to the object with those from the material library, To do this:
- Open the Library Browser. Right click on Buttercup_001 (for example) and open the Properties.
- Activate Override Material and click on
![Creating Libraries-image2015-5-27 15:51:35.png]() to select one of the material libraries in the matlibs folder
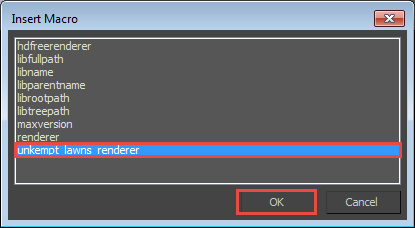
to select one of the material libraries in the matlibs folder - In the Mat. Library field we want to replace the renderer suffix with the macro we just created. Select the renderer part of the file name (
![Creating Libraries-image2015-5-29 11:29:52.png]() ) and either type the macro name manually or click on
) and either type the macro name manually or click on ![Creating Libraries-image2015-5-27 15:37:7.png]() and a list will open. Double click on UNKEMPT_LAWNS_RENDERER to insert the macro into the material library path.
and a list will open. Double click on UNKEMPT_LAWNS_RENDERER to insert the macro into the material library path.
![Creating Libraries-image2015-5-27 15:49:58.png]()
- The path should read matlibs\_fp_unkempt_lawn_$(UNKEMPT_LAWNS_RENDERER).mat
- To test the file, set the material selector to Mental Ray and open an object from the library, the material should use Arch and Design shaders. Switch the renderer to corona and reimport the same object. Corona materials should now be used on the object, replacing the Mental Ray versions.
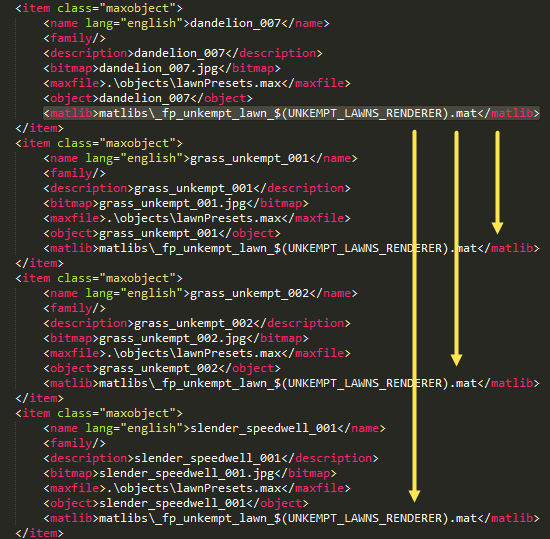
- Do the same for the rest of the objects. You may find it is faster to do this in the index.xml file by copying the <matlib></matlib> tag for each item.
![Creating Libraries-image2015-5-29 11:33:23.png]()
 ) and either type the macro name manually or click on
  and a list will open. Double click on UNKEMPT_LAWNS_RENDERER to insert the macro into the material library path.
In this example we are replacing the material on the object with another of the same name from a material library. It is also possible to assign a completely different material from a material library. To do this in the Item Settings click on  and pick a new material from the library. This will add a new line to the XML, for example:
<material>_fp_presets_tutorial</material>
Using Maxscript to detect the current renderer
For a more advanced setup it is also possible to extend the library using maxscript functions. For example, you may want to add the ability to automatically detect the active renderer instead of selecting it manually. To set this up:
- Create a new Maxscript (.ms) file in the same directory as the index.xml file. For this tutorial we have included a maxscript file called tutorialLibraryFunctions.ms which you are free to re-use . This tutorial isn't intended to teach maxscript, but even so the function we need is easy to understand:
This creates a new function called getRender. It uses classof renderers.current to return the active renderer and assign it to a variable called renderClass. The function then uses a series of if-else conditional statements to test renderClass against a list of renderers and return a string value if it tests true. You should notice the renderer name being returned is the same as shown in our table earlier and also the same values as used already in the drop down list and in the matlib file names. If you are not supporting a particular renderer it can be removed from the function and likewise additional renderers can easily be added using the same format.
fn getRenderer = (

    local renderClass = (classof renderers.current);

    if ((renderClass == VRay) or (renderClass == VRayRT)) then

        "vray"

    else if ((renderClass == mental_ray_renderer) or (renderClass == iray_Renderer)) then

        "mental"

    else if (renderClass == Octane3dsmax) then

        "octane"

    else if (renderClass == Thea_Render) then

        "thea"

    else if (renderClass == CoronaRenderer) then

        "corona"

    else

        "standard"

)
- Next we need add a new automatic option to the dropdown material selector. To do this open the index.xml file and add a new option inside the existing <select></select> tags. For the automatic selector to appear at the top of the list, make sure it is the first option. Add the following:
<option value="@tutorialLibraryFunctions.ms:getRenderer()">Automatic Selector</option>
When this option is selected, instead of the value being a string, it is injecting a macro that will call a maxscript file and function. Note that the name of the maxscript file is preceded by an @ symbol and it is separated from the name of the function by a colon (:). - To test this works, change the renderer to Mental Ray and import an object from the unkempt lawns library using the new materials > automatic setting. If you drag the material from the geometry rollout to the Material Editor you should see that the material uses Arch and Design materials. Then switch the renderer to V-Ray and import the same object - you should now have V-Ray Materials!
Location of the .ms file
When a maxscript file is called by the library browser it will search through all valid folders within the library path. We recommend saving Maxscript files either in the same location as index.xml or if you plan to re-use the same functions for multiple libraries in the root directory.
Managing Maps
The remapping of bitmap paths is not handled automatically by the Library Browser. To ensure that maps are located correctly you will need to add the maps directory to the users paths manually. To do this:
- In 3ds Max, go to Customize->Configure User Paths->External Files
- Click
![Creating Libraries-image2015-5-27 16:38:29.png]() and locate the maps folder then click
and locate the maps folder then click ![Creating Libraries-image2015-5-27 16:39:56.png]() to add the location.
to add the location. - The directory will now be used to search for missing map files. In our own libraries we strip the paths before saving the material.
 and locate the maps folder then click
  to add the location.
If you have a large number of libraries it may be simpler to simply copy all of the maps to single central folder and add this to the user paths instead of adding a maps folder for each library.
In the next section we'll look at how this process can be automated using maxscript.
Running Maxscript functions
To add additional functionality to the library browser we have included the ability to run a maxscript function when either the library is opened or an object is imported. To do this you need two things. Firstly an .ms file containing the functions, as before this should be saved in the same location as index.xml or the root directory if you'd like multiple libraries to access the file. Secondly you should add a line to the XML to tell it which .ms file to load plus the function's name. The basic format for this is
<maxscript file="filename.ms" script='functionName();' execute_on="item_select"/> -- (Execute_on can also = "lib_open")
Where filename.ms is the name of the maxscript file, functionName() is the name of the function saved in the maxscript file, and lib_open or item_select is when the script should be executed.
To demonstrate this, we will add a code snippet that adds the maps folder path for the current library to the User Paths automatically. This is useful if you are distributing libraries as it will prevent users from having to add these paths manually. This function can be found in the tutorialLibraryFunctions.ms file we used earlier and is included in this download. The function is called addMapDirectory and is as follows:
fn addMapDirectory LibraryMapPath =
(
 local pathExists = false

 for i = 1 to mapPaths.count() do

 (

  if mapPaths.get(i) == LibraryMapPath then pathExists = true

 )

 if (pathExists == false) then

     (

         if queryBox "This library's maps folder should be added to Customize->Configure User Paths->External Files.\n\nClick YES to add it automatically\nClick NO if you prefer to configure the map path manually." title:"Add Maps Path?" beep:true then (

         mapPaths.add LibraryMapPath

        )

     )

     LibraryMapPath

)
Without going into detail, this checks to see if the directory contained in the variable LibraryMapPath is already present in the User Paths. If it is missing a dialog will appear asking the user if they'd like to add it automatically. Let's add this to the library:
- Open index.xml, and add the following line after the first <library> tag
<maxscript file="tutorialLibraryFunctions.ms" script='addMapDirectory("$(LIBFULLPATH)\maps");' execute_on="item_select"/>
- This is pretty self explanatory, except perhaps for "addMapDirectory("$(LIBFULLPATH)\maps");". In this case $(LIBFULLPATH) is calling a forest pack global macro that returns the full path of the current library. There are a few of these that you can use including libfullpath, libname. libparentname. and librootpath.
- Save the XML file and go back to max to test the library. When you load in an object now you should get a dialog asking if you want to add the maps path. Click yes and then to test it has worked open Customize > Configure User Paths > External Files. You should see the maps path added as the final entry
![Creating Libraries-image2015-5-28 16:1:29.png]()

This is just one example, any maxscript can be triggered by the library including multiple functions.
That completes this library. If you want to distribute it, just .zip the folder and it's ready to go.
Installing Libraries
Now that this library is complete here's how to install it on another machine. This is very straightforward as it is only necessary for the user to add the library's path to their browser preferences. In fact it is the same technique as we used at the beginning of this tutorial to add a new folder location. If you're sharing your library, these are the kind of instructions you could distribute with your library files:
- Unzip the library (if it's archived) and note the installation path, make sure that the original directory structure is retained.
- Open Forest Pack's library browser and go to File > Preferences… or click
![Creating Libraries-image2015-5-28 18:3:29.png]() from the top toolbar.
from the top toolbar. - The Library Paths rollout shows a list of locations Forest Pack or RailClone will search in for valid libraries. We'll add a new library so click on the Add button.
![Creating Libraries-library_add_paths.gif]()
- In the Add New Library Path window, navigate to the location of the downloaded or networked library.
- In the Label field enter the name to display in the tree navigator.
![Creating Libraries-image2015-5-26 11:11:2.png]()
- Click
![Creating Libraries-image2015-5-26 11:11:25.png]() to add the location to the library.
to add the location to the library. - Click OK and you should now see the new location displayed in the tree navigator on the left hand side of the library browser.
![Creating Libraries-image2015-5-26 11:12:6.png]()
Conclusion
The final library created during this tutorial follows the good practice guidelines we recommend for well formed libraries that can be easily redistributed. In addition the thumbnails folder and index.xml file, the final structure includes a maxscript file for any additional functions and separate folders for objects, maps, and material libraries:
We've also looked at adding support for multiple renderers and how to add the libraries maps folder automatically to the Users Paths. Though we've only focused on a single library in this instance, multiple libraries can be included in the same location to make it easy to organise your content into logical catergories.
Finally, If you are a Evermotion, XFrog or HQPlants customer then there's no need to go through this process. For each of these vendors we have a catalogue installer that can be downloaded from our site that will automatically add all the correct files for you. To find out how this works please see the Installing HQ Plants catalogue tutorial and the additional install notes for XFrog Plants.
For more information about the features demonstrated in this tutorial, check out our reference section or visit the tutorials page for more Tips & Tricks videos and in-depth tutorials.