Resources
Requirements
- info RailClone Pro, Forest Pack Pro


Introduction
When we develop new features or make improvements to our plugins, we take into consideration what people are currently using them for - and then try to make it a little bit easier. A good example of this is roofs. We have noticed that a lot of people are using RailClone to distribute slates and tiles. This makes sense, creating roofs can be a tedious process, poly counts can creep up, and architects often ask for many many changes. A parametric solution is therefore ideal. In RailClone 2 the process involved using clipping splines that are automatically filled with roof tiles. Due to the way RailClone 2 worked you needed one RailClone object for each roof plane. This worked well, but it could have worked better, so in RailClone 3 we added a couple of extra features to make creating roofs, and in fact any other object that can be distributed using closed splines, even easier. Let's start this tutorial by taking a look at these new options.
The techniques for creating roof tiles work can be used with the free Lite version of RailClone so if you’re not yet a RailClone user then here’s a great excuse to take if for a spin.
Clipping Spline Principles
As always, it's best to explore the principles first so that we can easily adapt techniques for different applications. To illustrate this we'll create a roof style from scratch, later on we'll use presets. Along the way we'll learn about RailClone 3's new Clipping Hierarchy and Alignment modes.
If you'd like to follow along with the tutorial open the file from the downloads called roofExercise1.max.
Principle 1 - using closed splines.
RailClone needs to know the size of each roof plane in order to build the array. Additionally, the roof planes are probably not perfect rectangles, so we need to cut the array to fit. Both these operations can be driven by a single closed spline object. These are easy to create either by drawing them manually or extracting them from base geometry. Here's how to do the latter:
- Convert your base geometry to an Editable Poly object if it isn't already. We're going to use a feature of the graphite modelling toolset which only works with this geometry type.
- Go into Polygon sub-object mode.
- Turn on Selection > By Angle and lower the threshold a bit. This will make it easier to select complete planar areas.
- Turn on Ignore Backfacing so that you don't accidentally pick polys from the other side of the object. With these options selected, pick a roof plane.
- For a selection like this that doesn't have any inside edges, hold down control and click on the Edge sub-object level to convert the polygon selection to edges. If the selection does has internal edges you can use the Graphite Modelling tools to select just the border. To do this go to Modify Selection and hold down Shift while clicking Outline.
![Creating Roofs with RailClone-image2017-11-10_13-28-46.png]()
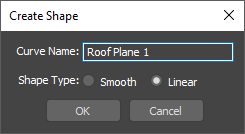
- Go back to the Modify panel and click Create Shape from Selection. Change the Shape Type to Linear, and click OK. You now have a spline that's ready to use with RailClone.
![Creating Roofs with RailClone-image2017-11-10_15-4-47.png]()
- Repeat this for all the faces of the roof. When you're done, Attach the splines together. One of the big improvements in RailClone 3 is that it's now possible to add tiles to the entire roof using just one RailClone object.

Principle 2 - Clipping Splines
Now we have some splines we're ready to create the RailClone style itself. Before we add tile geometry, we'll create a basic style using a marker that has one arrow that points down the roof, and another that is should be perpendicular to the roof plane.
- Create a new RailClone Object.
- Open the Style Editor by clicking on the
![Creating Roofs with RailClone-image2017-11-10_15-10-4.png]() button in the Style rollout.
button in the Style rollout. - Create a new A2S generator. This is used to create a 2 dimensional array.
- Add a new Segment node. This is used to import geometry into the style. On the Properties panel click the geometry picker button and select the arrow object from the scene.
- Wire the Segment to the Default input.
- Now we need to define the size of the array. To do this, create a new Spline node and wire it to the Clipping Spline input.
- From the the Spline node's Properties, pick a spline from the scene. For now we'll use something simple like a rectangle.
- Nothing will appear because at the moment RailClone is expecting to use this spline only for a boolean clipping operation. We need to tell RailClone to use it to define the size of the array as well. To do this, select the generator and go to the Properties panel. Turn on Extend X/Y Size to Area and the array is created to automatically fill the spline. At the perimeters the segments are clipped if they extend past the edges.
- This appears to be working well, but if we rotate the spline 45 degrees so that it more closely resembles the pitch of a roof there's an issue. The segments don't follow the plane defined by the spline. To resolve this we'll take a look at Alignment Modes.
 button in the Style rollout.
Principle 3 - Auto-Align modes
Alignment modes are a new feature of RailClone 3 that allows you to automatically rotate the array to match the spline. Behind the scenes it's using the vertex positions to calculate a plane, and then rotating the array to match. With Auto-Aligndisabled you get RailClone 2 behaviour, in which the orientation of the array is determined by the angle of the RailClone objects itself. As mentioned before, in this mode we needed one RailClone obect for each roof plane. In RailClone 3 there are in fact two auto-align modes, the difference is how the array is rotated around the Z axis.
- To Spline mode allows you to change the orientation of the array based on the first vertex in the spline. Basically it is finding the vector between the 1st and second vertices and aligning the array's X axis to this. If we apply the array to a hexagonal spline for example we have 8 possible rotation angles, simply by changing the first vertex. When you rotate the spline in this mode the array moves with it.
- X → XY mode always makes sure that the x axis of the array is parralel to the x/y world axis, irrespective of the vertex number. This can save time because you don't need to change the vertex numbering for things like roofs where the rows will typically always run parallel to the ground plane. No matter how you rotate the spline or change the vertex numbering the rows always remain parralel to the ground.
Principle 4 - Hierarchy modes
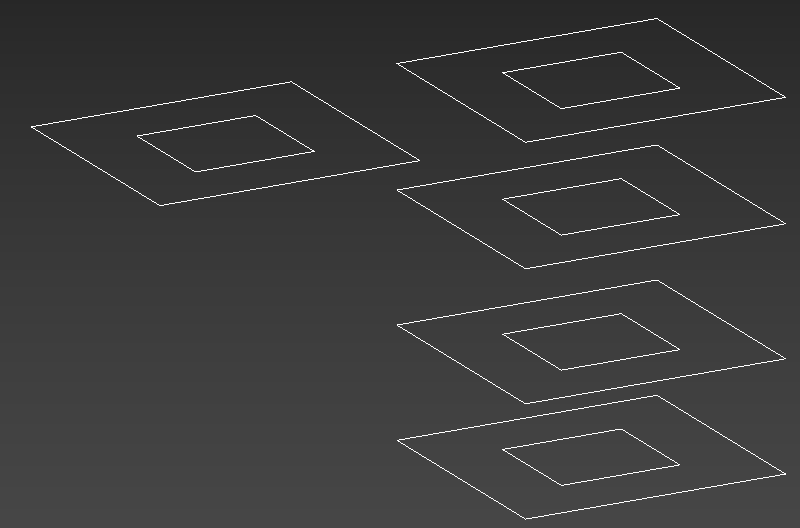
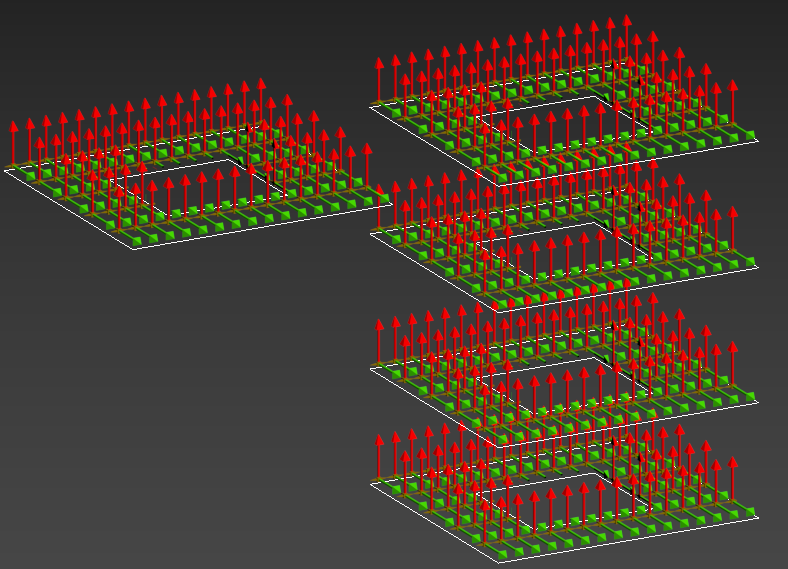
The other new clipping feature of RailClone 3 allows you to choose from one of three Hierarchy Modes. These are used to determine behaviour when a spline object contains more than 1 sub-spline. In this example we'll use an object that contains splines that are both inside one another, and stacked up, like this:
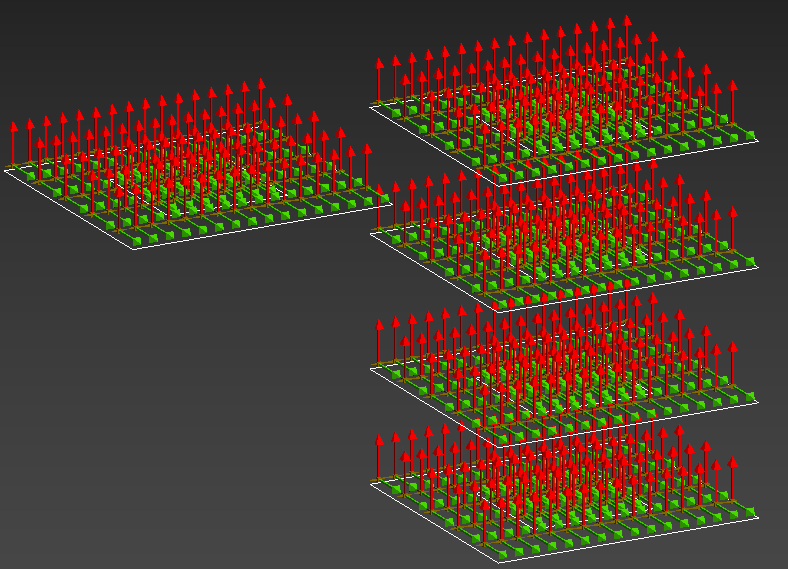
When Hierachy Checking mode is set to None each individual spline generates a unique array. Their position in relation to one another is completely ignored. Although that's not helpful in this case, it's a great mode for adding things like windows and doors to a large building where each spline should generate an individual array.
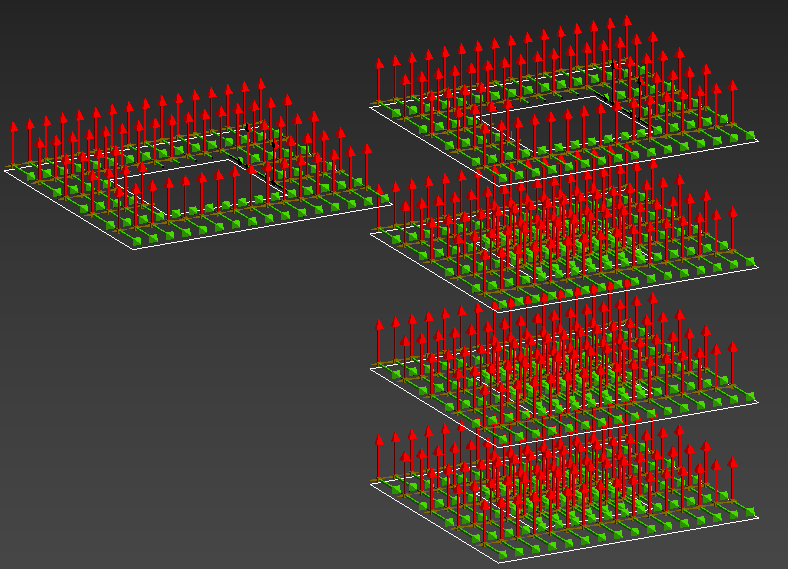
When Hierachy Checkingmode is set to Complete, RailClone will look for splines that are inside one another. It alternates between additive and subtractive operations from the outside in, so the first spline creates an array, a spline inside that clips the geometry, a spline inside that adds geometry back, and so on. As you can see this works well for the topmost splines, but where they are stacked it can't work out which splines belong to which plane. To resolve that we can give RailClone a helping hand using material IDs
To tell RailClone which splines belong together, just select them at the sub-object level and group them by assigning the same Material ID. This is particularly true also of facades where you will also often have splines that overlap if you look at them from the side views.
Once you've assigned your IDs, Hierachy Checking mode is set to By Material ID which uses a version of the complete hierachy mode but this time each group of splines identified with the same material ID is calculated independently, resolving any possible clashes.
There's one final consideration before we build the rest of the style.
Principle 5- Spline Direction is important
An array is built from left to right, following the direction of the spline, consequently the vertex numbering will determine which way the array considers to be "up". For example, the vertex numbering of a flat spline seen from the top view can increase either clockwise or ant-clockwise depending on the spline direction. When you create splines by extracting them from meshes, the chances are you'll get a mixture of clockwise and anticlockwise splines. To fix this you'll need to edit them. To check the roof spline we created earlier we can apply our arrow style and immediately we can see that a couple of the roof planes are facing the wrong way.

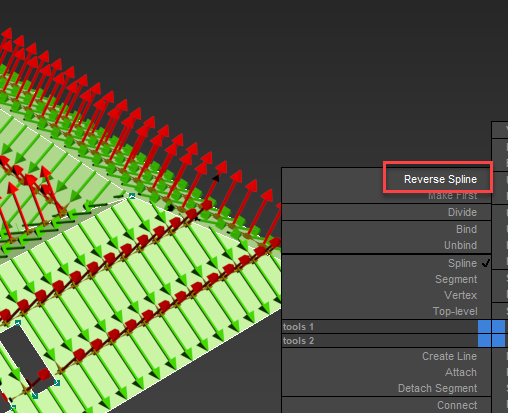
To fix this, select the offending sub-splines and click Reverse from the Geometry rollout or from the Right-Click menu.
Adding the tiles
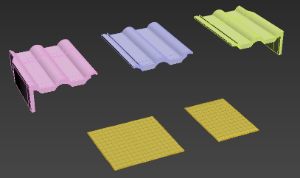
Now that we've got the basics down, we can finish this style by adding the tiles. Let's switch the spline back to the basic square while we create this so we can display the full geometry while keeping updates fast. Depending on the type of roof you're creating, you'll need a couple of different segments. Usually that's just a single tile for the default input, and optionally some verges to go on the left and right of the array. For slate roofs you may need a tile that is one and half times the width of the default tile in order to create alternately offset rows.
To create the roof using these segments:
- Go back to the style editor. Select the segment wired to the Default input and pick the standard tile (not an end)from the scene.
- Set the Generator's Default Segment Mode to Adaptive. This will prevent the final tile from being sliced and subtly scale all the others to fit.
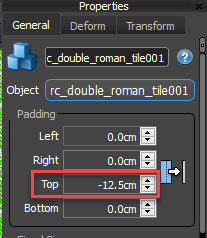
- The tiles are butted up against one another, add an overlap by decreasing the Segment's Top Padding value.
![Creating Roofs with RailClone-image2017-11-10_17-55-29.png]()
- The tile geometry's pivot should be set to the bottom of the tile for all of the segments. This will allows us to ignore the different height of the verges.
- To use this pivot in RailClone, select the segment and change Alignment > Z to Pivot.
- Now go to the Transform tab and adjust the Y Rotation until the tiles sit on top of one another correctly.
![Creating Roofs with RailClone-image2017-11-10_18-8-25.png]()
- Close up the gap between the tiles by adjusting the Segment's Right Padding. Now we can add verges. If you don't need verges then you're done!
- Clone the existing segment twice. Wire one to the Left input and one to the Right input.
- Pick geometry for the two sides. The Padding for the left segment is probably already correct, but adjust it if not. For the Right segment you'll need to set the Right Padding back to zero, and adjust the Left Padding instead if necessary to get the correct overlap.
- Finally, if the verges are a lot larger than the default tiles on the Z axis, it may cause them to get slightly out of alignment. This happens because the bounding box changes as they're rotated. To fix this, just adjust the Y Translation property of the Default segment.
That's pretty much it. Slates use the same process except that there's no need to add left or right Padding to overlap the tiles on the X axis. If you need to offset the rows of your slates however, you'll need to set up the sides slightly differently.
- You'll need two segments: One a standard slate width, the other is a slate and a half.
- Wire the standard slate to the Default input as normal.
- To create the sides, wire a Sequence operator to the Left and the Right inputs. Set the mode to Increment on Y. This allows us to create a repeating pattern on the Y axis.
- Wire the Standard Slate segment to the Sequence operators first input.
- Wire the Tile and a Half segment to the Sequence operator's second input. You've now created a slate pattern.
- If you'd like to randomise the Slates slightly just go into the Segment's Transform tab, enable and add some small values to the Random > Rotation and Random > Translation parameters.
Creating materials
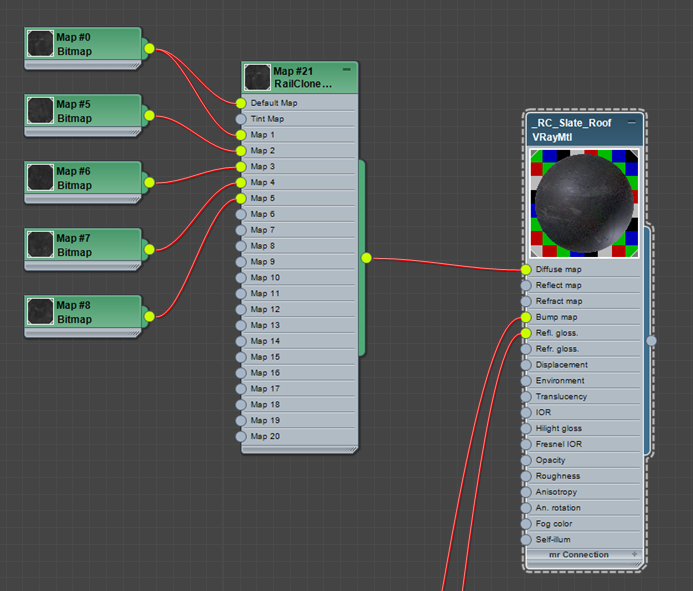
RailClone colour can be used to add another level of randomisation. Let's take a look at our slate example. We have 5 slate maps that we'd like to randomise. In previous versions of RailClone you'd have needed to use the Material node to randomise material IDs to achieve this. In RailClone 3 however you can just attach your images to a RailClone Color map. Each individual segment will be randomly assigned one of the textures.
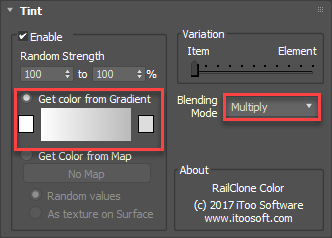
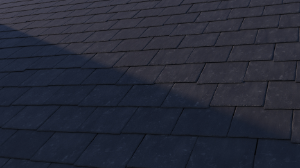
For more variation you can use RailClone Colors Tint options. In this example I've used a simple grayscale gradient and set the mode to Multiply. This will randomly adjust the lightness of each tile.
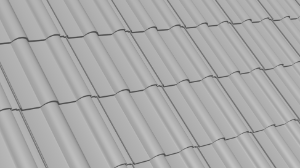
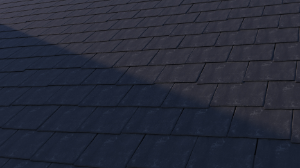
Below you can see the same roof before and after RailClone Colour was applied.
Creating Ridges
A roof consists of more than just tiles. To finish up we need to add a ridge. Once again we need to create a spline to define the path of the ridge, and the easiest way to do this is just to draw it using the Spline tool, snapping to either our existing splines or the roof geometry. Once that's done we can create a new ridge style by following these steps.
- Create a new RailClone object.
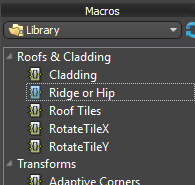
- Instead of building this style from scratch we can use one of the many built in Macros that help you to create common styles very quickly. You'll notice in the Roofs and Cladding category there's already one specifically for this purpose. Drag it to the construction view.
![Creating Roofs with RailClone-image2017-11-10_19-1-38.png]()
- It should now be a simple case of attaching the inputs. So we can start with a new Spline node and attach this to the Spline input. Pick a spline from the scene.
- Create 3 new Segments and use them to import the ridge start, mid and end geometry into the style.
- Attach them to the relevant inputs in the Macro.
- Finally, you'll notice on the macro that there's an input called AttachNull. Any time you see this in macro it's asking you to create an empty segment and wire it to this socket. It's being used inside the macro to create some spacing effects.
- the style is complete and you can add it to the ridge spline.
- The macro has several adjustable parameters, for example we can edit the Z offset so that it sits better on our slate roof.
- We can also edit the Padding to close the gap up between the tiles.
- Finally, if necessary you can adjust the bevel position and use Extend Ends to push the start and end away from the spline slightly. This will allow it to overlap the verges.
That's the principles covered, and it seemed to take a little while to explain. But let's see now how fast this is in practice, especially when using the built in presets.
Putting it into Practice
Creating the Splines for the roof
Open the file called rc_roof_tutorial_start.max. This scene contains a small building in a simple environment. We need to add some tiles to this roof.
In this example the roof is bit bigger, so to speed things up a bit we can use a simple script to extract the splines. It's available in the downloads for this tutorial, and essentially it's automating the procedures we saw earlier by converting a poly selection to an edge selection, creating a spline from that, and grouping them using a material ID. To use it.
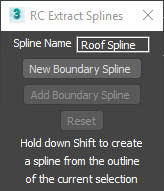
- Run the script by going to Scripting > Run Script and selecting RC_CreateBoundarySplines.ms.
![Creating Roofs with RailClone-image2017-11-10_19-11-43.png]()
- Enter a name for the new spline and hit return.
- Pick your first roof plane and click on the New Boundary Spline button while holding down shift.
- Do the same thing for all the other roof planes. Holding down shift is the equivalent of using the Graphite tools that we looked at earlier. If you choose not to hold down shift you will create one closed spline per polygon.
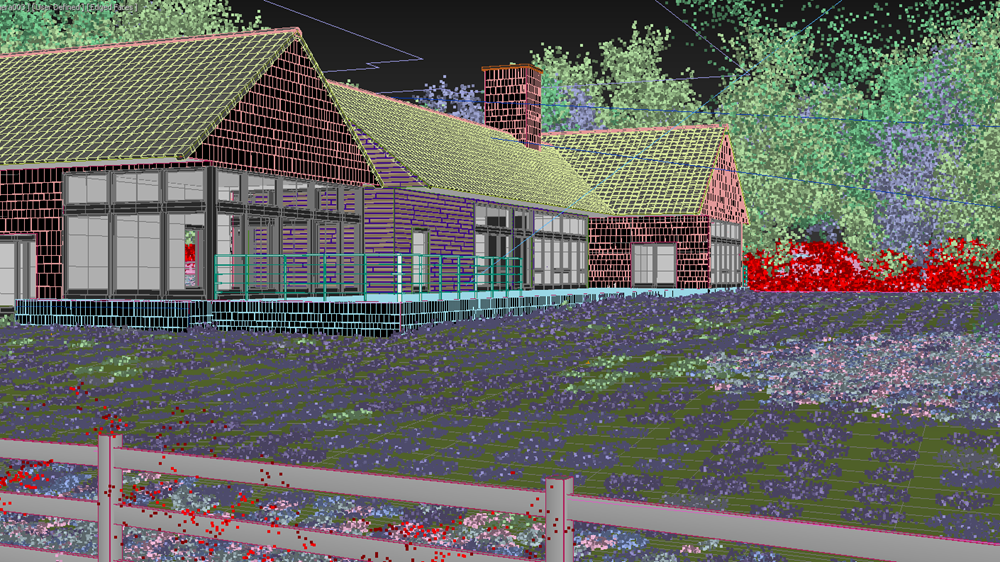
- Once that's done we have the splines we need, but still need to check to see if any need to be reversed.
- Pick the object name _rc_arrow and apply it to the new spline. This already contains a simple arrow RailClone style similar to the one we saw in the previous example. I find it just makes things a bit easier to visualise.
- There are quite a few that need reversing, so select them and use Max's Reverse Spline tool to fix the issue.
- Now we can go to the Style rollout and click on the Library button. Navigate to the Exterior > Roofing > Tileslibrary and pick a roof style.
- Click Import Selected and the roof style is loaded and replaces the arrows. That's the tiles done. Easy wasn't it?
- If necessary you might want to just adjust the splines a little bit to make sure that the verges overhang the end of the roof.
- You can also choose which material to use. The built in styles have nearly 30 to choose from. In the renders for this scene I've chosen use material 18.
With that done, let's add the hips.
- This time we'll hand draw the splines. Disable Start New Spline, otherwise just attach them together afterwards. It's easier if you make sure to always start from the same end draw your ridge paths, for example the start of the spline could always be the bottom part of the hips. Create separate splines for the hips and ridges so that you can control them separately.
- Create a new RailClone object and pick a ridge style from the gallery. Pick one of the splines you just created.
- You can now adjust the ridge using the built in Parameters. Adjust the Z offset to pull the ridge towards the tiles. You can also change whether the start and ends of the ridges are capped or bevelled. I'm also going to pick material 18 to match the tiles. If you wanted you could pick something that contrasts instead.
- Finally, clone this style to create the hips. Assign the new object to the hips spline and change the start and end to bevelled.
It's not just for roofs!
That's the tutorial more or less done, but it's important to note that these techniques aren't restricted just to roofs. They're useful for any situation where you need to cover a large planar area. In this scene, we could use the same technique for all the cladding and the same procedures would apply.
- First of all you need splines. I've already used the script to create one closed spline for each part of the facade.
- Then create a new RailClone object and open the library. There are a few cladding styles built in that we can use. There are also macros if you'd like a shortcut to making your own.
- Go to the Base objects rollout and assign the spline to the clipping parameter.
- Thats all there is to it. The cladding is applied to the whole building. All you need to do now is adjust the parameters, pick your material and hit render!

These new clipping options are a great way to create styles that can quickly and easily populate multiple large flat areas with geometry. We've looked at roofs and cladding, but there are myriad other posibilities. Best of all, thisworks with the free Lite version of RailClone, so there's no excuse not to give it a go. And iIf you use these tutorial files, or the techniques shown in this tutoral, we'd love to see them on our forum. Otherwise, stay tuned for our next tips and tricks installment and check out our other videos in the tutorials section of the website.