Tutorials
Learn new skills with our bite sized lessons
Resources
Featured Products
Get ProductsVideo Transcript
In our last tutorial we took a systematic, but largely abstract, look at all of the Operators in RailClone. In this instalment, we're going to take that theory and apply it to our building in order to add some Sequences, Randomization, and to Group geometry together to create a more sophisticated facade style.
We'll start with the main part of the building, which is currently quite simple with just one style of geometry used.
First of all though, let's fix the pillars, which you will see have a couple of issues where some appear to be double the width of the ones above and below. These pillars are in fact a corner on a straight section of the spline, and this is why there's an issue because bevelled Corners work in RailClone by putting a whole segment on either side of the vertex. To fix this:
- Add a Segment node and pick a half-width pillar from the scene. Wire a new Conditional node into the Corner input.
- Wire, the original corner into the False input and the new corner, the half-sized one, into the True input.
- Turn off Check Wide Angles and set the value to 110. This means any angle that's greater than 110 degrees will get the smallest segment and the standard 90-degree angles we'll get the normal-sized one.
![]()
With that fixed, we can change the window geometry to add new segments that include balconies.
- Duplicate an existing segment and pick the balcony geometry from the scene.
- Wire it to a new Sequence operator.
- You will now have a repeating pattern that works really well, but what if you want to randomize the types of balconies? To do this, clone a segment and pick this alternate balcony geometry from the scene.
- Wire this to a new Randomize operator, placed before the Sequence. You'll now have two types of randomised balconies.
- Let's do the same for the normal windows, Add three new Segments and pick the window geometry from the scene.
- Wire them to a Randomize operator.
- Now you will be randomizing the balconies and the normal windows sections.
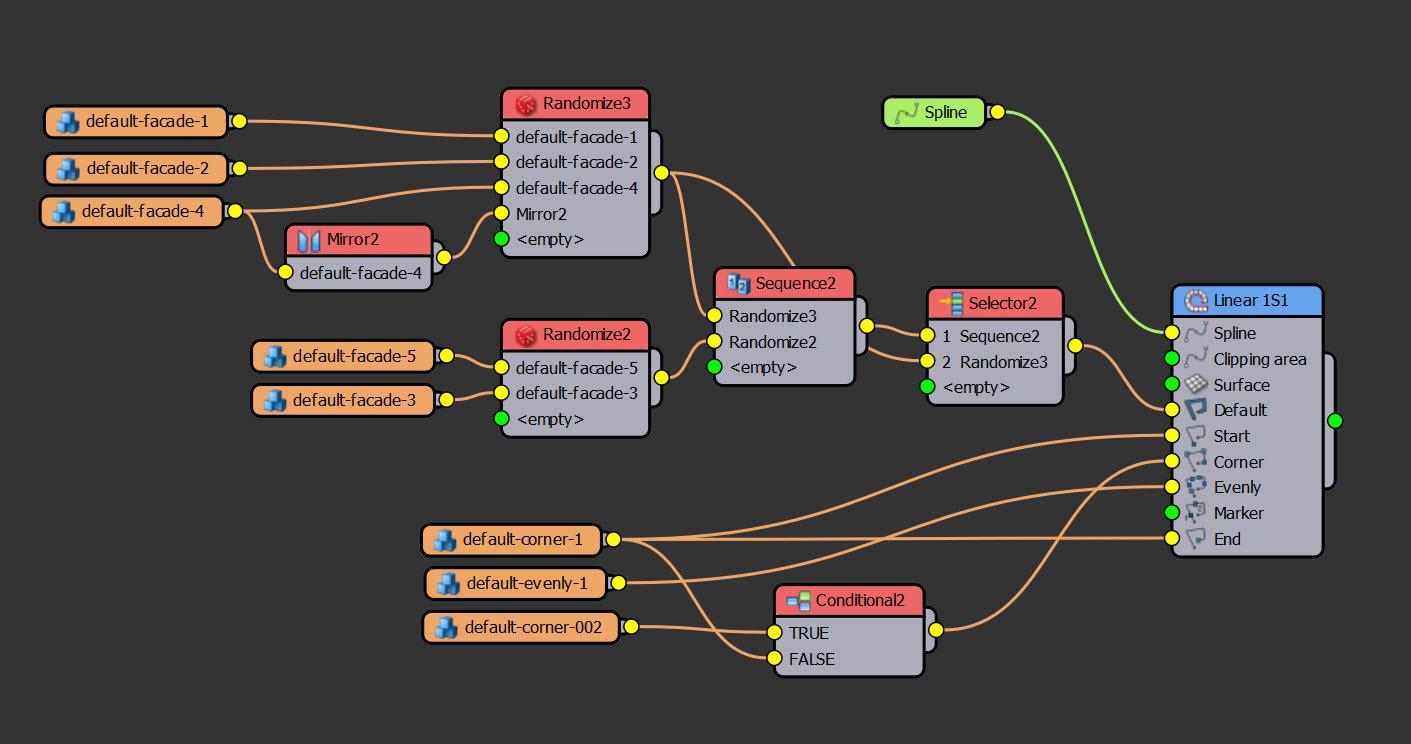
Let's say we want to remove the balcony sections from a part of the building you can do that using material IDs in the following way.
- Select the Base spline, go to the Segments sub-object and change the material ID to 2.
- Go back into the RailClone graph add a Selector operator between the sequence node and the Default input.
- Change the mode to X Spline Material ID.
![]()
- Wire just the normal facade sections into the second input.
- You'll have the balconies on material ID 1 and only the basic geometry on material ID 2.
Next up, we're going to switch our attention to the style used for the ground floor and use the Compose operator to combine and randomise several segments to create the shopfronts. In the scene, the pieces have already been prepared and the pivots have been arranged so that when they're aligned, everything snaps together like a jigsaw.
Here's how to add them to the existing style.
- This graph was created a couple of episodes back by adapting a built-in preset. Let's update it by deleting the existing Compose operators and swapping the Default, Corner and Evenly geometry for the new ones found in the scene.
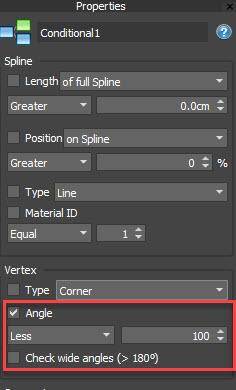
- The same as the floors above, there's an issue with double-sized corners on a straight spline section. We can fix them in the same way. The first thing we'll tackle is the corner, which is exactly the same as the floors we did above, I just need to clone it.
- Clone a segment and pick the half-size pillar geometry from the scene.
- Wire a Conditional node to the Corner input.
- Connect the original corner into the False input and the new corner into the True input.
- Turn on Angle and change the settings to test if the corner is greater than 110 degrees with Check Wide Angles turned Off.
![]()
You are now able to target those vertices that are on a straight section of path versus the ones that are on an actual corner. It's quite a handy technique.
With that done, we can start to add several layers of randomization to this style.
- Add a Compose operator, to the Evenly input.
- Right-click on an existing segment and then choose Clone Multiple. Pick all the bracket signs from the scene. and import them. This is a quick way of importing multiple segments.
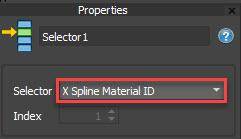
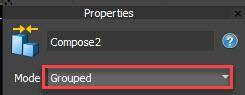
- Wire all the new Segments to a new Randomize operator wired to the second input of the Compose operator. Each pillar will now get a randomised sign, but at the moment it's next to the pillar rather than in the centre. That's because the compose operator is in Sequence mode. If we change it to Group mode, it uses the geometry's original pivot points to align the pieces.
![]()
- This fixes the position of the signs, but the whole composed segment is no longer aligned correctly to the spline. When you use a Compose operator in Group mode, it basically resets the alignment settings to the Auto modes.
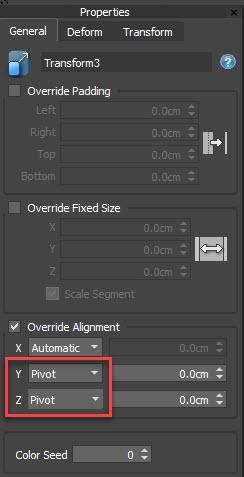
- This can be easily fixed by adding a Transform operator after the compose node. Then turn on Override Alignment, and then change the Y and Z axis back to Pivot.
![]()
Now that we've randomized our pillars let's start with the windows.
- I've got two types of shopfront which include a flat area to accommodate the shop names. Import them into the graph and wire them to a Randomize node.
- I've also got a full-height glass section, which I want to randomize as well.
- To do this add a second Randomize node and wire the existing randomise node to its first input and the fully glazed segment to its second input.
Now we can add shop names and canopies to these segments. To do that:
- Take the existing shopfronts, wire them to a Compose operator and change the mode to Grouped.
- Import all the shop signs.
- Wire them to a Randomize operator.
- Wire the Randomise operator to the Compose node to jigsaw them together. So now you can see, anywhere where there's one of the shopfronts that has space for a sign, will have a sign.
- Next, we'll add the canopies. So once again, we'll select Clone Multiple and import canopies. Wire them to another new Randomize operator and then wire them to the Compose node.
- You'll notice that the alignment to the path has changed again. Just like you did with the pillars, you can fix it by adding a Transform node, turning on Override Alignment and changing the Y and Z axis to Pivot.
- All of the shop fronts now have canopies. To randomly remove canopies from some shops, add a new Segment but don't pick any geometry. We call these Null segments. Connect this to the Randomize node used for the Canopies.
You can also control where you want canopies using Materials IDs. To do that:
- Go to the Base Spline and change the material ID to 2 where you want to remove canopies.
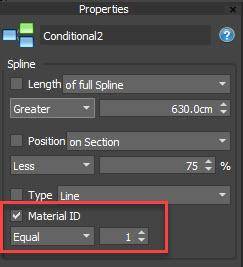
- In the graph add a Conditional node after the Canopies Randomize note.
- Wire the existing Null segment to the False input.
- Change the options to test if the Material ID is equal to 1. When this tests true, RailClone will pick the random node; and when it's false, it will pick the null segment.
![]()
So far. So good. But what about if you want to put some interiors into these shops so that we can see something through the glass. In order to do that, we'll import some simple interior geometry into RailClone.
- Wire both interiors to a a Randomize node.
- Wire the Randomize node to the the existing Compose operator.
- To do the same thing for the fully glazed segments, first wire a Compose modifier after its Segment node.
- Change the mode to Group
- Wire the interiors to the Compose operator.
You will now have shopfronts with a room behind them, which finishes our style!
In this tutorial, we used Compose Sequence, Randomize, Conditional and Mirror operators to create two different types of building style. These styles required a spline for each floor, but in the next video, we'll look at how to use a 2D array so that you can create a whole building using only a single path to define the footprint.
Make sure you don't miss it by subscribing to our YouTube channel