- Inicio
- Tutoriales
- Tips for Mastering Large Scale Environments
Requerimientos
- info Forest Pack Pro or Lite, RailClone Pro or Lite, Any Compatible Renderer

The scene and renders used in this tutorial were provided by Zagreb-based Polymachine, who created the project as a test-bed for their no-post pipeline. All the assets in the scene are modelled and textured with such detail that they could be used for a close-up render despite ending up hundreds or thousands of metres from the camera in the final shot. The aim is to produce an image that’s ready-to-go straight from the frame buffer, with little or no post-production.
Creating high quality assets permits Polymachine tremendous freedom to experiment, without having to worry that their models and textures won’t be able to stand up to their design decisions. Of course, it can also present problems. Scenes on this scale containing hundreds of thousands of detailed assets can put a burden on your renderer, and working with billions of polygons in the viewport in a way that enables fast iteration is nearly impossible.
Enter, Forest Pack and RailClone which both specialise in instancing almost limitless geometry while maintaining a fully procedural workflow. Forest Pack allows users to scatter hundreds of thousands of objects, each with millions of polygons, while a point-cloud display mode and several optimisation features keep the viewports fast. RailClone shares Forest Pack’s instancing capability but uses parametric arrays instead of scattering algorithms to distribute, manipulate and deform geometry.
In the following article we’ll share 15 tips based on this scene for anyone planning to create their own large scale environments.
Tip 1 Poly-modelling is often the quickest way to block out terrain
This lakeside scene wasn’t based on a real world location, so Polymachine had the luxury of designing the terrain as well as everything else. As they were aiming for a wide angle composition, the landscape is probably the biggest contributor to the overall balance of the image, so it’s a good place to start.
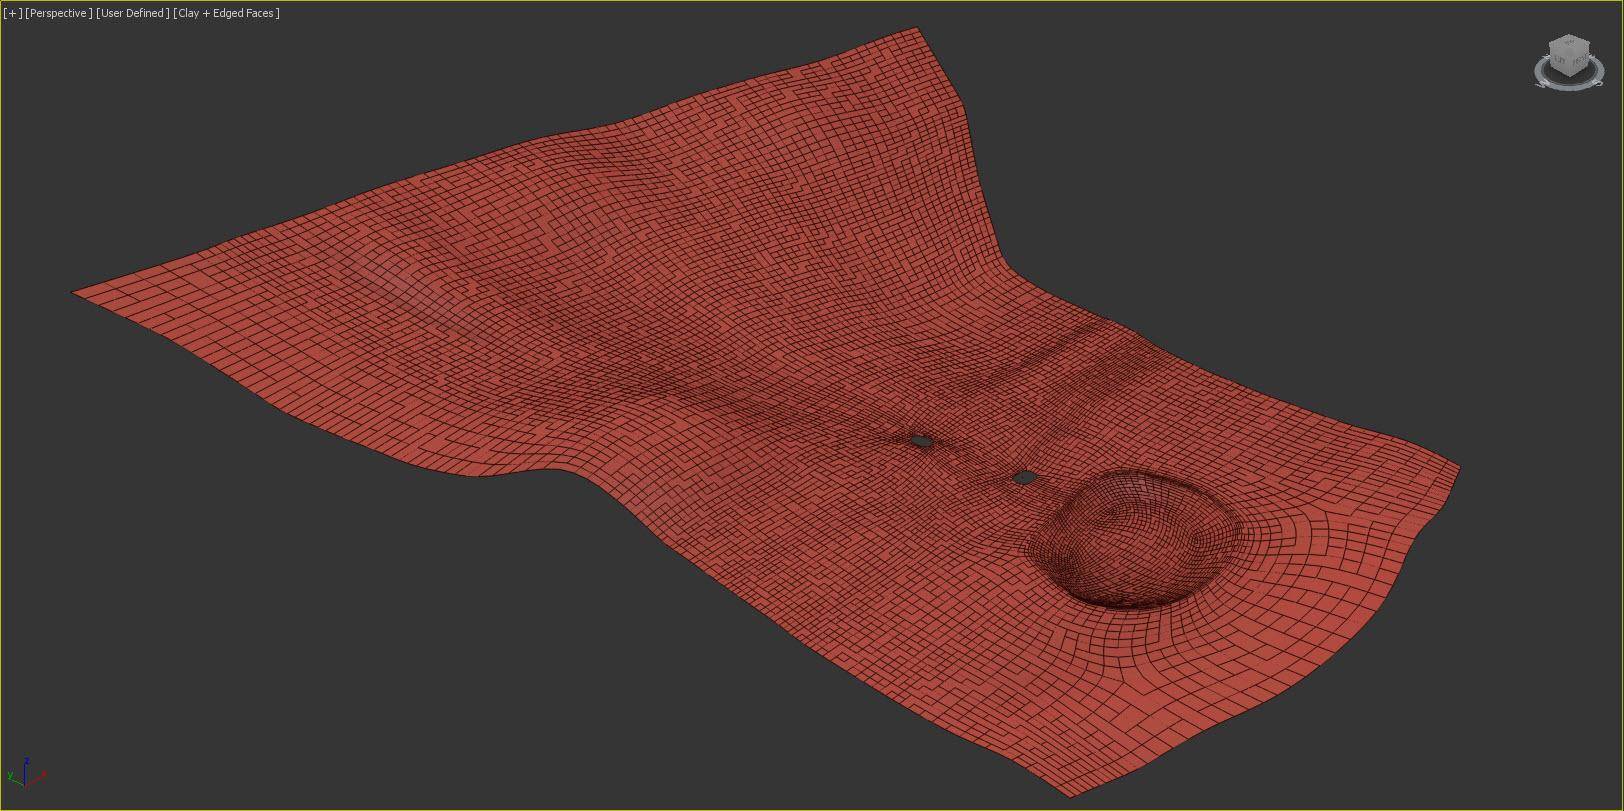
There are many excellent dedicated landscape modelling applications on the market, but for speed sometimes nothing can beat poly-modelling in 3ds Max. At this early stage, try to create the landscape in a way that encourages experimentation by maintaining good edge flow, using as few edges as possible to define the basic shapes and only then adding a Turbosmooth or OpenSubDiv modifier to smooth it out and add refinements.
Tip 2 Use placeholder geometry to decide on compositions
Once you have the terrain roughed out, add placeholder geometry for the major elements to help work out which camera angles you plan to use. They don’t have to be exact at this point, but a general idea of the direction from which you will be rendering will allow you to model and lay out the scene more efficiently.
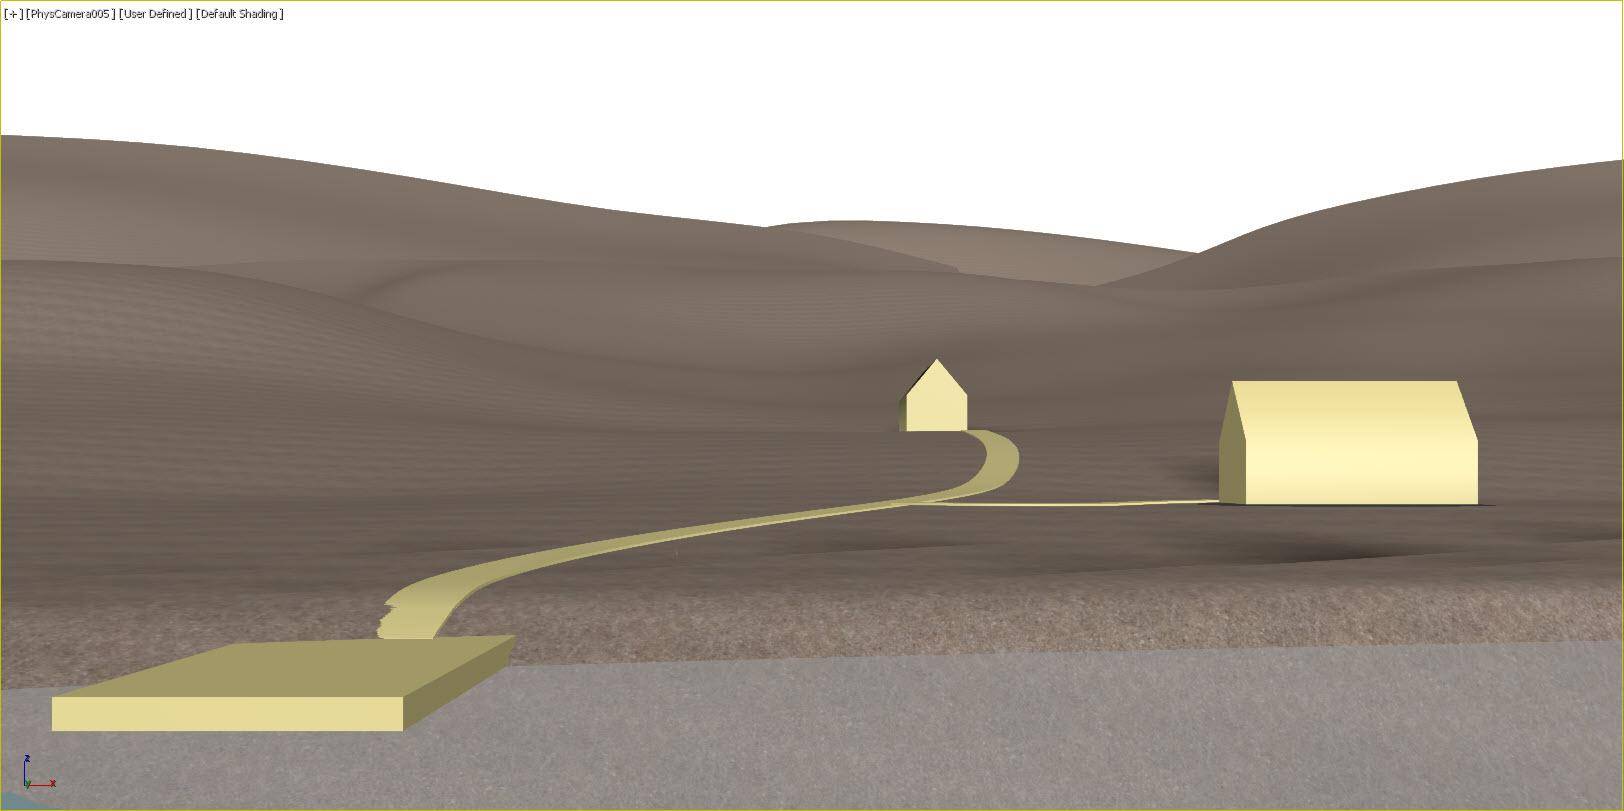
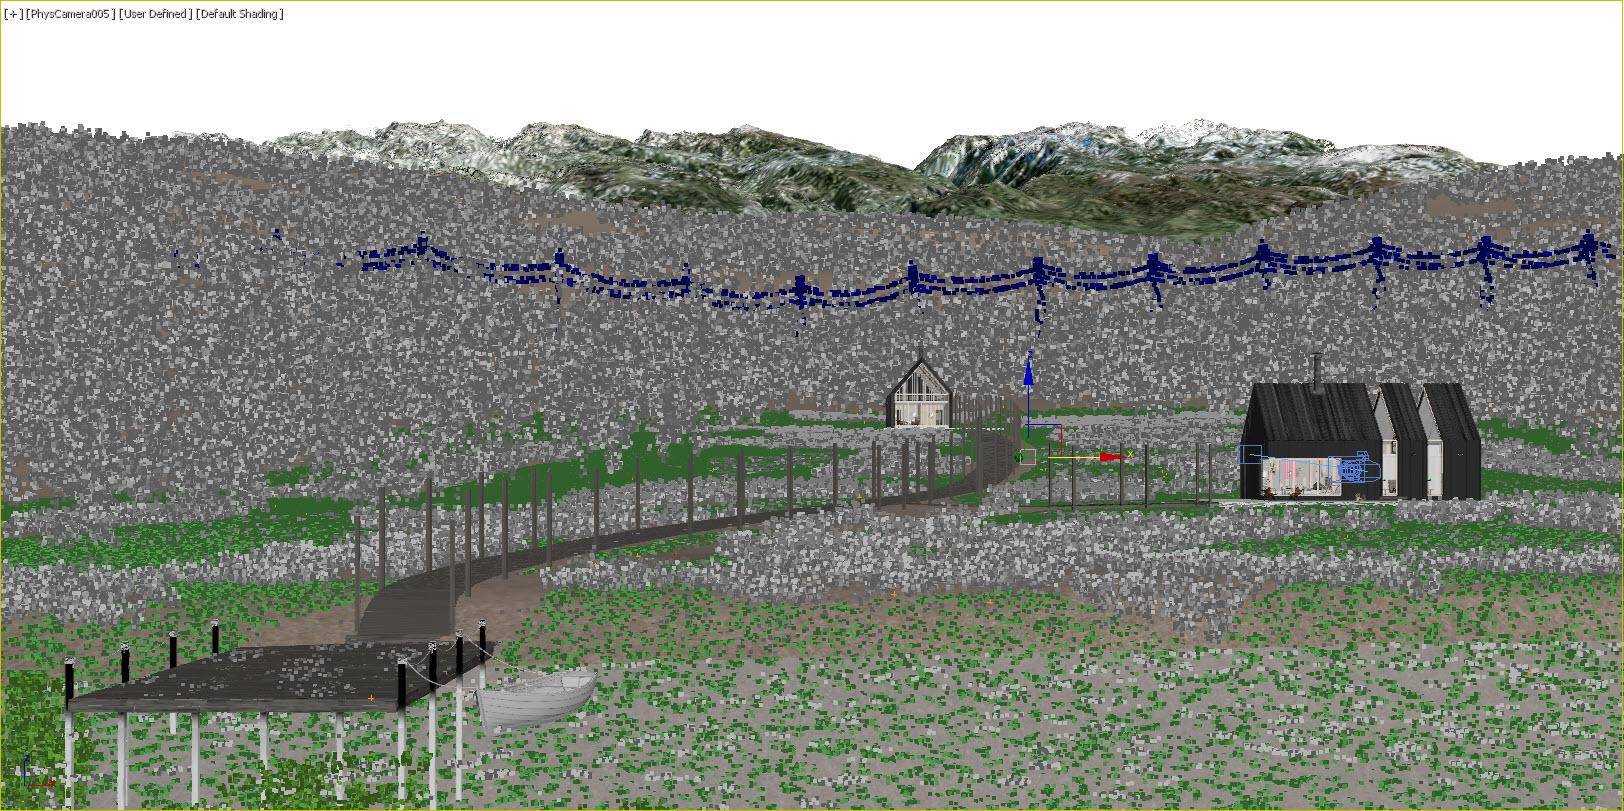
In this scene, the landscape was modelled with a lake in the foreground and a flat section to showcase the architecture in the mid-ground that gives way to rolling tree-lined hills in the distance. The eye is led through the image by the buildings in the mid-ground on the right which are balanced by a Jetty in foreground on the left.
Tip 3 Divide the terrain into separate meshes for efficiency
It’s tempting to model a landscape as one large surface, but when your scene is measured in kilometres that’s not always the most sensible approach. If you have your views established early then there’s no need to create a contiguous terrain.
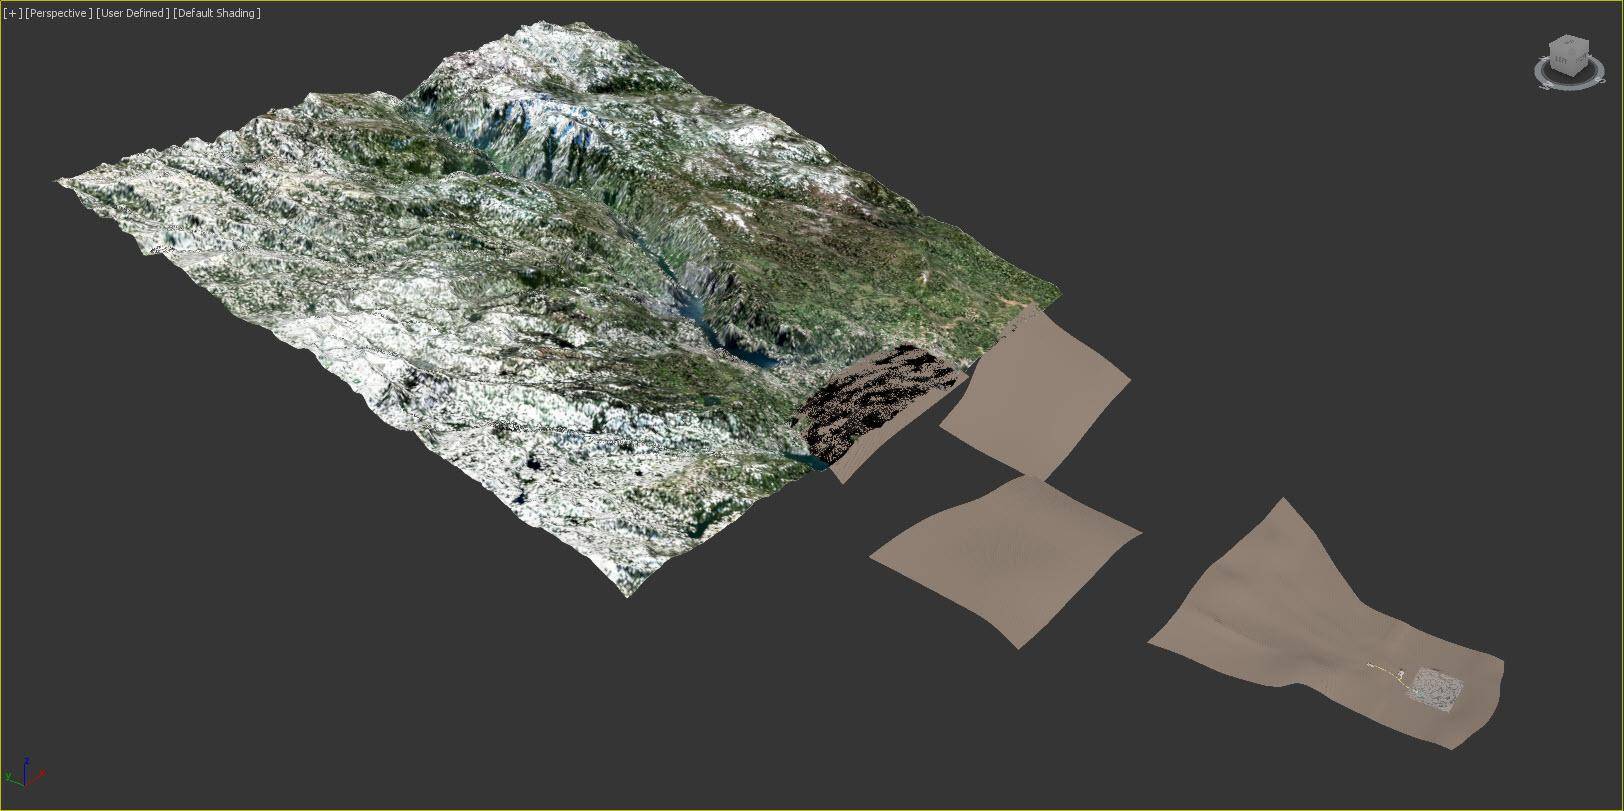
If you only model the sides of the hills facing the camera you significantly reduce the number of trees and other objects scattered later on, saving memory and speeding up render times. Also, to avoid having to add elements in post-production you can use the same approach to add scan data that fills in the background. In this scene, a scan of Yosemite National Park creates the mountains seen in the distance.
To learn more about using surfaces in Forest Pack check out this extra back to basic video.
Tip 4 Subtly randomise everything
With the terrain and the composition finalised it's time to start modelling in detail. To explain the complete process for modelling the architecture would require another whole article, but poly-modelling is used throughout for the building structure which is then populated with a mixture of high quality stock and bespoke models.
A key tip - for believable renders it’s important to add subtle variation. For example, each plank used on the building cladding in Polymachine's scene was subtly scaled, translated or rotated. You can use the RandomByElement modifier with multi-sub object materials to randomise the textures. Or of course you could use RailClone which is capable of randomising textures, adding random tints, randomising the scale, rotation and offset of UVWs and much more.
Tip 5 Keep as much as possible parametric
For any project we want to retain the ability to experiment, so it’s important to make sure that anything we add is easy to update.
One way to achieve this is to make models parametric. For example, tucked away in the trees in the lake scene is a power line that can be created using RailClone, a plugin that uses rule-based arrays to create procedural models.
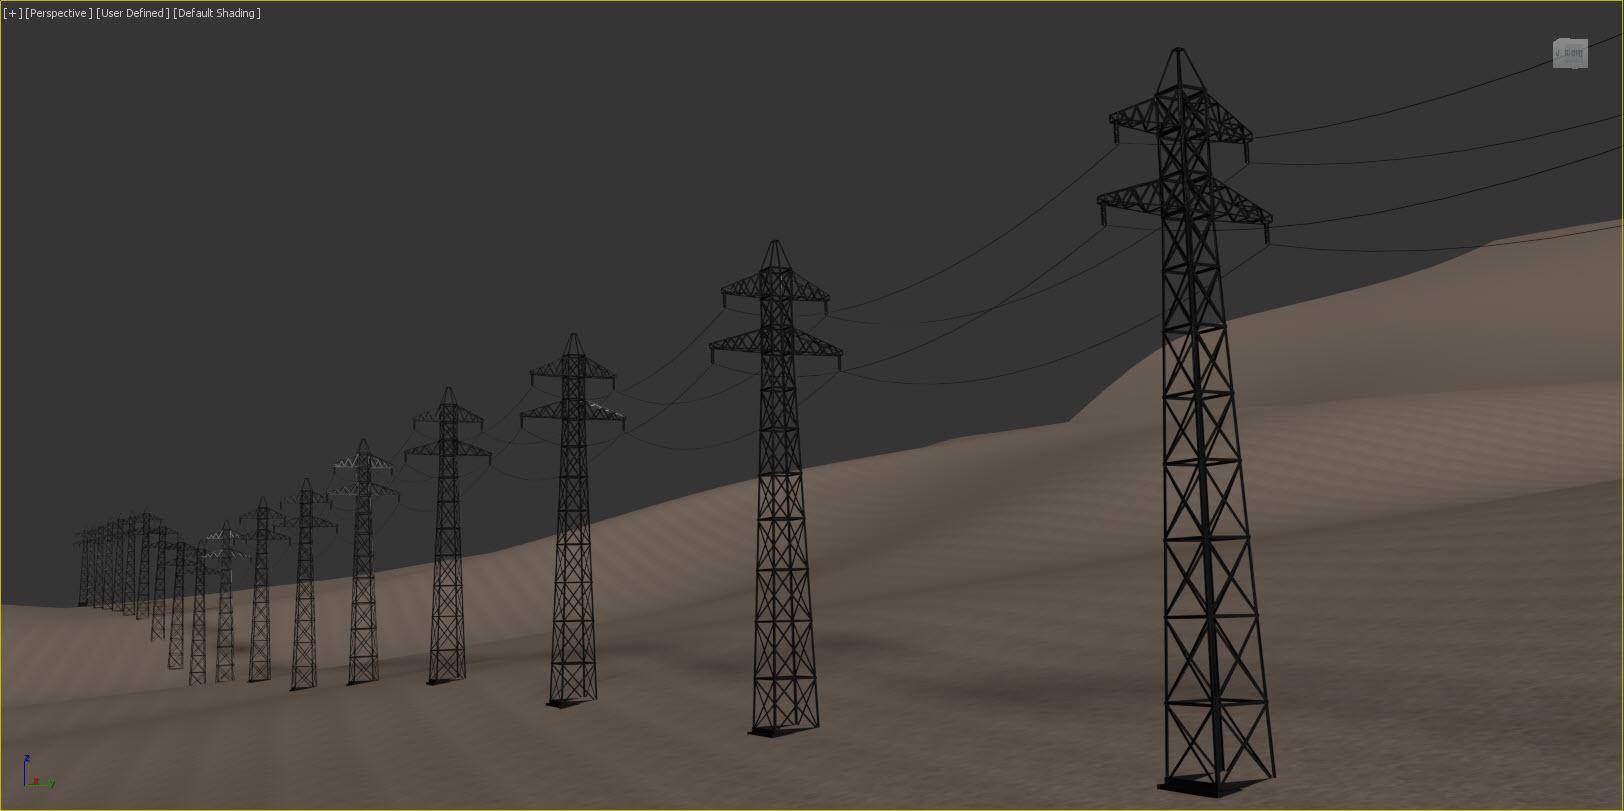
RailClone also instances geometry automatically, so even though the object ended up barely visible in the final render, you’ll have a reusable high quality asset that’s easy to edit and suitable for close ups in future projects.
Let’s take a look at a couple of simple examples in the lakeside scene to see how easy it is to add parametricism to your workflow. First we'll look at at good introduction to RailClone by recreating the power-lines and then move to a more advanced usage, the boardwalks.
Create the power lines
- The Powerline consists of two geometry objects. A pylon, and a cable. The pivots have been edited so that when their axis are aligned the cables meet the pylon in the correct place.
- To define the path of the power lines, draw a spline across the background of the terrain. Then create a new RailClone object, open the graph editor and create a one dimensional array by adding an L1S Generator.
- Add the geometry to Segment nodes and wire the pylon to the Generator’s Start, End and Evenly inputs to add them at the beginning and end of the spline, and then at regularly spaced intervals in between. The spacing between pylons can be controlled by editing the Evenly Distance in the Generator’s settings.
- Next, wire the cable geometry to the Default input and change the Default Mode to Scale so that the cables are automatically scaled to fit between the pylons.
- To make the pylons conform to the terrain, wire a Surface node to the Generator’s Surface input. Select the Surface node and pick the terrain from the scene.
- Adjust the Segment’s deformation modes so that they remain vertical. Change the Pylon’s deform mode to Step so that it remain vertical with deforming and change the cables to Vertical so that they connect correctly to the pylons but also deform to follow the path.
Create the boardwalk
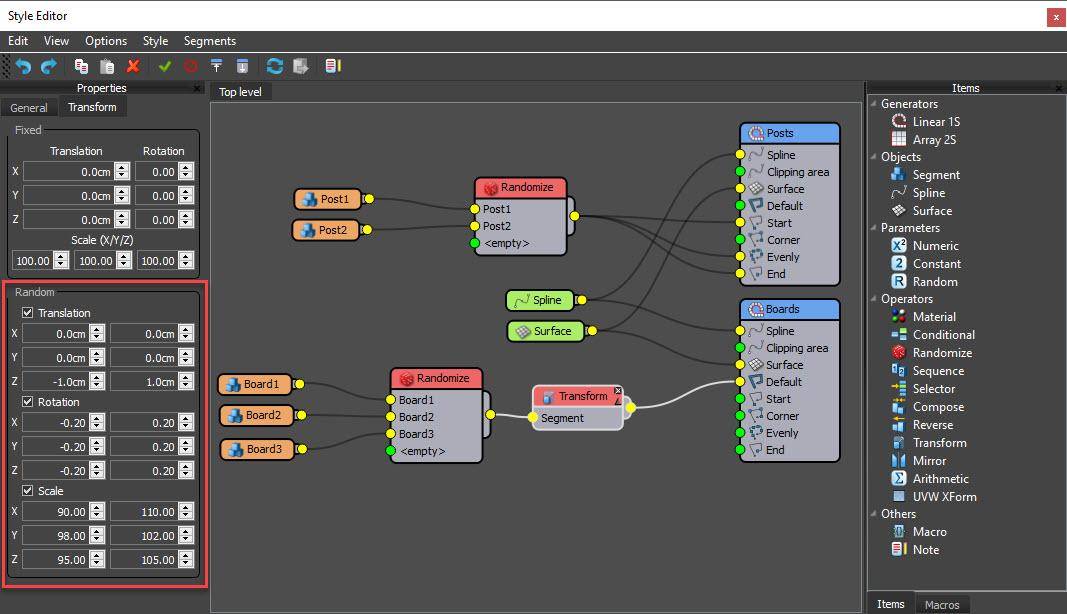
- The boardwalk is also created with RailClone. Draw a spline above the terrain to describe the centre of the path.
- Several plank models are distributed along the spline using a L1S array with a Randomise operator.
- To prevent gaps appearing between boards as they rotate along the spline’s curves, the geometry is automatically deformed to follow the path.
- A second L1S generator distributes the posts at evenly spaced intervals. The Generator’s Mirror and Y Offset options are used to copy and move the array to both sides of the path and a surface node is added to both generators so that the boardwalk follows the topology of the landscape.
Tip 6 Add variation to procedural objects
Just like the building’s cladding, procedural objects mustn’t look too perfect. For example, Polymachine added some chaos to the boardwalk's planks using the transform randomisation features found in the Segment node’s settings.
You should also randomise the textures used on each plank, but instead of using a modifier, you can use RailClone Colour which retains full instancing and has other advanced options including the ability to randomly tint the bitmaps by sampling values from a gradient or a map for even more variation.
Tip 7 Minimise the number of variations for high poly assets.
The vegetation used in the lakeside scene came from a mixture of library models and bespoke plants created using SpeedTree. Landscape artists often ask themselves how many plant models they need to create believable variation and disguise reuse? It’s not really the number but the differences between the models that’s important. You can hide a lot of repetition by simply randomising rotation and scale. Ideally, you should only include additional variations of a plant species if they look sufficiently different to justify the extra resources.
Tip 8 Know when to use Proxies, XRefs, or scene geometry
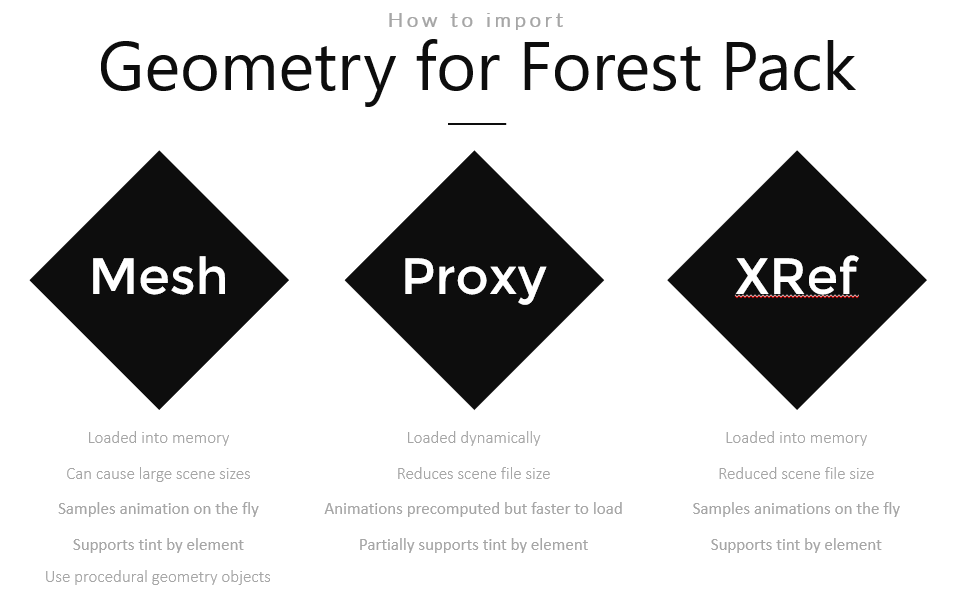
First of all, it is not necessary to convert geometry to proxies manually for use with Forest Pack and RailClone. Both plugins do this on the fly at rendertime. So just picking scene geometry is a perfectly acceptable way to work.
This has an advantage too if you are animated parametric objects like GrowFX trees. Forest Pack can sample the animation directly from the objects, there’s no need to bake it in a point cache, or export it to a Proxy file first. FrowFX models also contribute very little to the file size.
That said, non-procedural 3D vegetation models often comprise millions of polygons making the load and save times restrictively long when working with complex scenes.
You can improve this by keeping memory-hungry assets in separate files as either proxies or X-Refs. Proxies offer a small memory advantage during rendering because the geometry is loaded and unloaded from disk dynamically when required by the current render bucket, though that can be a little slower than XRefs.
Proxies also don’t support Forest Colour’s tint by element features, so if that’s important you should use XRefs instead.
Tip 9 Work from large to small
It makes sense to work on the objects that have the strongest visual impact first. That generally means scattering larger items before filling in with details.
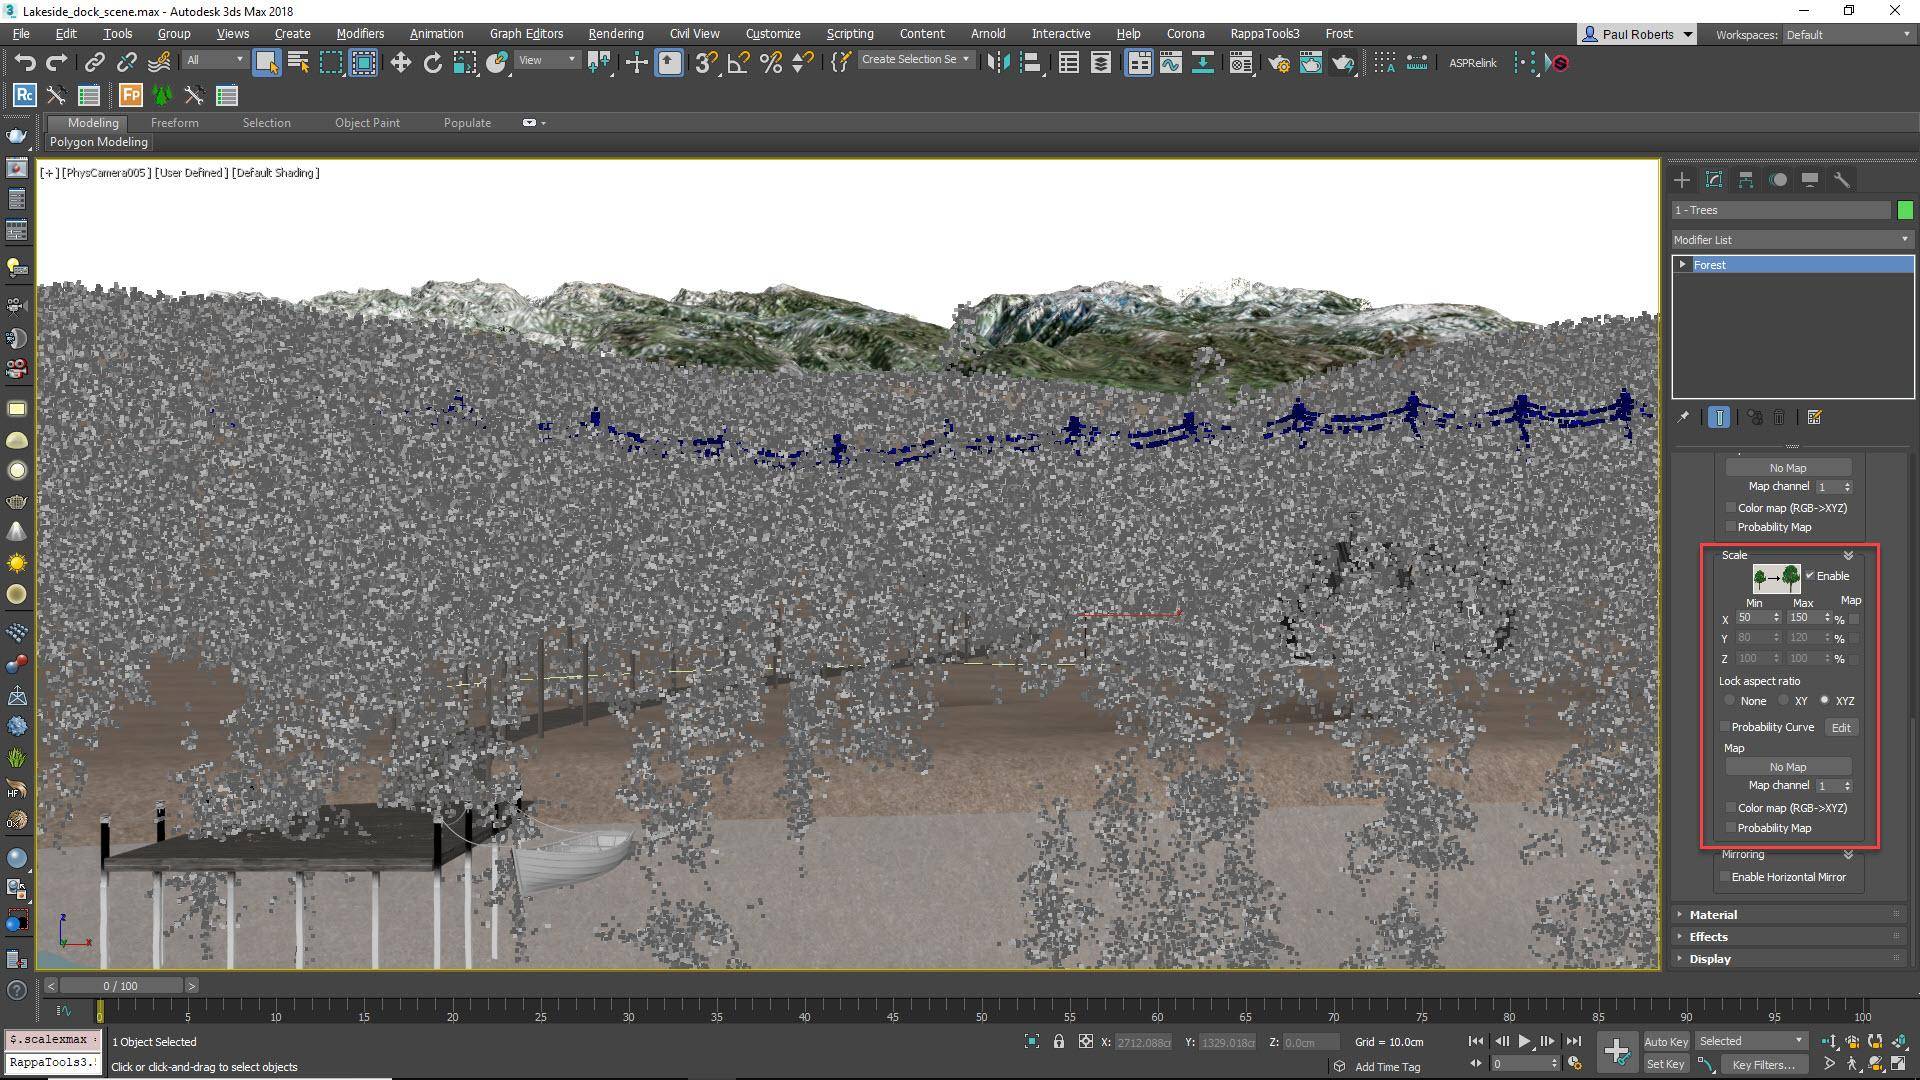
In the lakeside scene the trees are the largest items and occupy the largest area, so you would create those first by adding a new Forest Pack object that uses the terrain as a surface. Add the tree models to the geometry list and enable Rotation and Scale randomisation to cover up visible reuse. A large scale range, for example between 50% to 150%, will disguise repetition most effectively.
Tip 10 Work from the outside in
Once the main areas are blocked in, it's time to start refining the scatter by removing items where they are not wanted.
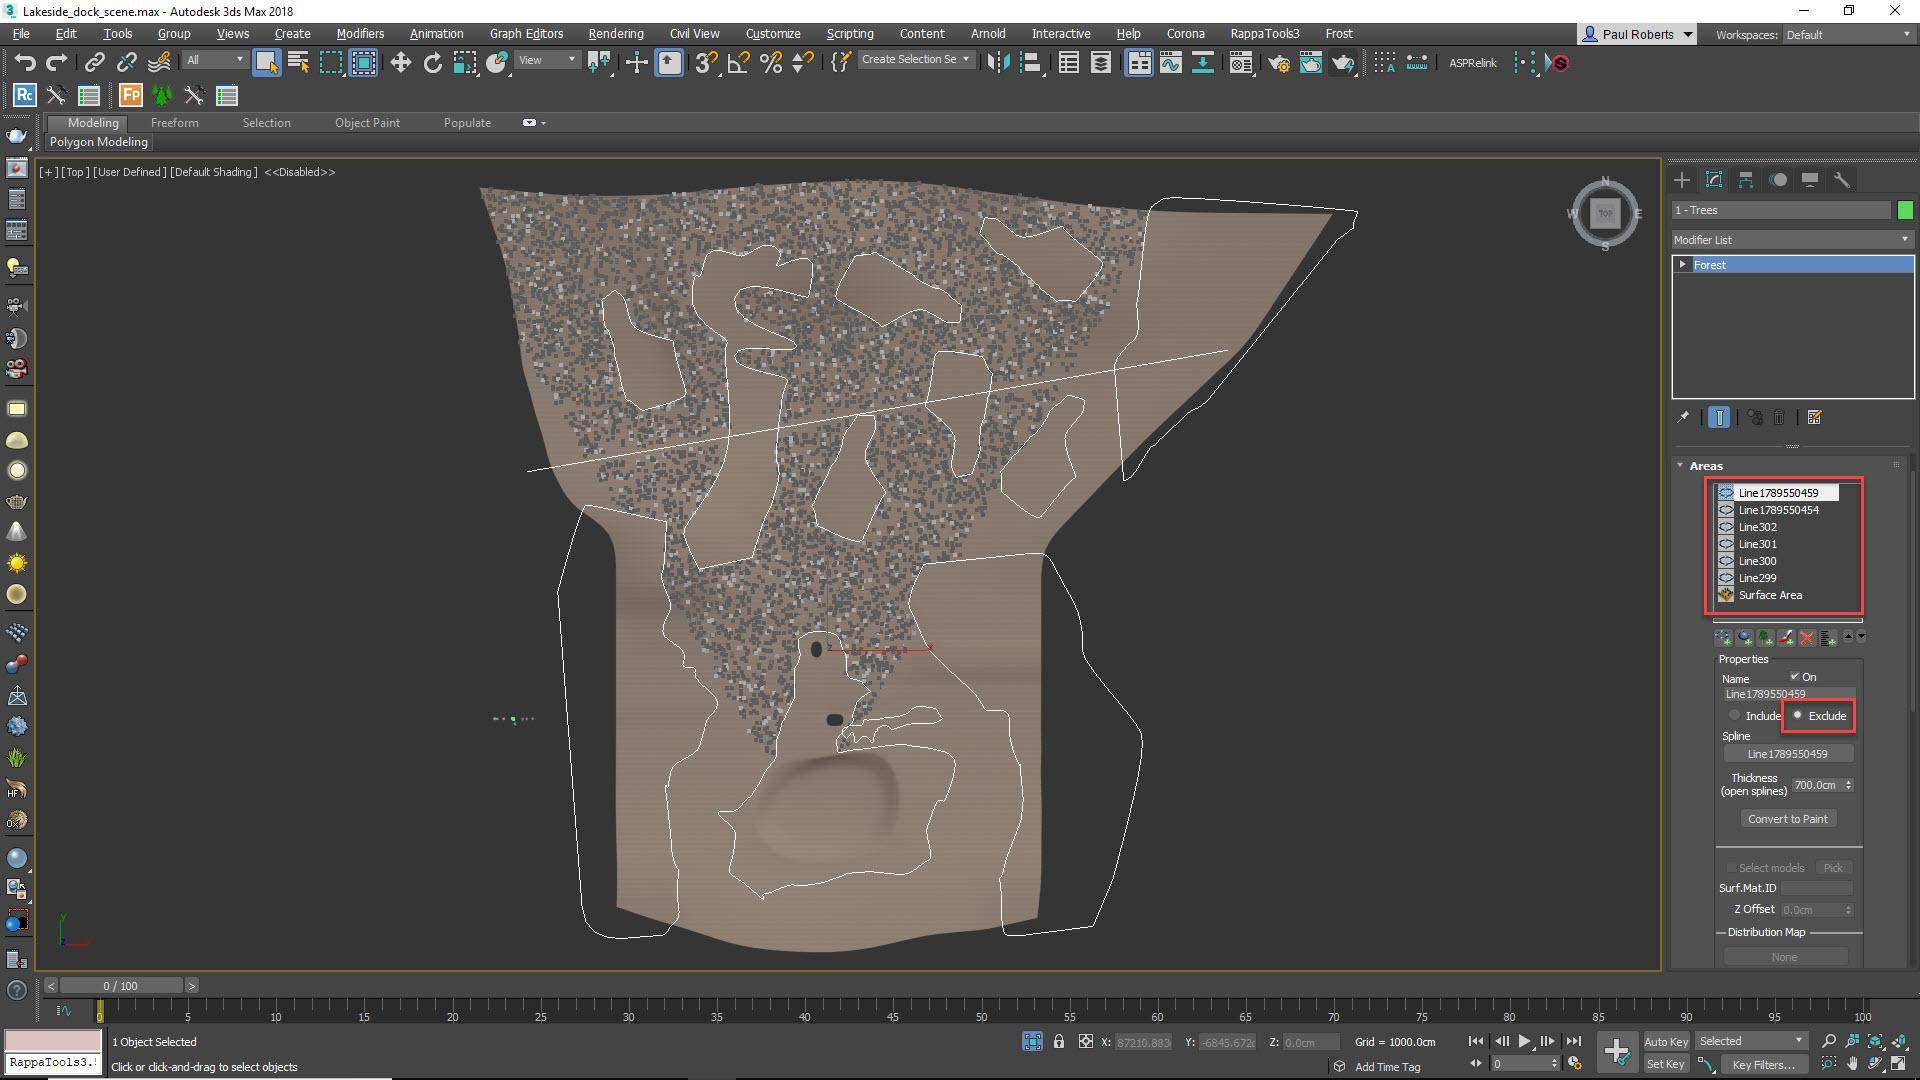
For example. in the lakeside scene the trees were scattered across the entire terrain, but this includes inside the buildings, on the boardwalk and in the lake. To remove them from those areas, draw closed splines from the top view and add them to the Forest Pack object’s Areas list. Set the mode to Exclude and the items inside the splines will be removed. Add additional closed splines to create small clearings in the forest breaking up the silhouette to create a more realistic distribution.
You should also remove trees from under the power lines by adding the same spline used by the RailClone object to Forest Pack’s Areas list and increasing the Thickness parameter. Because they share this spline, updating it changes both the power lines and the trees for a fully procedural workflow.
Tip 11 Always create patches for large areas of small plants and ground cover
Small plants and ground cover vegetation are normally modelled as individual plants. If we were to scatter individual plants in the lakeside scene, it would take over 6.5 million of them to fill the desired area - not the most efficient approach!
The solution is to use 2 Forest Pack objects, one to create a small patch of grass, and a second to distribute the patch on the terrain. To create a patch, use a small circular spline as an Area to scatter grass with Forest Pack. To prevent unsightly hard borders use the area’s Density Falloff feature to gradually thin out the scatter as it approaches the spline.
Scattering the patches
Next, create a second Forest Pack object using the terrain as a surface and add the patch to the Items list. Add Exclude splines as necessary to remove grass from inside the buildings, on the lake bed, and under the boardwalk as well as creating clearings to add interest to the composition. When using patches, a grid-like appearance can sometime be visible, especially if you use the Full Distribution map. To break this up, add Translation randomisation as well as the usual Rotation and Scale. By using patches, the number of scattered items has been reduced from over 6.5 million to half a million. Not bad, but we can still do better.
Tip 12 Cull any items that aren't visible
There’s little sense in wasting resources calculating items that aren’t seen in the final render. It's almost always sensible to go to the Camera rollout and enable Limit to Visibility and Auto Assign to Active View to use the current camera to automatically remove items that aren’t visible.
If you still need some items behind the camera to be retained for reflections, you can extend the scatter beyond the frustum slightly using the Expand parameter. Using this feature can reduce the number of scattered items from over half a million to less than 40k.
Reduce density based on distance
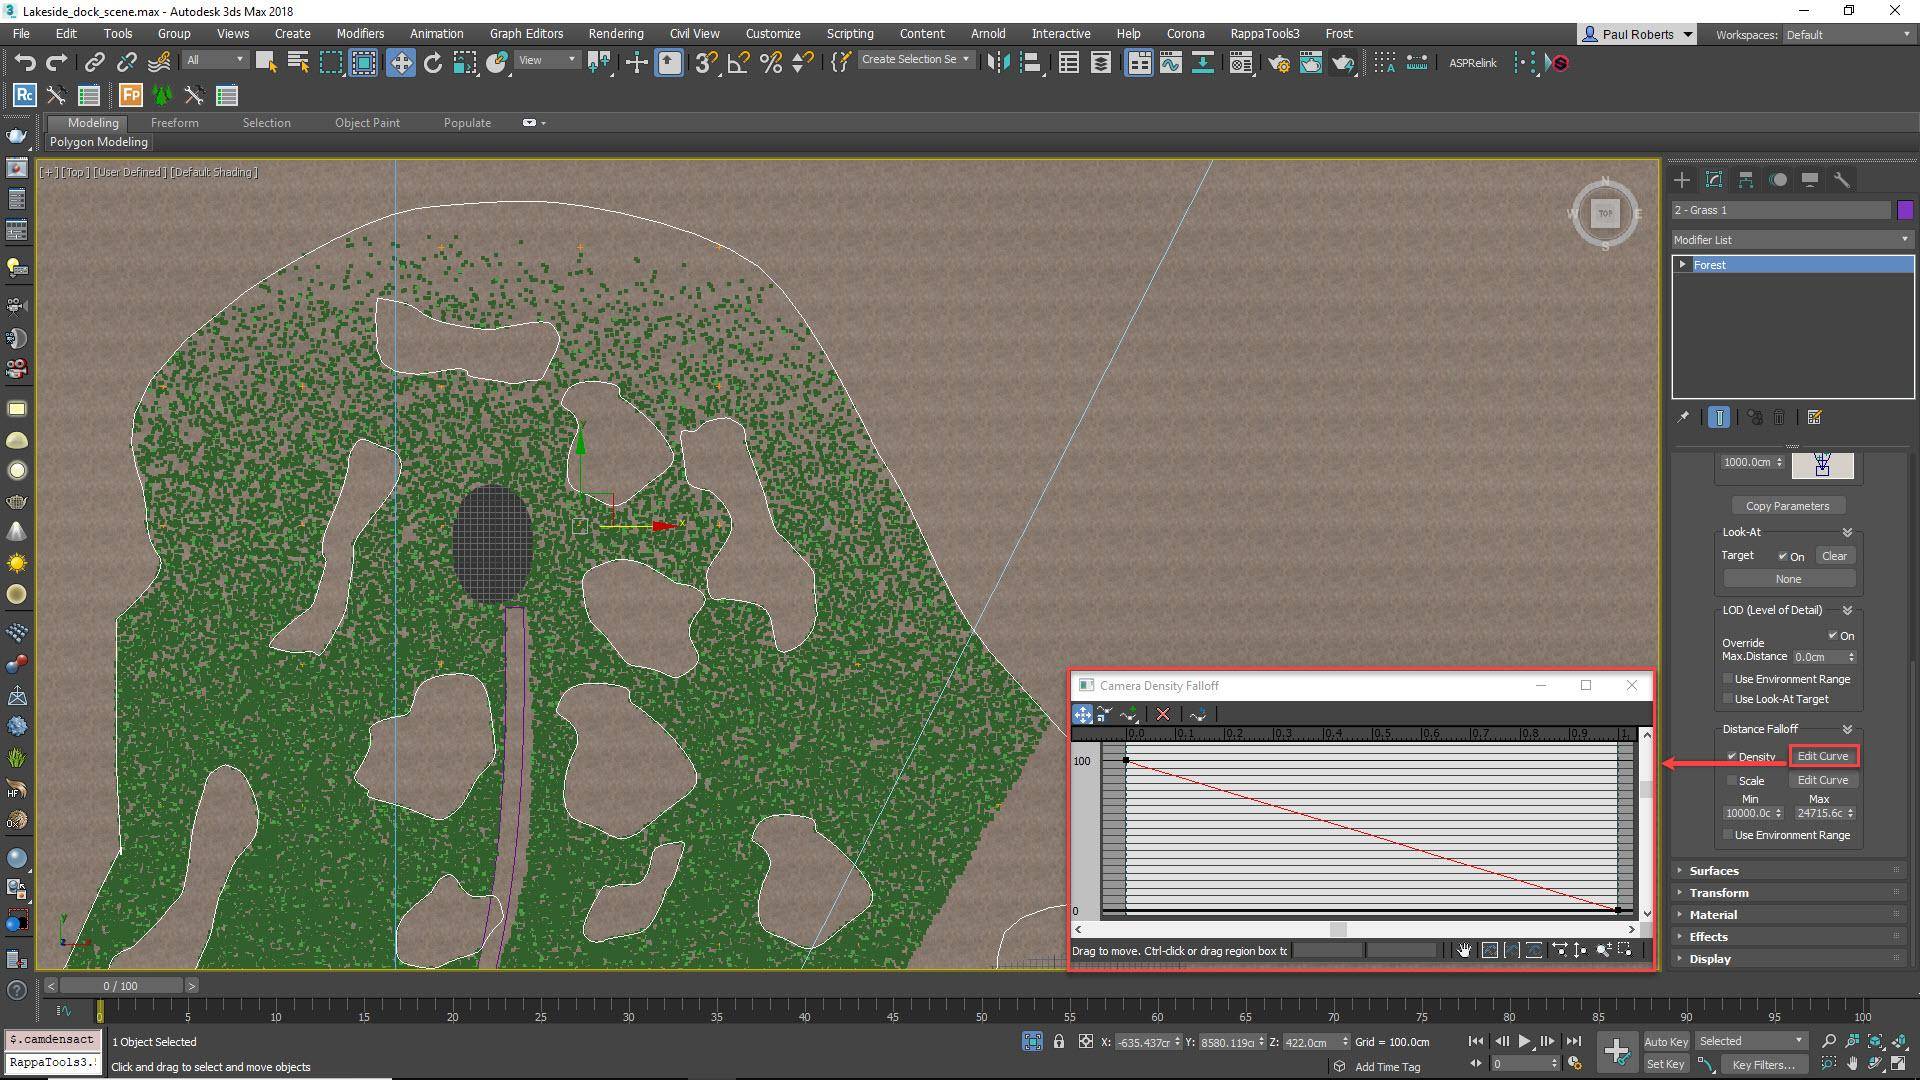
Another handy optimisation trick often not visible in the final render is to reduce the density of a scatter the further it is from the camera. To create this effect in Forest Pack, turn on the Distance Falloff option in the Camera rollout and open the Density Falloff Curve. The graph describes the density between the Minimum and Maximum distances, which can be edited to gradually decrease the number of grass plants as they enter the trees, reducing the overall item count even further.
Use Forest LOD
Using a Forest LOD object you can change an item based on its distance from the camera or size in the render. Often the biggest performance gains come from reducing the complexity of the shaders rather than the polygon count.
Tip 13 Use multiple layers of plants for convincing ground cover
Realistic ground cover is achieved by mixing several layers of plants in interesting ways to add compositional variety and visual complexity.
Using the same workflow and optimisation tricks as the grass, Polymachine created separate Forest Pack objects for long grass, dead leaves, sticks and twigs, mushrooms, and tall weeds. If you use this approach, be sure to pay attention to creating naturalistic and believable interaction between the layers by drawing unique Exclude areas and experimenting with different distribution maps.
TIP 14 Share splines between Forest Pack and RailClone
When you are using both Forest Pack and RailClone in a scene, they can share splines. For example a single spline can be used to create the boardwalk with RailClone and add tall grass around its edge using Forest Pack
Grass grows taller around the boundaries of objects where it cannot be trampled or cut. To simulate this, create a new Forest Pack object to add long grass and weeds around the boardwalk. Add the same spline used by the RaiClone style to the Forest Pack object’s Areas list and set the mode to Include. Increase the Thickness property until the grass area is slightly wider than the boardwalk. Then, to remove the grass from under the boardwalk itself so that it’s only visible at the sides, add the same spline again but this time set the mode to Exclude and change the Thickness property so that it’s smaller - roughly the width of the planks. You should end up with two strips of grass on either side of the path.
Tip 15 Add details using paint tools and tree editor mode
For more precise control placing items, it’s possible to hand-paint areas using Forest Pack.

For example, Polymachine created a new Forest object to add reeds around the lake. To do this you would go to the Areas rollout and add a new Paint area. Click on the button to activate Paint mode then click and drag on the terrain to paint reeds around the edge of the lake and in front of the jetty (if necessary open the brush options to change the size of the brush). It’s important to understand that you’re only painting an area, the plugin remains fully parametric so you can adjust the geometry, density, randomisation, etc. at any time.
Manual Placement
As you near completion of a scene you may find that you need to tweak a few individual objects in a scatter to perfect the composition. You can do this with Custom Edit mode.
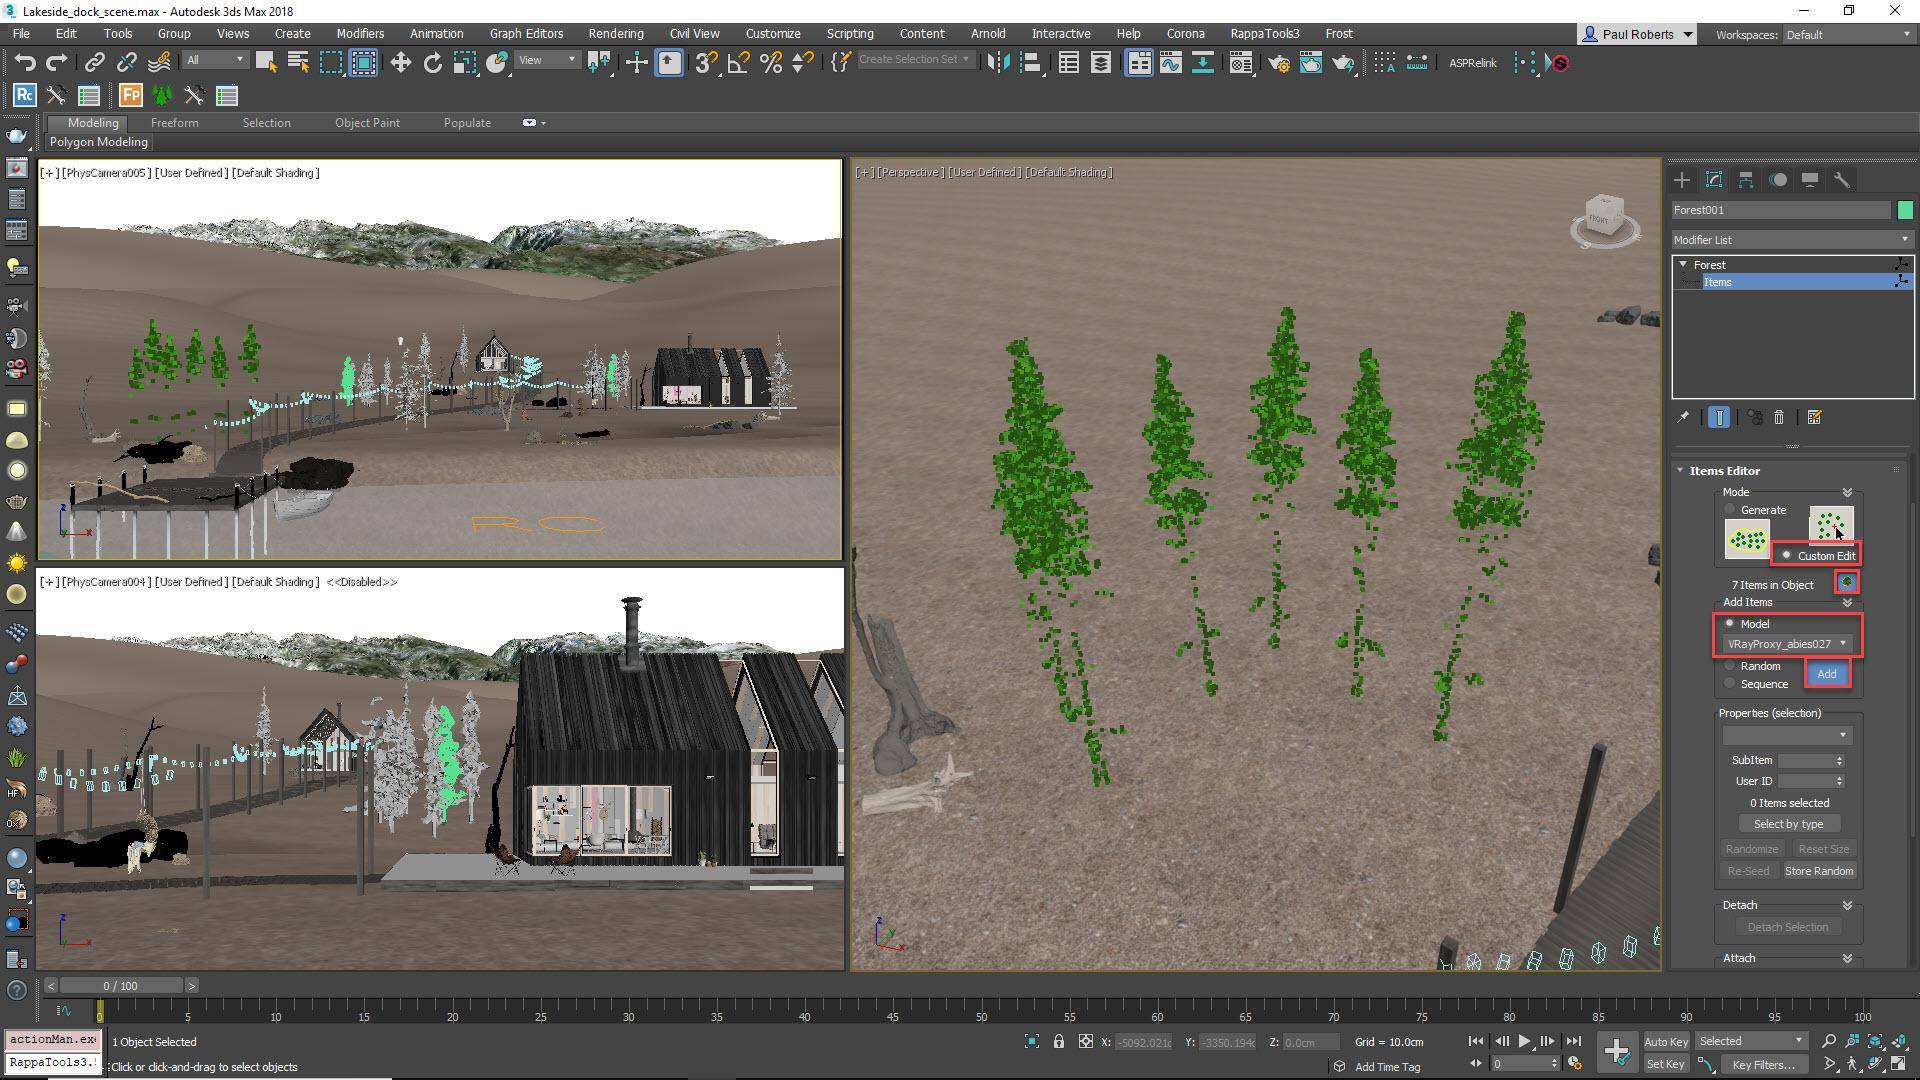
In fact even when just a couple of objects are placed by hand, a Forest Pack object can still be useful. Add all the items you need to the geometry list and add the surface. Enable Custom Edit mode and you’ll be able to choose and place individual items that will adhere to the terrain and have the benefits of using Forest Pack’s point-cloud display, randomisation and instancing features.