Файлы ресурсов
Требования
- info Forest Pack Pro, RailClone Pro, V-Ray

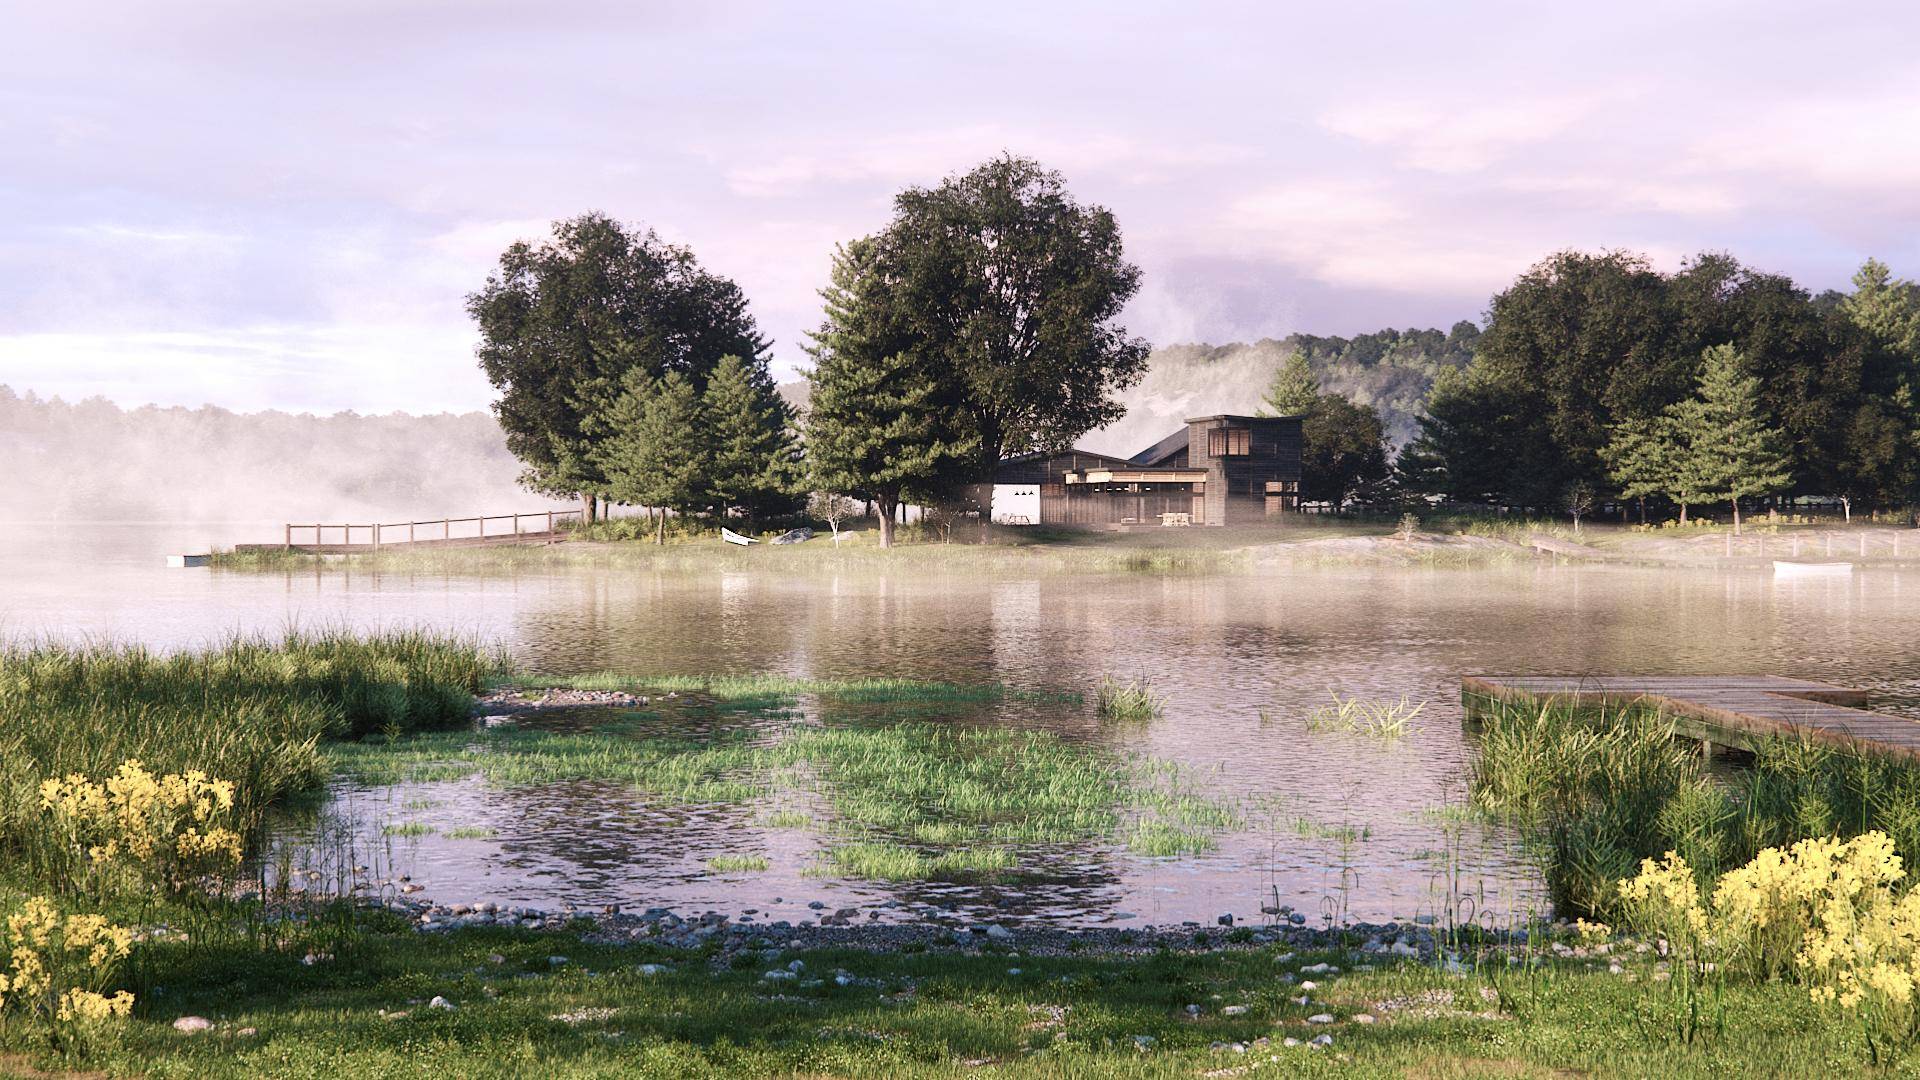
In this tips and tricks episode we’re going to look at how to use Forest Pack's surface tools to quickly populate entire scenes with basic ecosystems that adapt according to the elevation. In the process we’ll share 11 tips for creating this lake scene that can be applied to scattering geometry and optimising renders to create similar environments.
By completing this tutorial you'll learn several useful tricks that have a much wider range of applications, including:
- Use the free Glue plugin.
- Restrict scatters based on elevation information.
- Use Density and Scale Falloff
- Create several "layers" of Forest geometry.
- Use Distribution maps.
- Use Forest Clusters to add easy to control gaps in the scatter.
The files for this tutorial include the lake starter scene. The majority of this tutorial can be completed using models included in the built-in library, although Forest 6 is required to use some of the library objects shown. The supplied files are compatible with 3ds Max 2015 or above and Chaos Group's V-Ray renderer. Quadspinner's Gaea was used to model the terrain environment.
Tip 1 - Use a small section for testing
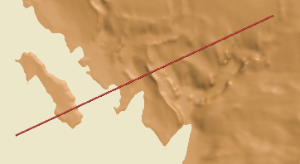
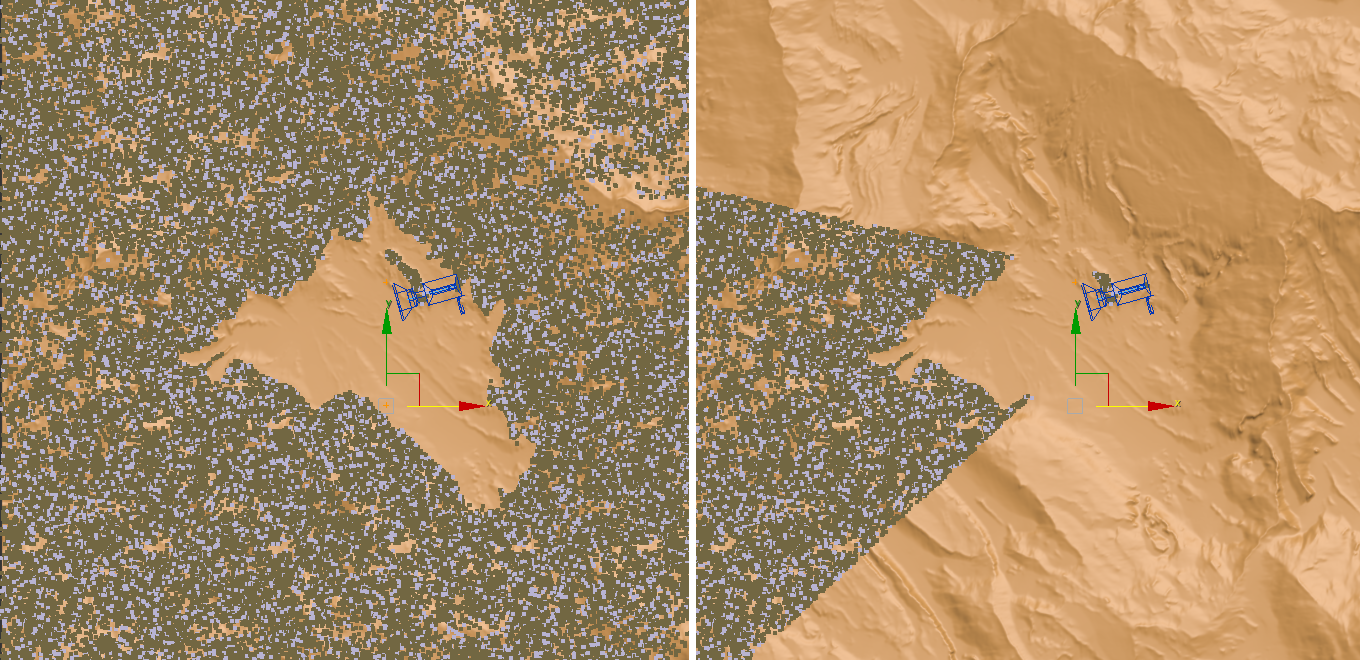
First of all, when working with very large terrains it’s often easier and faster to use a small section of the landscape to help set up the Forest Pack objects that will define the ecosystem. There are several ways you could create a section of the landscape, you could for example select and clone a section of the terrain or add slice modifiers to isolate a selection, but we find it’s easiest to just draw a straight spline above the terrain to define a representative cross section, and then use iToo Software’s free Glue Utility to project it onto the terrain. To do this:
- Draw a spline in the top view that overlaps a part of the terrain that represents more or less the full altitude range. I’ve included the island here too as that’s an important part of the composition.
![Using altitude-based falloff-image2018-4-16_11-10-37.png]()
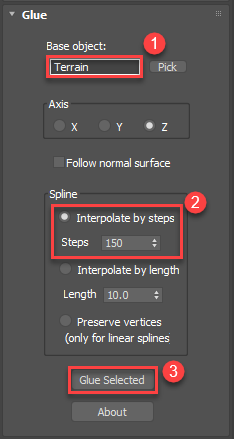
- Move the spline so that it’s above the terrain then go to the Utilities tab and open the Glue utility. If you don’t have Glue, you can download it for free from iToosoft’s website.
- Use Glue's Base Object picker to select the existing terrain object. If you want to follow the terrain more accurately, increase the Interpolate by Steps value. This will add more vertices to the spline before projecting it onto the terrain. Press Glue Selected to conform the spline.
![Using altitude-based falloff-image2018-4-16_11-8-24.png]()
- Now we need to turn this spline into a surface that Forest Pack can use. Do this by adding an Extrude modifier to the spline and using a negative amount to extrude downwards. Then, to add thickness, add an Shell modifier and increase the Inner or Outer amount until you get a small strip of land.
- Finally you should add a separate Plane object to represent sea level and you can then hide the original terrain so that you can work easily on this small section.

Tip 2 - Plan the ecosystem
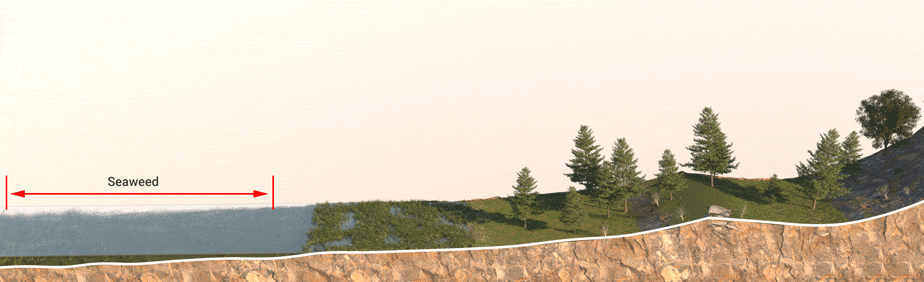
It’s sensible to plan out your ecosystem in advance. In that way you avoid wasting time modelling or sourcing things that later are not required. In this scene we’re going to keep it quite simple. Along the bottom of the lake bed we will add some seaweed, nearer the river banks we want some reeds. In fact we’ll add two types of reeds, tall ones that are largely above water level and smaller ones that poke above the water line and add some interest. Moving up as we get near the river bank we want some stones and pebbles that will transition into grass weeds and finally trees, rocks and flowers.
With a plan in place you can easily create a Forest Pack object for each of the distinct areas straight away. Here's a step-by-step example for creating the trees.
- Create a new Forest Pack object by setting the mode to Generate and picking the terrain cross section object we created at the beginning of the tutorial.
- Go to the Geometry rollout and open the Library. Select the objects you want to import. For this example we'll pick a Black Pine and an American Elm model from the new tree library included in Forest Pack 6. Note that you can select and import multiple objects at once by holding down the CTRL button as you click them.
- Adjust probabilities if necessary. In this example we want fewer American Elms so the Probability setting for this model can be lowered to 20%.
- Go to the Distribution rollout and choose a distribution pattern from the drop-down list. We used Patches 1, one of several new maps included in Forest Pack 6.
- Adjust the Density values until you get the correct coverage of objects. In this case I'm using about 500m but it really depends on the scene and the objects being scattered so experimentation is a must.
You should do the same thing for all the Forest Objects in your ecosystem plan. To save you from having to read a lot of unexciting repetition we're not going to show the creation of everyForest Objects. Throughout this tutorial we'll explain a principle and allow you to apply it yourselves. If you'd like to know more about the fundamentals of Forest Pack we recommend first following the Canal tutorial which will get you up to speed quickly, before tackling this tutorial.
As you can see, at this stage we didn't worry too much about any other settings, only the choice of models, their probabilities and distribution. If you use Forest Pack's built-in presets, like the new Layered Grass for example, you can probably use the default settings. In fact the scene mostly uses objects from the Forest Pack 6 library. Only the reeds and flowers are from a third party. If you want to follow the tutorial you will need to supply your models for these areas, or you could substitute them with the canes and daisies that come with the plugin.
Tip 3 - Restrict objects using altitude min and max settings
With all of the Forest Objects created we can restrict them to the elevation range planned in the first tip. This is made possible using the Limit by Altitude feature found in the Surfaces rollout. Using a simple Bottom and Top value you can restrict the scatter to a specific elevation range. We'll take this one Forest Object at a time from the bottom to the top, starting with the seaweed:
- Open Forest Lister, click the Select all Forest Object button
![Using altitude-based falloff-image2018-4-16_11-25-58.png]() and then click the Lightbulb icon
and then click the Lightbulb icon ![Using altitude-based falloff-image2018-4-16_11-26-34.png]() to hide them.
to hide them. - We'll enable the Forest Objects one at a time. Deselect all the Forest Objects using the
![Using altitude-based falloff-image2018-4-16_11-27-32.png]() button and unhide the seaweed Forest Object.
button and unhide the seaweed Forest Object. - At the moment the seaweed covers the entire terrain. We want it only on the lake bed. To enable this, go to the Surface rollout and enable Altitude Range > Limited.
![Using altitude-based falloff-image2018-4-16_11-41-12.png]()
- Adjust the Altitude Range > Bottom value until the seaweed is starting on the lake bed. You could leave this one because we want the weeds to go all the way to the bottom of the lake, but by narrowing the threshold so that it closely brackets the actual elevation range of the terrain, you will get more accurate results with Density and Scale falloff curves as we'll see later. For this scene a value of 14m worked well.
- Adjust the Altitude Range > Top value until the seaweed is stopping short of the shore. Don't allow it to get too close to the shore or it will protrude through the water surface (although a little of this is OK because we can fix it later by editing the scale based on elevation information).
 and then click the Lightbulb icon
  to hide them.
  button and unhide the seaweed Forest Object.
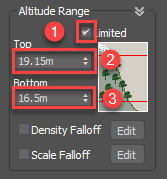
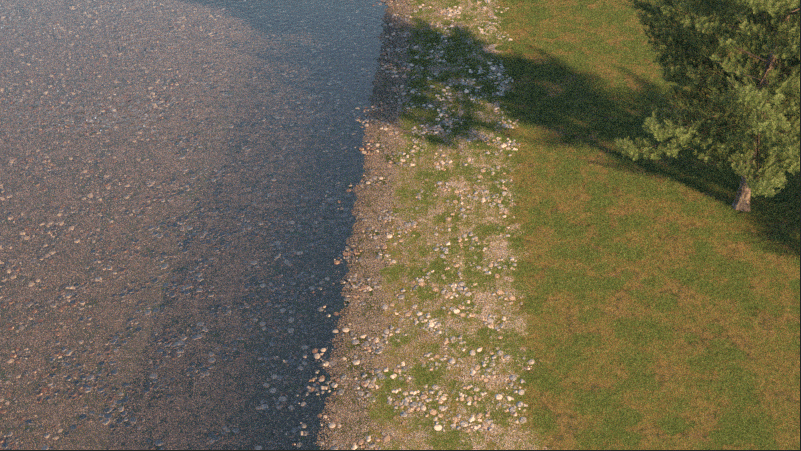
With those changes made you should have seaweed that is growing only on the bottom of the lake. Exactly the same technique is used to limit all the other Forest Pack objects used in this scene to create a complete ecosystem.
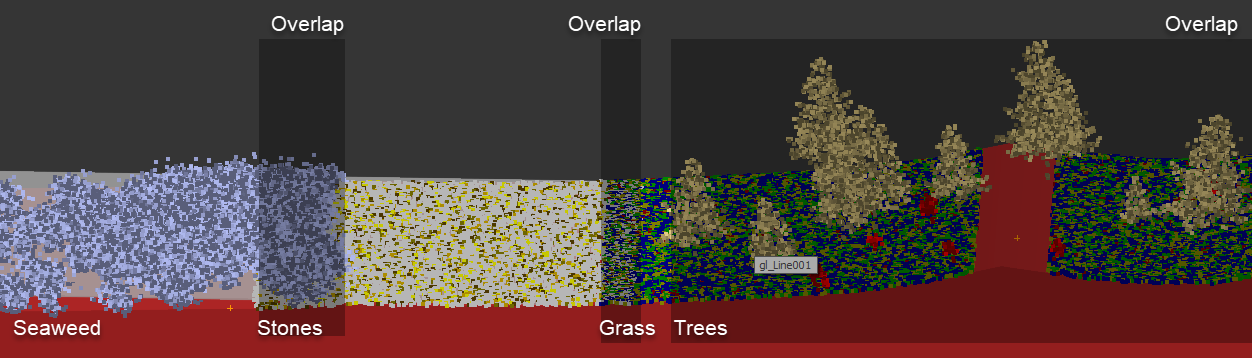
Tip 4 - Overlap Forest objects
To help disguise the joins between Forest objects and make them knit together seamlessly, it's a good idea to overlap their altitude range values. For example if we enable the Forest object that adds stones along the shore line you can then adjust the Bottom value so that it overlaps the seaweed. Similarly you should use a Top value so that the stones overlap the waterline and go up onto the shore a short distance. At this point we'll enable the main Forest object and turn on Altitude range starting on the lake bed and moving up the terrain. The settings we used in this scene were as follows, but different scenes will of course require their own experimentation:
| Objects | Bottom | Top |
|---|---|---|
| Seaweed | 14m | 19.15m |
| Stones | 18.7m | 20.2m |
Grass | 19.98m | 25m |
| Trees | 20.6m | 500m |
Notice that each layer's Bottom value is lower than the preceding layer's Top value, creating an overlap.
Tip 5 - Use Density Falloff
The main parts of the ecosystem are now in place, but the transitions can be a bit too sudden. Ideally we would gradually fade scatters where they overlap. This can be achieved using Density falloff which uses a graph to control the density of the scatter between the Top and Bottom altitude range.
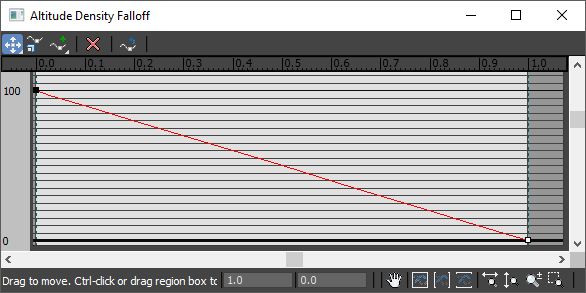
The graph's X axis represents the altitude range between the Bottom value on the Left and the Top value on the Right. On the Y axis we have 0% Density at the bottom of the axis and 100% at the top. For example, this graph gradually fades the density of the objects to nothing as they reach the Top altitude value.
Let's take a look at the stones object in this scene as an example. We'd like them to fade as they overlap with the seaweed at the bottom and the grass at the shoreline. To achieve that:
- Go to the Surface rollout and enable Density Falloff.
- Open the Density Falloff Graph.
- Use the Add Point tool to add two points to the curve
![Using altitude-based falloff-image2018-4-16_14-9-36.png]()
- Switch back to the Move tool and drag the start and end points down to 0.
![Using altitude-based falloff-image2018-4-16_14-10-19.png]()
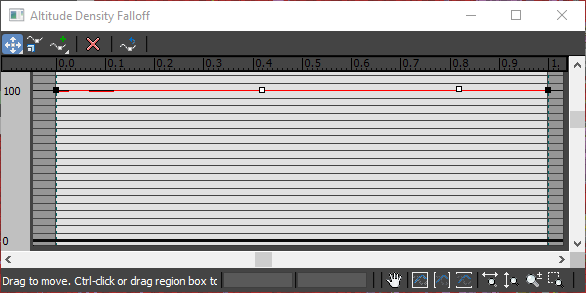
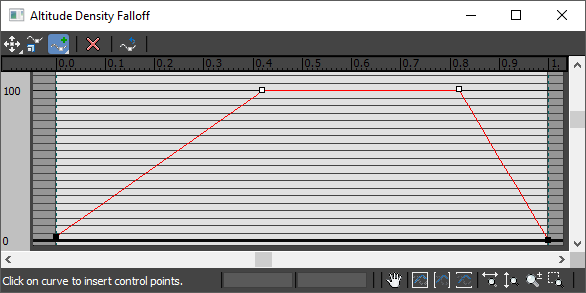
The density will now gradually fade as it approaches the bottom of the lake and as it overlaps the grass making the interaction between the two Forest objects much more natural.
In addition to the stone you can add the same effect to the grass, seaweed and anywhere else you need to disguise a hard visible line.
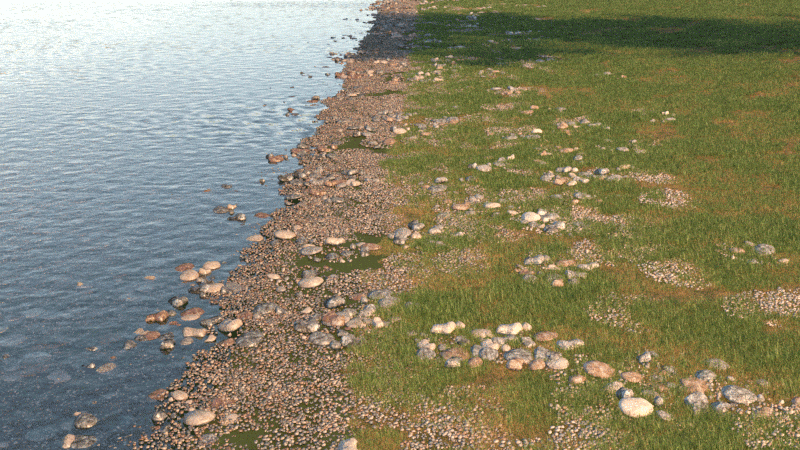
Tip 6 - Use Scale Falloff
As well as being able to control the density of the scatter based on the elevation, you can also control the scale. This can be useful if you need to change the size of objects based on their altitude, for example trees often get smaller the higher they are on a mountain due to the gradual reduction in oxygen levels (they're also less diverse and more scattered). In this case we can also use it to control the size of the seaweed so that it gets smaller the higher it is up the bank to the shore. This will stop it breaking through the water surface.To achieve this effect:
- Select the seaweed Forest Pack object and go to the Surface rollout,
- Enable Scale Falloff.
- Open the Scale curve editor. Like the density curve the X axis represents the altitude range between the Bottom value on the left and the Top Value on the right. The Y axis this time represents scale 0% scale at the bottom of the axis and 100% (and beyond) at the top.
- We want the seweed to be smaller in the shallow water, so adjust the curve's existing end point until the plants are no longer protruding above the surface of the water.
![Using altitude-based falloff-image2018-4-16_14-27-12.png]()
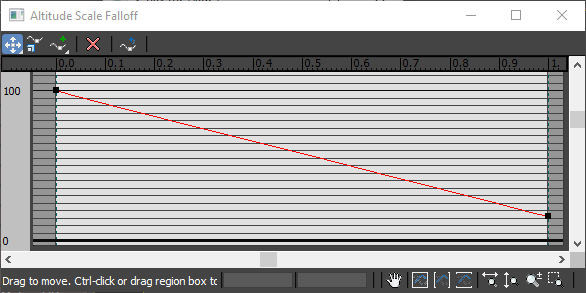
The same technique can be used to control the scale of the large reeds (created later) as they ascend the shore.

Tip 7 - Add layers
Now that we have the 4 basic zones setup - seaweed, shore, grass, trees - you can add more layers to each one to add diversity and interest. the easiest way is often to clone an existing Forest object so that some of the work is already done. For example we can clone the stones and use the style to add some reeds:
- Select the Stones Forest Object. Click Ctrl+V to create a clone and then go to the Geometry rollout and delete the existing items.
- Add new items, in this case two 3rd party reed models (or use something else suitable from the library).
- Go to the Surface rollout and edit the AltitudeTop and Bottom settings if necessary as well as the falloff curves. For the large reeds we used a Top value of 20m and a Bottom value of 19m, but you should eyeball this to get the results demanded by the scene.
In these scene we've used the same approach to add additional weeds in the grass zone. Short reeds and long reeds to the shoreline, and small trees and rocks to the trees zone.
Tip 8 - Use different distribution maps to get interesting interactions
When you create new layers by cloning an existing Forest object it's important to update the distribution settings. If you don't, cloned Forest objects scatter items in exactly the same places. Let's adjust the reeds as an example. Because they were creating by cloning the same source the small reeds and the large reeds share identical distribution settings, so you'll never really see the small ones under the large ones. What we want are overlapping distributions that are hidden and revealed in a believable way. To fix this:
- Select the Forest Object that's adding large reeds to the shoreline.
- Open the Distribution rollout.
- Select a new Distribution map. There are several new maps in Forest Pack 6 that work well for creating layers of forest objects that overlap and interact with one another in interesting ways. We'll use Patches 2 for this example.
![Using altitude-based falloff-image2018-4-16_14-51-25.png]()
- Now that we have a pattern that works it might be necessary to adjust the Density as well. For this example I've reduced the value to 15m to add additional reeds. You can also move the distribution map around the scene using the Offset X and Offset Y properties. This is useful if you want to layer two or more Forest Objects that use the same distribution map and similar densities.

Tip 9 - Use Clusters to add more gaps to the scatter
Sometimes you get a distribution pattern and density that's working well, but you still want to break up the scatter with gaps to add another level of randomisation and reveal other layers. The large reeds are a good example of this. The changes we made to the density are working well but we would like some sparser areas with items removed from the existing distribution. A neat way of doing this is to use Forest Pack's clusters feature, here's how:
- In the Geometry rollout, select the existing items and assign them the same Colour ID.
- Add a new Item to the Geometry list and set it to Disabled. Make sure it has a different Colour ID.
- Now go to the Distribution rollout and change Diversity mode from Random to Clusters. This mode groups together items based on their Colour ID. Because we created a disabled item with a different Colour ID, in effect we're creating gaps in the scatter.
- The nice this about this approach is that you can define the size of these groups in Scene units. For example I'm going to create 5m groups for the reeds object.
- To change the shape of the patches use the Roughness property. The higher this value the more irregular the shape of the group.
- Use Blurry edge to blend the groups together and use Noise to add a little natural variation within each group by including items with different colour IDs.
Repeat this trick to add some interesting interaction to any layered objects.
Tip 10 - Use Camera Clipping and falloff
Let's assume at this point that we have all the layers set-up on the test terrain and it's time to add them to the real scene. First, it's important to do some optimisation. Several of these objects have a high density setting and applying them to a terrain several kilometers wide is not a sensible idea. There are two easy optimisations that should be applied to nearly any object: camera culling and distance based falloff and clipping.
Camera culling can be applied to more or less everything. To illustrate we'll add the trees to the final terrain by unhiding the environment, selecting the trees, and then opening the surface rollout.
- Delete the existing objects from the Surface list.
- Click on + and add the terrain the the Surface list. The trees will populate the entire area using the settings that we set up on the small sample landscape.
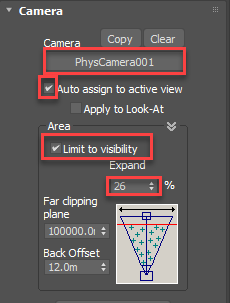
- To limit the objects so that they're only scattered in the camera's view all you need to do is open the Camera rollout and assign a camera to the relevant slot. Then enable Limit to Visibility. Anything that is not visible from this camera's perspective will be removed from the scatter.
- You can even enlarge the frustum slightly so that items still appear in reflections by increasing the Expand property.
![Using altitude-based falloff-image2018-4-16_15-37-23.png]()
- If you are planning to render from multiple cameras, enable Auto-Assign to Active View and the camera used for clipping will be changed automatically when you switch views.
![Using altitude-based falloff-image2018-4-16_15-39-19.png]()
As I mention, you should use this feature on nearly every style to optimise your renders. It's applied to everything in this scene.
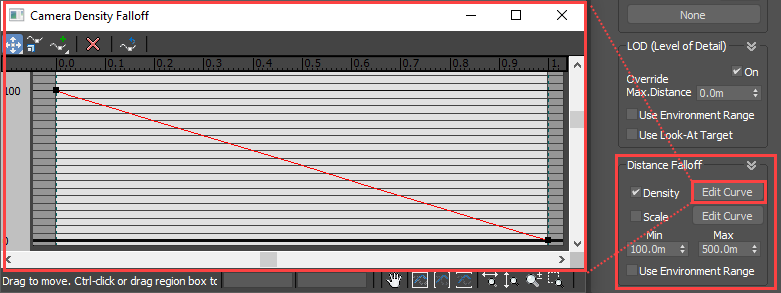
Closely related to this is the ability to clip geometry based on a distance from the camera. With small plants and ground cover there comes a point when they're so far from the camera that they're barely visible. At that point it's really not worth wasting resources computing them. To demonstrate this feature we'll optimise the Forest Pack object used to add the grass object.
- Select the Grass Forest object.
- Because the density of this style is so much higher, this time we'll add the camera clipping before changing the surfaces.
- Once again assign the Camera, enable Auto Assign to Active View and enable Limit to Visibility.
- Now go to the Surfaces rollout, remove the existing list and add the terrain. If nothing appears it's likely that Forest is exceeding the maximum number of items. You can increase this using the Max Density property in the Distribution rollout and by adjusting the Display settings, but really we need to optimise this scene. There's not way we will see the grass on the distance horizon so we should limit to a specified distance from the camera.
- To do this use the Far Clipping Plane property. A value of 500m works well and still includes the island in the midground of the render where the grass is still visible.
- It's also possible to adjust the Density and Scale of objects based on their distance from the camera. To do this enable Distance Falloff > Density or Scale. You can then use the graphs just like we saw earlier to adjust these properties using curves. The X axis is the Distance from the camera and the Y axis is either Scale or Density.
Do the same thing to all the Forest objects, applying camera clipping, limiting the scatter based on distance and finally swapping the temporary surface for the real terrain. We're now ready to make a few adjustments to the scatters to cater for other objects in the scene like the buildings and Jettys.
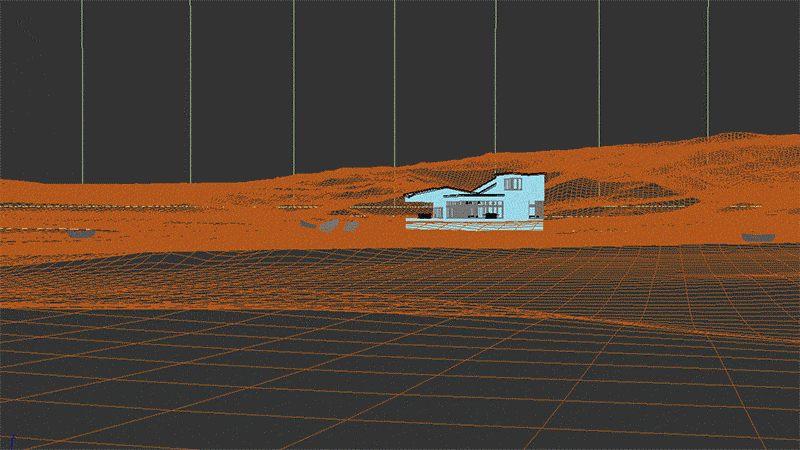
Tip 11 - Add manual areas. For example to exclude the house and Jettys
So far we've used only altitude information to create these scatters. The Final step is to make some adjustments for the composition and the requirements of the scene. These include.
- Removing trees, grass etc from inside the building. To do this you can use a spline that's the shape of the buildings footprint and add it as an exclude area to any relevant Forest objects.
- Remove reeds from the jettys. Fortunately these are RailClone objects that already use a spline to define the footprint. All you need to do therefore is add them as Exclude areas to any affected scatters.
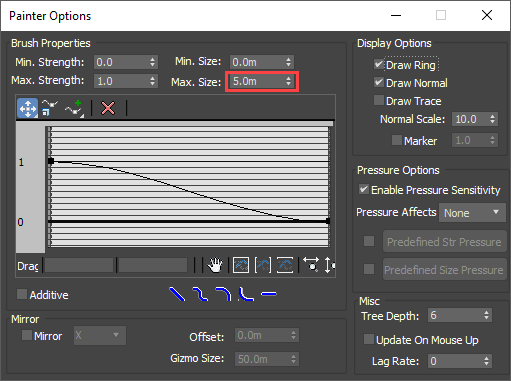
- Use Forest Pack's paint tools to selective remove parts of the scatter to improve the composition. For example we've removed the tall reeds from the bank right in front of the camera. to do this:
- Goi to the Areas rollout and add a new Paint area.
- Set the mode to Exclude
- Open the Brush Settings and increase the size of the brush
![Using altitude-based falloff-image2018-4-16_16-35-34.png]()
- Click to activate the Paint Brush tool and paint in the viewport to remove objects.
- Add some trees using Item editor mode to cast shadows in the foreground.
- Finally, some flowers have been painted in the foreground area to add a little interest using the same Painting Tools but this time with the mode set to Include.
Conclusion
In total 11 Forest Objects were used in this scene, including seaweed at the bottom of the lake, a shore line consisting of two types of reeds and stone, two layers of grass, some large rocks with flowers and tall weeds, and finally saplings and mature trees. That's a lot of layers, but they all used a combination of tips explored in this tutorial to populate and optimise a scene automatically, based on the elevation of the terrain. This is a really powerful technique for quickly fleshing out environments, even if a little manual adjustment is required later. Best of all, if we were to change the terrain, perhaps by sculpting a second island or changing the shape of the shoreline, the system would automatically adapt to the new landscape. Thanks to the camera clipping modes, the view can also be changed and the scene will be re-optimised accordingly.
Thanks for reading, please stay tuned for our next tips and tricks instalment and check out our other videos in the tutorials section of the website and If you use these tutorial files or the techniques shown in this tutorial for your own work, we'd love to see it on our forum.