Файлы ресурсов
Требования
- info RailClone 2.4 Lite or Pro
Introduction
Welcome to another instalment of our regular tips and tricks episodes. After a run of in-depth 30 minute tutorials, this time we’re going to return to something a little more concise as we share time saving graph-snippet for mapping segments and randomizing them with individual tiles or bricks from textures..
In the RailClone 2.4 feature tour we showed how the UVW XForm operator can be used with a Random Offset and Step parameter to grab individual tiles from a texture. The problem here is that while you can enter offset values separately for both the U and V offset, there’s only one step parameter that is used for both axes. This is great as long as the texture has an equal number of tiles, but if the number of tiles is different on each axis then the textures won't align with the segments correctly. In this tutorial we use multiple UVW XForm operators to separate the controls for the U and V axes. In addition, we’ll automatically adjust the segment's UVWs so that they scale to fit an individual brick to save you from having to manually adjust the UVW coordinates on the source geometry.
Building on this concept, we finish with a more advanced example that calculates the offset required to extract textures from a running bond pattern automatically. This is useful for bricks, which are often found on texture sites in this format.
As well as learning more about the UVW XForm operator, this tutorial will also provide a helpful introduction to exporting parameters and creating arithmetic relationships between properties.
By the end of this tutorial you should be able to:
- Create graphs to extract parts from textures.
- Use UVW XForm > Randomise Offset.
- Use UVW XForm > Step mode.
- Create simple arithmetic equations.
- Use the expressions editor.
Download Contents
The exercise files for this tutorial includes the following .max scenes compatible with Max 2010 and V-Ray
- RC_uvw_offset_start.max - The starting file if you want to follow the tutorial.
- RC_uvw_offset_end.max - The result of the completed tutorial
Theory: Cumulative Values
Values in RailClone can either be cumulative or non-cumulative. Non-cumulative values are always overwritten by the node wired last in the chain, whereas cumulative values are additive and the final outcome is the sum of the relevant values in all the nodes wired to the generator's input.
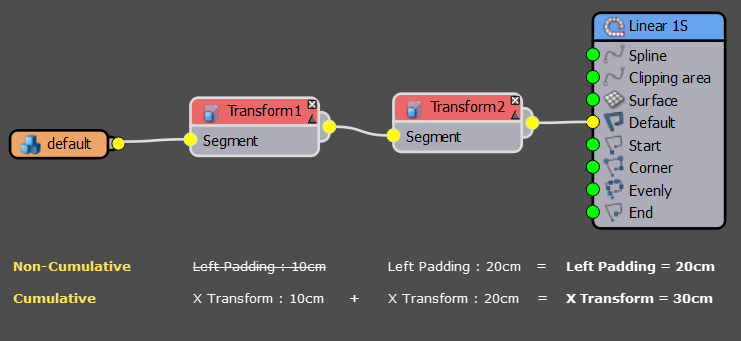
For example, in this node tree there are two Transform operators wired one after another. If you set a Left Padding value of 10cm in Transform operator 1, and a Left Padding value of 20cm in Transform operator 2, then the actual padding value used is 20cm. The second value overwrites the first because padding values are Non-Cumulative
On the other hand if you set a X-Fixed Transform value of 10cm in Transform operator 1, and a value of 20cm in Transform operator 2, then the actual value used is 30cm. The second and the first values are added together because transform value are Cumulative.
This tutorial exploits the fact that the values contained in the UVW XForm operator are cumulative, so we can use two or more UVW XForm operators to control the U and V offsets, step values and more separately.
Cumulative and non cumulative values
Non - Cumulative
- Padding
- Fixed Size
- Alignment
Cumulative
- Fixed and Randomised transforms
- UVW Fixed and randomised Tile, Offset and Rotation
Extracting textures from Stack Bond patterns
In the first example in this tutorial we’ll extract the tiles from a texture that is 4 tiles across by 13 high:
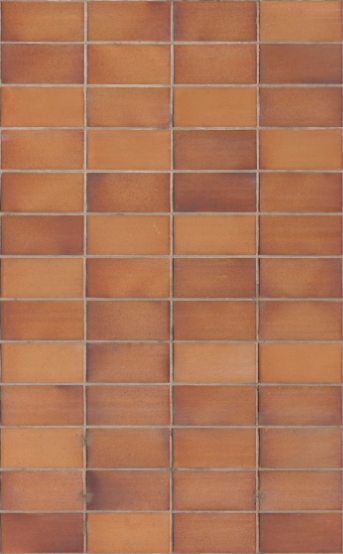
However, rather than hard code these values, we’ll make them editable from the Parameters rollout so that other textures can be used without expecting the user to open the style editor and understand the graph. To do this we export parameters and wire them to Numeric nodes. Whenever a Numeric node is added to a graph, an entry is created in the Parameters rollout so that a value can be entered outside the style editor by the user. Let's try this:
- Open RC_uvw_offset_start.max and select rc_tiles from the scene. This is a simple RC object that creates some tiles with a 6mm padding on all sides. At the moment you'll notice that each tile is mapped with the entire texture so first let's adjust the tiling so that each segment only displays the bottom left tile of the texture.
![Mapping Tiles and Bricks-image2015-6-9 21:30:26.png]()
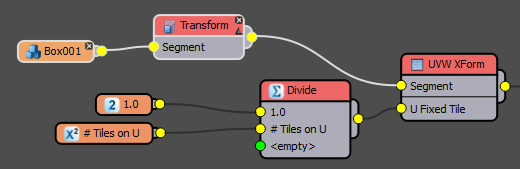
The segment's mapping before we add the UVW XForm Operators - To do this we need to change the fixed-tiling value. UV space is represented by a value from 0 to 1, so if we divide 1 by the number of divisions in the texture, 4 in this case, we get the fixed-tiling value we need. To do this, create a new Constant node, set the mode to float and the value to 1.0. Next create a Numeric Node, changes its name to "# Tiles on U", and set the value to 4 from the Parameters rollout in the Modify Panel. Finally create a Arithmetic node and set the mode to Divide. Wire the Constant node to input 1 and the Numeric node to input 2.
- We have now calculated the tiling value for the U axis. Add a new UVW Xform operator, name it "U XForm" and wire it between the Segments and the generator. Right click on the UVW Xform node and export Fixed > Fixed Tile > U. Wire this to the Arithmetic node.
![Mapping Tiles and Bricks-image2015-6-8 22:35:34.png]()
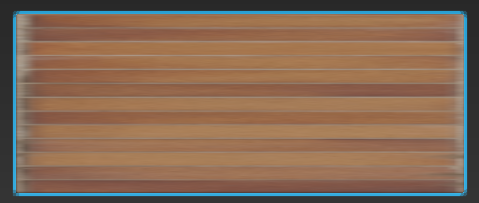
- Only one tile texture should now appear on the U axis for each segment.
![Mapping Tiles and Bricks-image2015-6-8 22:39:59.png]()
- Now we need to do the same thing for the V axis. Because we're going to need it later, do this by creating a brand new UVW Xform operator and export Fixed > Fixed Tile > V. Rename this operator "V XForm" and wire the node between the existing U Xform operator and the generator.
- Select the existing arithmetic and "# tiles on U" node and create a copy. Rename the copied Numeric node to "#Tiles on V" and set the value to 13 from the modify panel. This is the number of tiles on the V axis in the texture, so dividing 1.0 by this value will give us the correct tiling to display a single tile image.
- Wire the copied Arithmetic node to V Fixed Tile.
![Mapping Tiles and Bricks-image2015-6-8 23:0:21.png]()
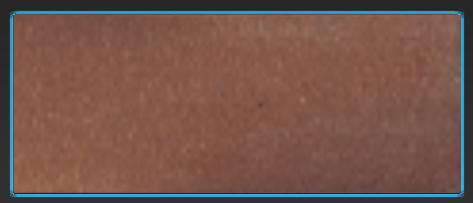
- Each segment will now be mapped with a single tile.
![Mapping Tiles and Bricks-image2015-6-9 21:35:32.png]()
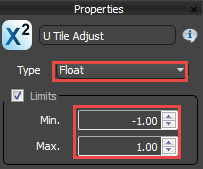
At the moment this also includes the grout or joint between the tiles. It is often the case that we want to remove this and to do that we need to add a couple more controls. Firstly we need a small adjustment to the tiling so that we can scale it to exclude the joints and we then need to be able to slightly offset the position to centre the texture on the segment. To do this, for both the XForm nodes, right click and ExportU or V Fixed Offset, depending on the generator. - Add a new Numeric node to each of these exported values and change the Type to Float. Turn on Limits and set Min to -1 and Max to 1. You can now use these to adjust the position of the map.
![Mapping Tiles and Bricks-image2015-6-9 21:38:4.png]()
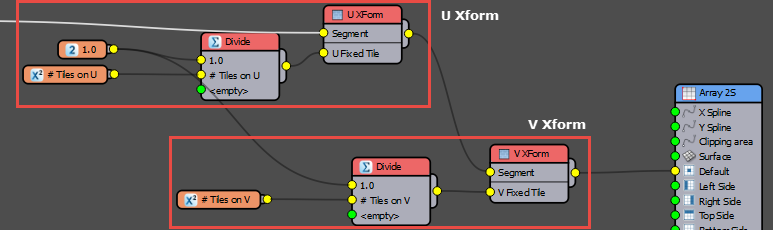
- We already have sizes being piped into the Tiling inputs so to change the scale we need to add an adjustment to the existing values. To do this add a new Arithmetic operator for each UVW Xform and leave the mode set to Add. Wire the Divide nodes to the first input and wire the Arithmetic nodes to the U or V Fixed Tile inputs. Change the Modes of the new Numeric nodes to Float. Turn on Limits and set Min to -1 and Max to 1.
![Mapping Tiles and Bricks-image2015-6-8 23:53:0.png]()
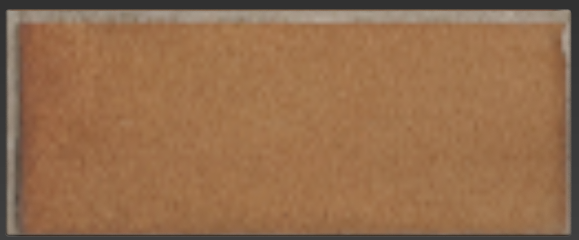
- Adjust these new parameters so that only the tile shows on the segment, clipping off the joints.
![Mapping Tiles and Bricks-image2015-6-8 23:53:26.png]()
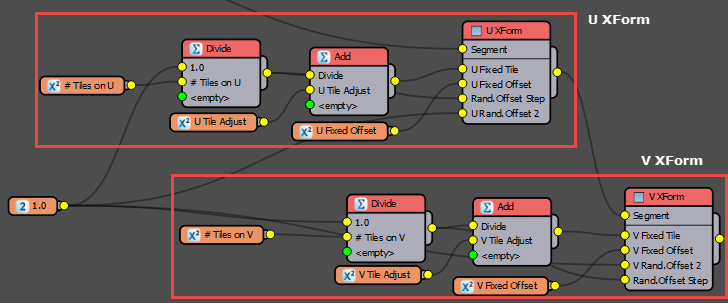
- Now that we've isolated a single tile we can randomise the offset to select the others in the source texture. To do this we'll use the UVW Xform's Randomise features. This enables you to set a range for the Tiling, Offset and Rotation of the UVWs and use a step value as a multiplier to return values from within that range. Fortunately we've already calculated the correct step values by dividing 1.0 by the number of tiles, so we just need to export some values and hook up the existing arithmetic nodes. Before we do that though, make sure Random Offset is turned on by going to the UVW Xform operator's properties and activating Random > Offset.
- Right click on both UVW XForm Operators and export Random > Rand. Offset 2 > U or V, depending on the XForm operator currently selected.
- Right click on both UVW XForm Operators and export Random > Rand. Offset Step
- For the U and V groups of nodes connect each one's Divide node to the Random Offset Step input
- For both UVW XForm nodes connect the 1.0 Constant to the Rand. Offset 2 inputs.
![Mapping Tiles and Bricks-image2015-6-9 0:41:44.png]()

If you've followed this successfully you now have a style that allows you to add a texture with tiles or bricks in a stack bond pattern and extract individual textures, with controls to adjust the offset and scale so that you can clip our the grout or mortar. You can check it works by applying a different material making sure you adjust the "# Tiles on U" and "# Tiles on U" values to match the new texture. The segment's UVs should be automatically recalculated to match the new bitmap. In the next section we'll adapt this idea to use a texture that has the tiles in a running bond pattern.
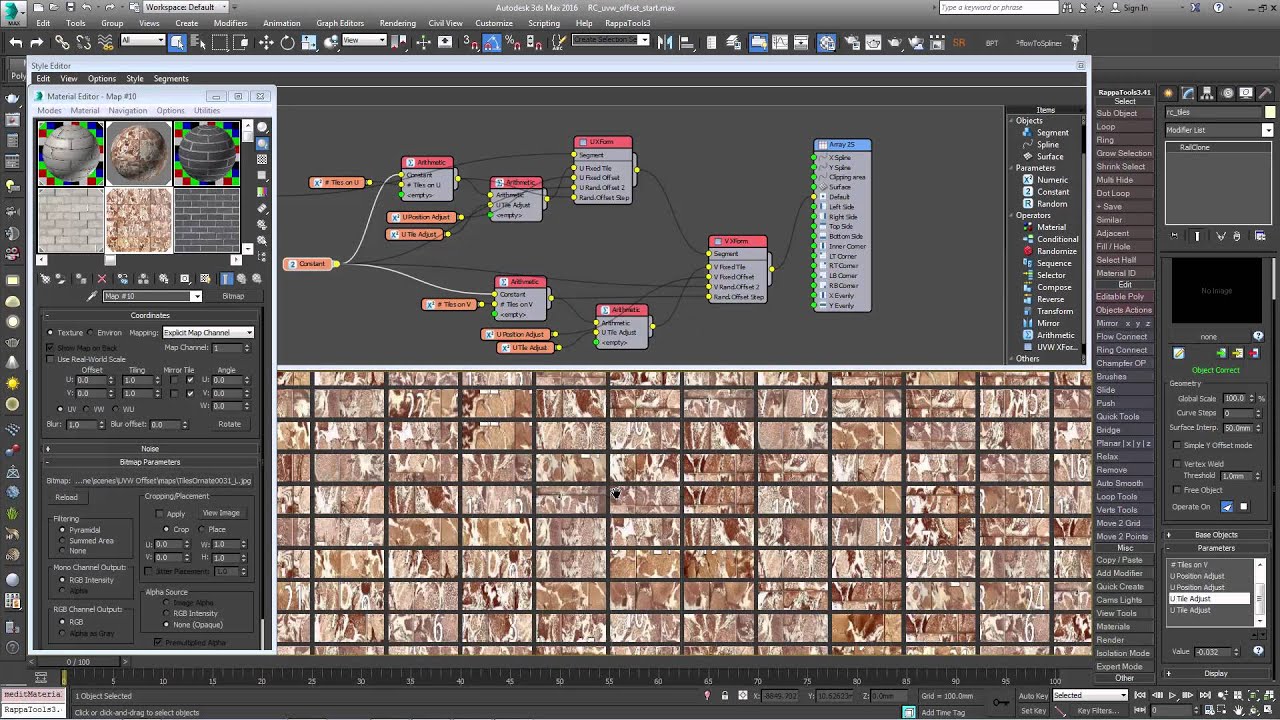
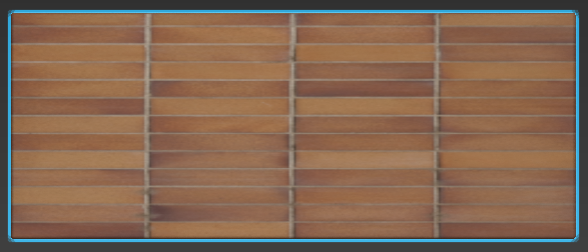
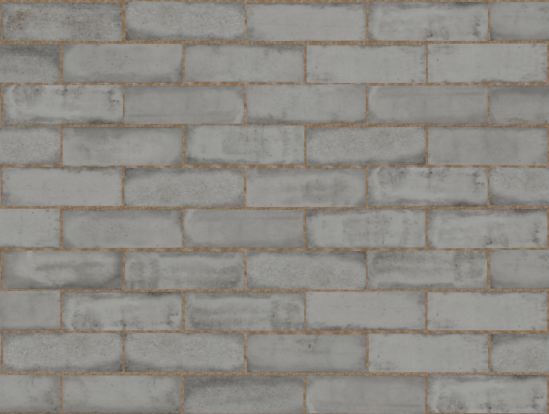
To extract individual brick images from a texture with a running bond pattern, we just need to extend this idea further by adding different settings to grab the bricks from even rows and different settings for odd rows.
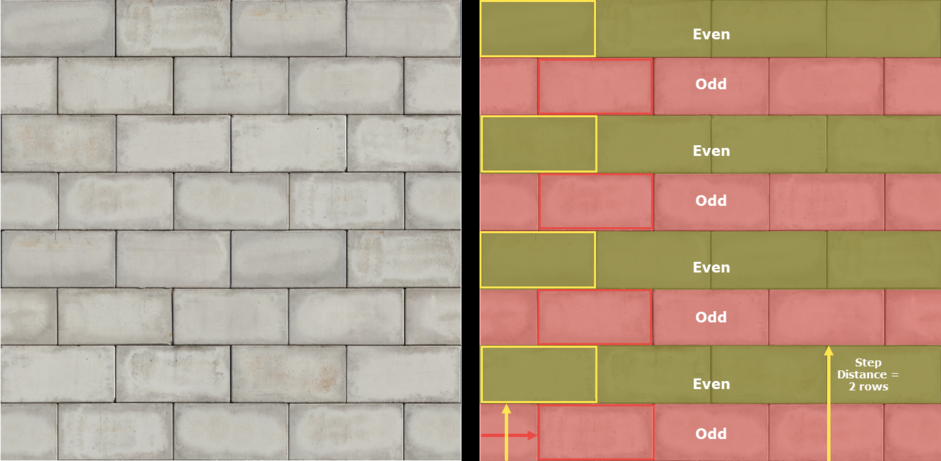
In the image above we can see the texture used in this tutorial. The first row is offset by half a brick so we need to move to texture coordinate half the step distance along the U axis to compensate (shown in red). Because this coordinate change will only work when the bricks are offset, we double the V Step value to pick only the odd rows. This means you now have only whole bricks, but we're missing the even rows show in green. To get the textures from the even rows, we need to create a separate UVW XForm map that moves the UV coordinates up one brick on the V axis. Because it's still using the same step value as the odd rows, this will also sample two rows apart and grab the bricks from the all even rows.
Let's put this idea into practice:
- Select the network of nodes we created in the previous example and click
![Mapping Tiles and Bricks-image2015-6-9 18:16:34.png]() to copy them to the clipboard.
to copy them to the clipboard. - Select rc_bricksand open the Style Editor.
- Click
![Mapping Tiles and Bricks-image2015-6-9 18:20:19.png]() to paste the UVW nodes into the new RC object. As you can see you can easily re-use groups of nodes by copying and pasting.
to paste the UVW nodes into the new RC object. As you can see you can easily re-use groups of nodes by copying and pasting. - Connect the nodes between the existing segments and the default input of the generator.
- To make this graph a little simpler to read as we add more nodes, roll up the existing arithmetic nodes by selecting them and clicking
![Mapping Tiles and Bricks-image2015-6-9 18:20:11.png]() from the top toolbar. This will hide the inputs and maker the graph look less busy.
from the top toolbar. This will hide the inputs and maker the graph look less busy. - Now lets adjust the "# Tile on U" value to 4 and the "# Tiles on V" to 8 to match the number of bricks in the currently applied texture. The bricks look better but because of the running bond some bricks have a joint in the middle.
![Mapping Tiles and Bricks-image2015-6-9 18:24:25.png]()
- So to fix this we need to do two things, select every other row and shift the tiles one half brick to the right. To pick every other row we need to double the current step value. To do this create a new Arithmetic node and wire the existing V Divide arithmetic node to its first input.
- Connect the new Arithmetic node the the V Xform operators Rand. Offset Step input.
- We need to multiply the current V tile value by two, to avoid adding more nodes, let's do this with an expression instead. This can be useful if you want to create arithmetic relationships but avoid adding too many constant nodes. Click on the arithmetic node we just created and change the mode to Expression.
- Open the Expression editor and enter return Input1*2; The Input1 variable calls the value wired to the arithmetic node's first input slot. If more nodes were attached you could access their values using Input1, input2,Input3 ... etc.
- Now all the segments will have a texture with a joint because we are sampling only the odd rows.
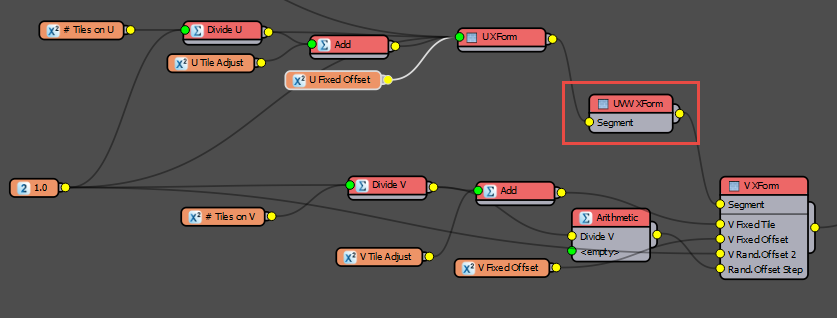
- To shift the samples half a brick to the right, create a new UVW XForm operator and wire it between the two existing UVW XForm operators
![Mapping Tiles and Bricks-image2015-6-9 18:32:29.png]()
- Right click on the new XForm operator and export Fixed > Fixed Offset > U and V.
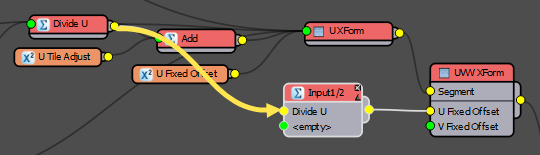
- To get half the size of a brick create a new Arithmetic node and set the mode to Expression. Open the Expression Editor and enter return Input1/2;. Wire the U Divide node to Input Slot 1 and the wire the Arithmetic node's output to the new UVW XForm operator's exported U Fixed Offset input
![Mapping Tiles and Bricks-image2015-6-9 18:38:9.png]()
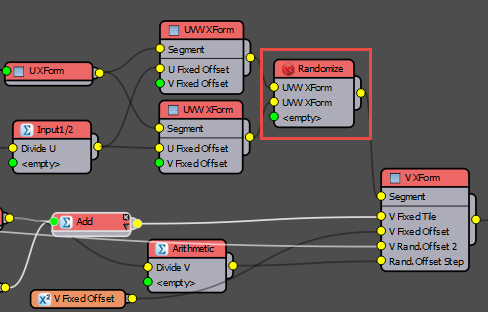
- The set-up is now correctly extracting the brick textures, but only from the odd rows. Lets grab the textures from the even rows as well. To do this create a copy of the UVW XForm operator we just created.
- Wire both the new XForm operators to a new Randomise operator.
![Mapping Tiles and Bricks-image2015-6-9 18:41:28.png]()
- To offset one of these XForm operators to grab the even rows attach the V Divide node to the V Fixed Offset input. This re-introduces the joints to the centre of the bricks but this is because we need to also disconnect the U offset for this node. When the U offset is removed the even segments are no longer offset on this axis and they sample the textures correctly.
![Mapping Tiles and Bricks-image2015-6-9 18:49:11.png]()
 to copy them to the clipboard.
 to paste the UVW nodes into the new RC object. As you can see you can easily re-use groups of nodes by copying and pasting.
  from the top toolbar. This will hide the inputs and maker the graph look less busy.
That completes the setup, this node tree looks confusing at first site but it's a good demonstration of how you can use arithmetic operators to create complex relationships between nodes in RailClone. The good thing about this setup is that you only have to do it once. Now you have this node graph you can copy and paste it into any style where you might want to sample parts from a tiling texture. And because we've exported so many parameters, it's easy to adjust them directly from the modify panel without needing to open the style editor and alter the graph.
Conclusion
Using these technique you should be able to use the UVW XForm operator to help extract regularly spaced elements from tiling textures and minimise the amount of work you have to do slicing and preparing your maps in Photoshop. Of course for some uses you don't need to use step values at all, and you can randomise within the full range of the UV Offset and Rotation values for each segment to create nearly limitless variation. This is much simpler, often requiring only a single node, to see how it's done, check out the RailClone 2.4 features tour video for an example.
Stay tuned for future training, or for more information about many aspects of RailClone's features please see our reference section or visit the