Resources
Requirements
- info 3DS Max 2010, Forest Pack Pro, RailClone lite
Introduction
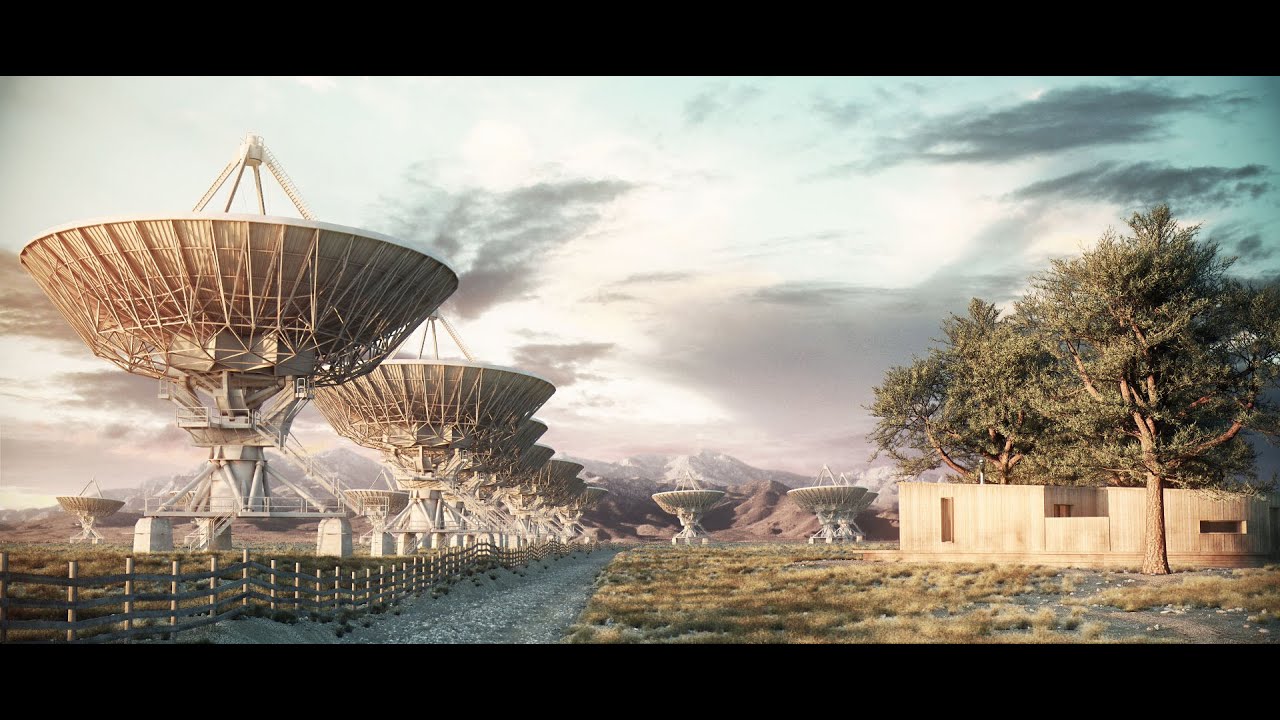
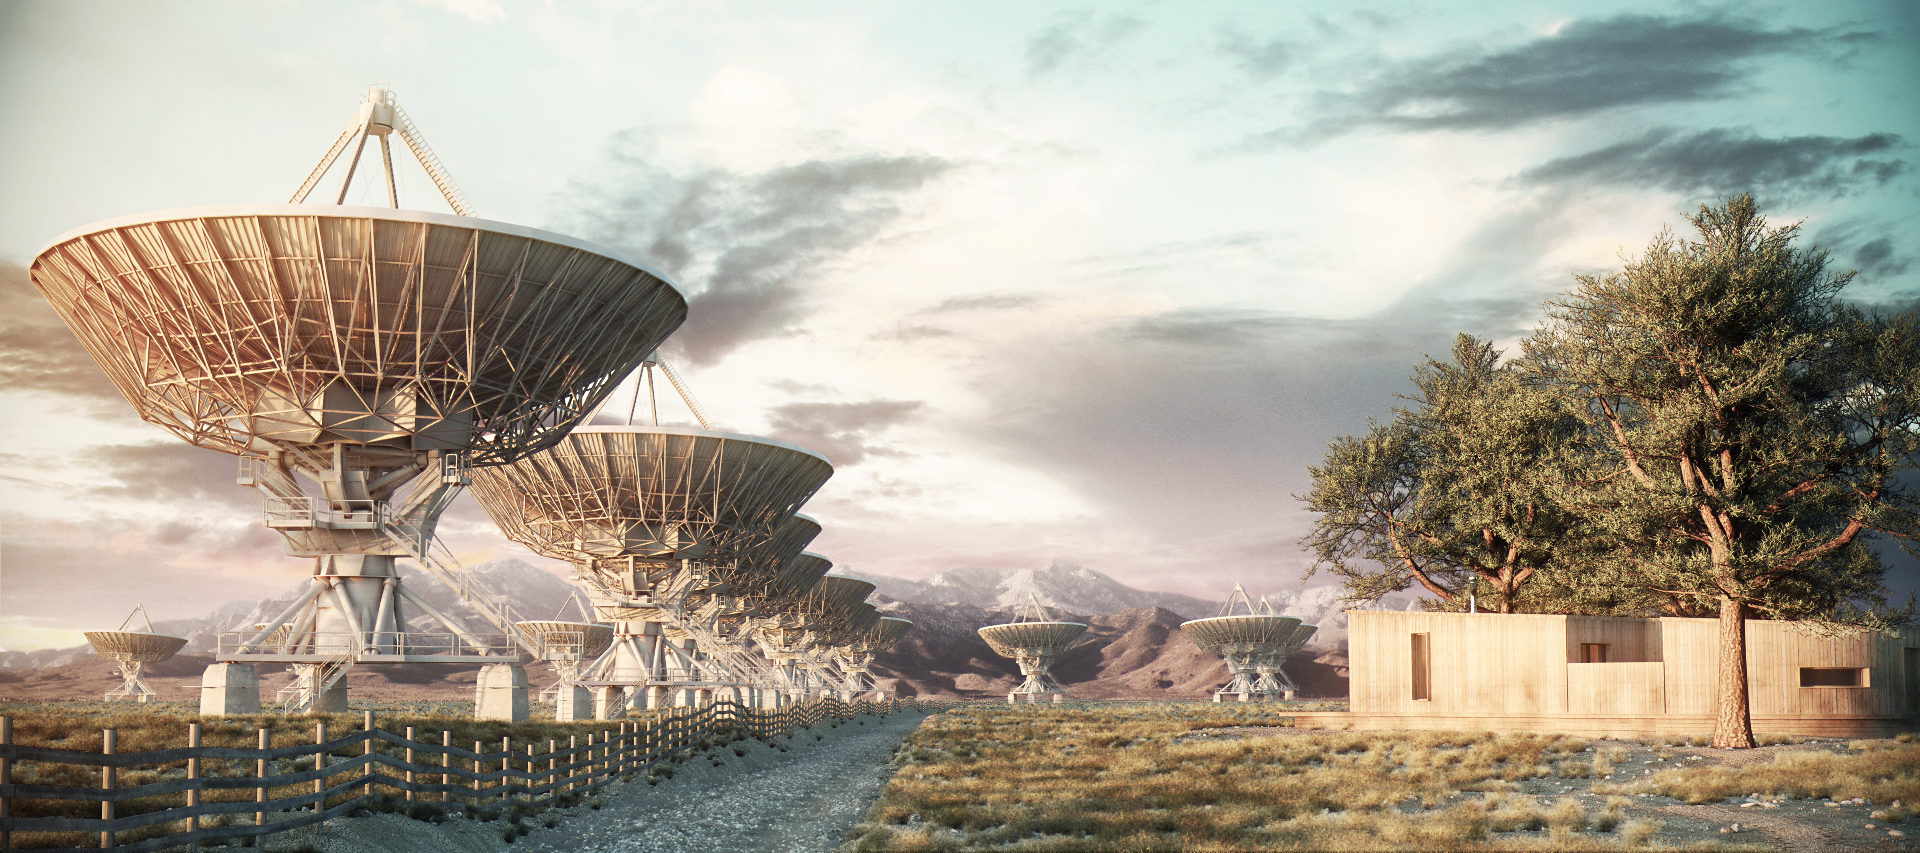
In this Tips and Tricks episode we answer several questions frequently asked by users about animating with Forest Pack, and explain in detail how to control animation applied to scattered objects. Forest Pack has four unique modes that enable you not only to scatter animated objects with significant memory efficiency, but also randomise their starting frames, create offsets and control playback using maps. We'll start by looking at the principles of these modes in detail and then apply the techniques to the simple scene shown above.
By completing this tutorial you will be able to:
- Scatter animated geometry.
- Create looping animations.
- Randomise the starting frame of animated geometry using fixed sample points.
- Control the starting frame of animated geometry using a map.
- Control the absolute frame of animated geometry using a map.
This tutorial requires Forest Pack Pro and RailClone Lite or Pro, the lite version can be downloaded free from here. Parts of this tutorial also use Bercon Maps, and GrowFX though they aren't essential for completing the scene.

The scene files included in the downloads for this tutorial use animated meshes created with the GrowFX plugin by Exlevel. GrowFX greatly simplifies the process of creating parametric plants, trees, flowers and other nature models and also has robust tools for animating wind and growth animations.
If you do not own GrowFX, don't worry! We've included simplified plant animations using Max's native tools. These can be found in a layer called Standard Plants. If you'd like to try GrowFX, a 30 day trial can be downloaded from our store.
Download Contents
The exercise files for this tutorial includes the following .max scenes compatible with Forest Pack Pro, RailClone lite, Max 2010, and V-Ray or Mental Ray.
- fp_animation_start.max The scene starting file if you want to follow the tutorial.
- fp_animation_exercises The simplified exercises to illustrate Forest's four animation modes.
Theory: Forest Pack's animation modes
By default the plugin will not use the animation found on source objects unless explicitly told to do so. To illustrate how to turn on animation and master the different modes used to control playback, open the animation_exercises.max file included in the downloads for this tutorial. Once these exercise are completed, we'll apply these principles to the example scene.
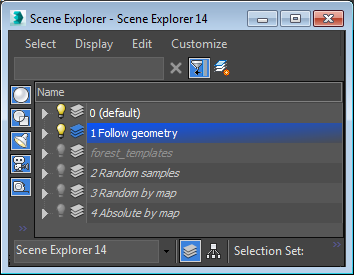
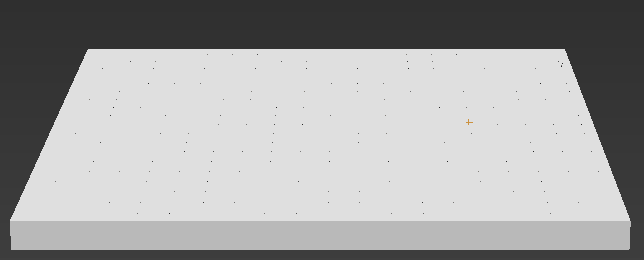
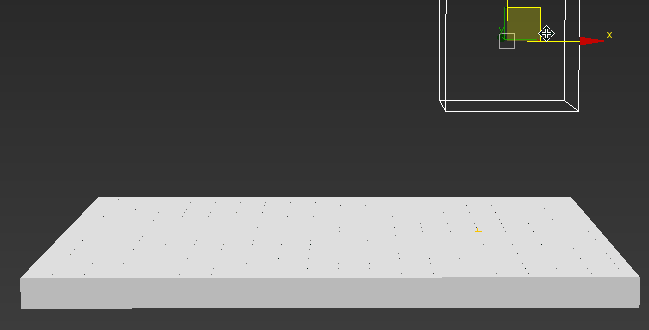
This file contains a simple plane with arrows on it, the arrows are distributed with Forest Pack and laid out in a grid so that we can easily see the effects of changes to the animation controls. Also in the scene, to the left of the plane, are 5 animated objects that we'll use in later exercise. If you click on Manage Layers  , you'll see there are 4 layers, one for each animation mode. Unhide the layer called 1 Follow Geometry.
To get started scrub the animation bar. Nothing happens. As mentioned above, this is because animation is off by default, so for the first step let's enable an animation mode and ensure that we can preview it in the viewport:
Follow Geometry mode
- Select the Forest Pack object called fp_follow.
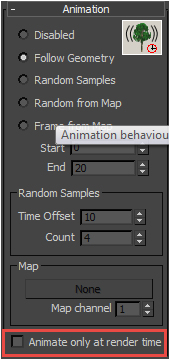
- Open the Animation rollout. Change the mode from Disabled to Follow Geometry.
- Now if you scrub the timeline... still nothing happens. However if you render a few frames, animation is working. This is to maintain performance. By default Forest Pack does not preview the animation in the viewports. To enable viewport previews, uncheck Animate Only at Render Time from the bottom of the animation rollout. Now if you scrub the timeline it works in the viewports, and at render time, as expected.
![Animating in Forest Pack-image2015-2-12%2017%3A43%3A37.png]()
In these exercise files, to make things clearer in the viewport, Forest Pack has been set to display the scattered objects as meshes. If the geometry was more dense, or the scatter area larger this might not be possible. Fortunately Points-Cloud mode also enables you to preview animations, allowing you to get a good indication of the rendered results of more complex scenes. To illustrate this try the following:
- Open the Display Rollout and set the mode to Points-Cloud.
- Select the plane and change the size from 20 x 20m to 600 x 600m.
- Scrub the timeline. You'll see you can still get a decent idea of the animation in the viewports, despite the huge number of instances. Though this geometry is simple, the same would apply for much more complex models.
Randomising the starting frame.
Next we'll look at how to randomise the starting frame of the animated objects. This will allows you to use a single animated model to create a lot of variation by starting instances playing from randomly selected points offset along the timeline.
- Unhide the layer called 2 Random Samples and change the view to the Cam Random Sample camera.
- Select the Forest object called fp_random.
- Open the Animation rollout and check Random Samples.
- Scrub the timeline, the arrow's playback is now randomised.
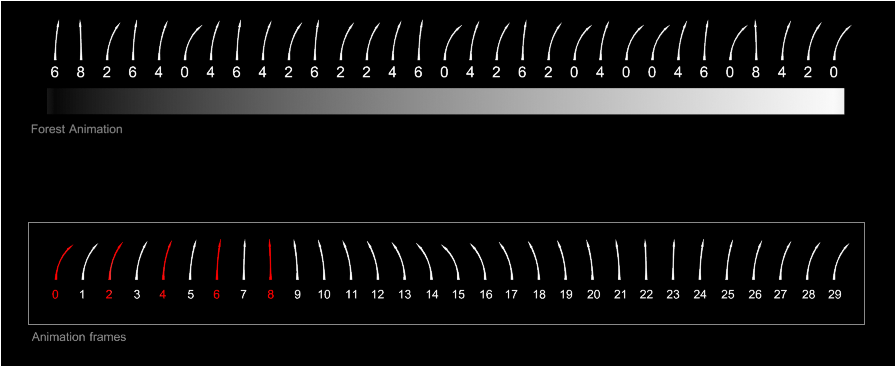
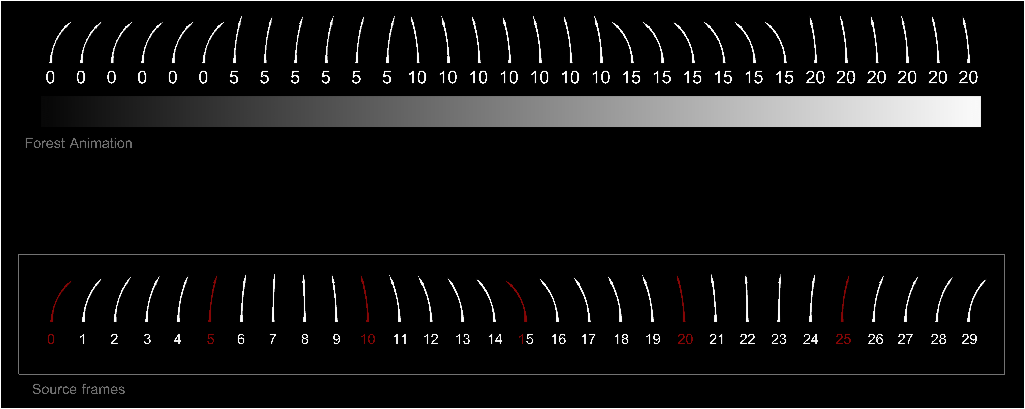
You'll notice when you activate Random Samples mode that the Time Offset and Count parameters become available. These are used to control the sample points along the timeline. To create the points, the Count parameter defines the total number of samples, while Time Offset determines the number of frames between them, starting from frame 0.
For example, if we use a Count value of 5 and a Time Offset value of 2, we get the 5 samples points marked in red in the diagram below. These start from frame 0 with 4 further samples each taken 2 frames apart. The bottom row illustrates the sample points on a 30 frame animation on the source object. In the resultant scatter, shown on the top row, you can see that only these 5 frames are used as a starting point at frame 0.
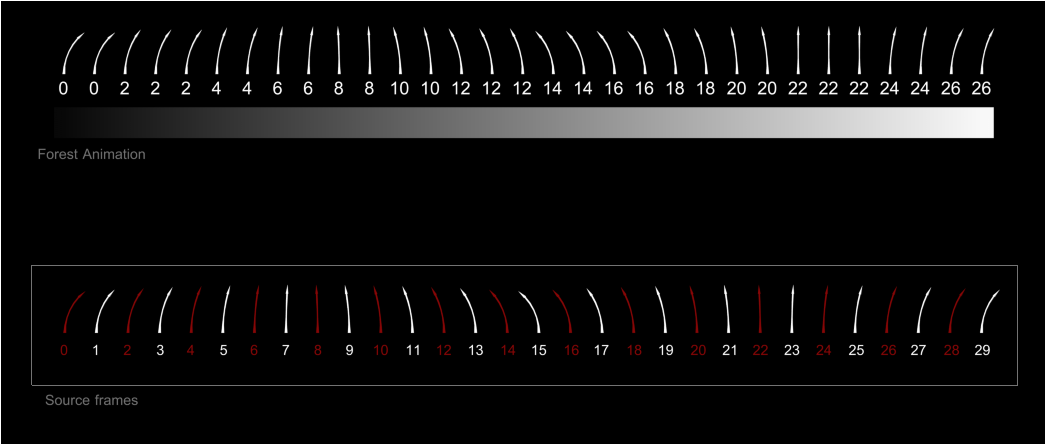
Let's try another example. In the illustration below, the Time Offset value has increased to 5 and the Count is now 6. This returns 6 samples at frames 0,5,10,15,20 and 25, randomly scattered by Forest Pack Pro.
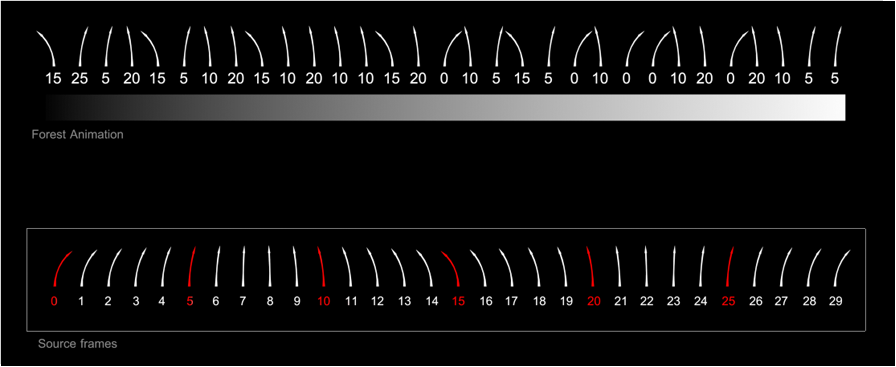
(Note that the larger samples value has resulted in a more pronounced difference in the resultant animation.)
Understanding the Count and Time Offset parameters is the key to mastering this mode and the next, Controlling the starting frame using a map.
A few tips about source geometry
When playing pack the exercise files you'll notice that the animation stops at Frame 30. This is to be expected, it's when the source geometry stops too. In many case this may be the effect you're after, but if you want the animation to continue throughout the entire duration of the shot, you need to be sure that the source objects' animation is long enough. This is especially true when randomising starting points, as the source objects may need to continue animating well beyond the active time segment.
How this is resolved will depend on how the objects have been animated. Types of animation typically fall into two categories, either procedurally generated, for example wind animations created with GrowFX, Speedtree or another foliage modeller, or manually keyframed. In most cases procedurally animated geometry is ready to use without need for adjustment as it continues ad infinitum. For keyframed animations it may be the case that the animation finishes before the scene is over. When this is the case, you can either create a loop, or add additional keyframes. Below is a collection of tips about preparing animated meshes for Forest Pack.
Use parameter curve out-of-range types to create loops
Probably the easiest way to create a looped animation is to use the Parameter Curve Out-Of-Range options found in the graph editor. To illustrate we'll make the arrow animation repeat, instead of stopping at frame 30.
- Select the arrow name Bend with keyframes and open the Curve Editor by clicking
![Animating in Forest Pack-image2015-2-13%2015%3A15%3A54.png]() or going to Graph Editors > Track View - Curve Editor ...
or going to Graph Editors > Track View - Curve Editor ... - From the Controller View in the Curve Editor, locate the Bend with keyframes object and expand the tracks until you can select Modified Object > Bend > Angle.
![Animating in Forest Pack-image2015-2-13%2015%3A24%3A41.png]()
- Click
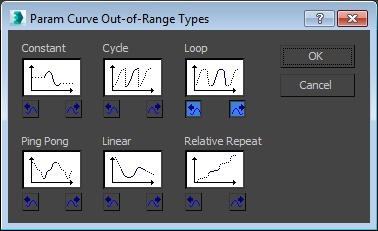
![Animating in Forest Pack-image2015-2-13%2015%3A25%3A16.png]() or go to Edit > Controller > Out Of Range Types.
or go to Edit > Controller > Out Of Range Types. - From the Out Of Range Types dialogue, select Loop (or another appropriate type).
![Animating in Forest Pack-image2015-2-13%2015%3A26%3A55.png]()
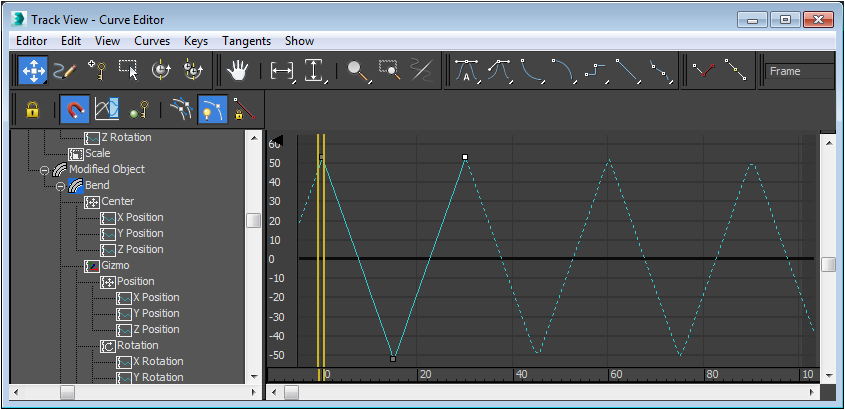
- Note that the graph now shows a dotted line to indicate the new looped animation
![Animating in Forest Pack-image2015-2-13%2015%3A29%3A18.png]()
 or going to Graph Editors > Track View - Curve Editor ...
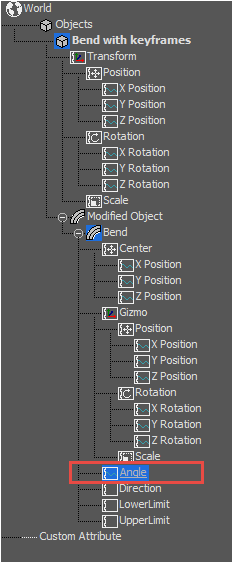
 or go to Edit > Controller > Out Of Range Types.
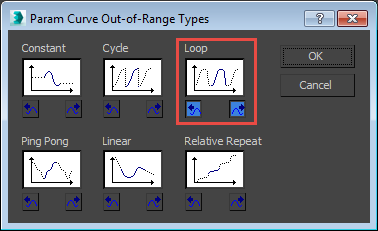
Create endless animations with Noise Controllers
Instead of looping keyframed animation, some foliage animations lend themselves to noise controllers. Using these will create a lot more variation, avoiding the obvious repetition of a keyframed loop and the animation can never accidentally stop. To add a noise controller to create the arrow animation:
- Select Bend with Noise Controller from the scene and open the Curve Editor by clicking
![Animating in Forest Pack-image2015-2-13%2015%3A15%3A54.png]() or going to Graph Editors > Track View - Curve Editor ...
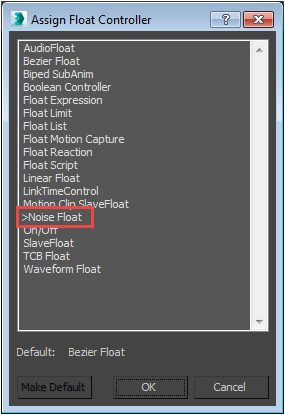
or going to Graph Editors > Track View - Curve Editor ... - From the Controller View in the Curve Editor, locate the Bend with keyframes object and expand the tracks and right click on Modified Object > Bend > Angle.
- From the Assign Controller dialog, select Noise Float.
![Animating in Forest Pack-image2015-2-13%2015%3A50%3A38.png]()
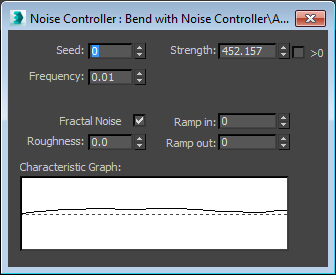
- From here you can set the strength and frequency of the noise. You'll want a low frequency setting of approximately 0.01 and strength of about 450, but feel free to play with these settings to get interesting alternate results. If you play the animation the results of your changes to the noise controller can be previewed in real-time, making it much easier to get a satisfactory result.
![Animating in Forest Pack-image2015-2-13%2015%3A51%3A57.png]()
- Close the dialog and graph editor. This technique, coupled with the bend modifier generates some reasonably decent wind animations for grass and ground cover plants. The non GrowFX grass and tree included in the scene files use this technique. The tree also uses a vertices with soft selection passed up the stack to a noise modifier to create some smaller leaf animation. You can read more about this technique on Ramy Hanna's blog.
Animated transforms are ignored
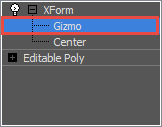
If you animate the rotation, translation or scale of an object and then add it to Forest Pack, you'll find that the animation is not used in the resultant scatter. This is due to some frightening matrix maths, fortunately there's a simple workaround. Instead of animating the object directly, simply add an XForm modifier and animate the Gizmo. This resultant animation is indistinguishable from animating the object directly and works flawlessly when added to Forest Pack.
Animated meshes must be a single object
Many rigid animations comprise a hierarchy of multiple parts. Ideally these should be combined into a single object before being scattered by Forest. Though Forest Pack can scatter groups, each item in a group is treated as an individual object. It is unlikely the original position and orientation of the elements will be maintained.
The easiest solution is to convert a collection of animated parts into a single proxy, this has the added benefit of caching the animation to disk so it's very fast to load compared to calculating animation on the fly.
Using animated RailClone objects
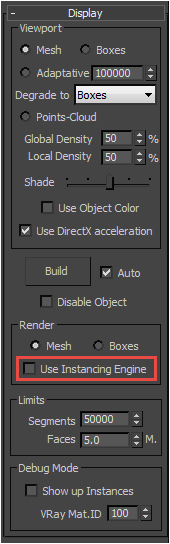
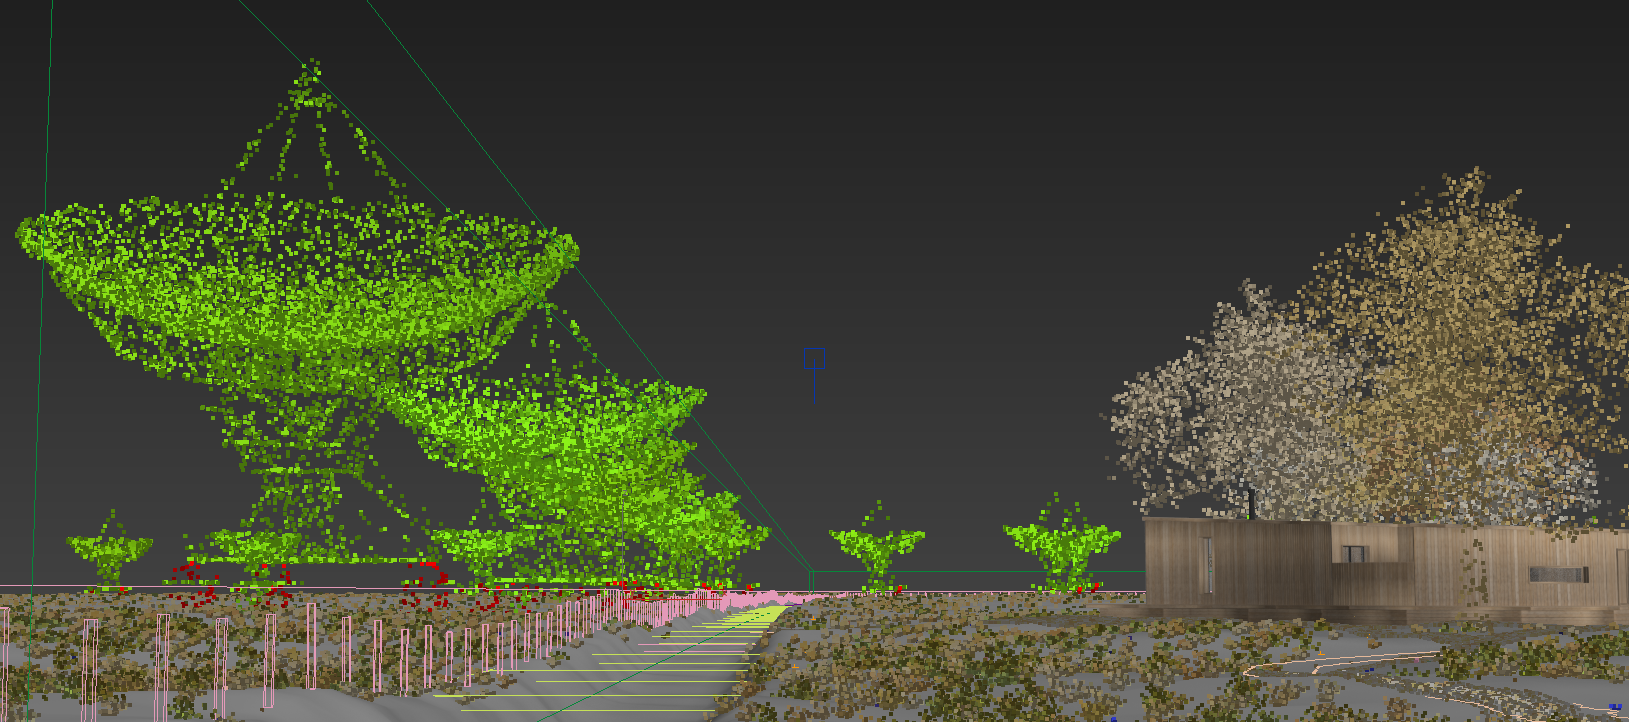
In the included scene, instead of using a proxy for the Radio Telescopes, we've animated the 3 parts of the radio telescope using RailClone - it's a simple setup and there's nothing wrong with using animated RC objects in Forest Pack. The only step necessary to ensure the RailClone object renders correctly is to uncheck Display > Use Instancing Engine.
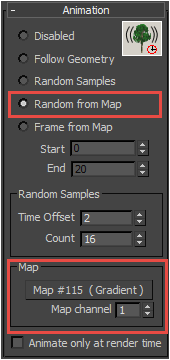
Set the starting frame with a map
Instead of allowing Forest Pack to randomly distribute sample points you can use a grayscale map to precisely specify the placement of a sample point from which an animation will start. To illustrate this, if it's not already, open the animation_exercises.max file included in the downloads for this tutorial and do the following.
- Unhide the layer called 3 Random by Map and change the view to the Cam Random From Map camera.
- Select the forest object called fp_random_by_map
- Open the Animation rollout and check Random From Map.
- Click on the Map slot and select a Gradient map.
![Animating in Forest Pack-image2015-2-13%2019%3A7%3A1.png]()
- Click play, you'll now get a wave effect from front to back. To modify the map just instance it into the material editor, for example you could rotate it so that the wave effect animates from side to side.
These kind of effects are great for animations of wind moving across grass, where you will often witness gusts travelling from one side of a field to the other. Before going any further let's take a look at how this works. As in the previous example, the sample points are controlled using Time Offset and Count parameters to determine the number and frequency of sample points. With this mode however, they are placed on the surface using a map. For example, using a Time Offset value of 5 and Count of 6 we get sample points (shown in red) of 0, 5, 10, 15, 20, and 25. In the top row you can see how a gradient map controls their distribution. The grayscale range is equally divided by the Count value with the first frame represented by black and the last represented by white. When the colour exceeds a threshold, the next frame is displayed. This explains why you can't see frame 25 in the top row as the gradient is only pure white at the very end of the row.
In this second example you can see that if you increase the Count to 15 and decrease the Offset to 2 you'll see a much smoother wave animation in the top row.
More or less any map that is calculated before render time can be used to offset the animation. In particular noise maps are quite effective for creating wind animations across grass and large areas of forest.
Frame from Map
The final mode works a little differently. Instead of creating a number of equally spaced sample points along the timeline from which the animation will start playing, you define a range using Start and End parameters. A map is used to control the absolute frame displayed, based on a grayscale value. Scrubbing the timeline in this mode will not result in animation playback. Instead, to control the animation the grayscale value itself needs to change. Let's take a look at a couple of examples starting with a typical usage; a simplified growth animation.
Creating a growth animation:
- Open the animation_exercises.max file included in the downloads for this tutorial.
- Locate the object called Growth Animation and scrub the timeline. Note that frames 0 - 30 are the growth animation and frames 31 - 60 contain a loopable bend animation.
- Unhide the Absolute By Map layer and select the forest object called fp_random.
- Open the Animation rollout and check Frame From Map.
- Change the Start Value to 0 and the end value to 30. This will ensure we are only using the growth part of the animation.
- Click on the Map slot and select a Gradient map.
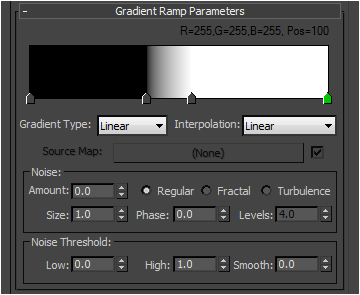
- Open the Material Editor and drag the Gradient map to an empty map slot.
- In the Gradient Ramp Parameters, create a new flag just before the halfway point and set the colour to black. Create a second flag just after the halfway point and set the colour to white. You'll now have a gradient with a large black area at the beginning, a large white area at the end, and a short transition in between.
![Animating in Forest Pack-image2015-2-15%2016%3A37%3A48.png]()
- From the material's Coordinates rollout, set the tiling to 0.2, turn on
![Animating in Forest Pack-image2015-2-15%2016%3A40%3A15.png]() and animate the U Offset value from 1 at frame 0 to -2 at frame 100.
and animate the U Offset value from 1 at frame 0 to -2 at frame 100. - Play the animation. You'll see the arrows grow grow from right to left, controlled by the map.
![Animating in Forest Pack-bymap.gif]()
 and animate the U Offset value from 1 at frame 0 to -2 at frame 100.
Adding a loop after the growth
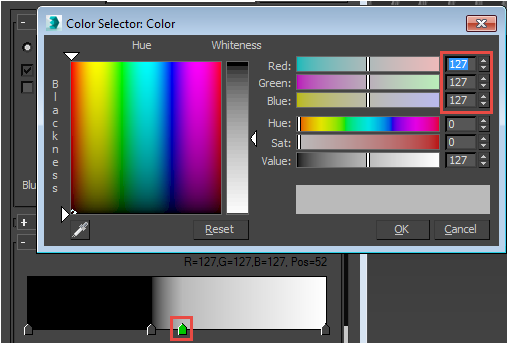
In some situations you may may need a loop to play after the object has grown. This can be achieved by creating animated maps that loop only a portion of the timeline. As mentioned above, this object has a growth animation between 0 and 30 and a looped bend animation between 31 and 60. If we use a range from 0 to 60 in Forest pack this means that the first half of the grayscale gradient ramp will control the growth (rgb, 0,0,0 to 127, 127, 127), while the second half (rgb 128,128,128 to 255,255,255) will control the bend animation. This is easier to explain with an example:
- Select the Forest object from the previous exercise and from the animation rollout change the the End value to 60.
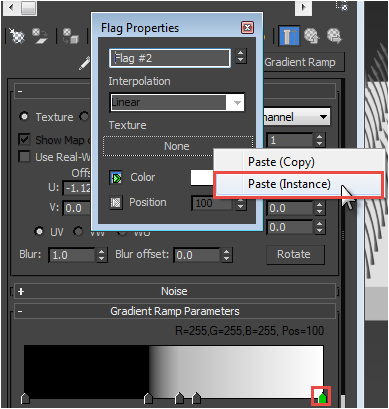
- Open the material editor and select the existing gradient. Select the 1st white flag and set the colour to RGB 127,127,127.
![Animating in Forest Pack-image2015-2-15%2017%3A1%3A48.png]()
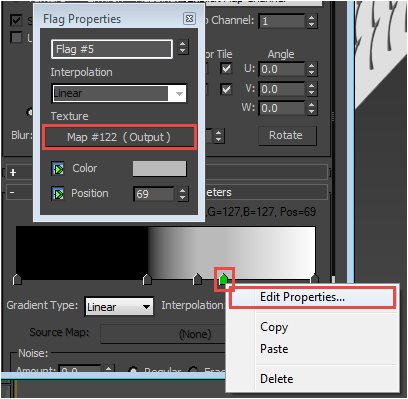
- Add a another flag just after this one, right click on the marker and select Edit Properties ... Click on the texture map slot and add an Output map.
![Animating in Forest Pack-image2015-2-15%2018%3A28%3A11.png]()
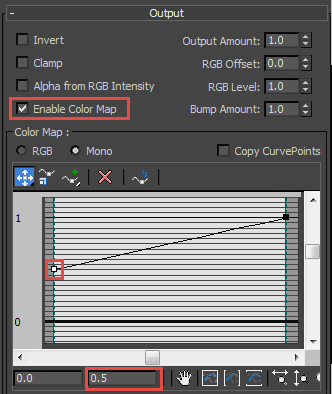
- In the Output Map, turn on Enable Color Map and adjust the curve so that the starting point's value is 0.5.
![Animating in Forest Pack-image2015-2-15%2018%3A21%3A35.png]()
- Click on the Output's Map slot and add a Composite Map.
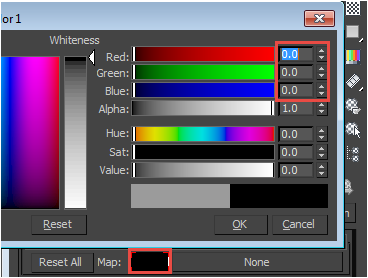
- In the Composite map, on the first layer click
![Animating in Forest Pack-image2015-2-15%2018%3A29%3A22.png]() and change the colour to white. Note that this map type uses floating point values, so enter 0.0 for Red, Green and Blue.
and change the colour to white. Note that this map type uses floating point values, so enter 0.0 for Red, Green and Blue.
![Animating in Forest Pack-image2015-2-15%2018%3A6%3A9.png]()
- Turn on
![Animating in Forest Pack-image2015-2-15%2016%3A40%3A15.png]() and move the timeline to frame 30. Change the colour of the Colour Correct map to White by entering 1.0 for the RGB channels.
and move the timeline to frame 30. Change the colour of the Colour Correct map to White by entering 1.0 for the RGB channels. - Go back to the Composite Map, and add a new layer by clicking
![Animating in Forest Pack-image2015-2-15%2018%3A13%3A53.png]() .
. - Click
![Animating in Forest Pack-image2015-2-15%2018%3A14%3A28.png]() to add a new map to the layer and add a Noise map with a size of 400, a High value of 0.8 and a Low value of 0.2.
to add a new map to the layer and add a Noise map with a size of 400, a High value of 0.8 and a Low value of 0.2.![Animating in Forest Pack-image2015-2-15%2018%3A17%3A34.png]()
- Go back to the Composite map and set the blending mode for the noise layer to Difference.
- Finally we need to make the Solid colour in layer 1 loop. Open the Curve editor by clicking
![Animating in Forest Pack-image2015-2-13%2015%3A15%3A54.png]() or going to Graph Editors > Track View - Curve Editor ...
or going to Graph Editors > Track View - Curve Editor ... - From the Controller View in the Curve Editor, locate the Gradient Ramp, then the Colour Correct map, and keep expanding the tracks until you find the colour animation we just created. Select the Colour 1 track.
![Animating in Forest Pack-image2015-2-15%2017%3A16%3A50.png]()
- Click
![Animating in Forest Pack-image2015-2-13%2015%3A25%3A16.png]() or go to Edit > Controller > Out Of Range Types
or go to Edit > Controller > Out Of Range Types - From the Out Of Range Types dialogue, select Loop.
![Animating in Forest Pack-image2015-2-15%2018%3A6%3A59.png]()
- The graph will now show a dotted line to indicate the new looped animation. Close the graph editor.
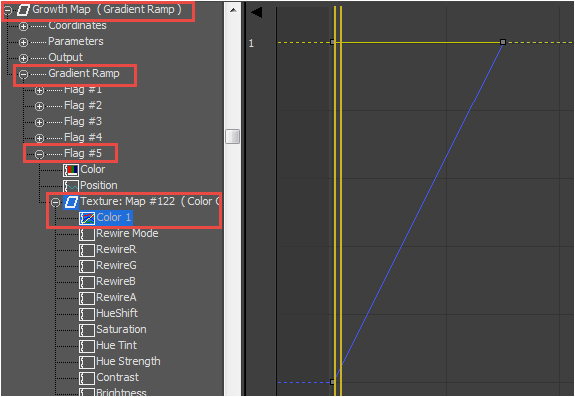
- Go back to the Gradient in the material editor and instance the Output map to the last flag in the gradient ramp.
![Animating in Forest Pack-image2015-2-15%2017%3A22%3A20.png]()
 and change the colour to white. Note that this map type uses floating point values, so enter 0.0 for Red, Green and Blue.
 .
. to add a new map to the layer and add a Noise map with a size of 400, a High value of 0.8 and a Low value of 0.2.
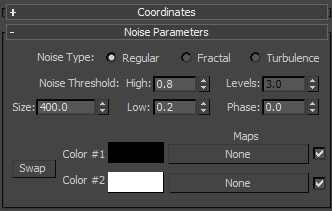
If you play back the animation now you'll get a growth that transitions into a looped bend animation with some randomisation added by the noise.
Distance Based Animation
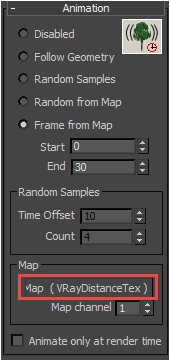
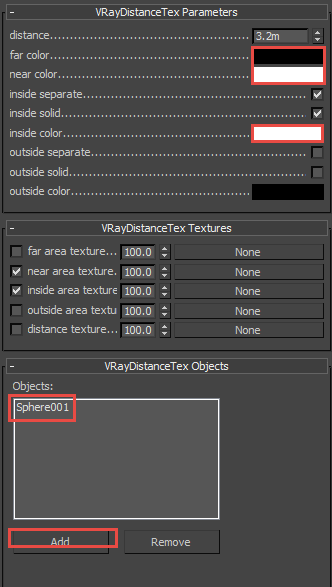
If you are a V-Ray user it is possible to use VRayDistanceTex to drive animations based on their proximity to a list of objects. To do this:
- Carry on from the previous exercise. From the Animation rollout, set the End frame to 30, click the Map slot and add a VRayDistanceTex map.
![Animating in Forest Pack-image2015-2-15%2018%3A48%3A28.png]()
- Drag the VrayDistanceTex map to the material editor and make the following changes:
![Animating in Forest Pack-image2015-2-16%201%3A12%3A39.png]()
- Enter a Distance of 3.2m.
- Click on Add and pick Sphere001 to add to the object list.
- Set the Far colour to Black.
- Set the Near colour and Inside colour to White.
- Select Sphere001 from the scene (It is set to display as a box). As you move it near the surface of the Forest Pack object the arrows will grow in that area.
Vertex Colour driven animation
If you are not a V-Ray user it is possible to get a similar effect as the previous example by using a Vertex Colour map. To do this follow these steps.
This example uses a couple of free scripts:
Blur Vertex Colour by Grant Adam is used to add vertex colours to a stack selection. It can be downloaded here.
Selection Cache Modifier by Peter Wajte enables you to cumulatively cache vertex selections. It can be downloaded from maxplugins.de. Just search for your max version.
- Select Growth Animation, open theanimationrollout and add a Vertex Colour map.
- Select the Surface called Plane004.
- Apply a Volume Select modifier and set the Stack Selection Mode to Vertex.
- Change Select By... > Volume to Object and pick Sphere001 from the scene.
- Check Use Soft Selection and enter a Falloff value of 300.
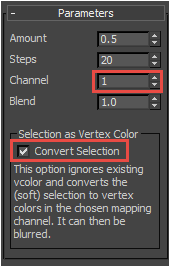
- Add a Blur Vertex Color modifier (see above) and check Convert Selection. Set the Channel to 1 and enter a Blur value of 0.5.
![Animating in Forest Pack-image2015-2-15%2019%3A36%3A43.png]()
Using this technique in combination with Peter Watje's Selection Cache modifier, it is also possible to "Draw" a growth animation using another object. To do this follow these steps:
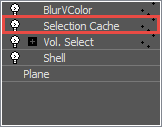
- Add a Selection Cache modifier between the Volume Select and BlurVColor modifiers.
![Animating in Forest Pack-image2015-2-15%2019%3A44%3A10.png]()
- Set the Mode to Replace.
- Turn on Accumulate Selection.
- Click
![Animating in Forest Pack-image2015-2-15%2019%3A54%3A57.png]() and choose a location to save the cache file.
and choose a location to save the cache file. - Click
![Animating in Forest Pack-image2015-2-15%2019%3A55%3A40.png]() to write out the cache. Once this is done you may also optionally click
to write out the cache. Once this is done you may also optionally click ![Animating in Forest Pack-image2015-2-15%2019%3A56%3A7.png]() to turn off the Volume Select modifier, it is no longer required.
to turn off the Volume Select modifier, it is no longer required. - Click
![Animating in Forest Pack-image2015-2-15%2020%3A1%3A13.png]() to preview the animation.
to preview the animation.
 and choose a location to save the cache file.
 to write out the cache. Once this is done you may also optionally click
  to turn off the Volume Select modifier, it is no longer required.
  to preview the animation.
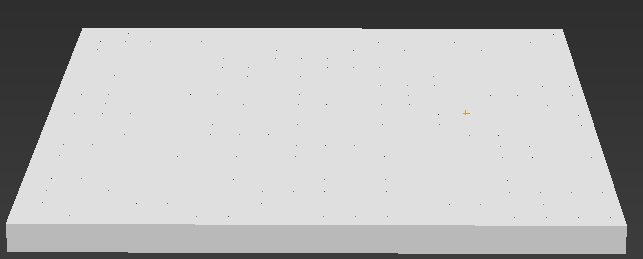
Practice: Applying animation to a simple scene
We've gone into quite a lot of detail about how Forest Pack handles animated geometry, and explored the implications of this using a number of abstract exercises. To wrap this tutorial up we'll see how easy and quick it is to use Forest Pack to control animated objects. In this short section we'll use three of the techniques described above on a small animated scene to see how they apply in a typical situation.
To get started open either fp_animation_start_mray.max or fp_animation_start_vray.max depending on your renderer. In the file there are a number of hidden layers you can activate.
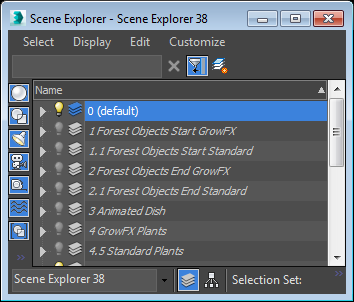
To follow along with the tutorial, If you have GrowFX installed unhide 1 Forest Objects Start GrowFX, otherwise unhide 1.1 Forest Objects Start Standard. If you'd prefer just to see the end results, unhide either 2 Forest Objects End GrowFX, or 2.1 Forest Objects End Standard. In all cases the Forest objects have been set up for you with the exception of the animation, which we'll add by following these steps:
Animating the Radio Telescopes
Start by animating the simplest objects first. The Radio telescopes in the scene all move perfectly in sync. To do this use Follow Geometry mode.
- Pick Forest_Telescopes_Start from the scene.
- Scroll down to the Animation rollout and turn on Follow Animation.
- That's all you need, but to illustrate some of the interop between RailClone and Forest Pack, temporarily turn Off Animate only at render time.
- Unhide the Animate Dish layer and select rc_telescope.
- Go to the RailClone object's Display rollout and turn on Box Mode. Because Forest is in Adaptive Display mode it will update to display the 3 boxes that make up the simplified RC object. This will preview really quickly in the viewports yet will appear as a full mesh in renders without any need to adjust settings before render time.
Randomise the tree animations
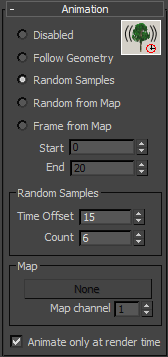
The Follow Geometry technique worked well for the telescopes, but even with good transform randomisation, synchronised trees aren't going to look very convincing. Instead we'll use Random Samples mode to create animation variation. To ensure that the animation looks sufficiently differentiated, use a large Time Offset value.
- Select Forest_Trees_Start.
- Open the Animation rollout and check Random Samples.
- Set Time Offset to 15.
- Set Count to 6. (It's worth remembering that increasing the value increases memory usage).
![Animating in Forest Pack-image2015-2-15%2023%3A0%3A15.png]()
Animating windswept grass
Though that technique works well for the trees, randomising the offset for grass will look too chaotic. We want to simulate gusts of wind blowing across the landscape in waves, so in this section we'll create a custom grayscale map to use with Random From Map mode.
- Select Forest_Grass_Start.
- In the Animation rollout turn on Random from Map and turn off Animate Only at Render Time
- Though we can preview the animation effects in points cloud mode, to see even more clearly the effects of the map we're going to create, it can be helpful to temporarily substitute the plant geometry for something simpler. A useful trick , especially if you're a GrowFX user, is to create a low poly proxy object that contains roughly the same animation as the full geometry. With GrowFX this is as easy as duplicating the object and deleting more-or-less everything except a single stem and the wind animation. Because this proxy object is driven by the same wind source as the hi res plants, we'll get a good indication of the finished animation.
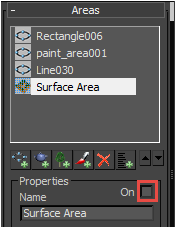
- To enable us to fine tune the animation we'll use a 25m "patch" to help visualise the effect. This has already been created and added to the Forest Object. To enable it go to the Areas rollout and turn off the Surface Area.
![Animating in Forest Pack-image2015-2-15%2023%3A12%3A3.png]()
- Still in the Areas rollout, turn on Rectangle006 and adjust the viewport so you can clearly see the grass patch.
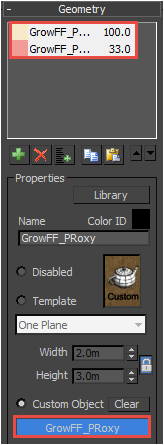
- Go to the Geometry rollout and select the two items by clicking their names while holding down Control. Click on the Custom Object geometry picker and select GrowFX_Proxy from the scene.
![Animating in Forest Pack-image2015-2-15%2023%3A18%3A28.png]()
- From the Display rollout, change the mode to Mesh.
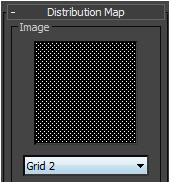
- From the Distribution rollout, change the distribution map to Grid 2.
![Animating in Forest Pack-image2015-2-15%2023%3A21%3A48.png]()
- Now we'll create a map, there's any number of ways to approach this, but in this example we'll combine 2 Gradient maps. Go to the Animation rollout, click the map button and select Gradient Ramp.
- Set the Time Offset to 7 and Count to 20.
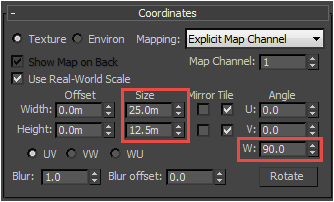
- Drag the Gradient Ramp into the material editor as an instance. In the Coordinates rollout check Use Real-World Map Size, set the Width to 12.5m and the Height to 25m. If you play the animation now you'll see the offset is creating a wave-like motion, moving horizontally across the screen.
- To create a wave that moves horizontally and vertically we'll combine two falloff maps. Click on the Map Type button and select a Composite map.
- Click
![Animating in Forest Pack-image2015-2-15%2018%3A13%3A53.png]() to add a new layer and copy the existing gradient ramp to the new texture slot. Rotate the copied Gradient ramp by 90 degrees and adjust the width and height settings as follow:
to add a new layer and copy the existing gradient ramp to the new texture slot. Rotate the copied Gradient ramp by 90 degrees and adjust the width and height settings as follow:
![Animating in Forest Pack-image2015-2-15%2023%3A48%3A29.png]()
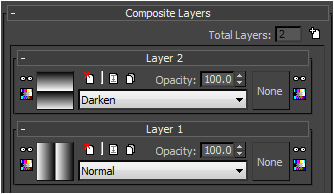
- Change the top layer's blending mode to Darken, The composite map should now resemble the image below. If you play the animation, you should see a wave effect running horizontally and vertically.
![Animating in Forest Pack-image2015-2-15%2023%3A49%3A39.png]()
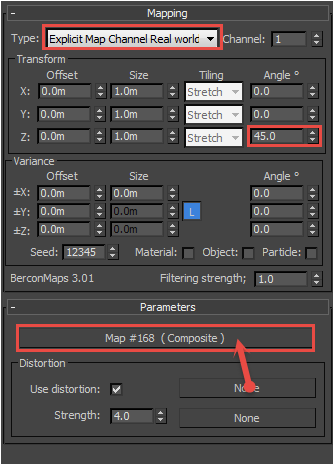
- If you have Bercon Maps installed, you can use it to add further distortion. Click on the Map Type button and select Bercon Mapping. Keep the existing map as a sub map but move it from the Distortion map slot to the main input. Change the Type to Explicit Map Channel Real World and rotate the map 45 degrees on the Z axis.
![Animating in Forest Pack-image2015-2-15%2023%3A58%3A22.png]()
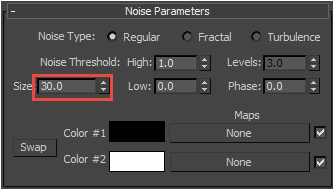
- Set the Distortion Strength to 4. Add a Noise map to the Distort map slot and set the noise map's Parameters > Size value to 30.
![Animating in Forest Pack-image2015-2-16%200%3A2%3A27.png]()
- If you play the animation now you'll see a highly randomised wave pattern that simulates wind. All that's needed now is to restore the correct distribution, area and geometry settings.
- In the Display rollout, change the mode to Points-Cloud.
- In the Distribution Map rollout, change the map to Dense.
- In the Areas rollout , turn off Rectangle006 and turn back on Surface Area.
- In the Animation rollout, turn on Animate Only at Render Time.
- Finally, in the Geometry rollout, replace the GrowFX proxy objects with GrowFX_Prarie_Grass and GrowFX_Red_Fesue (or non Growfx versions if applicable).
- Render!
Conclusion
The video below demonstrates the final render, The sky and mountains in the background have been added in After Effects along with some basic post-production:
Using these techniques gives you a great deal of control when scattering animated objects, from simple synchronised animation, to advanced manipulation of offsets, and absolute playback using maps. In the last part we covered some basic uses in a real scene, but I hope that you can see the creative potential in these techniques and that they help you save time and produce great work! We'll be returning to animation in future instalments to look at more specific and unusual uses for these tools. In the meanwhile stay tuned for future Forest Pack and RailClone training, or for more information about many aspects of Forest Packs' features please see our reference section or visit the tutorials page for more Tips & Tricks videos and in-depth tutorials.