Resources
Requirements
- info 3DS Max 2011, RailClone Pro 2.1
Introduction
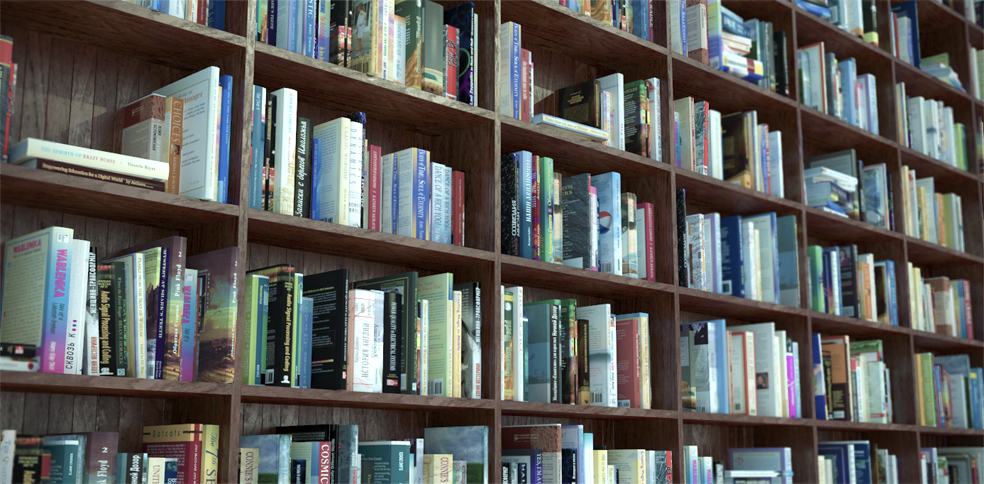
In the previous Tips&Tricks episode we looked at using RailClone to create parametric shelves. In this tutorial we'll continue to use RailClone to populate these shelves with randomised books. There are many possible approaches for creating the distribution path for the books, but this tutorial will focus on using a one dimensional array with splines positioned along the rear of each shelf. This is ideal where the shelving is of unequal heights. Alternatively if the shelves are evenly spaced it is possible to use the same technique in a 2D array to automatically create all the shelving based on simple height and width dimensions. Please see the scene files for examples of both techniques.
By completing this tutorial you will be able to:
- Randomise geometry and control the probability of a segment being selected.
- Randomise materials.
- Adjust alignment and rotation,translation and scale using the transform operator
- Use conditional operators to test distance along a spline segment.
- Nest generators.
Preparing the geometry
No special modelling is required for the books used in this style. A range of sizes and shapes will give you improved variety and realism but it is possible to create a similar effect from a single book by adding size randomisation using the segment's Properties>Transform>Randomise>Scale controls.
The books use two material IDs. ID 1 is reserved for the page edges and 2 is assigned to the book's cover. The multi-sub material already applied to the RailClone object has 99 book cover textures from IDs 2 - 100.
Book Textures
The textures used in this tutorial were created by Nikita Gushchin. Due to licensing restrictions they are not included in the download but can be obtained free by visiting HQ Details. Simply drop the .jpg files into the maps folder to use.
Download Contents
The exercise files for this tutorial includes the following .max scenes compatible with V-Ray and Mental Ray.
- books_start.max The starting file if you want to follow the tutorial.
- books_end.max The result of the completed tutorial
- books_2d_array.max A demonstration of the same style used in a 2D dimensional array
- books_plus_shelf.max An example demonstrating how the techniques in this tutorial can be combined with the shelving tutorial to automatically create shelving and books in a single object.
Creating the style.
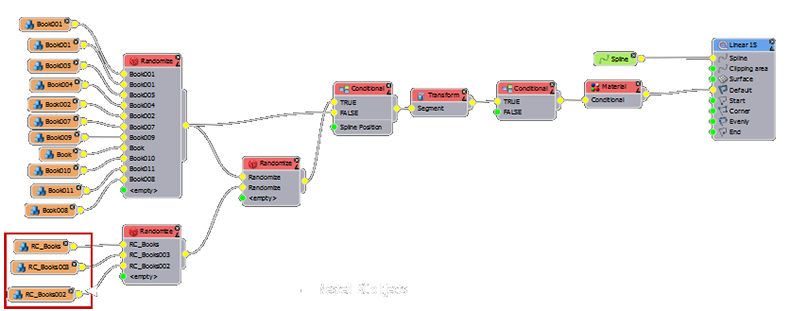
Step 1. Create rows of books:
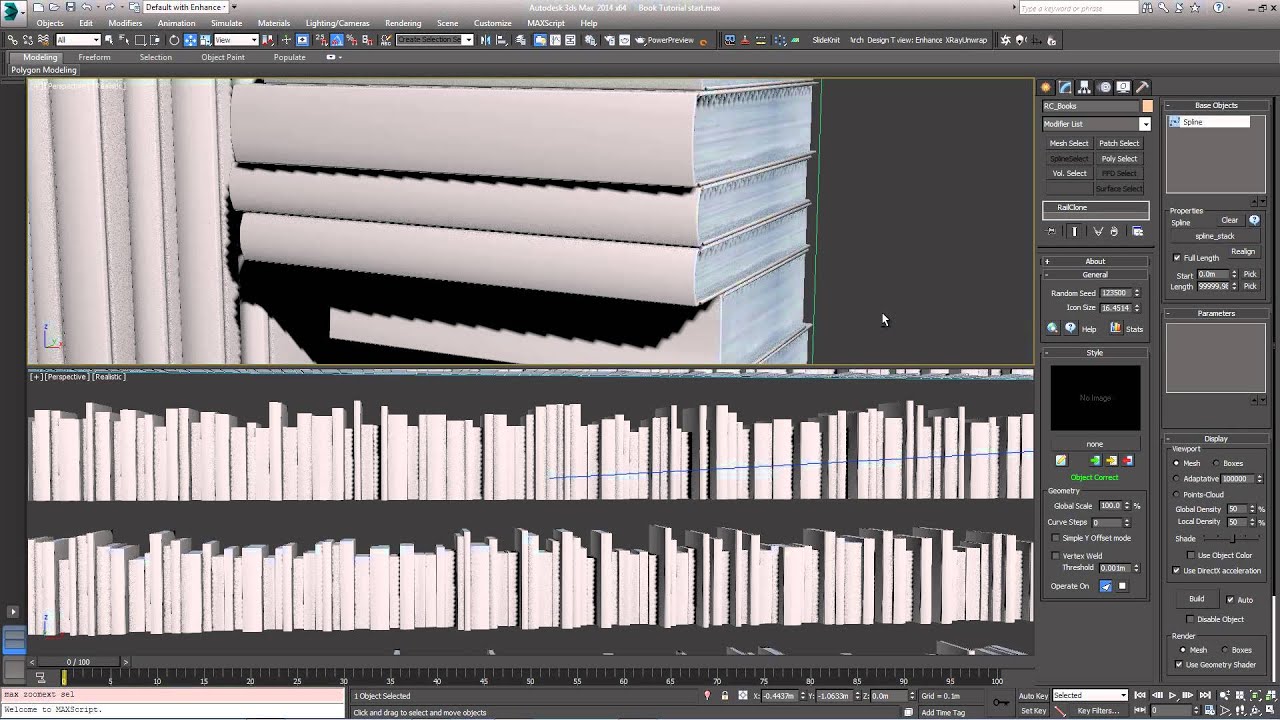
rc_books
- Select RC_books from the scene and open the style editor. To save time there are 11 book already added to the style, none of the segment's default settings have been changed.
- Add a new L1S operator and Spline node and wire them together.
- Select the Spline node and pick spline_shelves from the scene.
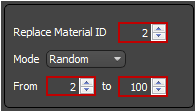
- To randomise the textures on the books, add a new Material operator. The cover is on material ID 2 so set the Replace Material ID value to 2. Set the From and To values to reflect the number of maps you will be using. In this case we have 99 textures so set the From value to 2, and the To value to 100.
![Creating randomised books-rc_mat_id.png]()
- Add a new Randomise operator. connect all 11 books to the inputs then wire the output to the Material node. You will now have a randomised selection of books following the spline.
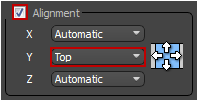
- We want the spline to represent the back of the shelving so we need to move the alignment point on the Y axis. To avoid having to do this individually for every segment, add a new Transform operator between the Randomise and Material nodes. Go to the Transform operators setting and change the General>Alignment>Y value to Top.
![Creating randomised books-rc_transform1.png]()
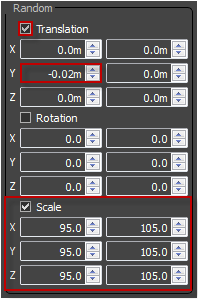
- To add more variety to the books we can add a little size and Y translation randomisation. Still in the transform operator go to Transform>Random and turn on Scale and Translation. Use the settings as illustrated in the screen shot below:
![Creating randomised books-random_step_1.png]()
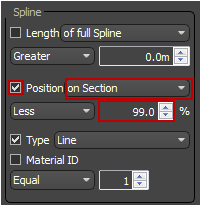
- At the end of the spline you will notice that some books are being sliced. We could turn on the generator's adaptive mode to prevent this but when using segments with random widths you will get occasional overshoots which is not ideal. Instead we will use a conditional operator to stop segments from being generated near the end of the spline segment's length. To do this add a new Conditional operator between the Transform and the Material node.
- In the Conditional operator's Spline settings, turn on Position and pick On Section from the drop down menu. Set the percentage value to 98.6%. This value may need to be adjusted depending on the length of the spline so you may wish to export it for easy access.
![Creating randomised books-rc_conditional.png]()
To create the stacks and angled books we'll nest multiple RailClone objects. In the next two steps we'll create these two new styles and in the final step incorporate them with the books we just created.
Step 2. Create stacks of books
rc_books_stacked
- Clone the RC_books object we just created and name it books_stacked.
- With the new RailClone object selected, open the style editor find the Spline node and pick spline_stack from the scene.
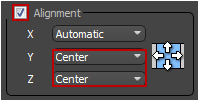
- We now have a stack of books but the alignment needs to be changed. Open the Transform node's parameters and change the Y and Z Alignment to Center.
![Creating randomised books-rc_transform2.png]()
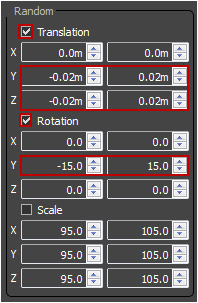
- To add some randomisation to the stack, while still in the Transform node's settings, turn on Transform>Random>Translation and set the Y and Z minimum to -0.02m and maximum to 0.02m.
- Turn on Transform>Random>Rotation and set the minimum to -15 and maximum to 15.
![Creating randomised books-RC_randomise_transforms.png]()
- To stop books being sliced at the top of the stack, select the L1S generator and set Properties>Rules>Default>Mode to Adaptive.
![Creating randomised books-adaptive_mode.png]()
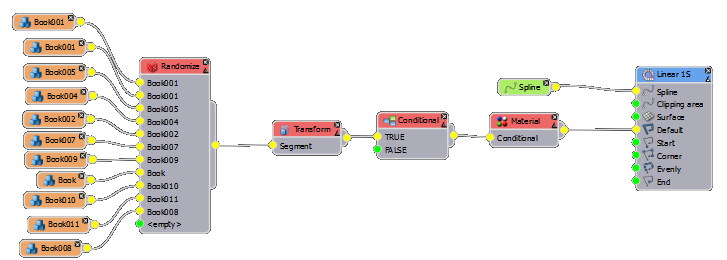
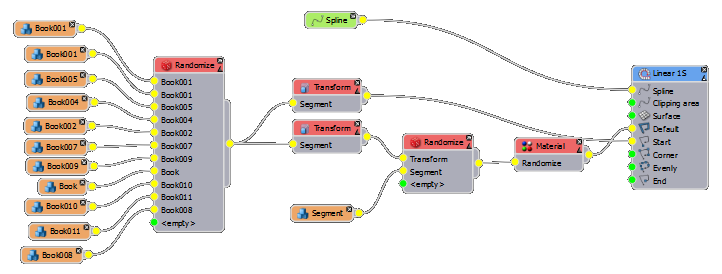
- We now have a stack of books but if you change the seed value you will see that it is always the same height. To create stacks of varying heights we can randomly add an empty segment to the sequence. Adding an empty segment with no padding values "breaks" the array meaning no further segments appear after that point, a useful quirk that can be exploited to create random numbers of books.
- Add a new Random operator between the existing randomise node and the transform. See the node tree above for clarification.
- Create a new Segment and wire it to the second input. You will find that by changing the seed value you now get different numbers of books in the stack. To change the chance of an empty segment being selected you can change its Presence % from the Random operator's properties. Decreasing the presence of the empty segment increases the probability of getting taller stacks.

Step 3. Create angled books
books_angled_left
books_angled_right
- To create angled books clone the books_stacked object we just created, rename is Books_angled_left and assign it to the spline called spline_books_left
- For each Segment, do to the Transform rollout and disable Trandform Affects Size
- Open the style editor and select the transform node. Change Properties>General>Alignment Y to Top and Z to Automatic.
![Creating randomised books-rc_transform1.png]()
- Deselect the randomisation tick box for translation .
- To angle the books change min and max Properties>Transform>random >X>Rotation value to -5.
- Finally we need to add a normal upright book for the angled books to rest against. To do this wire the Randomise node that is directly connected to the book segments to a new Transform operator. Set the new Transform node's Properties>General>Alignment Y parameter to top, and wire this into the Start input of the L1S Generator.
- That completes the books angled to the left. To create a new style with books angled to the right, simply clone this RailClone object and rename it Books_angled_right, select the new object and open the style editor.
- Assign the spline named spline_books_right.
- Find the transform operator responsible for tilting the books and change min and max Properties>Transform>random >X>Rotation value to 5.
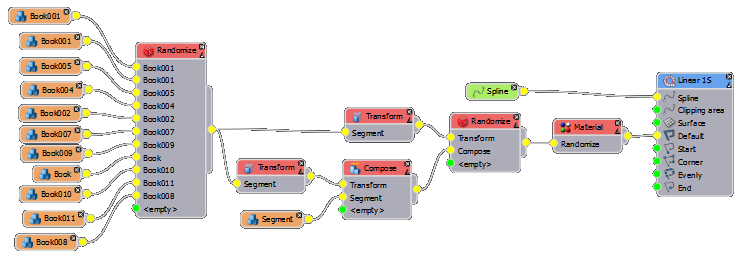
- Create a new Compose object, unplug the transform node from the Start input of the generator and attach it to the first slot in the new Compose node. Attach the empty segment to the second slot of the new compose node.
- Finally, replace the empty Segment in the second randomise node with the Compose operator we just created.
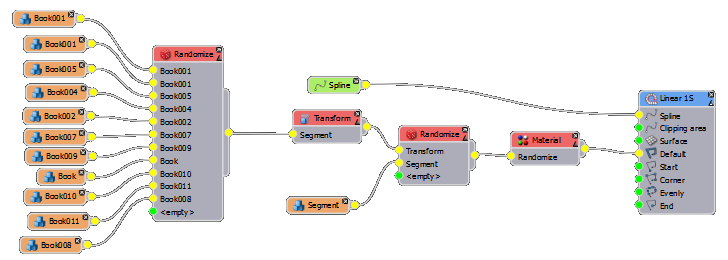
Step 4. Nesting RailClone objects
rc_books (finished style)
- Select the rc_books from the scene and open the style editor.
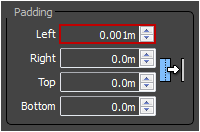
- Add a new Segment for each of the RailClone objects just created and pick books_stacked, books_angle_left and books_angle_right from the scene. Add a 0.001m left-padding to the books_stacked segment to prevent the occasional appearance of empty segment's from stopping the array.
![Creating randomised books-left_padding.png]()
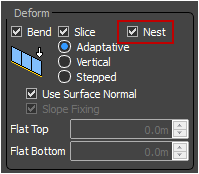
- For each of the new segments turn on the Properties>Deform>Nest tick-box. This will ensure that each instance of the embedded RailClone objects takes a new random seed.
![Creating randomised books-rc_nest.png]()
- Wire these segments into a new Randomise operator.
- To prevent these larger segments appearing too close to the end of the spline and being sliced, clone the existing Conditional modifier and plug the new randomise node into the False input. Connect the book's randomise node to true. Reduce the Position on Spline Segment value to about 93%.
- Finally, create another new randomise node and wire in the book's existing randomise operator and the conditional operator we just created. In the randomise operator's parameters, set the presence of the conditional input to 10%.
![Creating randomised books-rc_presence.png]()
- All the probabilities can used to achieve different results. Simply adjust the presence values to control the number of angled and stacked books that appear in the style.

Conclusion
In this style we nested 3 RailClone objects to create random numbers of angled and stacked books. To distribute the books this style uses one spline per-shelf but it is also possible to use exactly the same technique in the X Evenly slot of an A2S generator to automatically generate equally spaced shelves from a simple spline and height dimension. Alternatively you could incorporate this into the previous bookcase tutorial to generate the shelving and books in a single style. Examples of both these approaches can be found in the scene files downloadable on this page.
Though this example looks at distributing books, the same principles can easily be applied to other objects. It also possible to nest 2D arrays which can be used for randomising objects along the depth as well as width of the shelf, useful for placing products on shelves in shops or supermarkets.
Stay tuned for future training, for more information about many aspects of RailClone's features please see our reference section or visit the tutorials page for more Tips&Tricks videos as well as in-depth tutorials.