Resources
In this tutorial, we’re going to share several useful techniques to quickly create entire cities. Staring with a simple grid, we’ll demonstrate how to populate a city with 3 types of building, each showcasing a different technique. We’ll start with courtyard buildings, add towers that are automatically scaled and oriented to fill an entire city block, and finally fill blocks with multiple mid-size commercial buildings.
All these techniques use RailClone, our unique procedural modelling tool. In addition to useful layout tools, RailClone is able to render enormous polygon counts, making it well suited for this kind of task. Don’t worry if you don’t have RailClone, you can use the free version which features many of the features found in the Pro version. This Lite edition limits you to 3 source building models per RailClone object but apart from that all the other techniques shown in this tutorial will work fine.
To populate the city you can use existing assets or model them yourself. In this tutorial, we’ll demonstrate using buildings from Evermotion’s extensive collections. The courtyard houses come from collection AM172, the skyscrapers and towers from AM181, and the mid-size commercial buildings from collection AM203. We will also use low-poly cars from collection AM132 to fill the roads. If you visit the Evermotion’s website, you can download a selection of free samples from each collection to follow along with the exercises.
Step 1 - Creating a City Grid
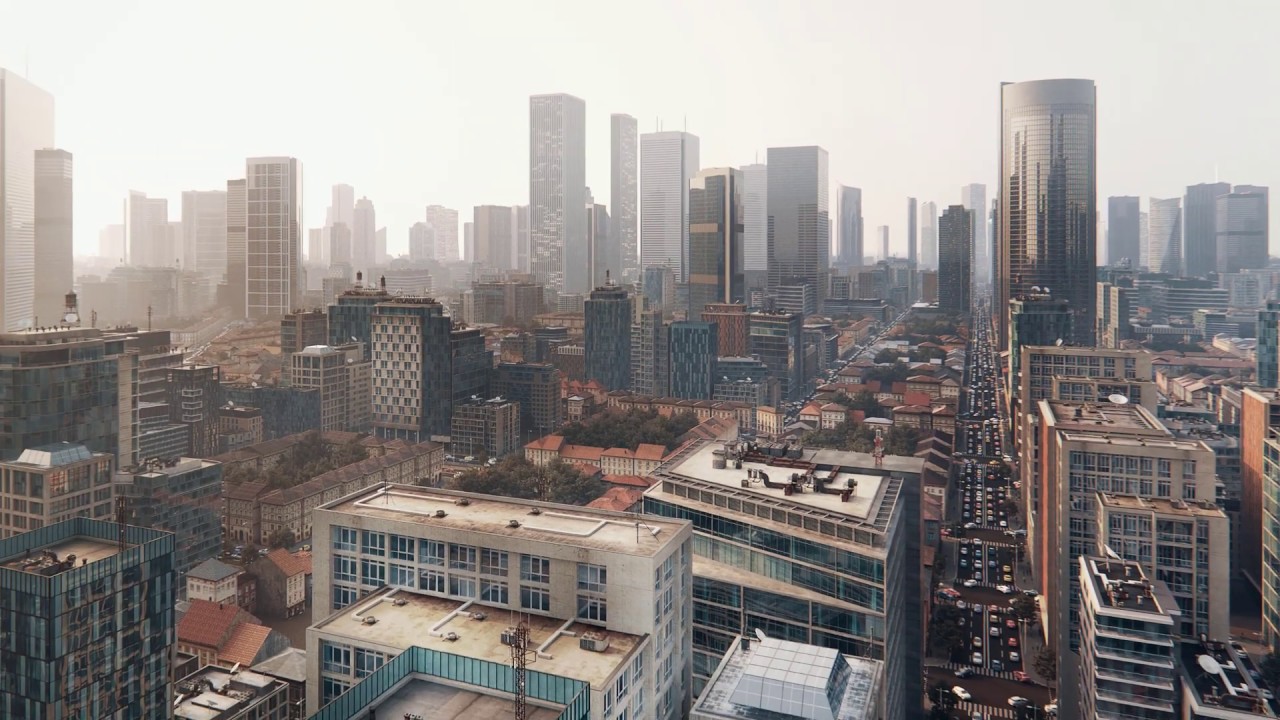
Start by laying out the city using 3ds Max’s built-in tools to create a closed spline for each city block. When designing the city there are a couple of things to consider: Firstly the techniques in the tutorial work best with rectilinear city blocks; secondly vertex types should be set to Corner for 90 degree bends, these will be used by RailClone to add corners and are also useful to add zebra crossings and other details at the intersections to the streets; thirdly, for gradual changes in direction use Bezier, or Smooth vertex types but be aware that we won’t be deforming geometry in this tutorial so there’s a limit on how curved splines can be before adjacent buildings intersect.
Step 2 - Draw or Detach a Test Area
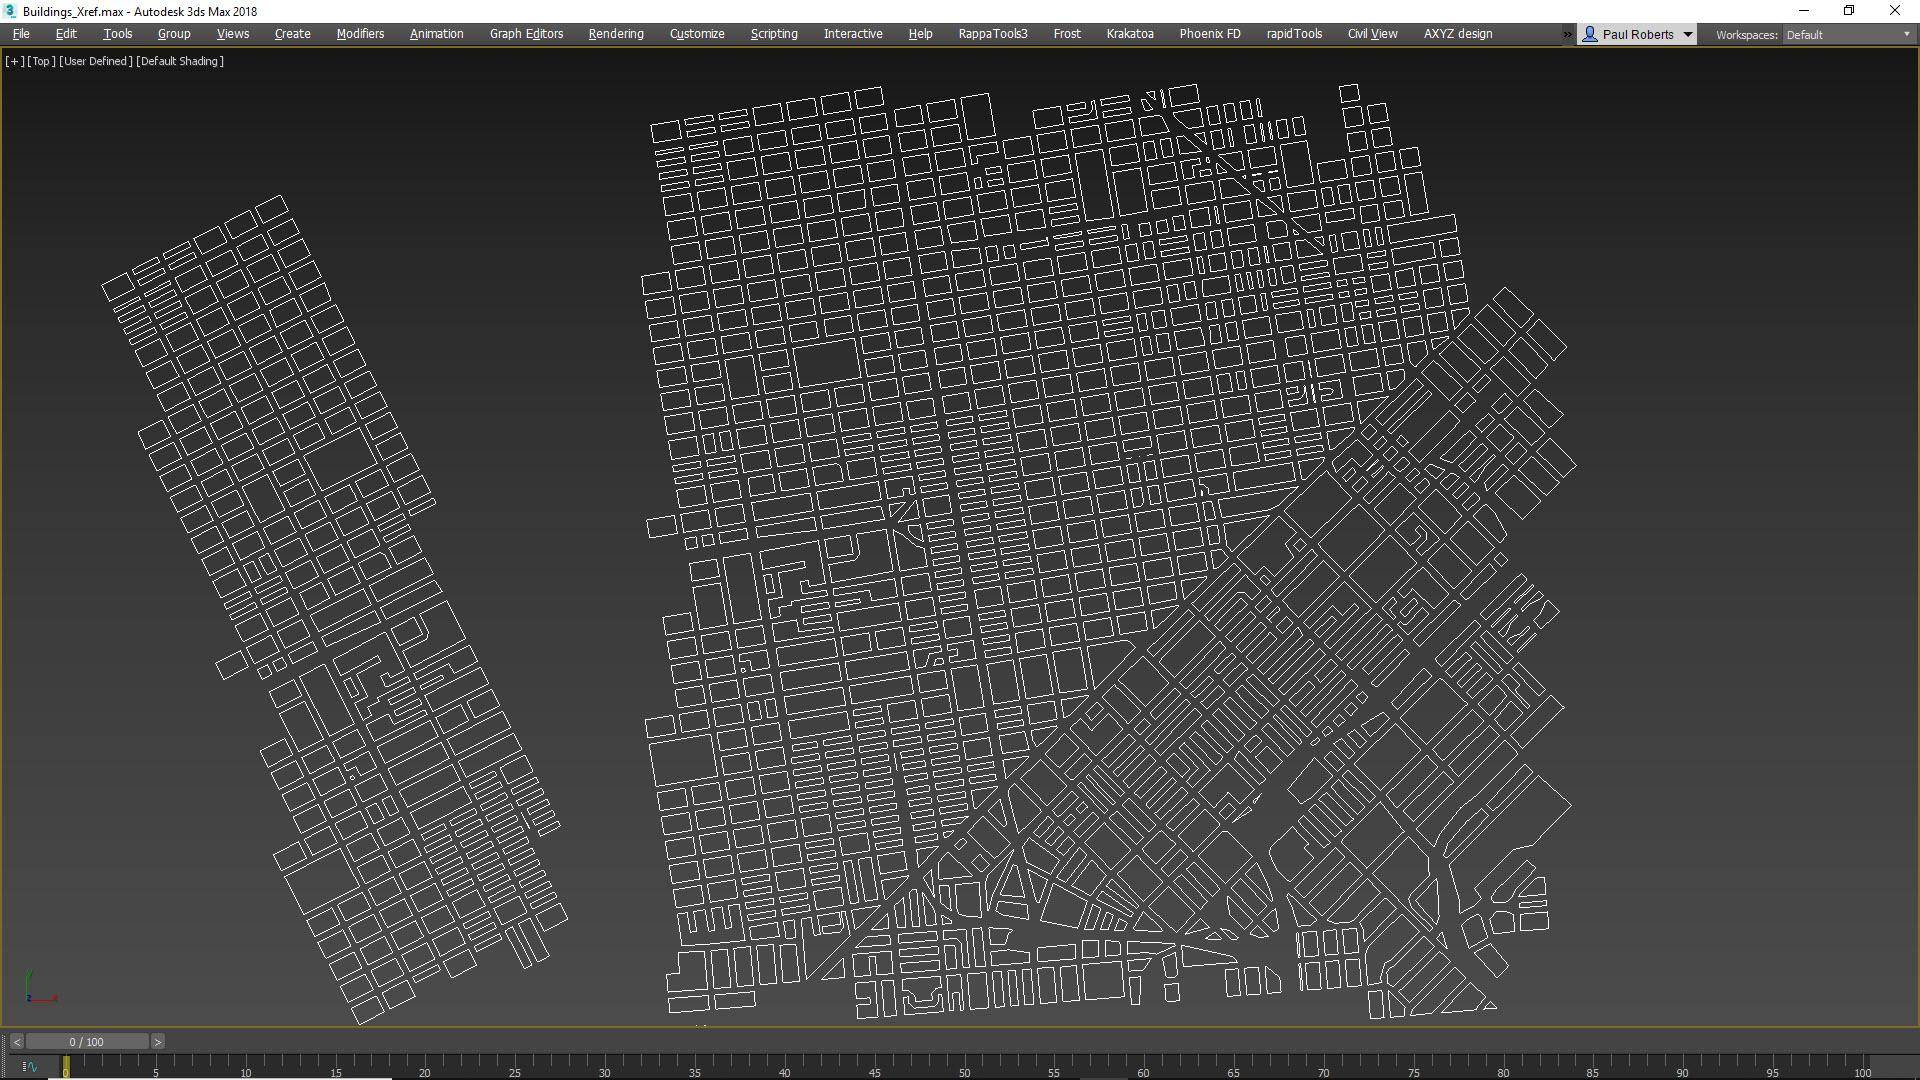
Once your city is created, it’s a good idea to create a smaller collection of splines you can use to test out your procedural styles. This will speed up the creation process because Forest Pack and RailClone won’t need to perform complex calculations on the entire city grid. Create a couple of rectangles and a straight spline and attach them so that they’re a single object. Next, merge your chosen assets into the scene. In this example, we will use the free sample from Evermotion’s AM172 collection of house models.
Step 3 - Prepare Geometry for use with RailClone
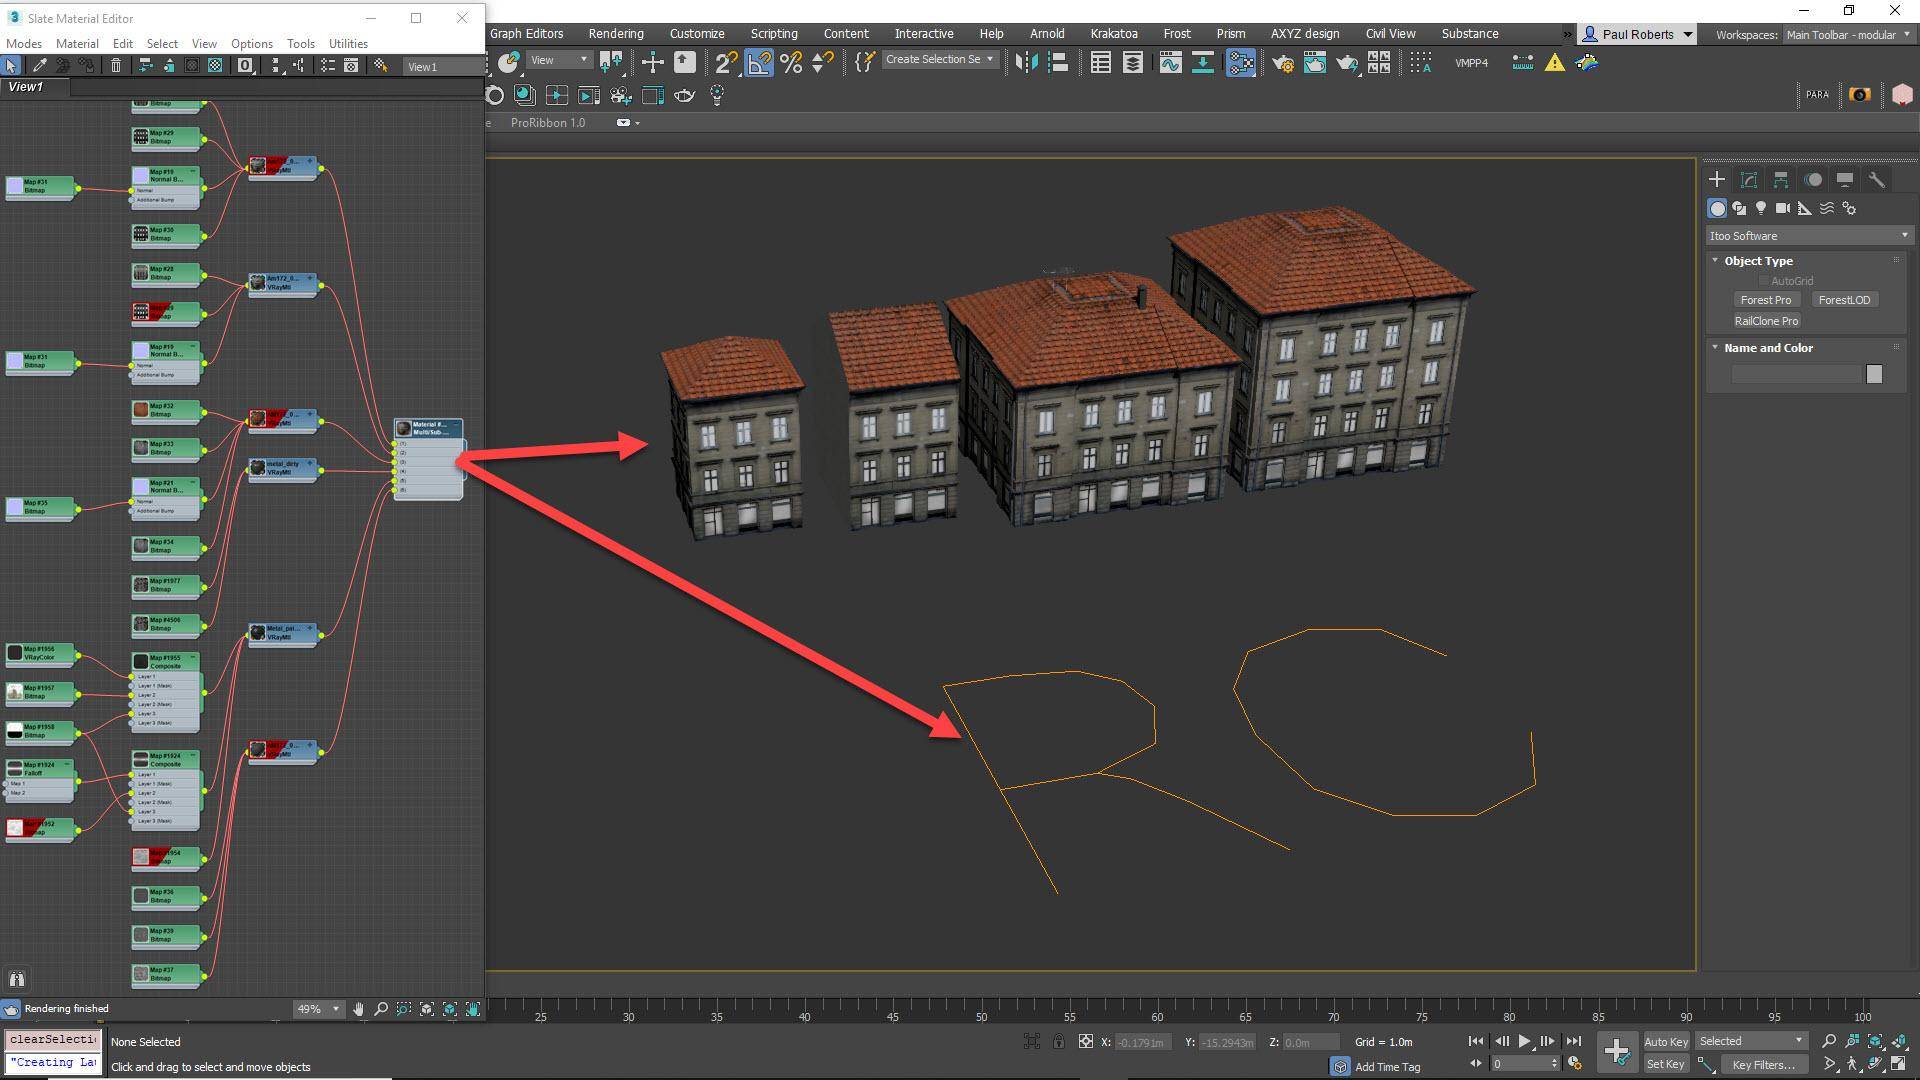
RailClone 3 and below does not automatically consolidate materials and reassign IDs, so you will need to create a single Multi-Sub object material that can be applied to all of the source geometry. To make this clear, the same single material needs to be applied and work correctly on both the RailClone object and the individual components. An easy way to consolidate materials is to attach the objects together into a single mesh. By doing this, Max creates a multi-sub object material and reassigns IDs automatically. You can then detach each object back into separate objects, centre and re-adjust the pivots.
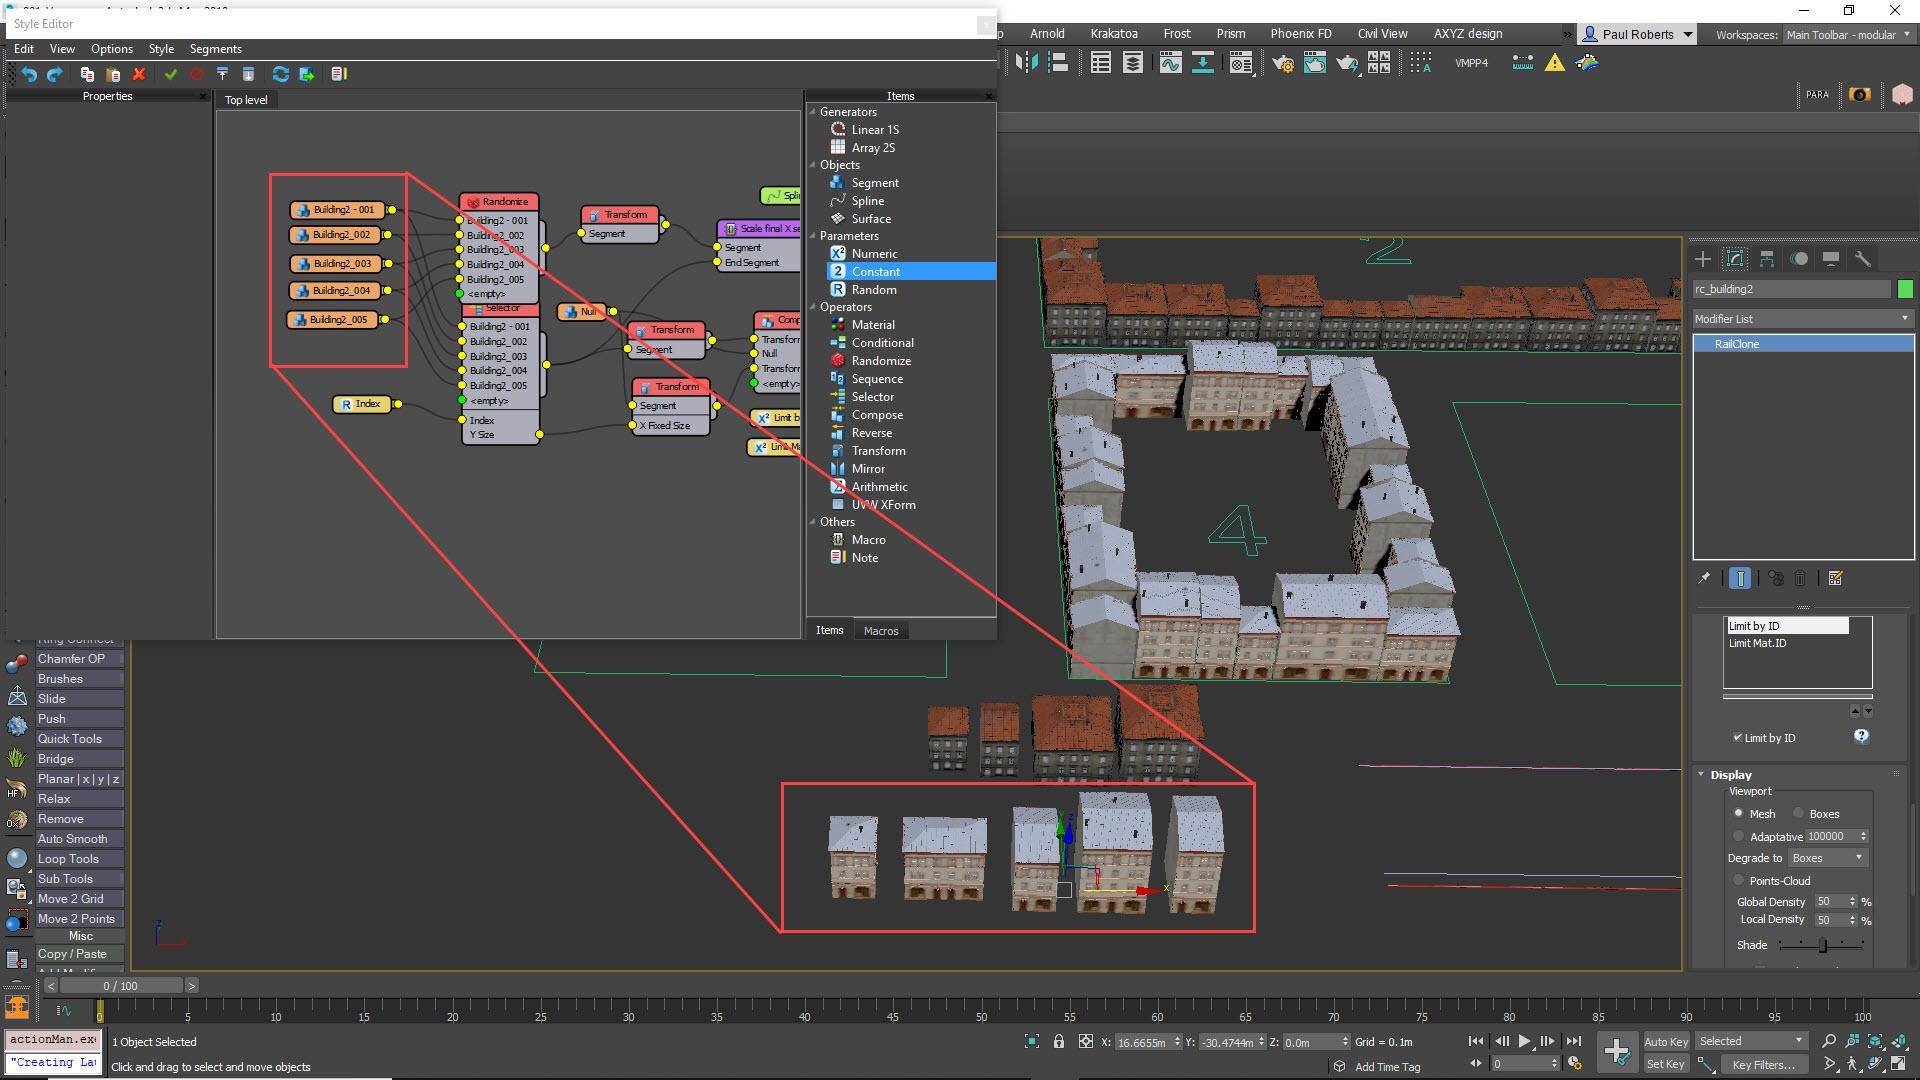
Step 4 - Create a RailClone Object

Now we’re ready to create the first of the three types of RailClone object we’ll study in detail for this tutorial. This one will add buildings around the perimeter of a city block, and it’s particularly suited for courtyard, townhouse and terrace style architecture. Create a new RailClone object and open the Style Editor. Create an L1S generator and wire a new Spline node to the generator’s Spline input. Use the Spline node to select the test spline we created in Step 2. Create a new Segment node and disable Slice and Bend to make sure that full instancing is retained.
Step 5 - Add the building geometry
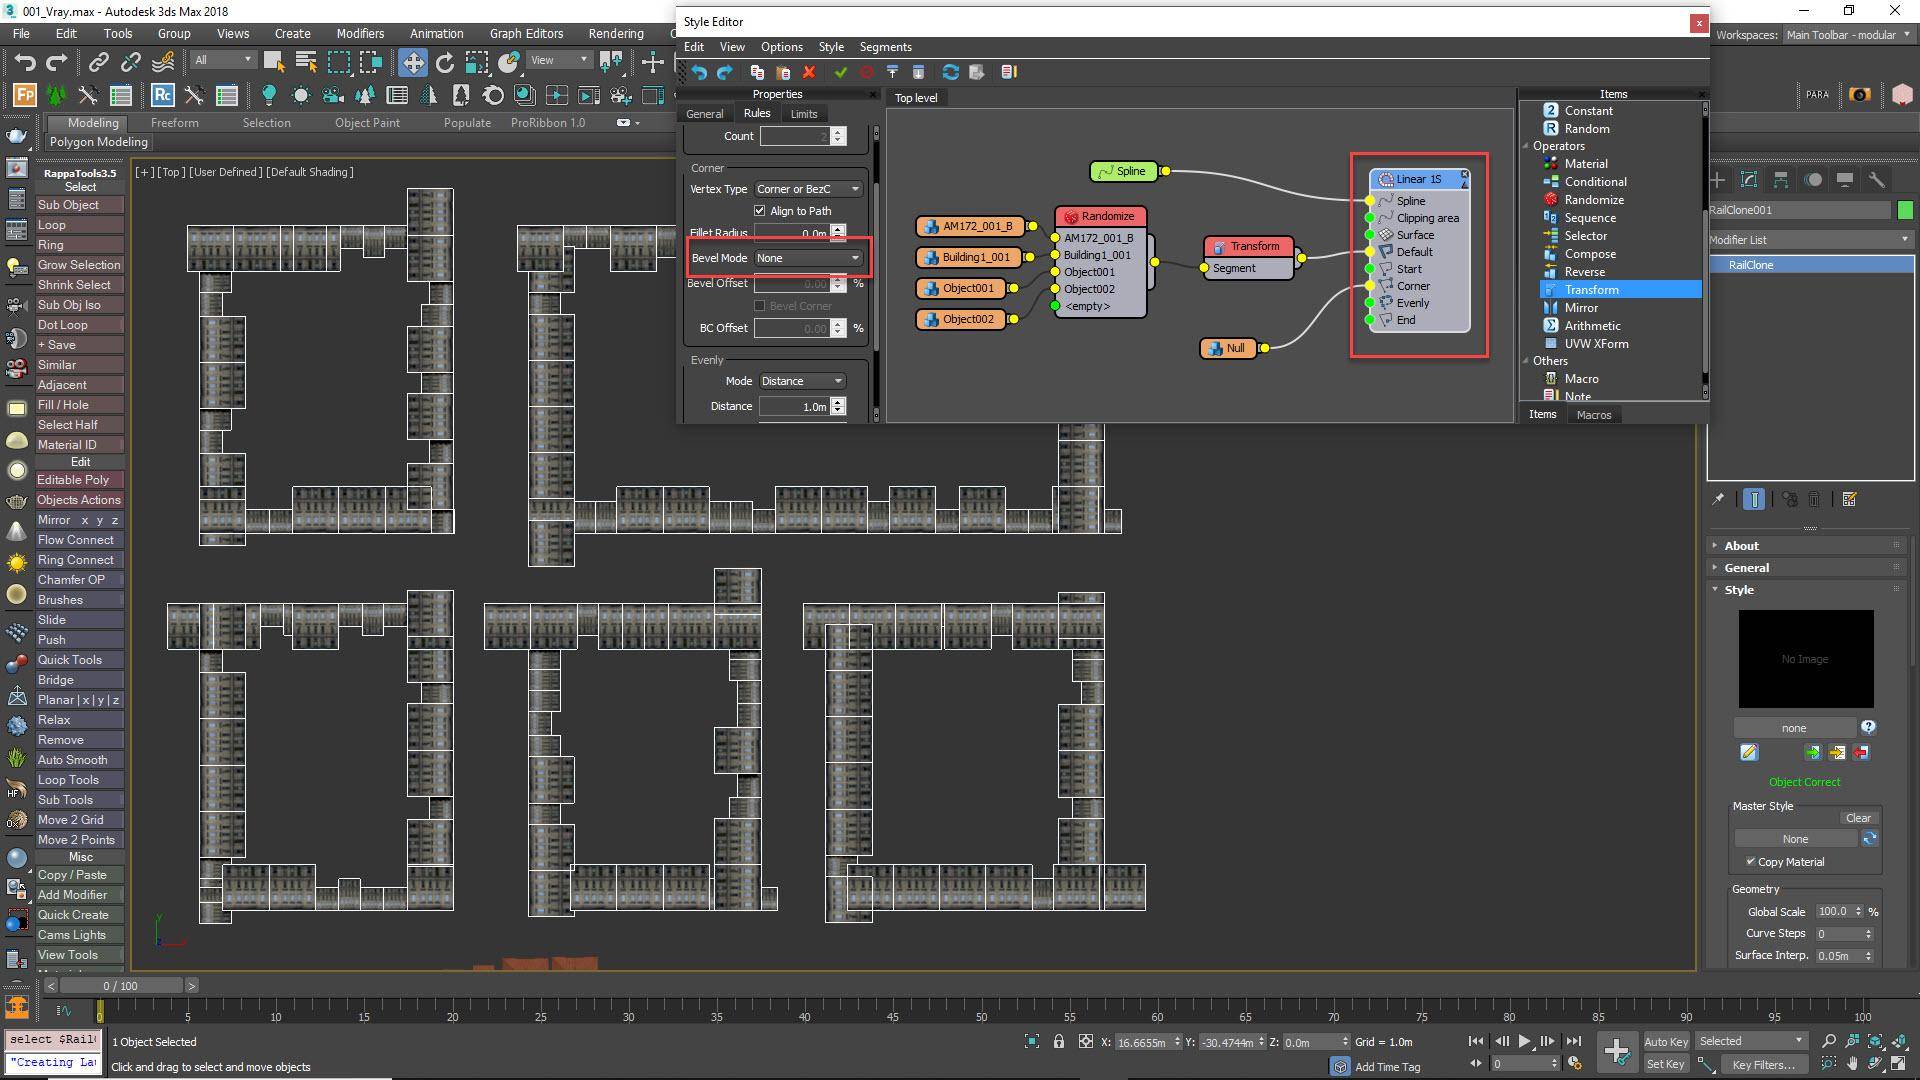
To add all the buildings to the RailClone graph, right-click on the existing Segment node and select Clone Multiple. Select the building objects and click OK. Each will be automatically loaded into a new segment with the same settings as the original. Wire the Segments to a new Randomise node and wire the Randomise node to the generator’s Default input. The buildings are centred on the spline. To change this, wire a Transform node between the Random node and the Generator and use it to change the Y-Alignment to Bottom. Wire an empty segment to the Corner input and set the Generator’s Bevel Mode to None.
Step 6 - Understanding Default modes
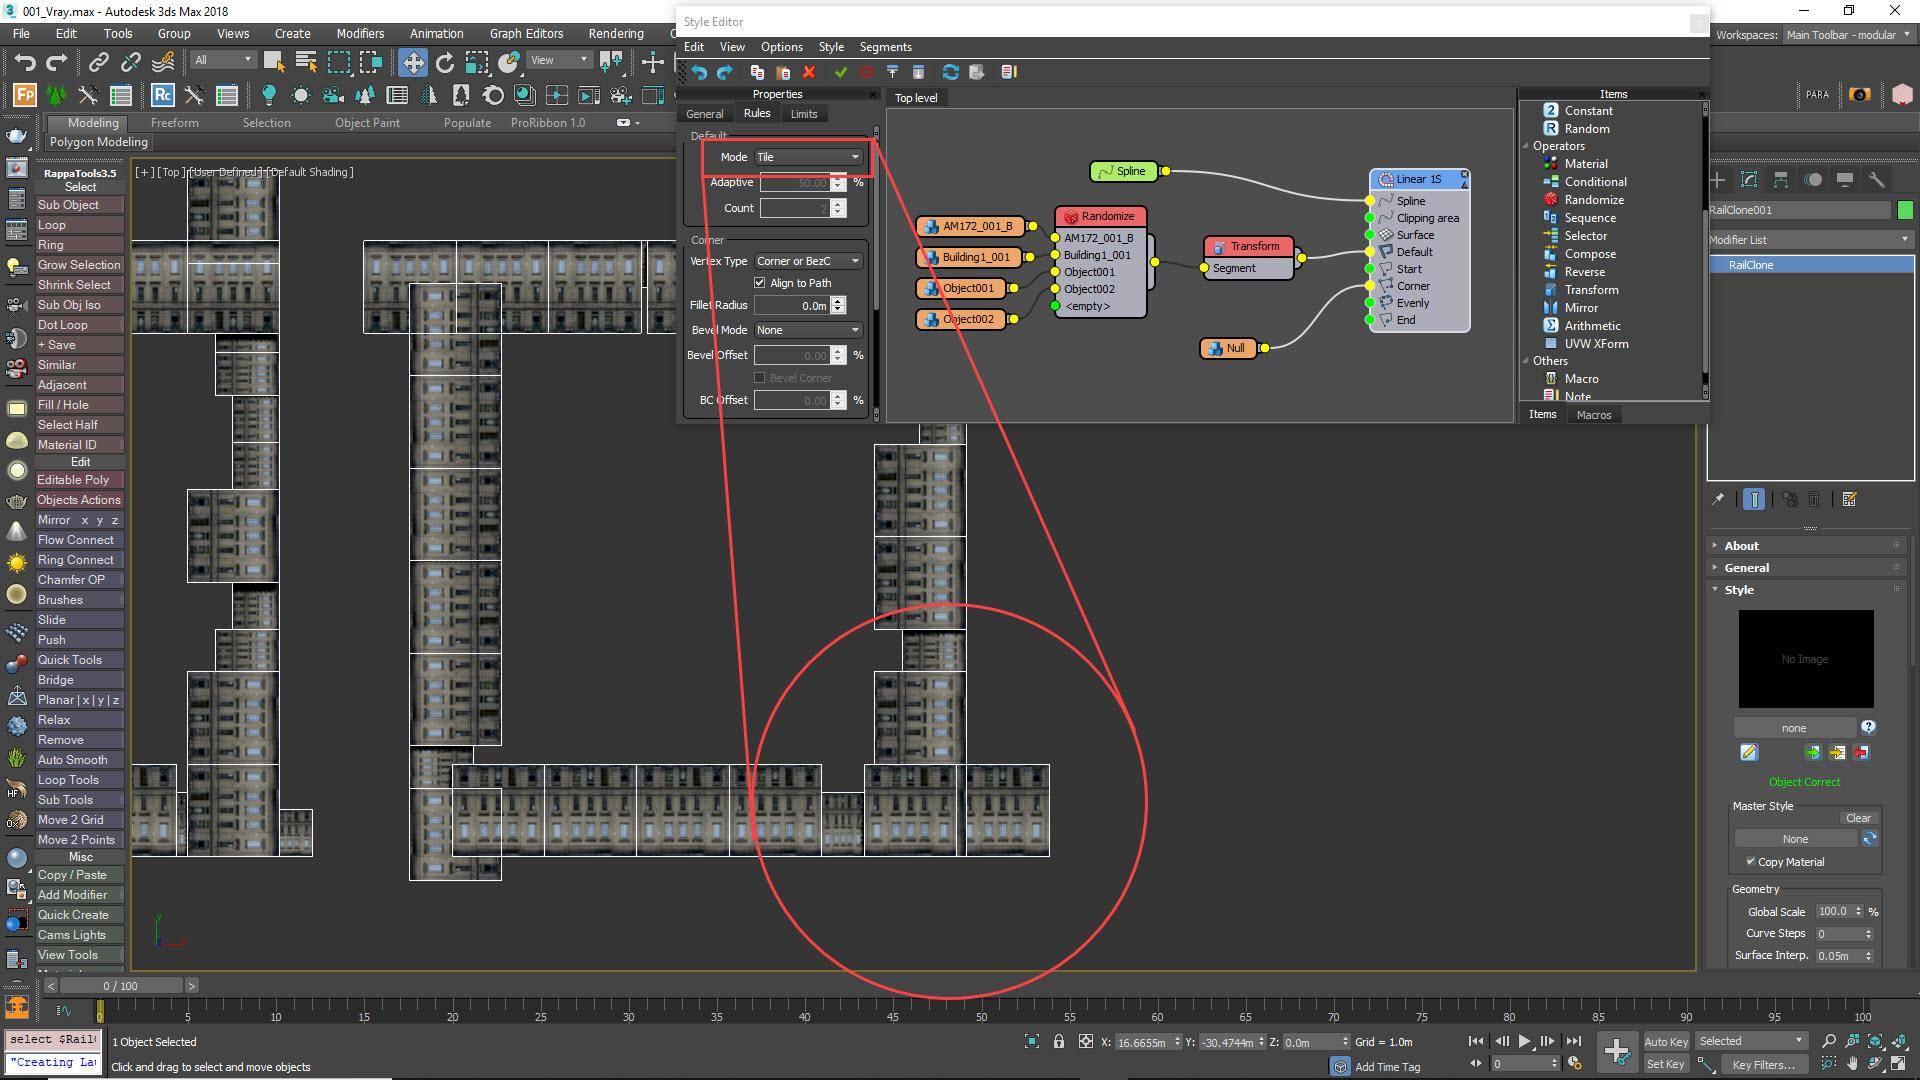
The way that RailClone distributes segments to fit along the spline can be controlled using the Default options found in the Generator’s Rules tab. In Tile mode, the segments are simply placed one after another along the Spline and the final segment is sliced to fit. Because we have disabled slicing though, the final segment will extend beyond the end of the spline which will cause problems with buildings extending outside the block and crossing the pavements and roads.
Step 7 - Adaptive, Scale and count modes
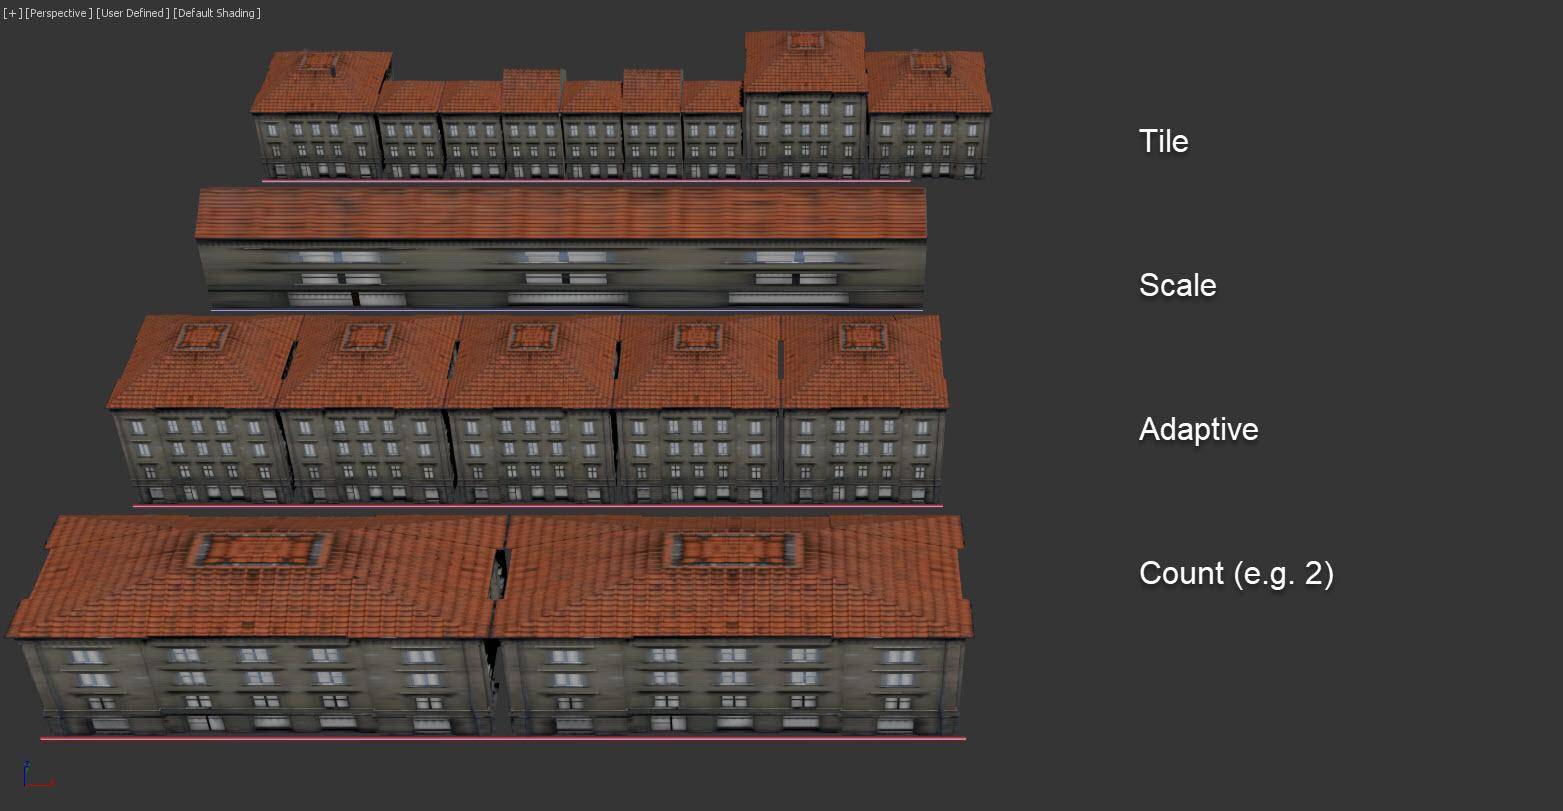
There are three other Default modes available: Adaptive which subtly scales all the segments by the same value so that they fit the spline exactly, Scale which stretches a single Segment the length of a spline section, or Count which allows you specify a fixed number of Segments and then scales them to fit the available space. Unfortunately, these all require the segments to be exactly the same length on the X-axis, which is not the case with our buildings.
Step 8 - Using the Scale Final X Segment Macro
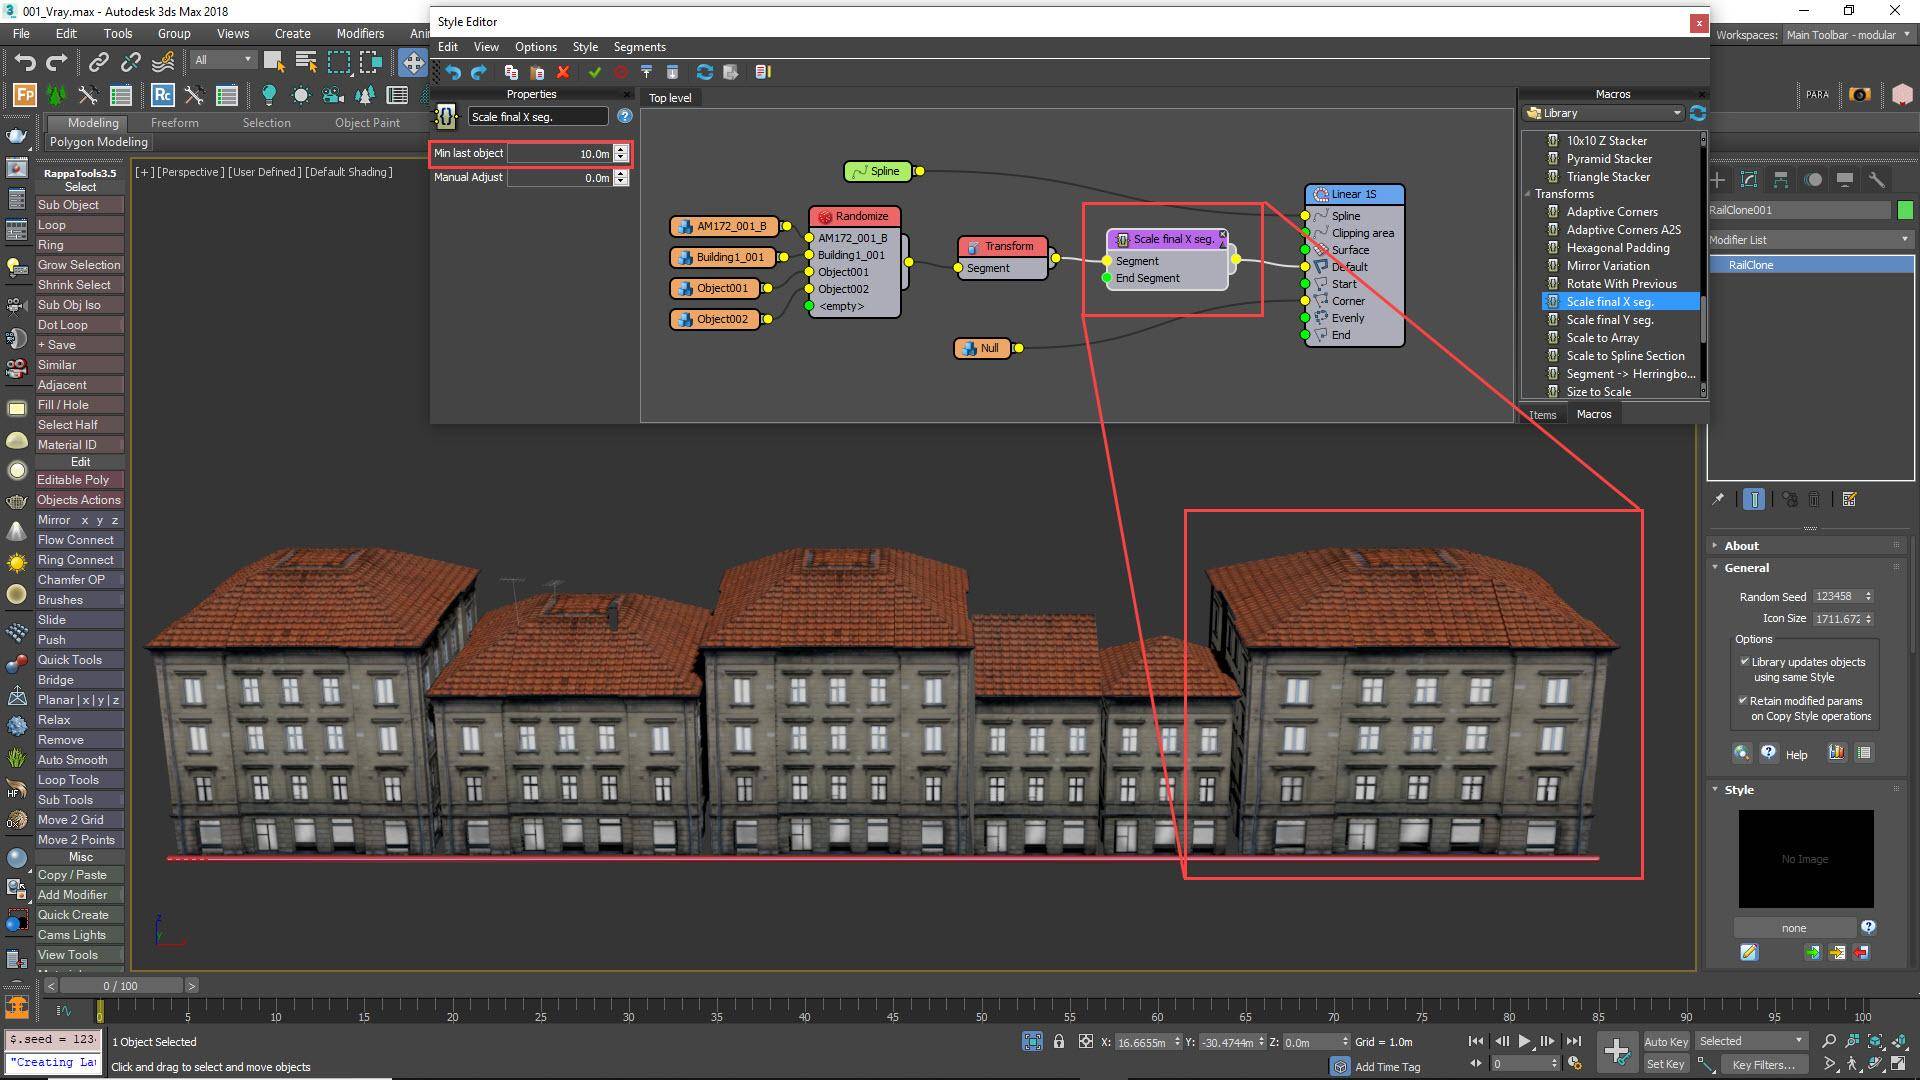
So none of these existing modes are appropriate, luckily you can add others using the built-in macros. Set the mode to Tile and add a Scale Final X Segment Macro from Macros > Transforms. Wire it between the Transform node and the Generator. This macro will scale the final Segment before a corner or the end of the array to fit the available space. The Minimum Last Object Size parameter is used to determine the minimum size of the final building. If you increase this value you’ll get larger final buildings, if you lower it you will get smaller buildings.
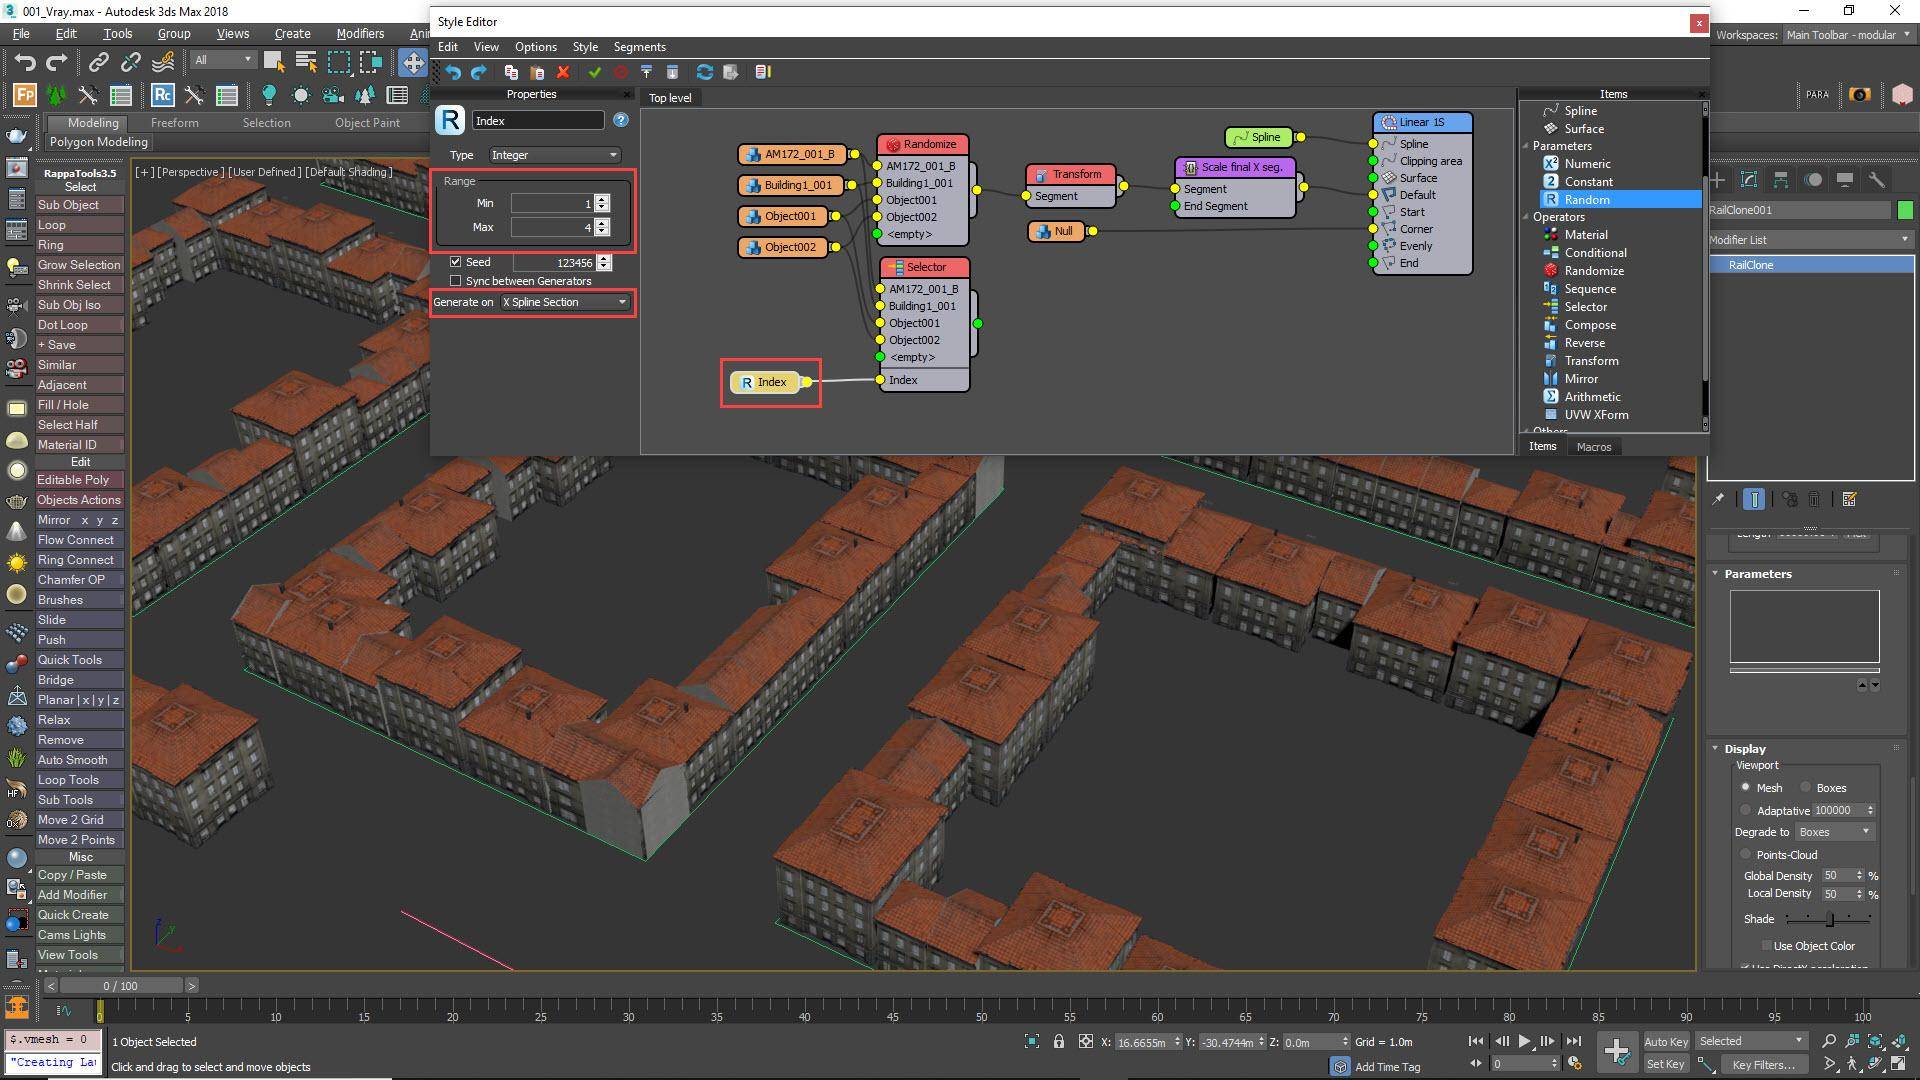
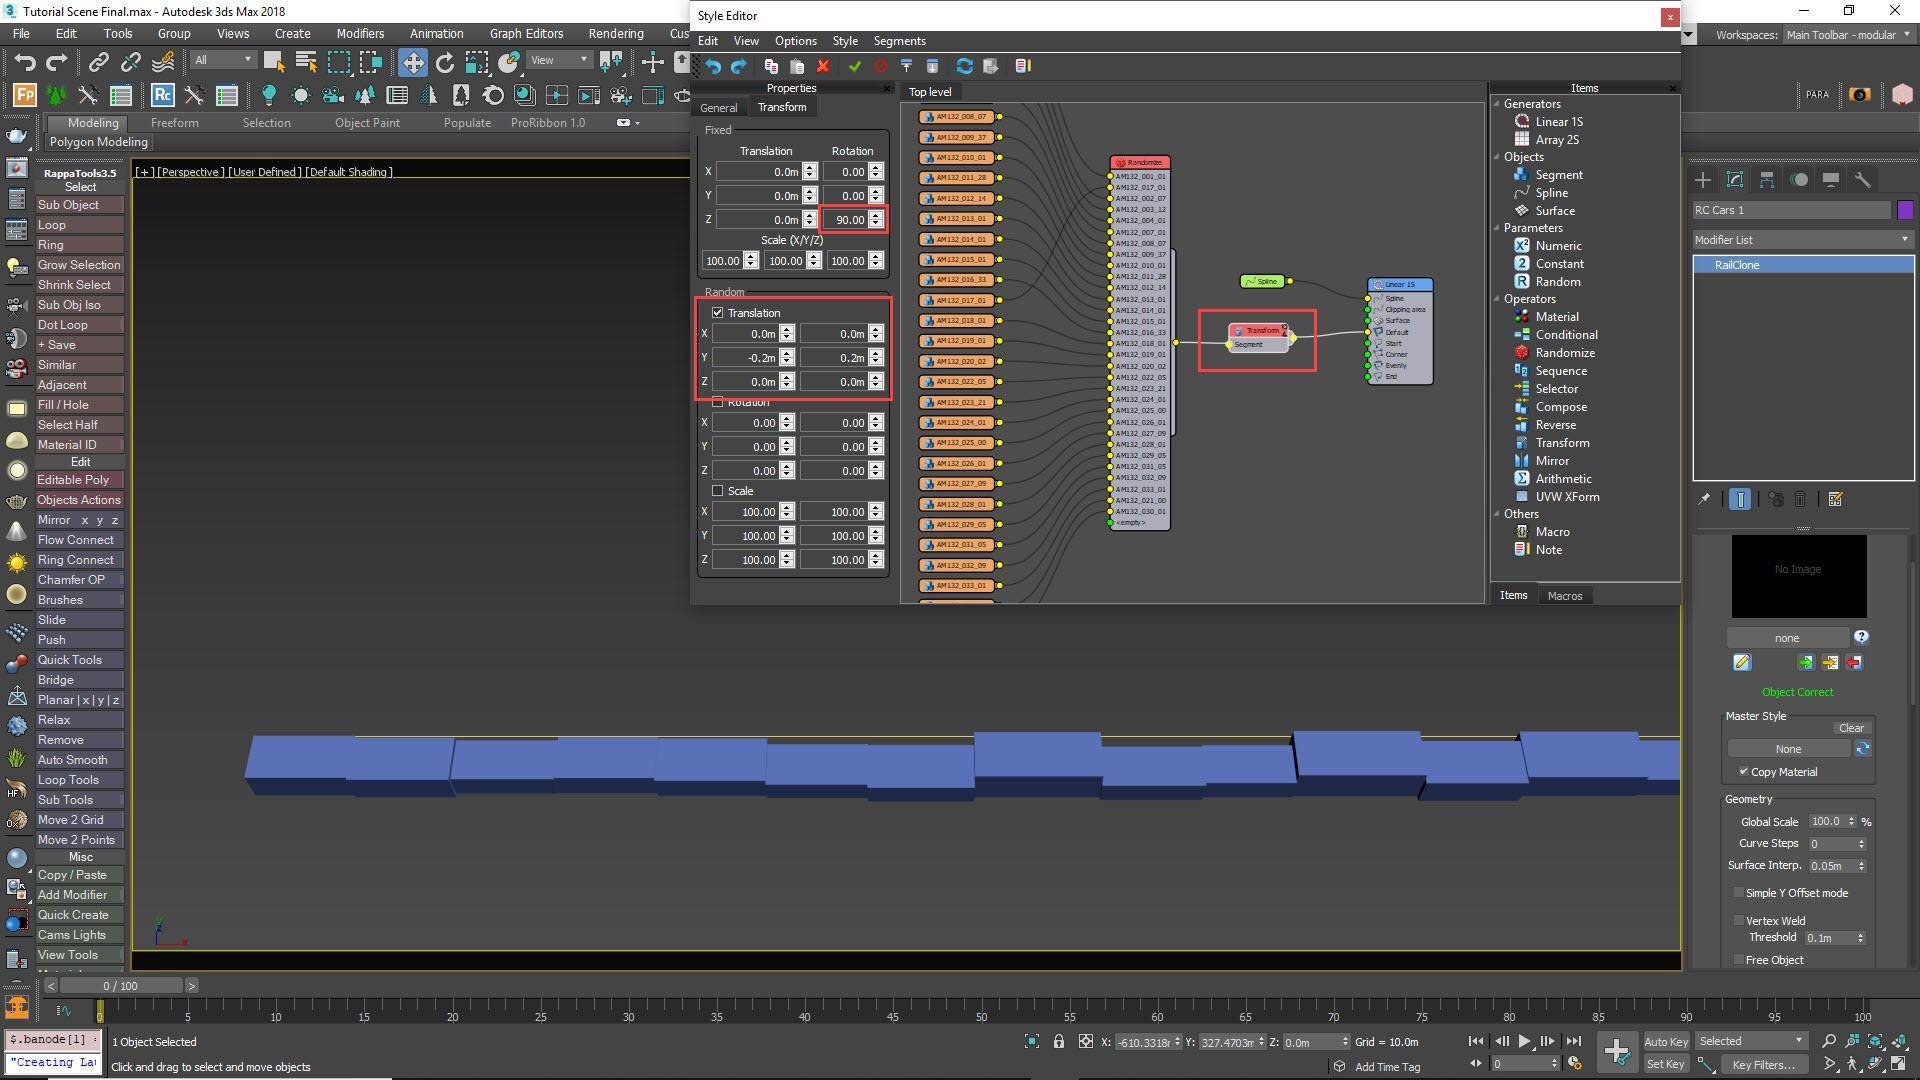
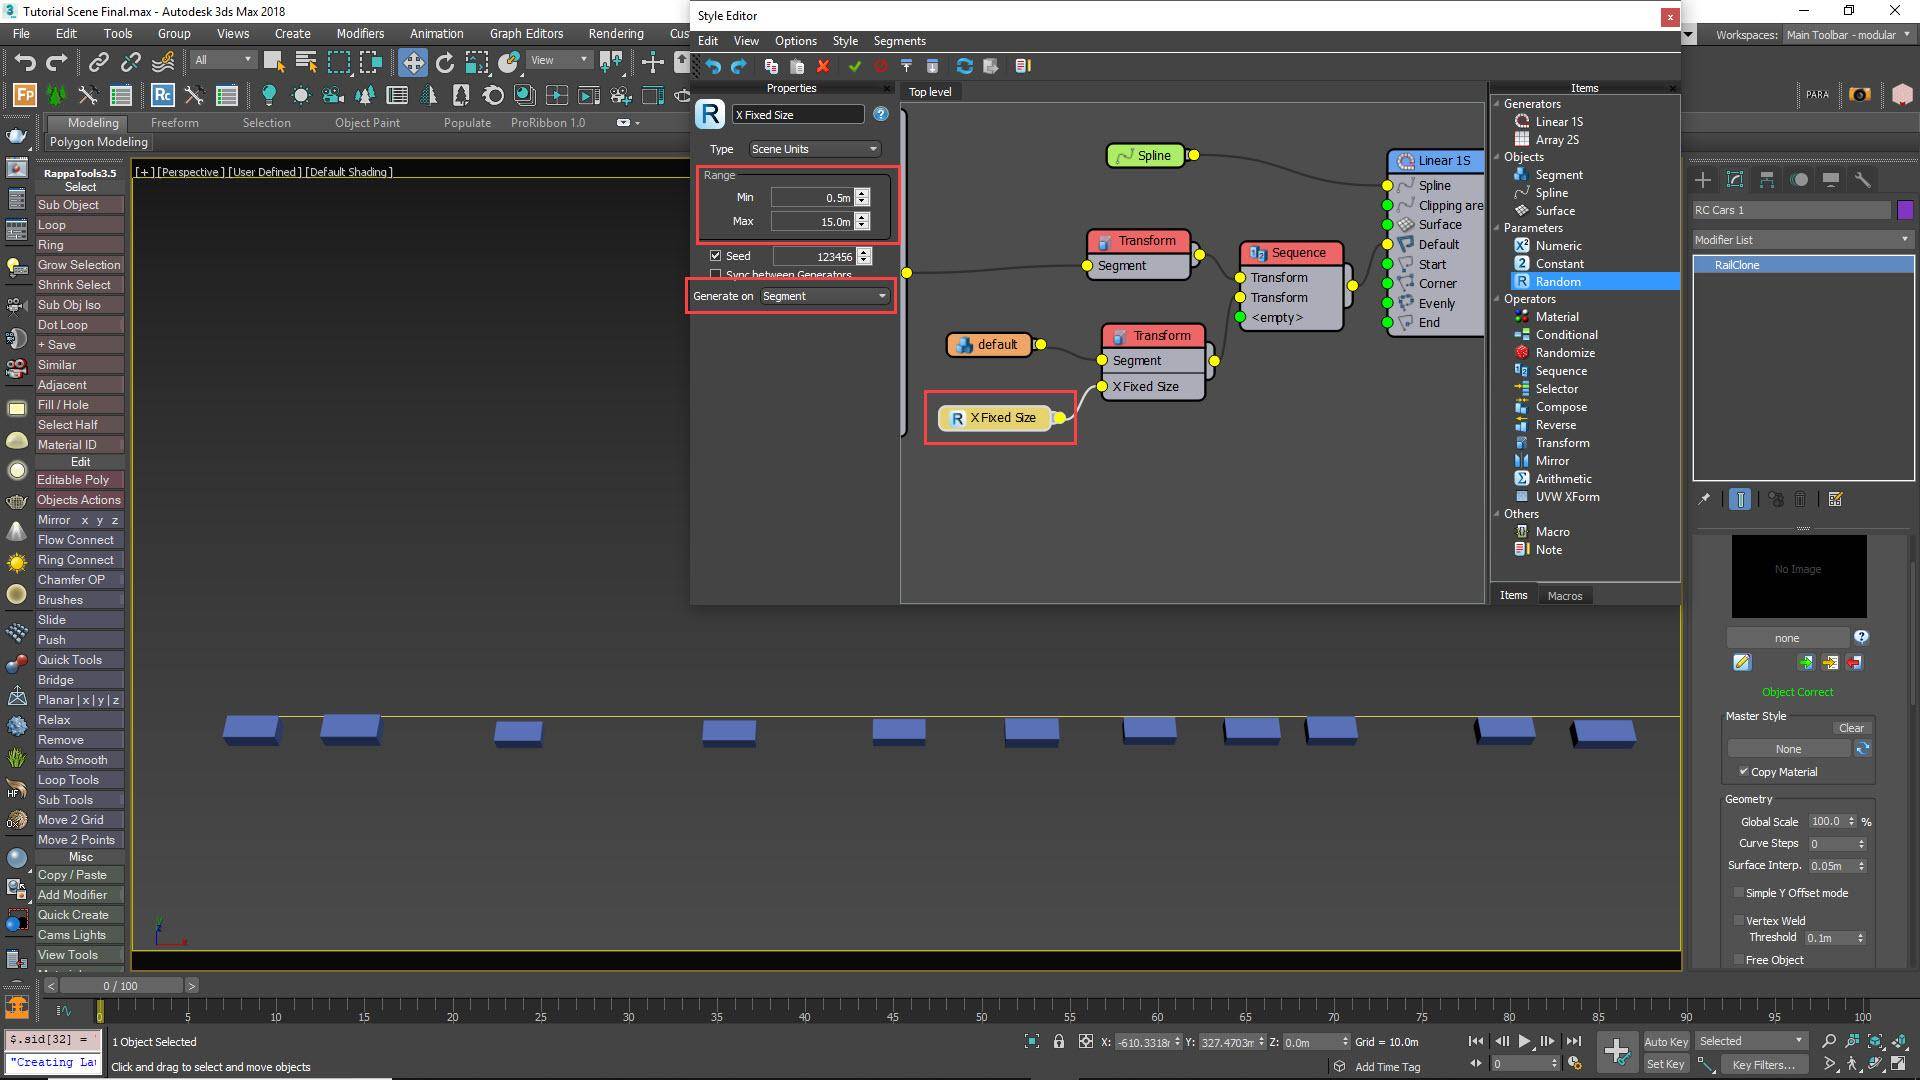
Because the position of the building following the corner does not take into consideration the depth of the buildings before the corner, there are overlapping segments after the corners. To fix the problem, we need to add random buildings to the corners in such a way that we can reliably predict their size. The randomise node won’t work for this, instead, wire the existing buildings to a new Selector node, export the Index and wire it to a Random Number node. Set the Min value to 1 and the Max to the number of buildings attached and set Generate On to X Spline Section.
Step 10 - Add a Compose Operator
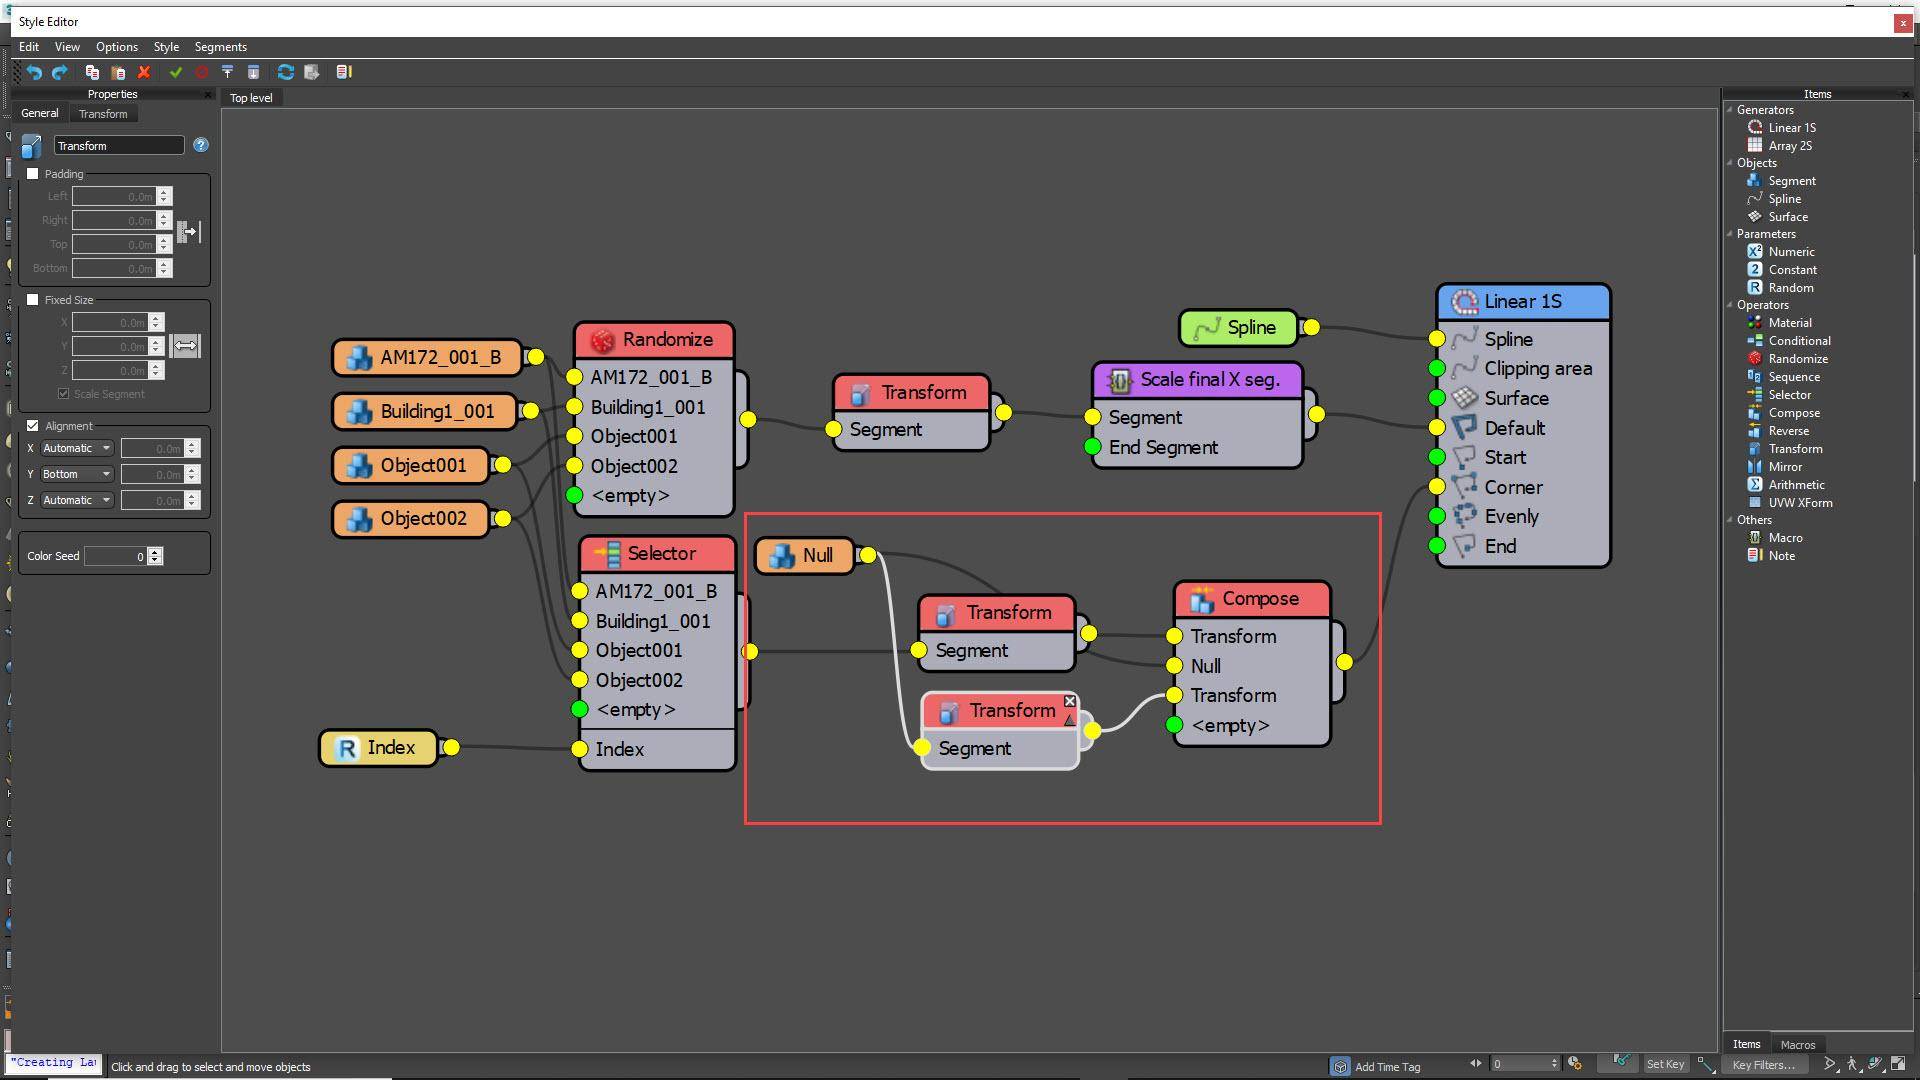
Wire a Transform node between the Random node and the Generator and use it to change the Y-Alignment to Bottom. Now we need to control how a buildings are arranged at the corner. We want a single building to appear entirely before the corner vertex, with an empty segment following the corner the same size as the Y-Dimension of the preceding building. To do this we wire a Compose operator to the Corner. Wire the Transform node to the first input, wire an empty Segment to the second input, then wire it to the 3rd input but this time via a Transform operator that we can use to control its X Size.
Step 11 - Complete the Corner
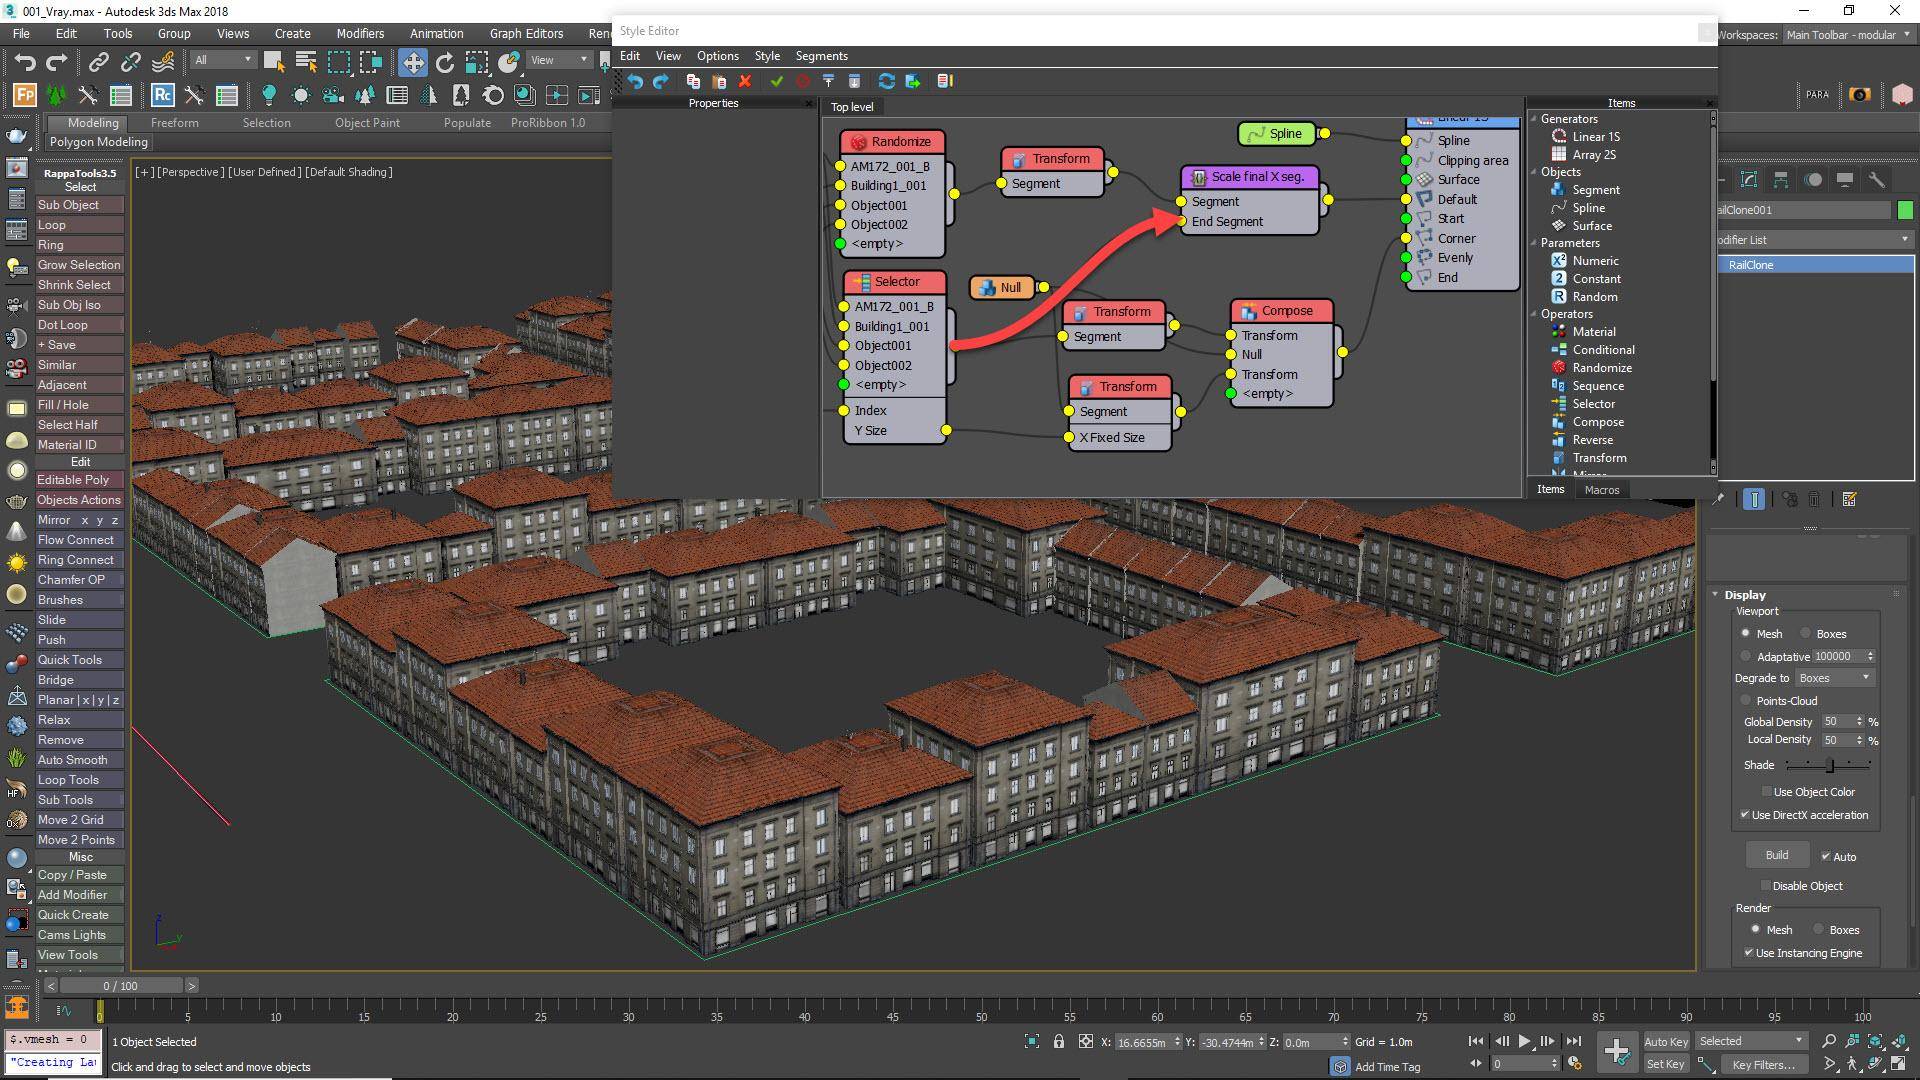
Export the X Fixed Size of the Transform node and be sure to enable it in the parameters. Export The Y Size attribute from the Selector operator and wire this to the X Fixed size input of the Transform node. The Y Size of the randomly selected corner segment now controls a gap that follows the corner. To finish the effect, wire the Selector Operator’s output to the End Segment input of the Scale Final X Segment macro. This will allow the macro to take into account the size of the corner segment when it calculates the size for the final segment.
Step 12 - Limit the building by material ID
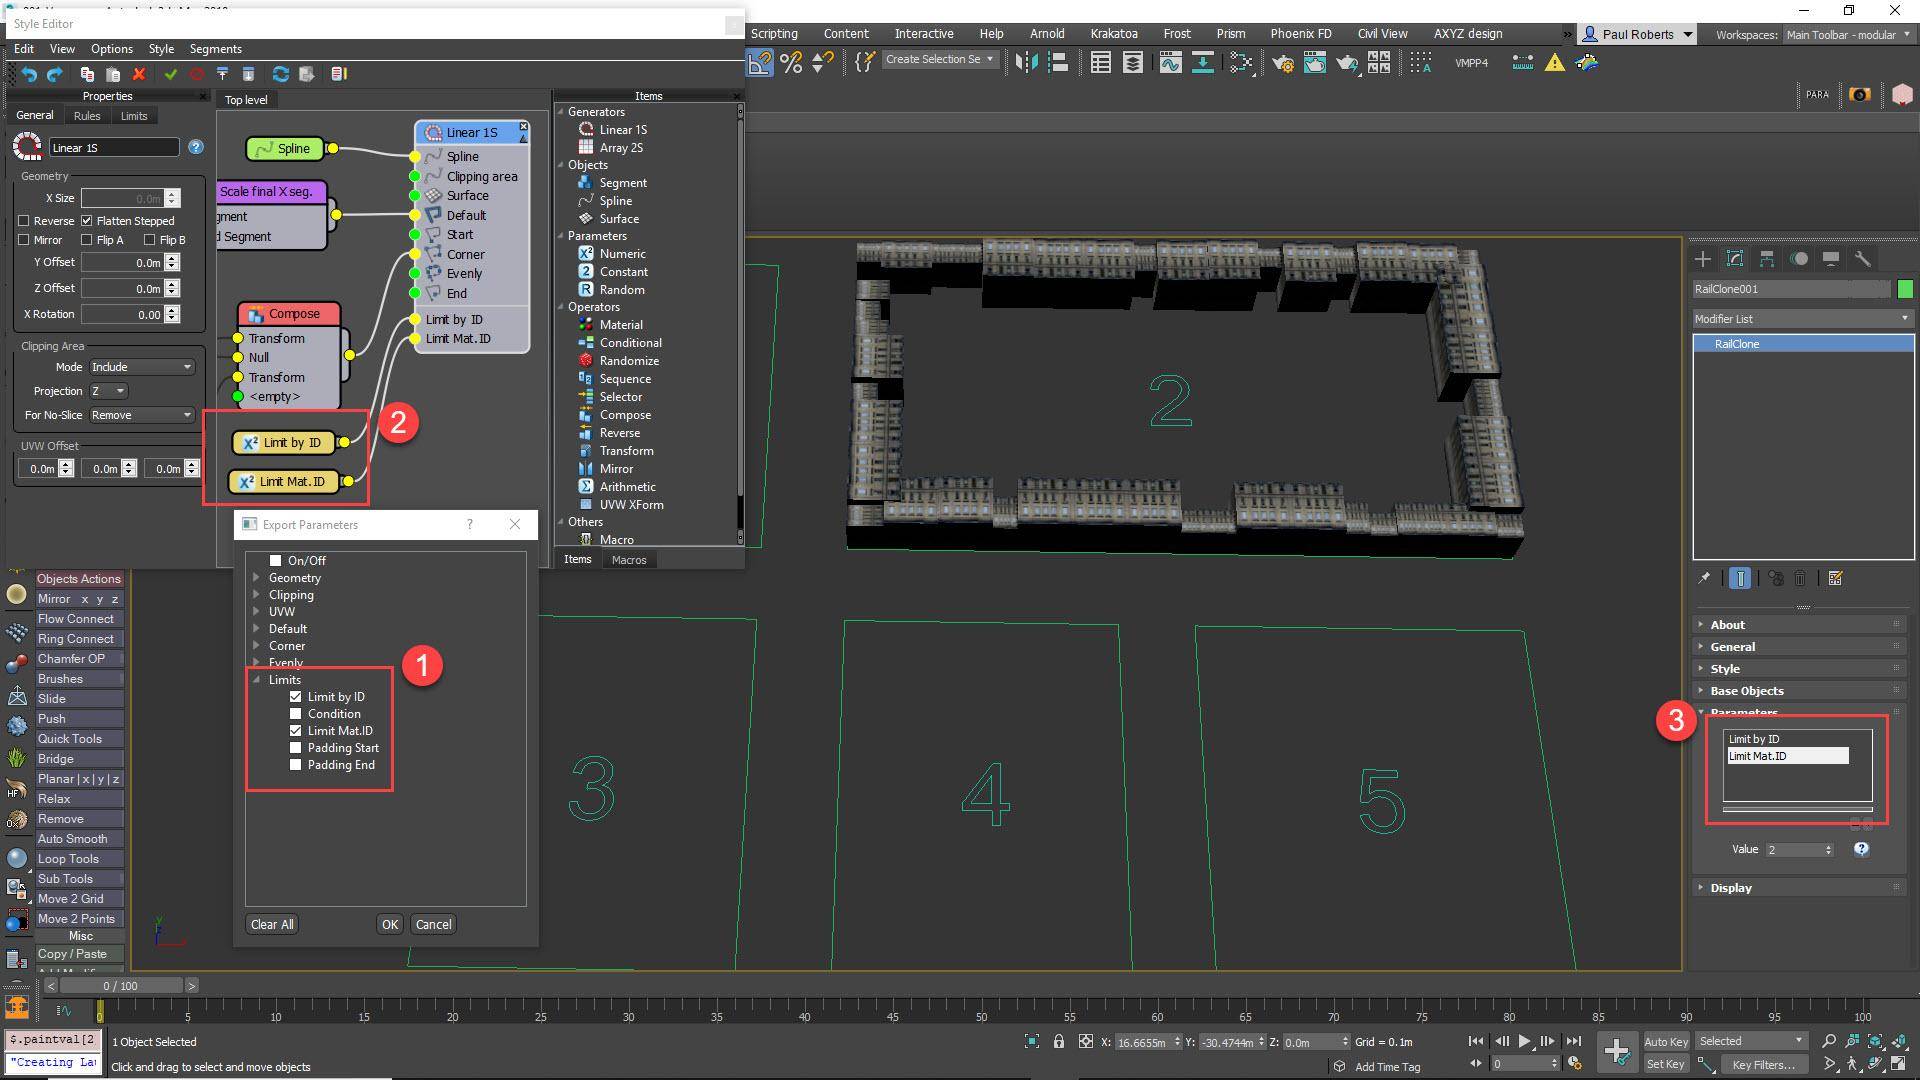
For all the styles in this tutorial, we will add the ability to use the material ID assigned to a spline section to control whether or not it generates geometry. To do this right-click on the generator and export Limit by ID and Limit Material ID. Wire a new Numeric node to each of these inputs and change the type of the first to Boolean, and the second to Integer. Using the parameters rollout you are now able to control whether the Limit by ID function is enabled or disabled, and choose which ID value generates geometry.
Step 13 - Duplicate and Replace Segments to Create More Styles
The style is now built. If you want to create more variety you can now duplicate this RailClone object and swap the geometry referenced in the Segment nodes to create different architectural styles for each block. Give each RailClone object a different material ID so that you can easily manage how they are distributed on the city grid. In our sample render we had 20 different courtyard styles, each with its own corresponding material ID. In the next section of the tutorial we’ll add skyscrapers that rotate and scale to fill an entire city block.
Tip: Add a spline to multiple RailClones
When you want to assign a spline to multiple RailClone objects you can use a simple code snippet. Select the RailClone objects, open the Maxscript Listener (F11) and type
for obj in selection do obj.banode[1] = $SplineName (where $SplineName is the name of the spline).
Step 14 - Setting up Skyscrapers
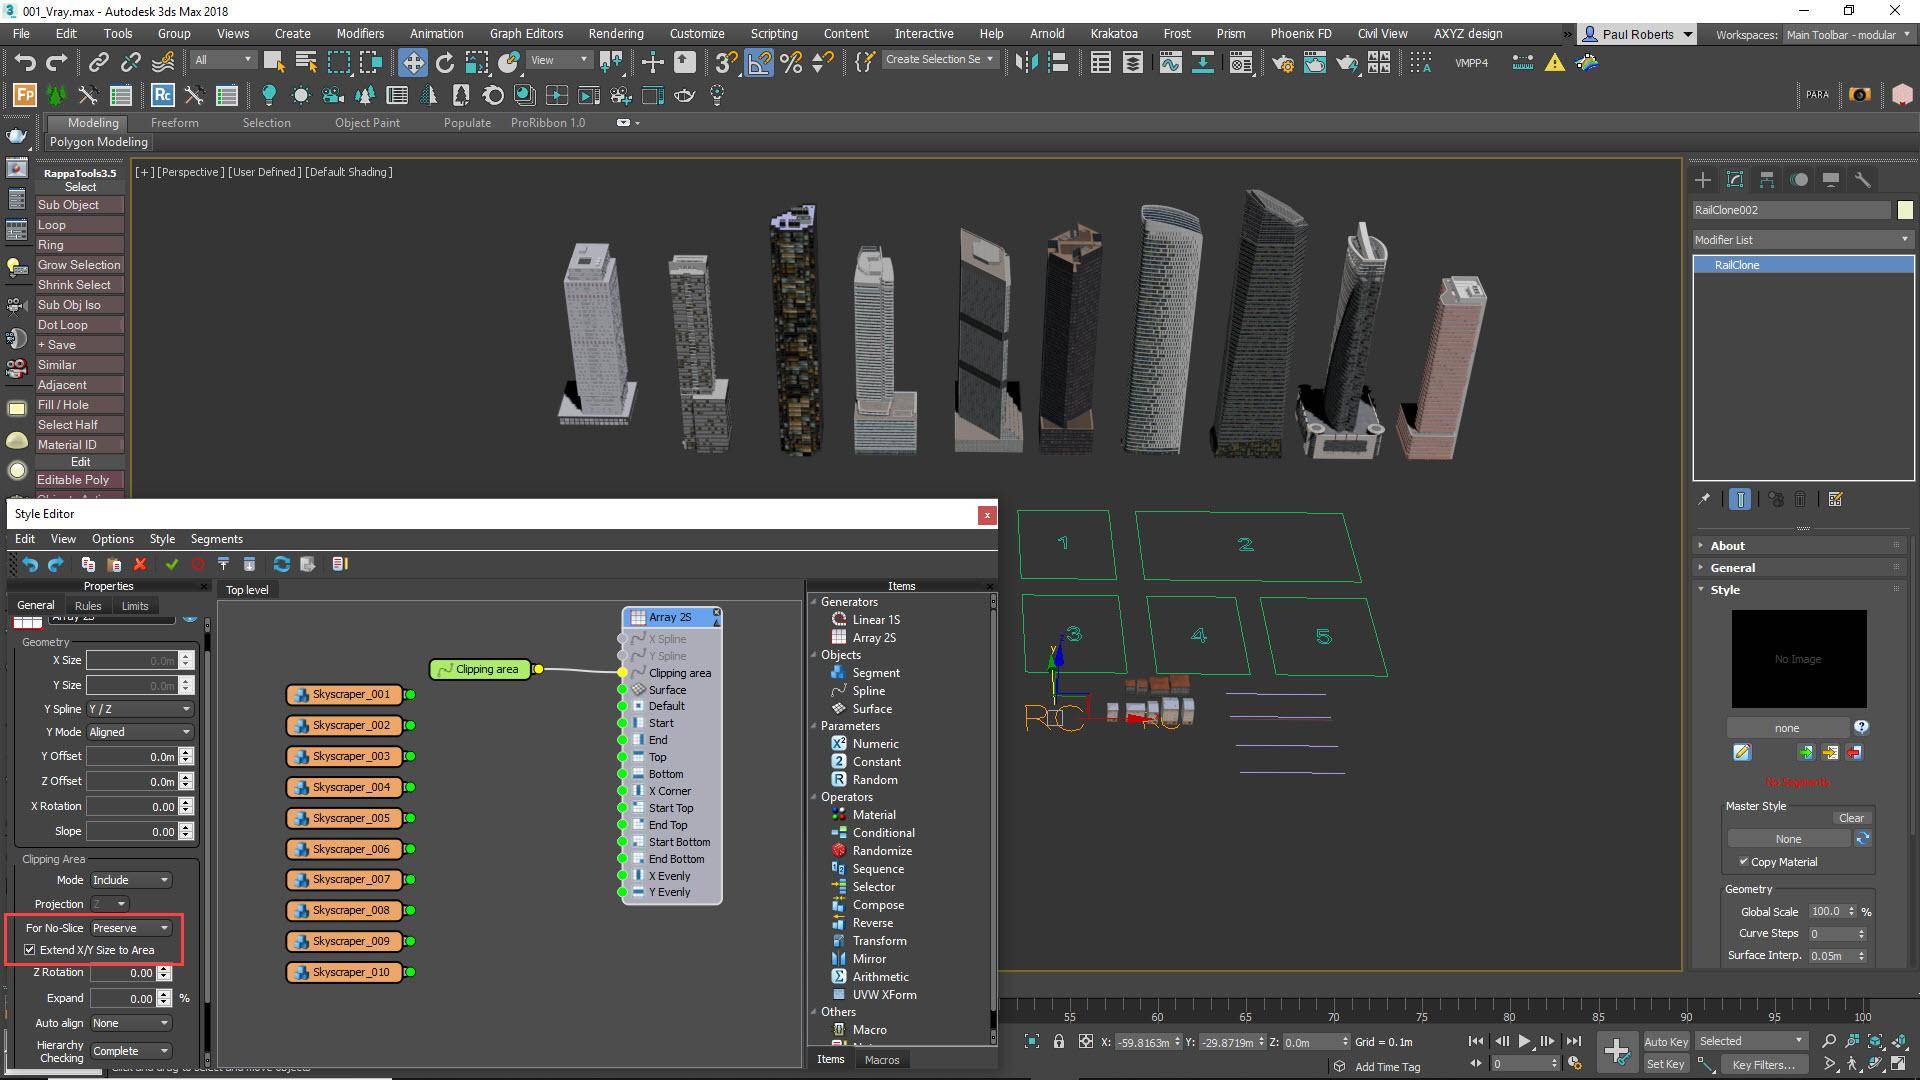
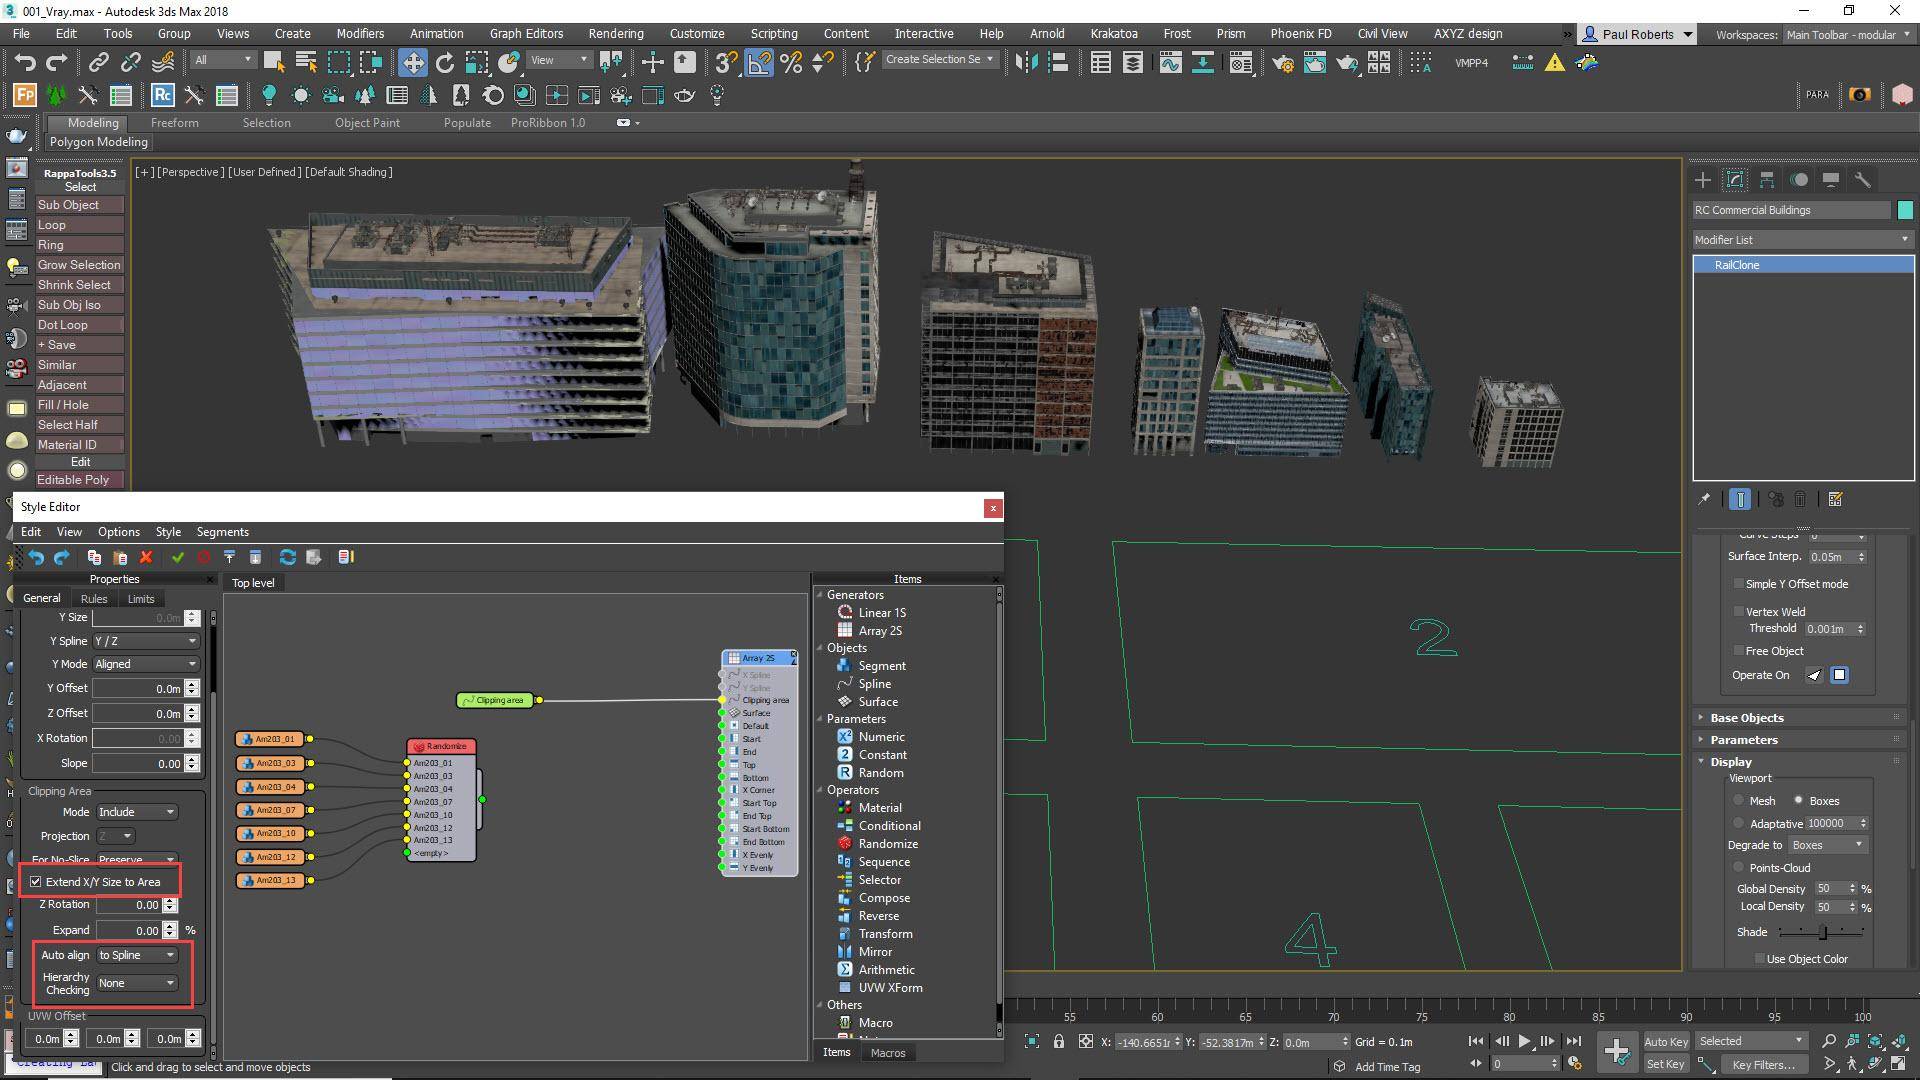
After preparing the source geometry, as discussed earlier, so that all assets share the same Multi-Sub Object material, create a new RailClone object and open the Style editor. Create a 2D array then add a new Spline node and wire it to the Clipping Spline input. Pick a spline from the scene. In the Generator’s settings, enable Extend X/Y Size to Areaso that the size if the array is automatically calculated to fit the size of the base spline. Change For No Slice to Preserve. Add the buildings by adding a new Segment, disabling Bend and Slice, and using the Add Multiple option to import all the tower buildings.
Step 15 - Fit the Skyscrapers to the Spline
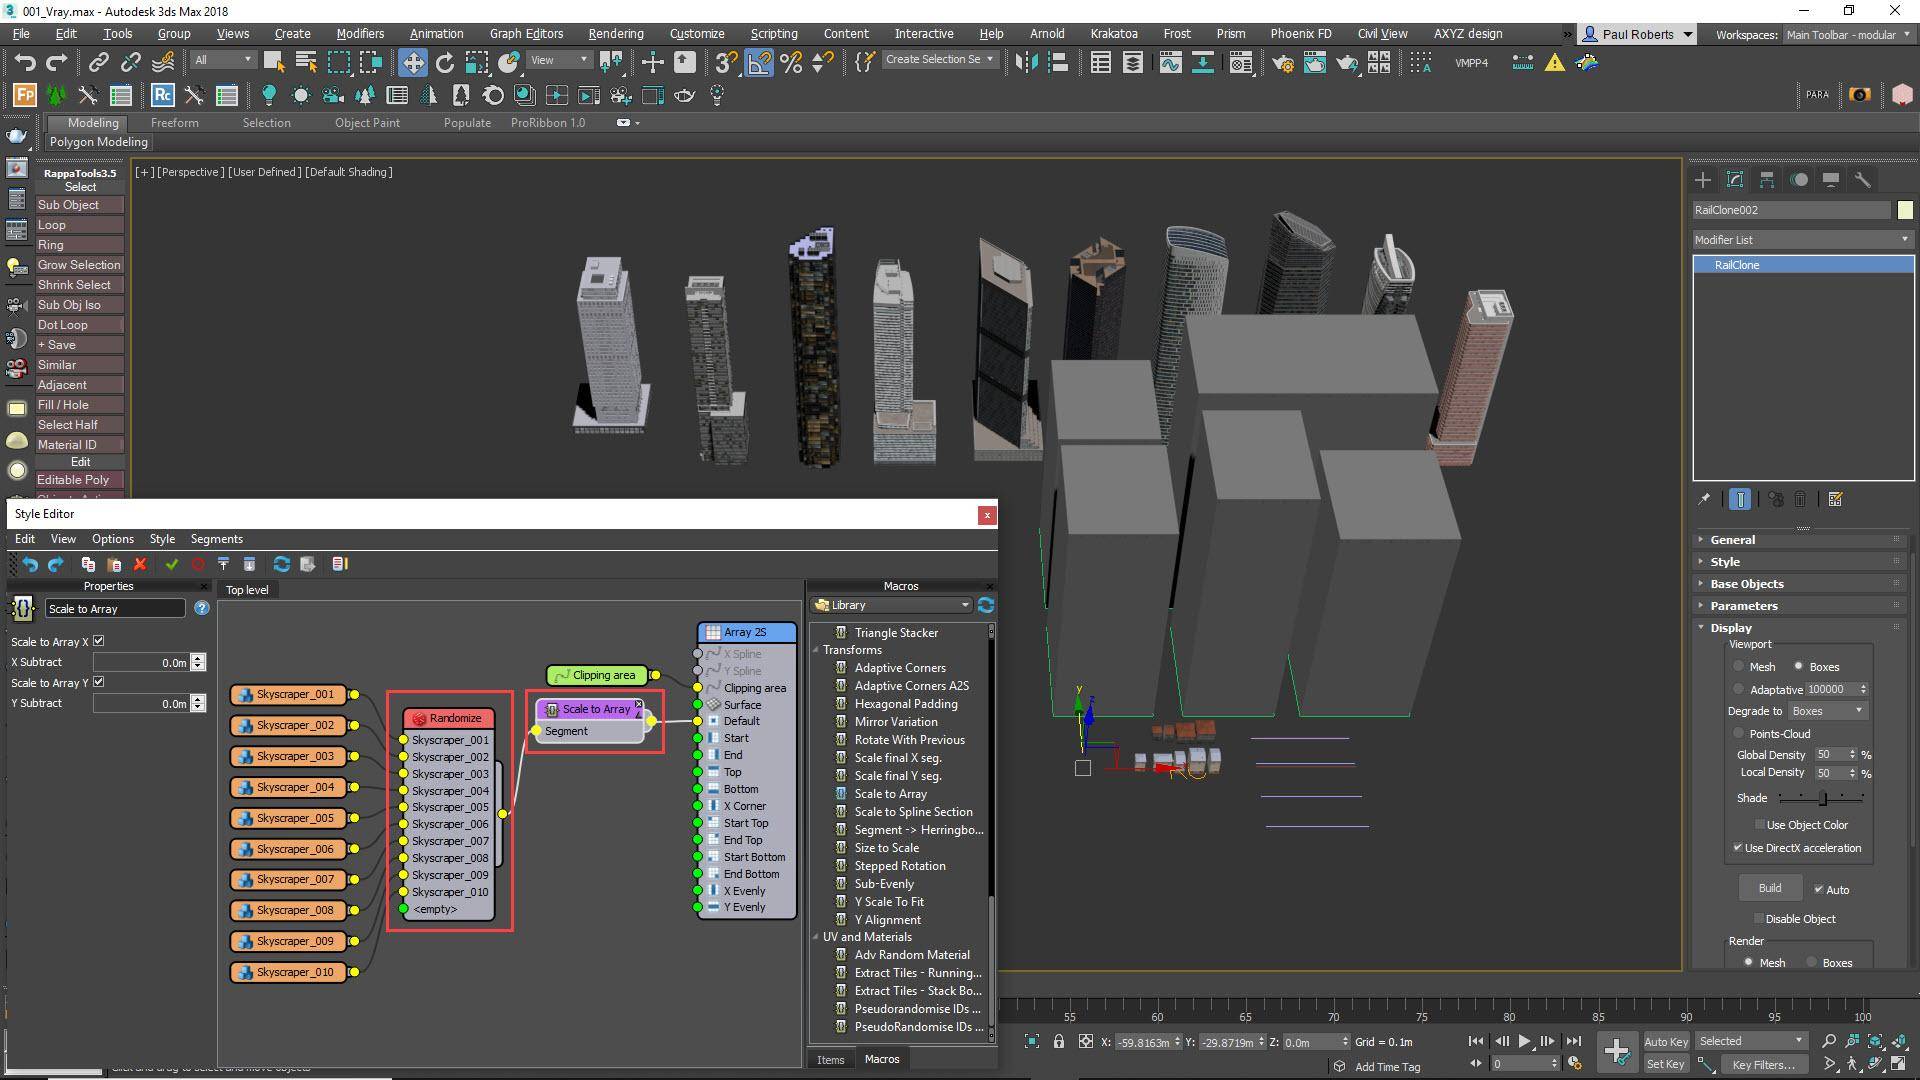
Wire all the building segments to a new Randomise node and wire the Randomise node to the Default input. The buildings will be tiled inside the spline area. We want exactly one building per spline area. We could use the Generator’s Default > Scale mode, but this only works for the X-axis. Instead, we’ll use a macro that allows you to scale on both axes. Wire a Scale to Array macro between the Random node and the Generator and enable Scale to Array X and Y. Next we want to rotate the building to match the orientation of the spline.
Step 16 - Rotate to Match the City Block
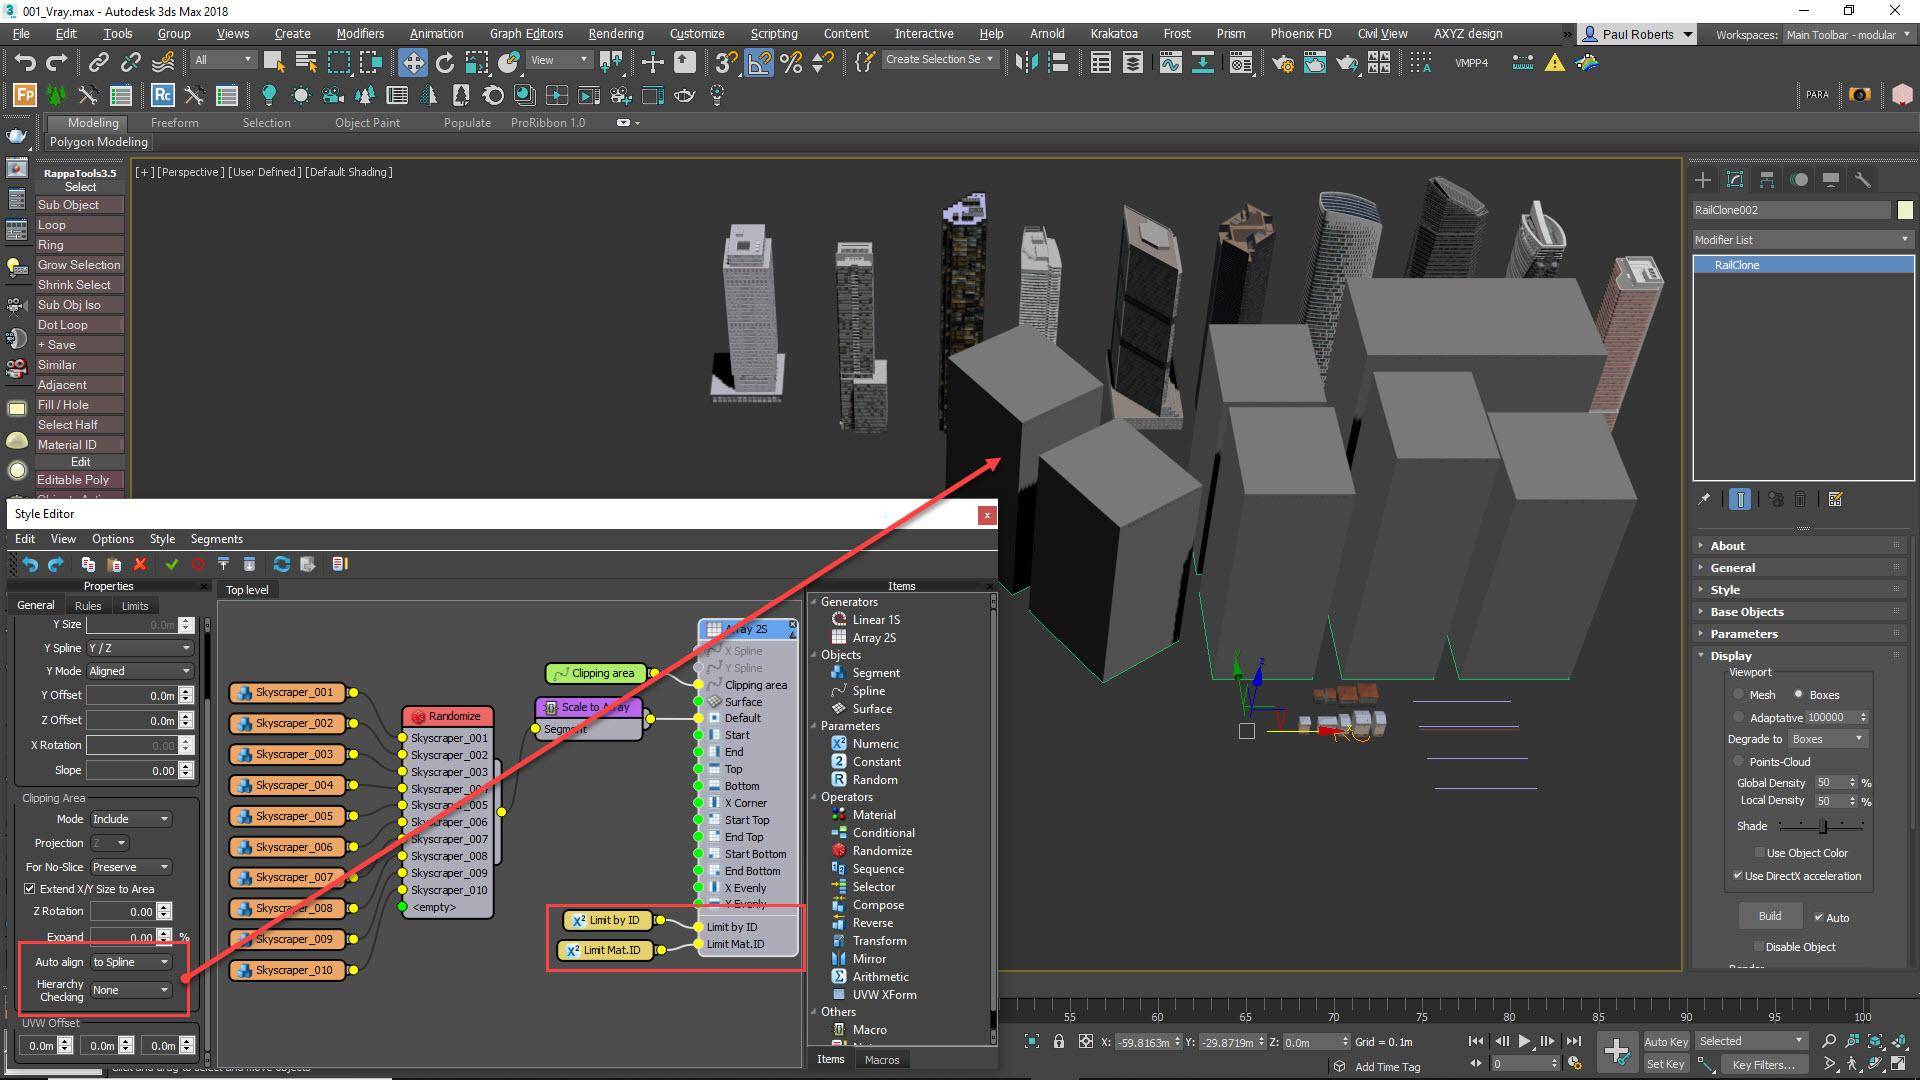
By default, the array’s rotation will match that of the RailClone object. We want each array to rotate to match its sub-spline. To do this, open the generator’s settings and change Auto-Align mode from None to Spline. This mode calculates a direction vector based on the first and second vertex in a closed spline and uses it to align the array. While you’re here you should also change Hierarchy Checking to None to drastically speed up calculation times. Finally, export the Limit by Material Id and Limit by ID values and wire them to Numeric nodes.
Step 17 - Filling Blocks with Offices
The third technique combines the previous two. We will automatically calculate the size and orientation of the array, but then scale the final segments on the X and Y axis so that multiple buildings can fit neatly inside a city block. To do this, Create a new RailCloneobject and open the Style Editor. Add an A2S generator and turn on Extend X/Y size to Area, set Auto-Align to Spline and set Hierarchy Checking to None. Attach a Spline node and pick the spline from the scene. Create a Segment and disable Bend and Slice. Use Add Multiple to import the buildings.
Step 18 - Randomise the Office Buildings
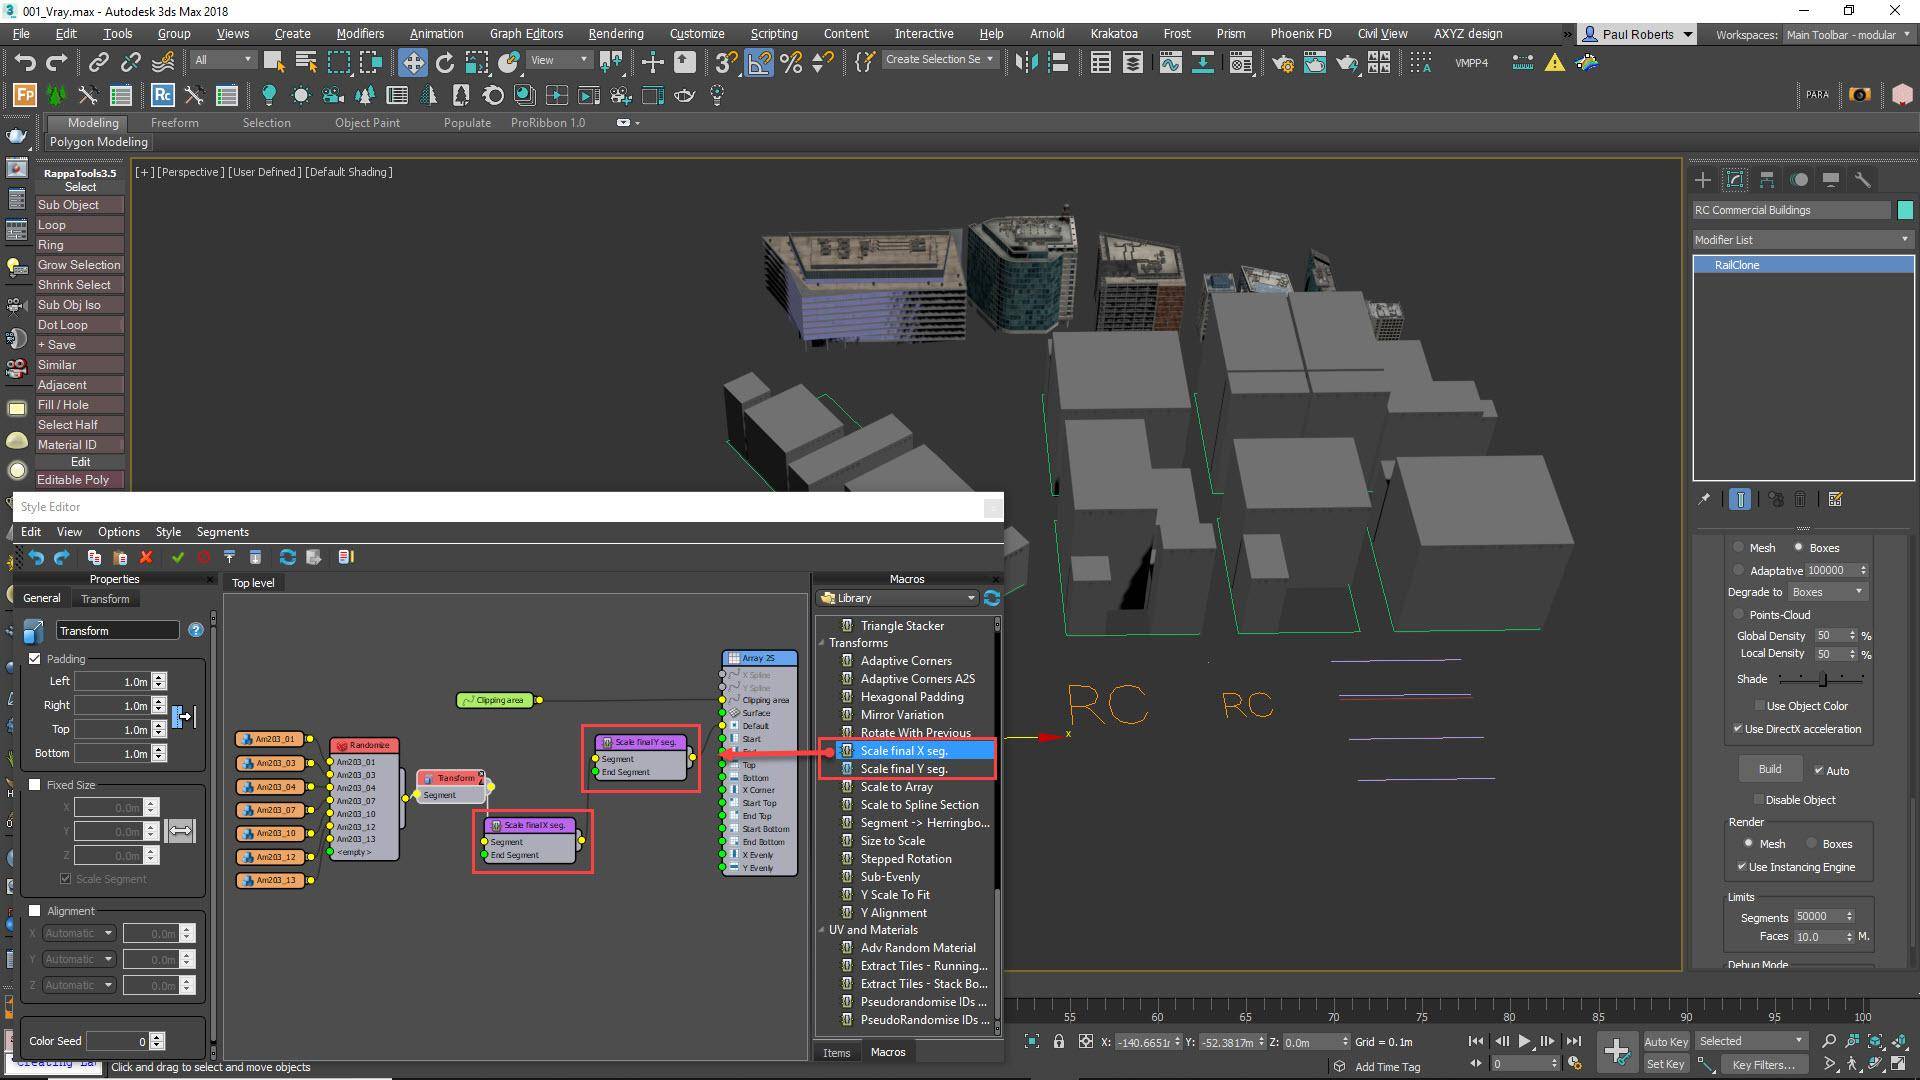
Wire all of the building segments to a new Randomise node. Wire the Randomise node to a Transform node and add some padding so that there’s a gap between the buildings. To ensure the buildings fit inside the spline, we’ll scale the final building on the X and Y axis by adding two Macros. Wire a Scale Final X Segment and Scale Final Y Segment macro in series between the Transform node and the Generator’s Default input. These are the same macros we used for the Courtyard blocks. Increase the Min Last Object Size parameter until you remove any ultra-thin buildings.
Step 19 - Populating the Entire City
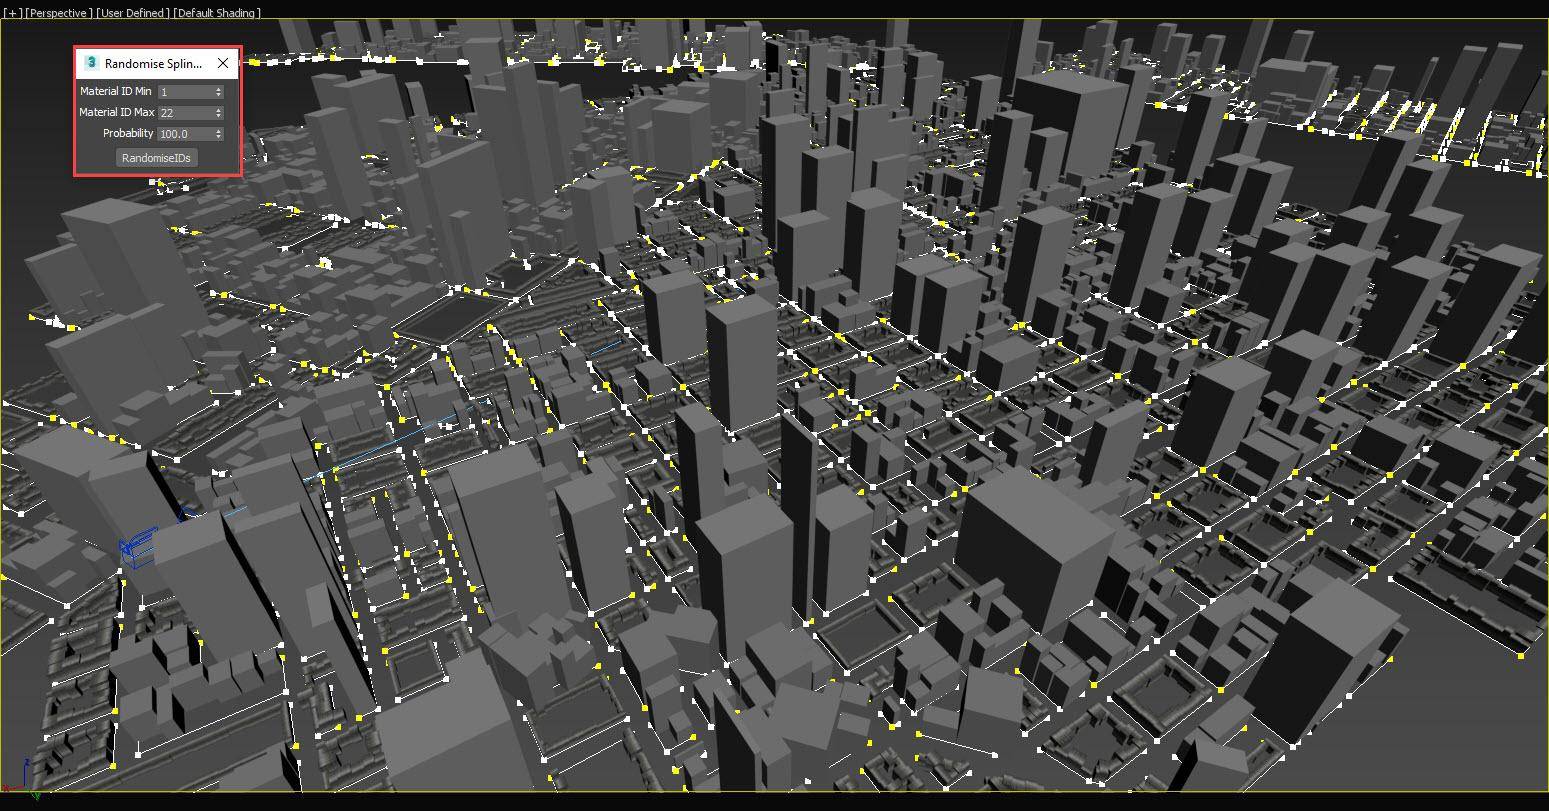
To finish the style, once again we export the Limit by Material ID and Limit by ID values and wire them to Numeric nodes. Set the Material ID value to 22. You now will have 20 courtyard building variations on Material IDs 1 - 20, Skyscrapers on Material ID 21, and finally offices and commercial buildings on material ID 22. Using these numbers you can change the material IDs on your city grid to design your layout. Alternatively, for the demo scene we used a script (included in the downloads) to Randomise the IDs.
Step 20 - Save and XRef to a new Scene
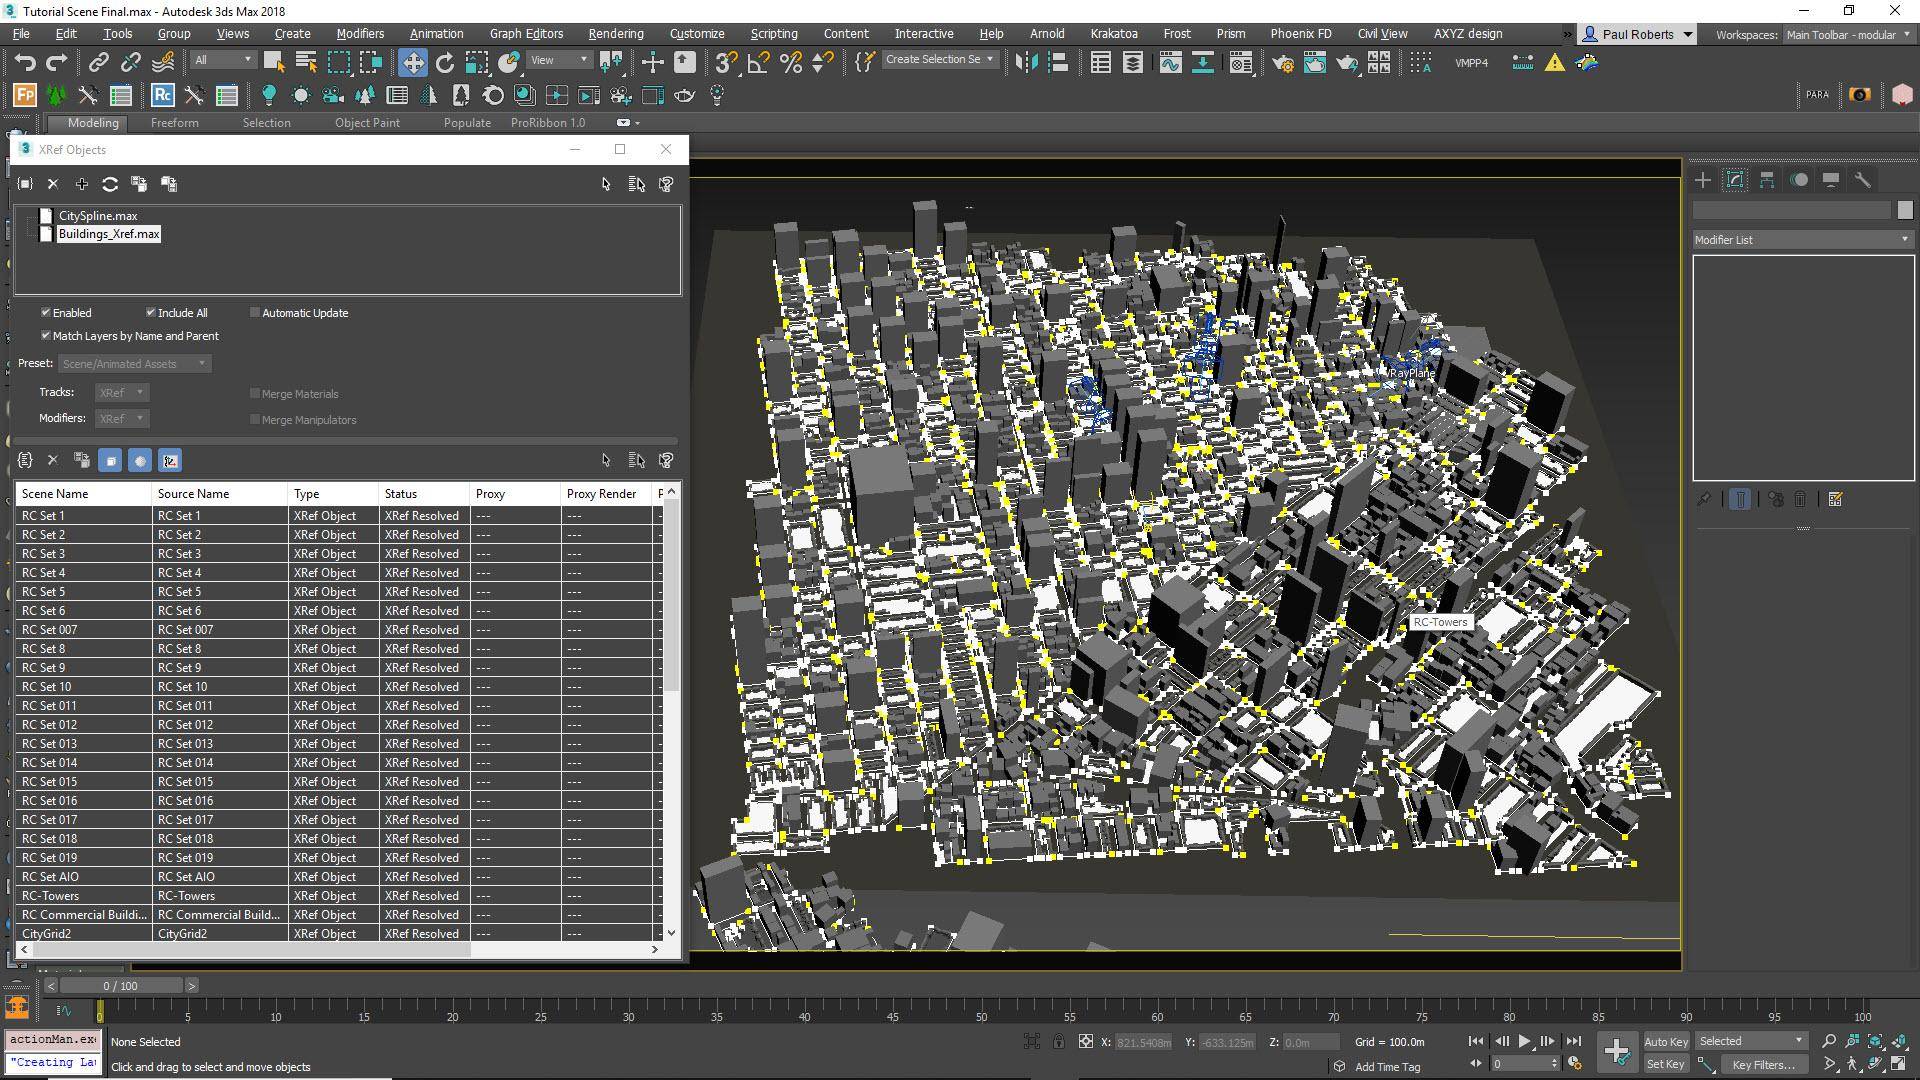 Once you are happy with the layout of the city, save the file and create a new Max scene. We will XRef the buildings into this scene so we can continue to add details without having to wait during long save times. Clone the city spline and extrude it to create a base for the building and add a plane the size of the whole city. Translate the plane down on the Z axis the height of a pavement to create the roads. The city grid spline can also be used to add cars to the streets.
Tip: Road Materials
Instead of modelling and texturing roads you can use a simple plane to cover the entire area and use V-Ray Distance Textures to parametrically add wear and tear based on the surface's distance from the city block.
Step 21 - Using RailClone for Cars
Either RailClone or Forest Pack could be used to add cars, but for this example, we’ll use the former. Don’t forget though, that your car models will need to be prepared so that they share a single Mult-Sub Object material and none of the geometry should be grouped. Then, create a new RailClone object and add car models to the graph in the same way as we did for the buildings. Wire them to a Randomise operator, and add a Transform node to rotate the cars and add some Translation variation if necessary.
Step 22 - Adding Spaces Between Cars
If you wire the Transform node to the Default input, the cars will be bumper to bumper. To add some spaces, add a new Sequence operator after the existing Transform node, then wire a brand new Transform node to the second input. Wire a Null segment to the new Transform node, export its X Fixed Size and enable it from the parameters. Wire a Random Number node to the X Fixed Size input and adjust the Min and Max values to control the spacing.
Step 23 - Export Parameters
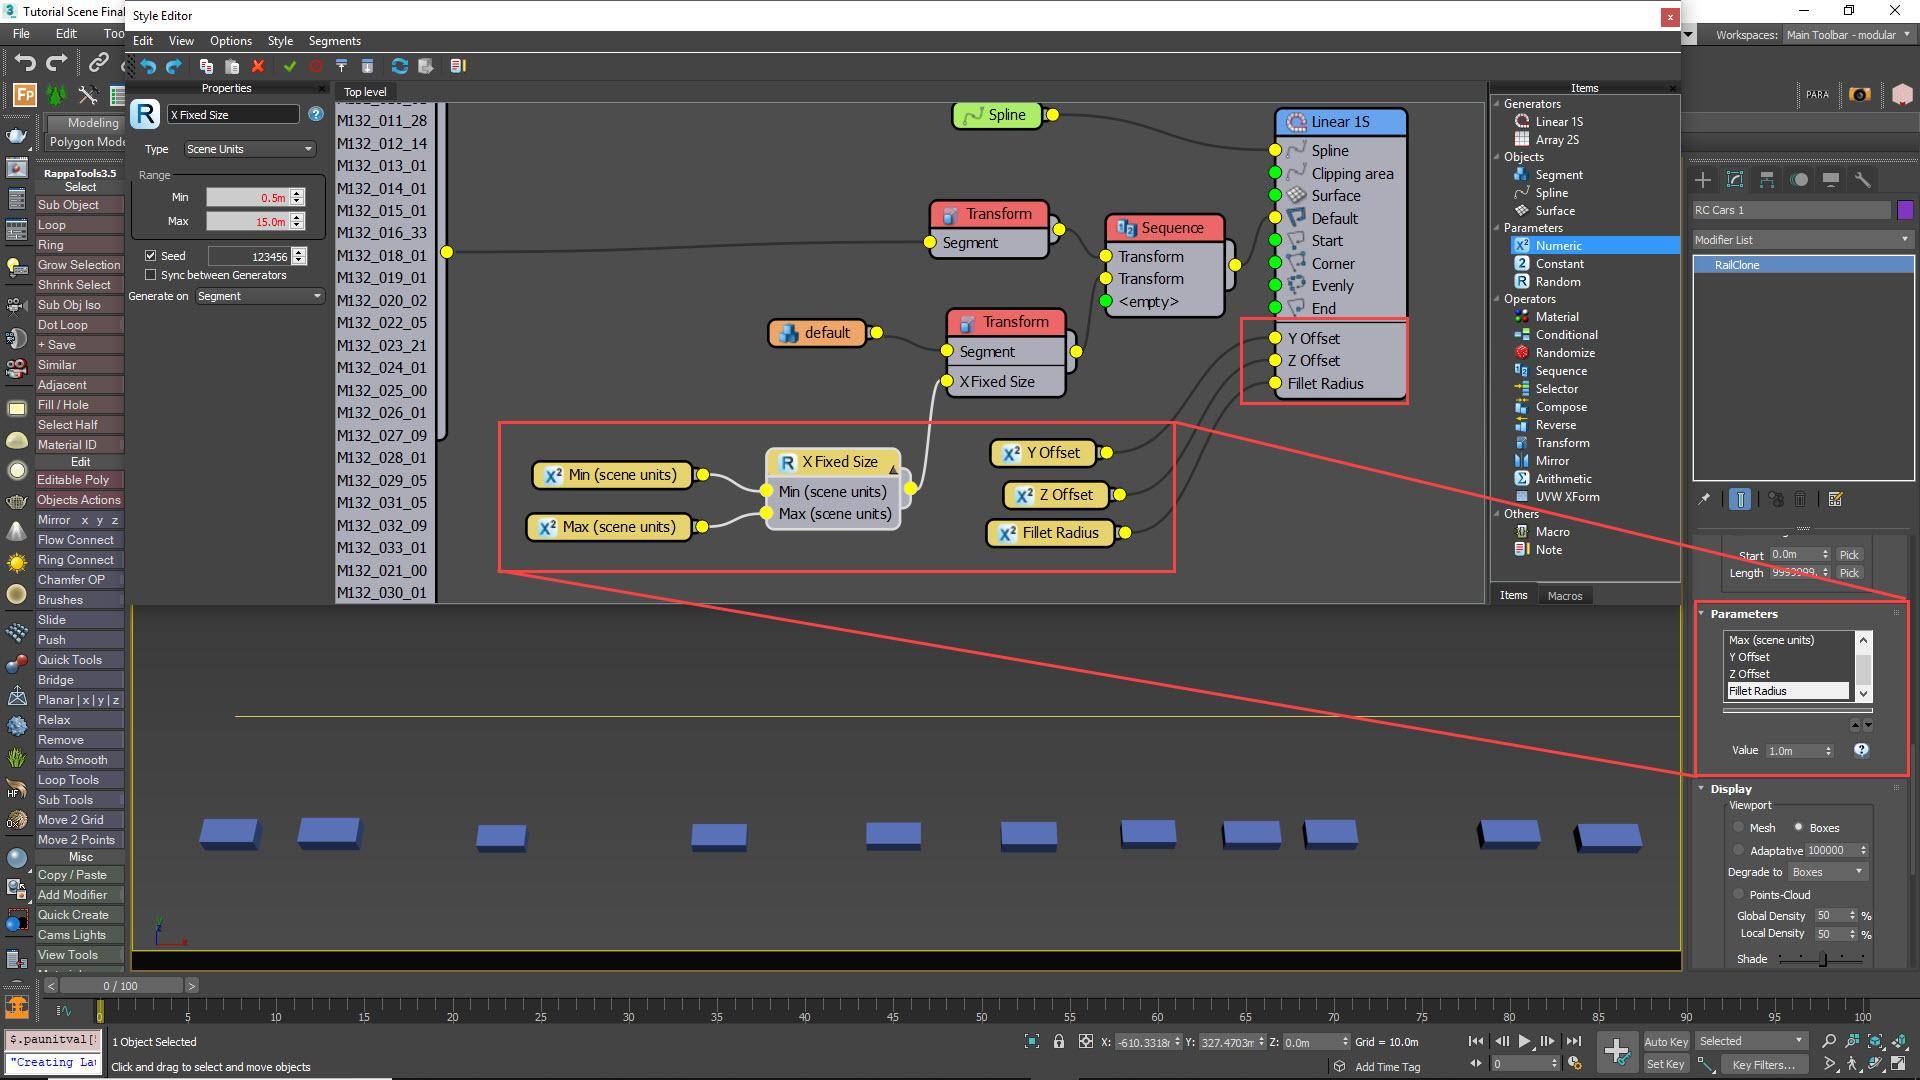
To make this style easier to edit from the Modify panel, let’s export a few parameters. From the Random number node, export the Min and Max values and attach new Numeric nodes set to Scene Units. From the Generator, export Fillet Radius, Y Offset, and Z Offset. Wire new Numeric nodes to these too, all set to Scene Units. Once you’re done, you can apply the style to the city grid and easily adjust the parameters to position the cars and control the density from the modify panel. For multiple lanes, simply duplicate this object and edit the Y Offset value.
Step 24 - Other uses for RailClone
There are several other RailClone objects in the final scene. Most of these are very simple and are included in the exercise files so you can see how they’ve been created. For example, we used RailClone to add the pavements, the street lights, road markings, pedestrian crossings, and even people walking along the pavements. To make things easy to set up, all of these are driven by the same set of city grid splines used to generate all of the buildings. Let’s take this even further and use the same splines again to add trees to our city.
Step 25 - Adding Trees to the Streets
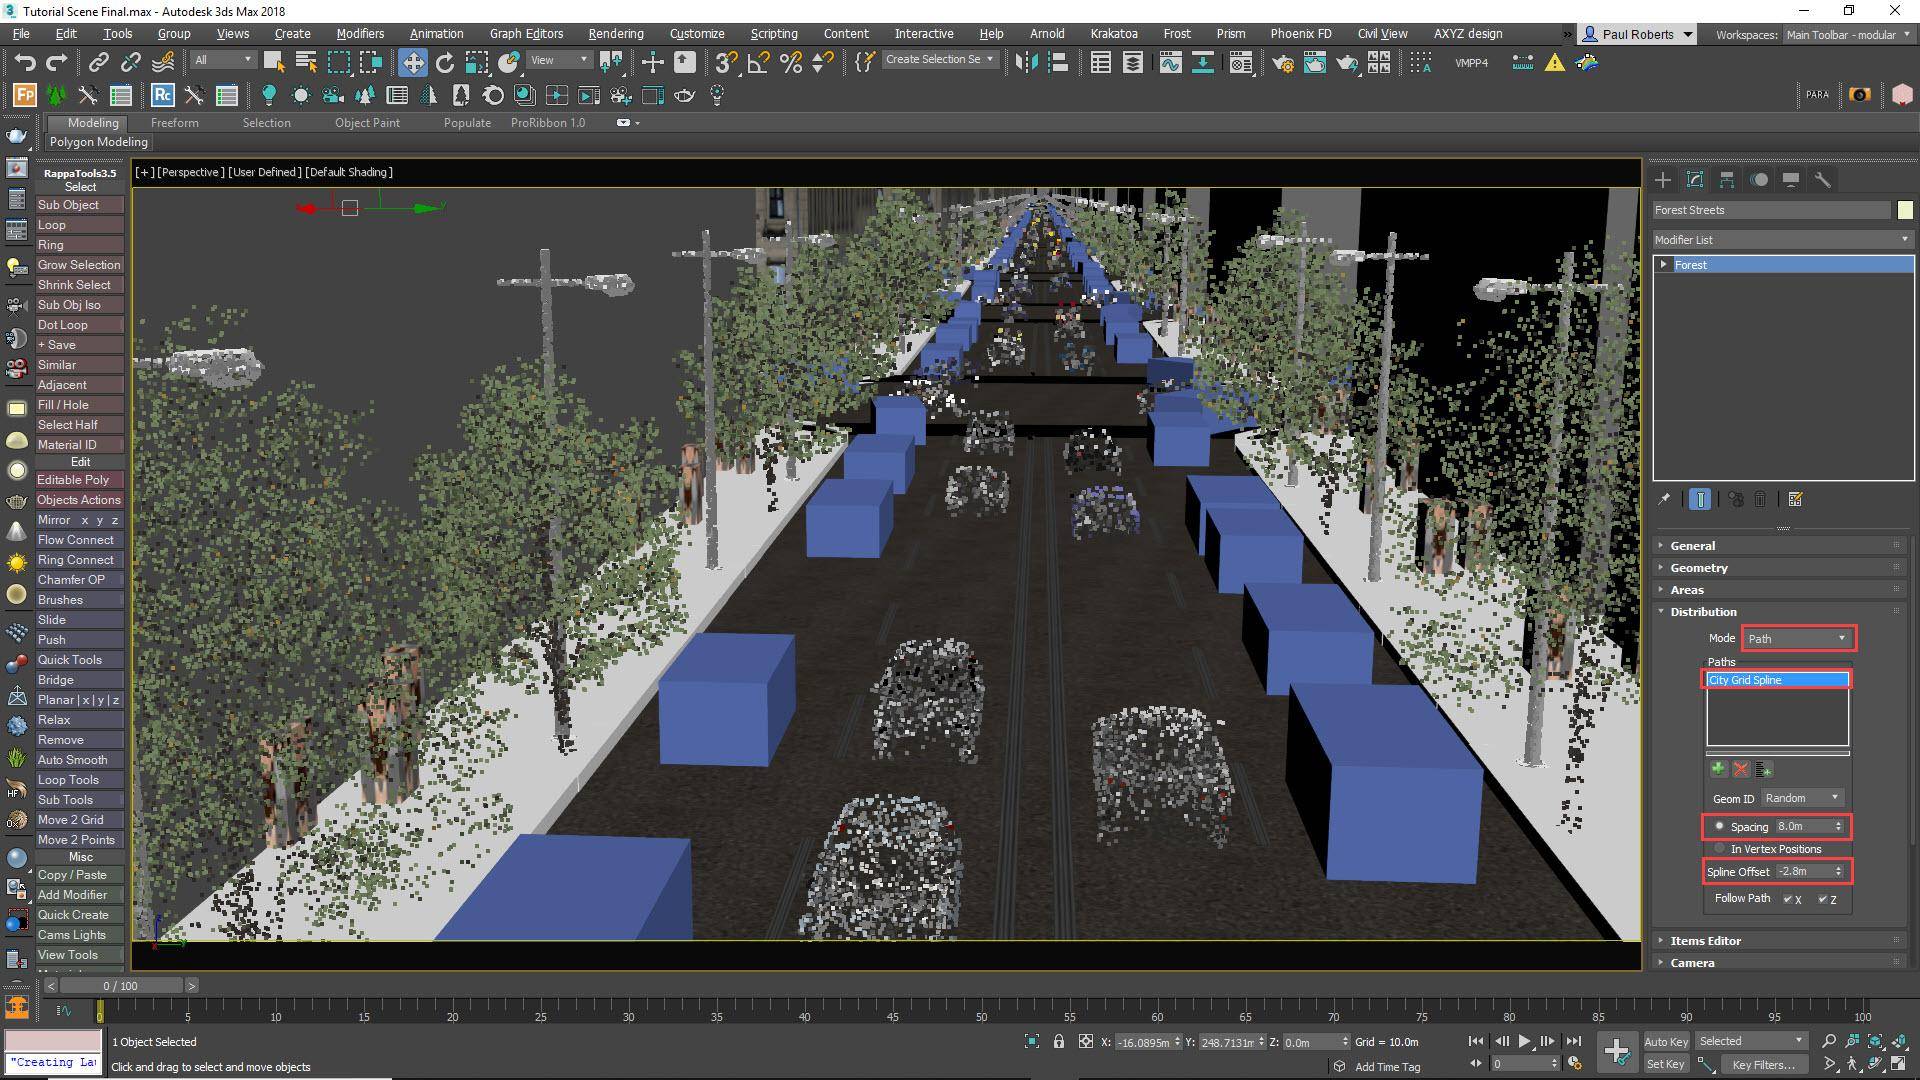
We will use Forest Pack to add trees to the streets. Create a new Forest Pack object by dragging an icon in the viewport. Open the Modify Panel, go to the Distribution rollout, and change the mode to Path. Add the City Grid to the Splines list and use the Spacing property to control the distance between trees. In the Geometry rollout, add a tree from the library. If it’s too large you can resize it using the Scale property. Back in the Distribution rollout, use the Y Offset value to move the trees to the edge of the pavements.
Step 26 - Adding trees inside the courtyards

The courtyards look too empty so let’s add trees to them too. Clone the city grid and delete the sub-splines that create the towers and commercial buildings. Create a new Forest Pack object and add the spline to the Areas List. In the Geometry rollout, add one or more trees from the library then go the Distribution rollout, select a pattern and adjust the density. For both Forest Pack objects, enable Rotation and ScaleRandomisation and Enable Limit to Visibility and Auto Assign to Active View from the Camera rollout to optimise the scene by removing items that are not visible in the final render.
Step 27 - Using Falloff
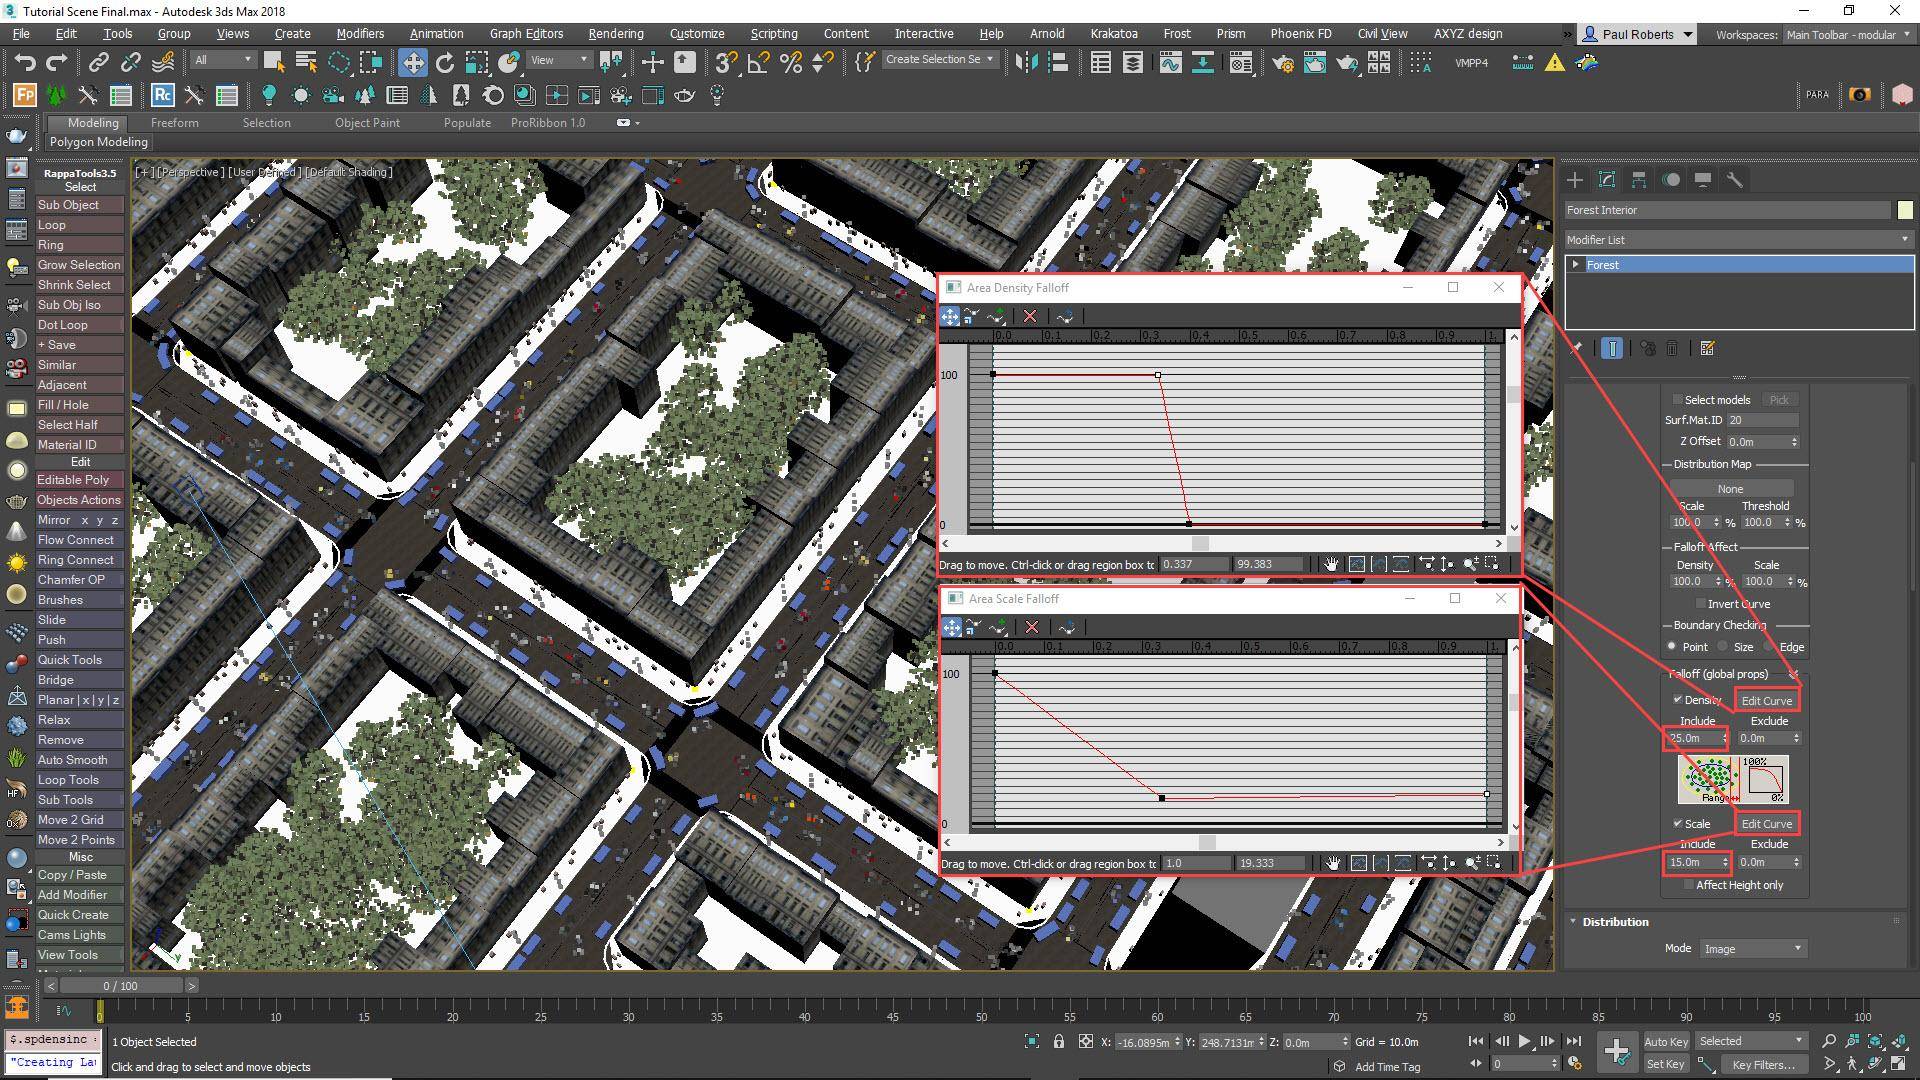
To remove the trees from the edge of the city block where they intersect with the buildings, go to the Areas Rollout and enable Density Falloff. Edit the Falloff graph so that it’s stepped to create a hard cut off instead of a gradual reduction in Density. You can then increase the Include value to remove trees from the perimeter of the city block. To reduce the size of the trees you can use the Scale falloff settings. This time though, don’t set the Minimum scale to 0 in the falloff graph, 30 - 40% will look more realistic.
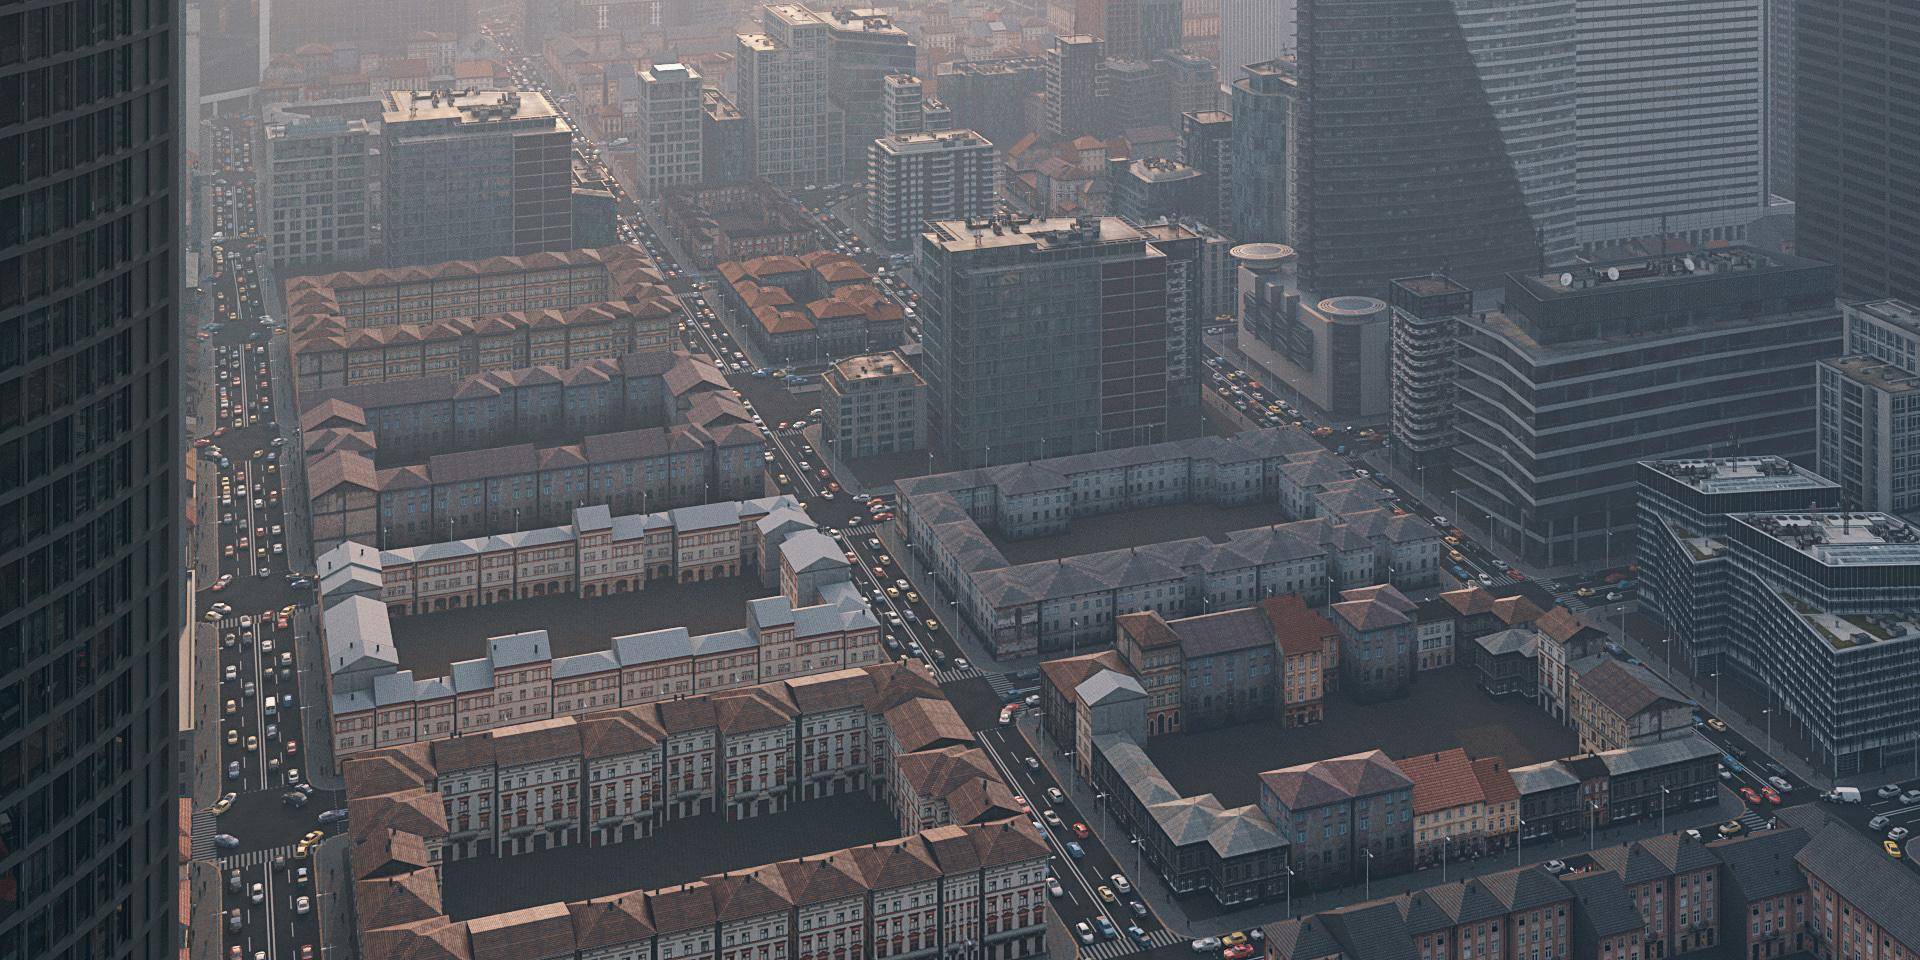
Step 28 - Putting It All Together
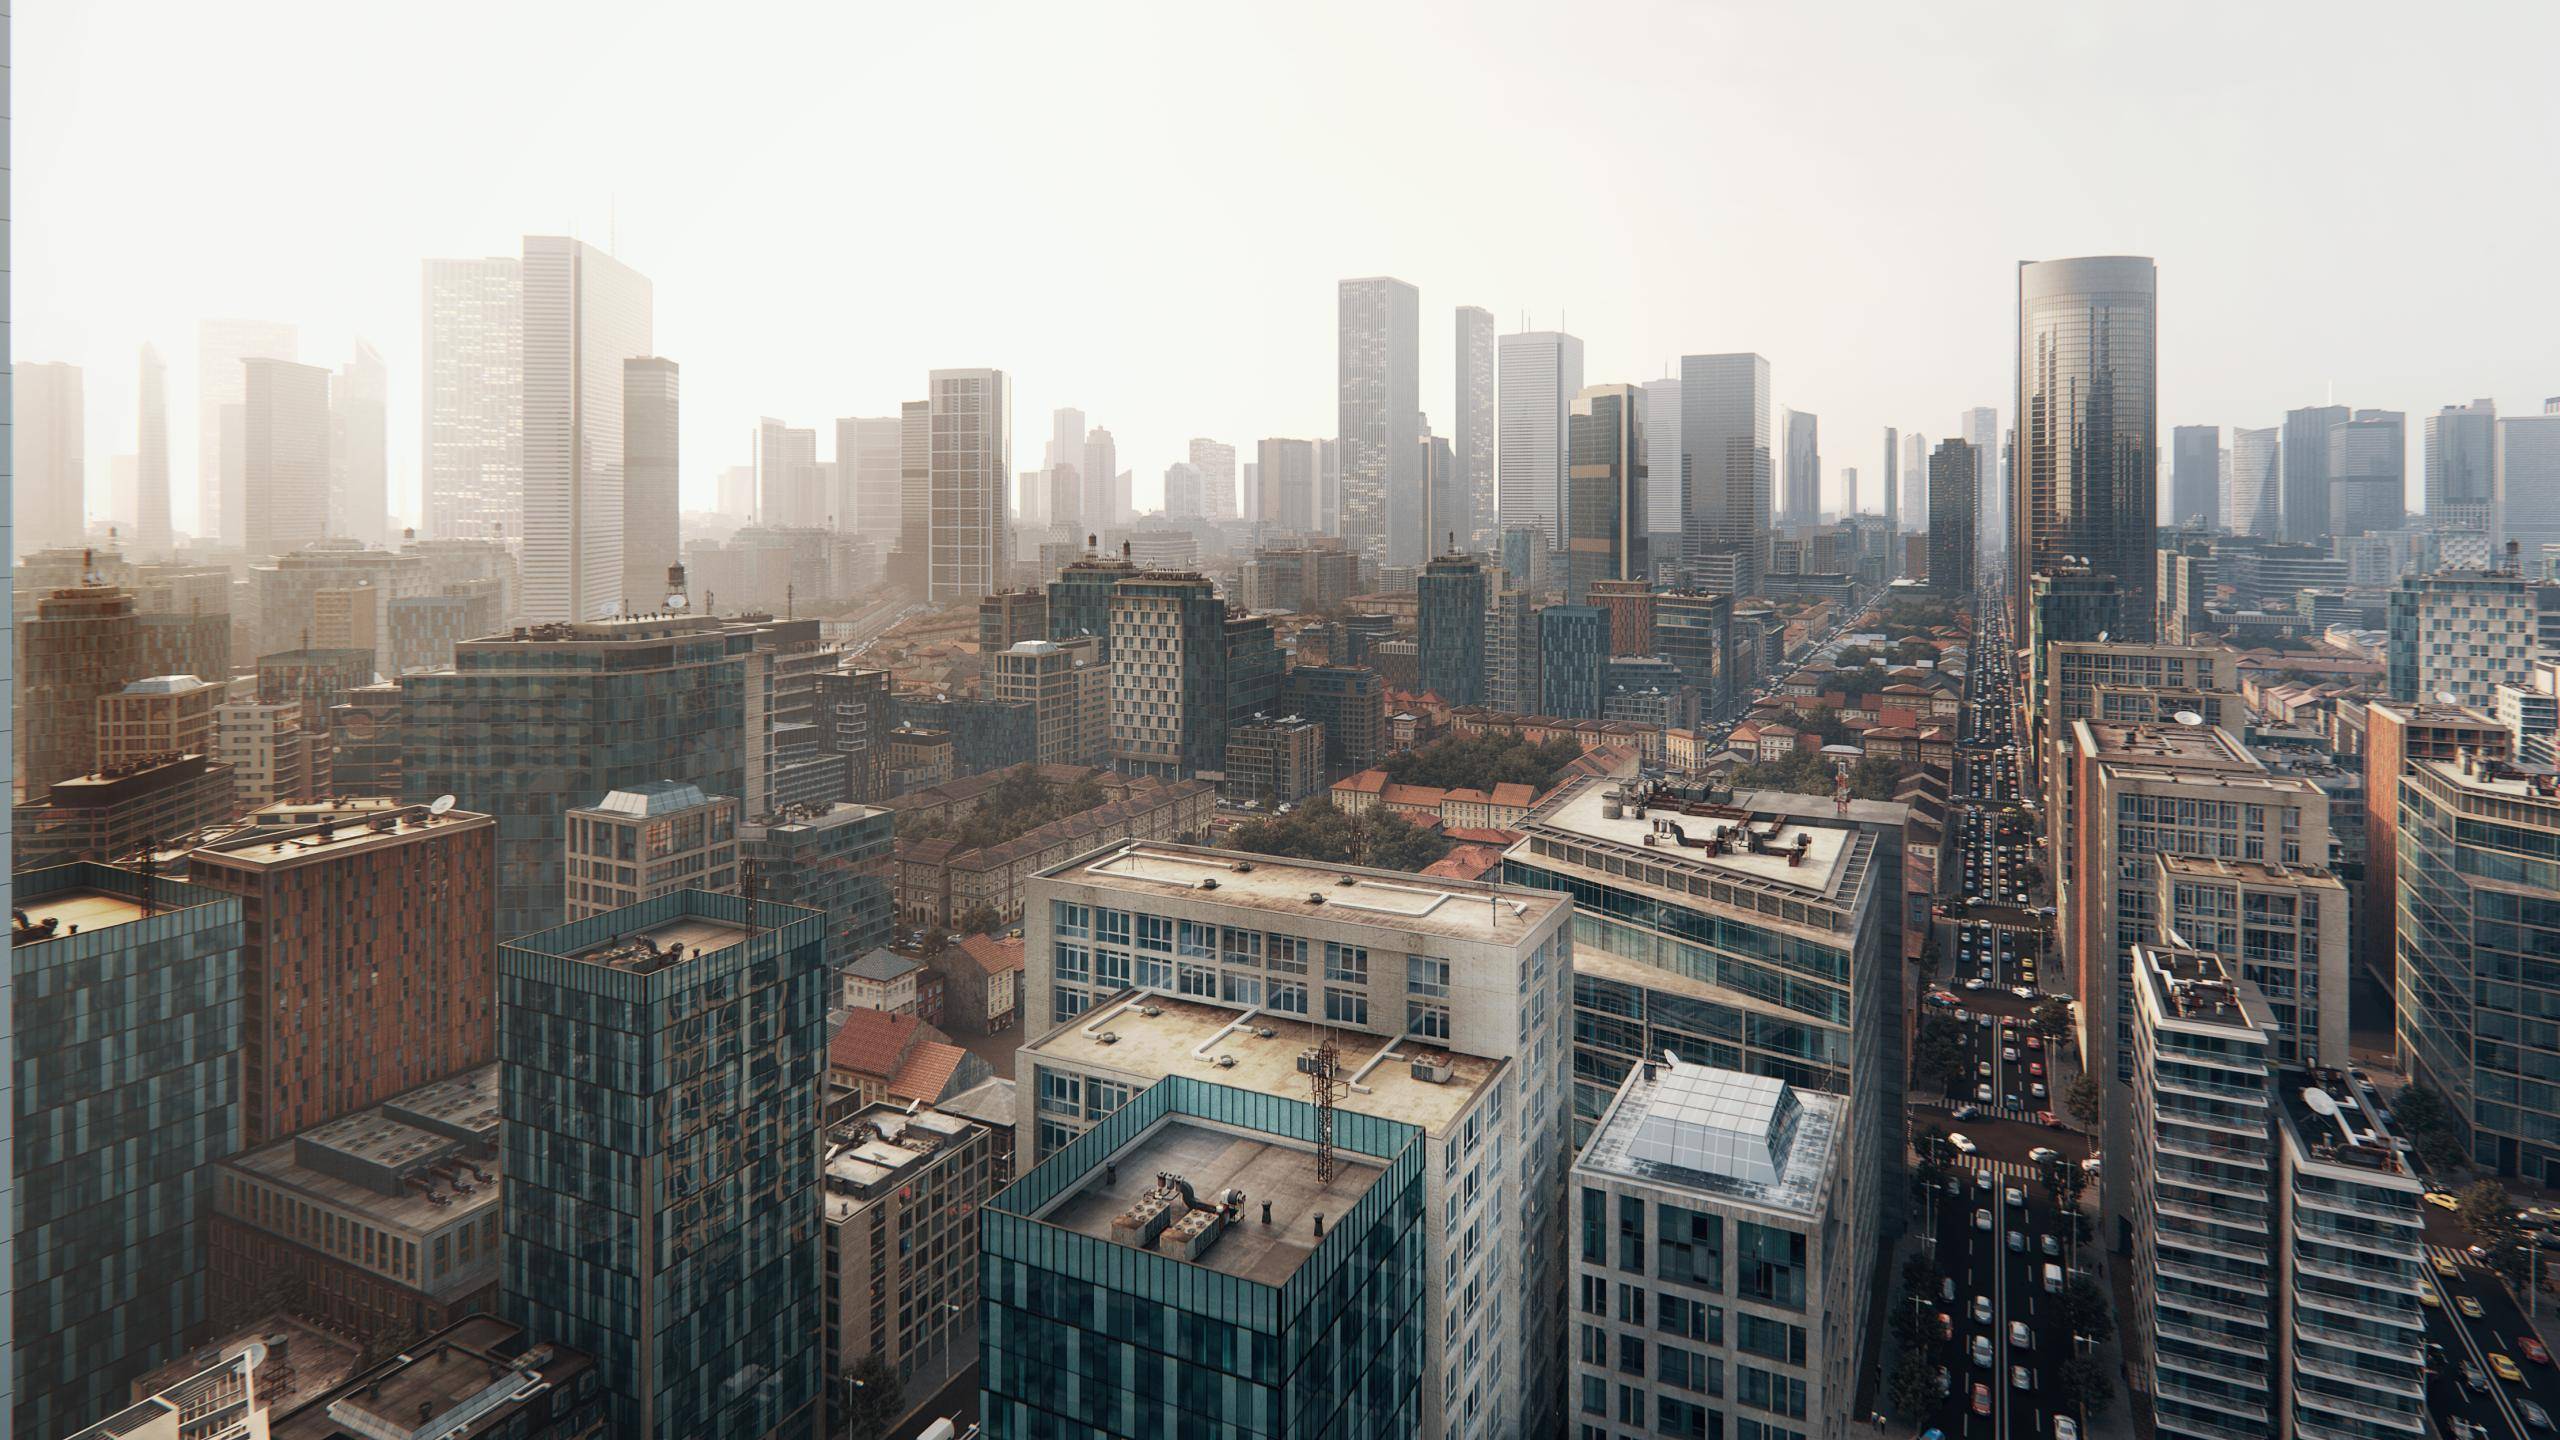
Using these tricks and techniques we have been able to generate hundreds of buildings, thousands of trees, streets full of cars and people and many more small details to create a convincing 3D render. Best of all, once you’ve set this up you can easily create cities for other projects just by changing the base spline. You could even extend this by adding more RailClone items to the streets to create street clutter such as road signs, traffic lights, bus shelters, bins advertising hoarding and much more. Experiment, and have fun!