Requirements
- info Forest Pack Pro or Lite, RailClone Pro or Lite, Any Compatible Renderer
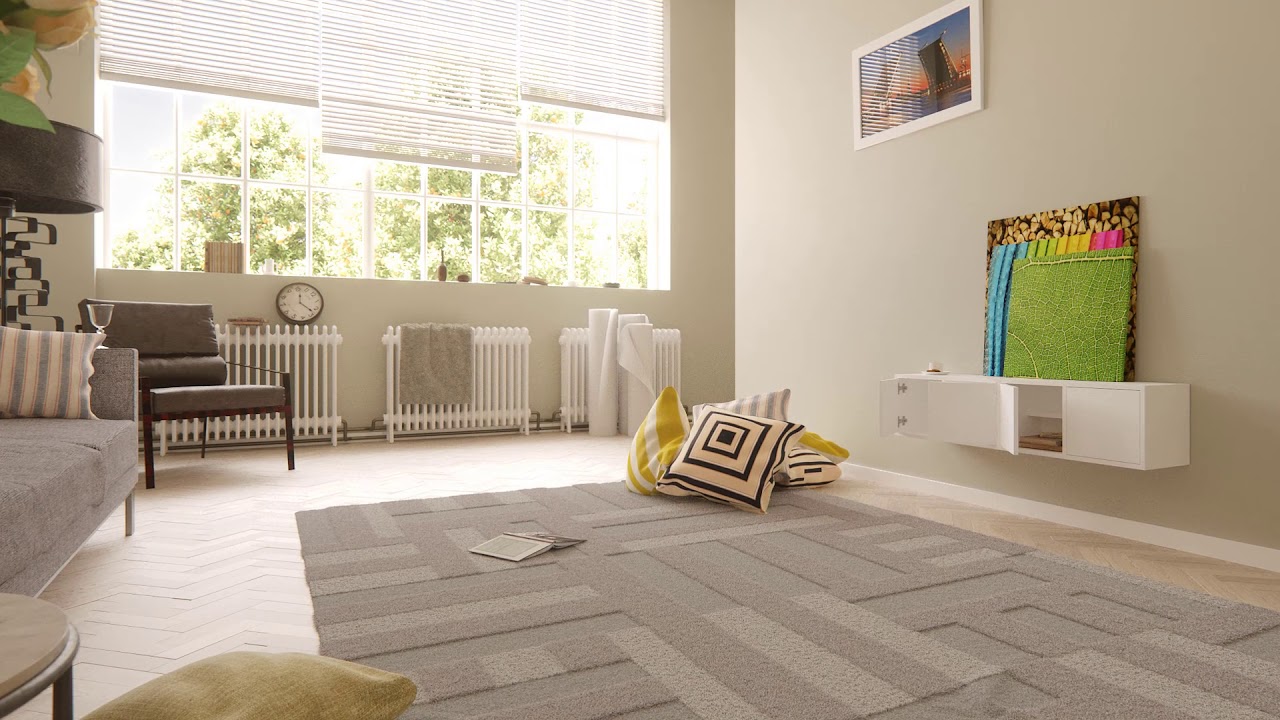
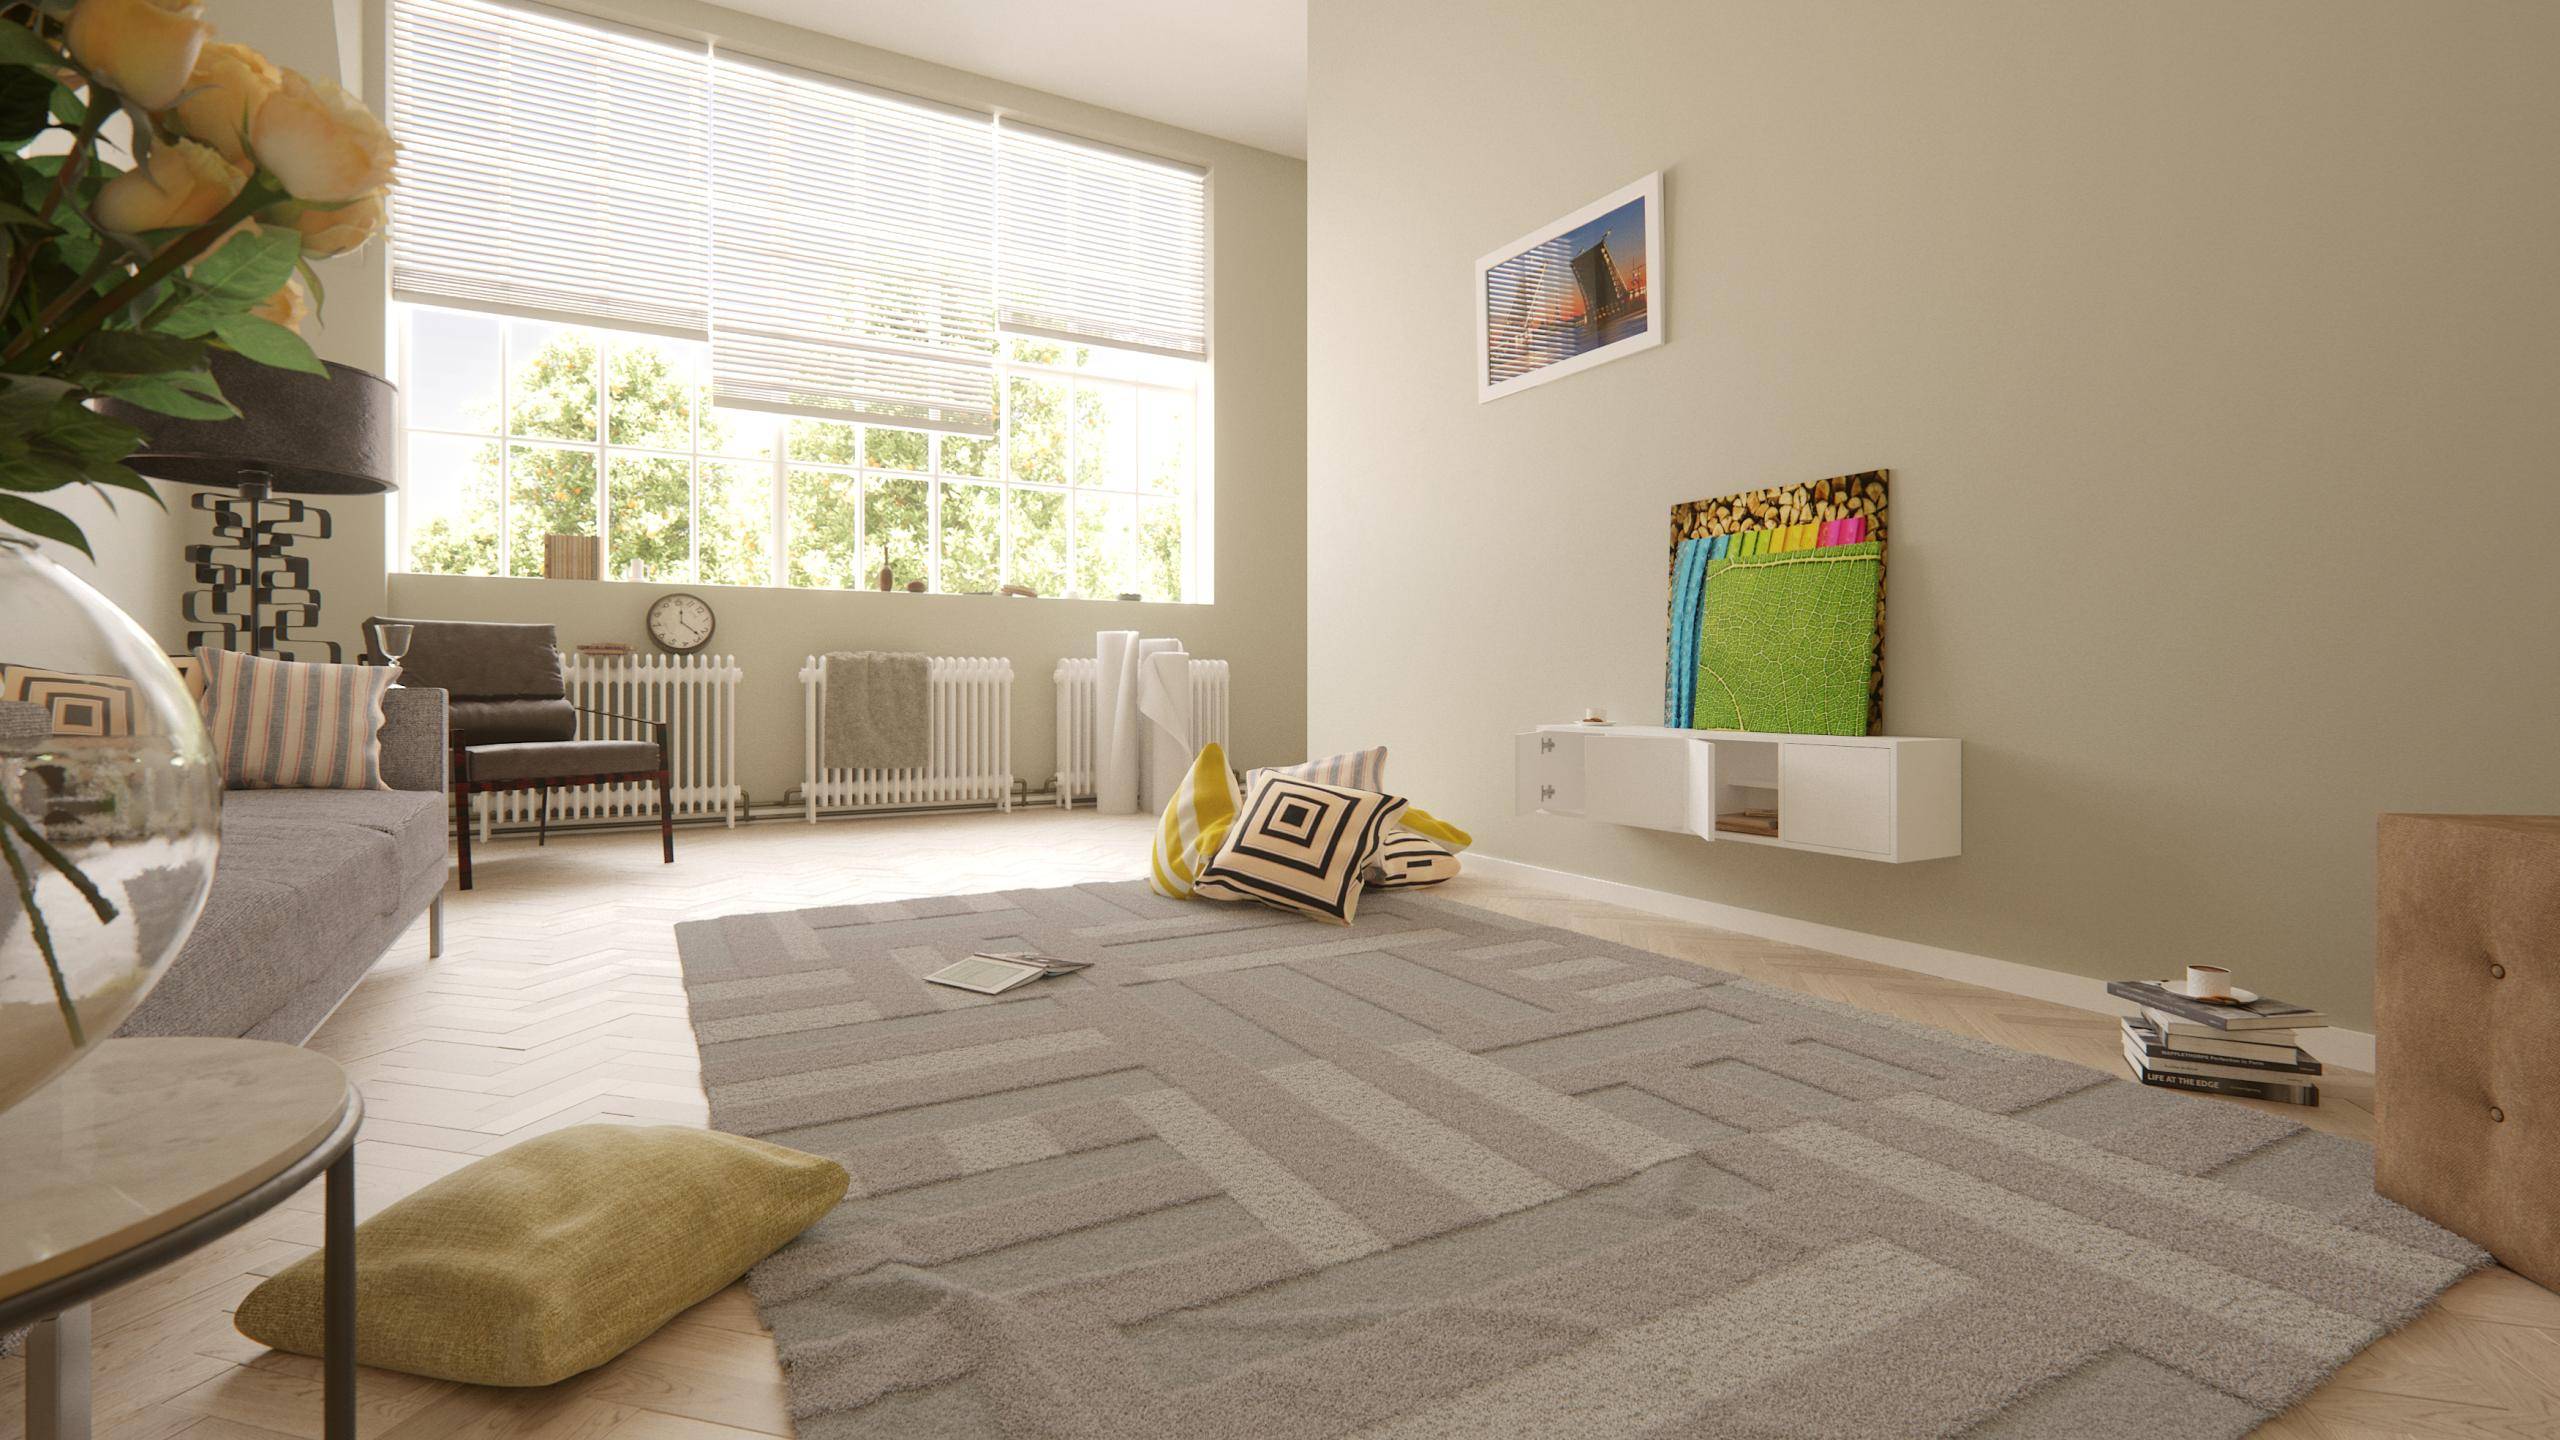
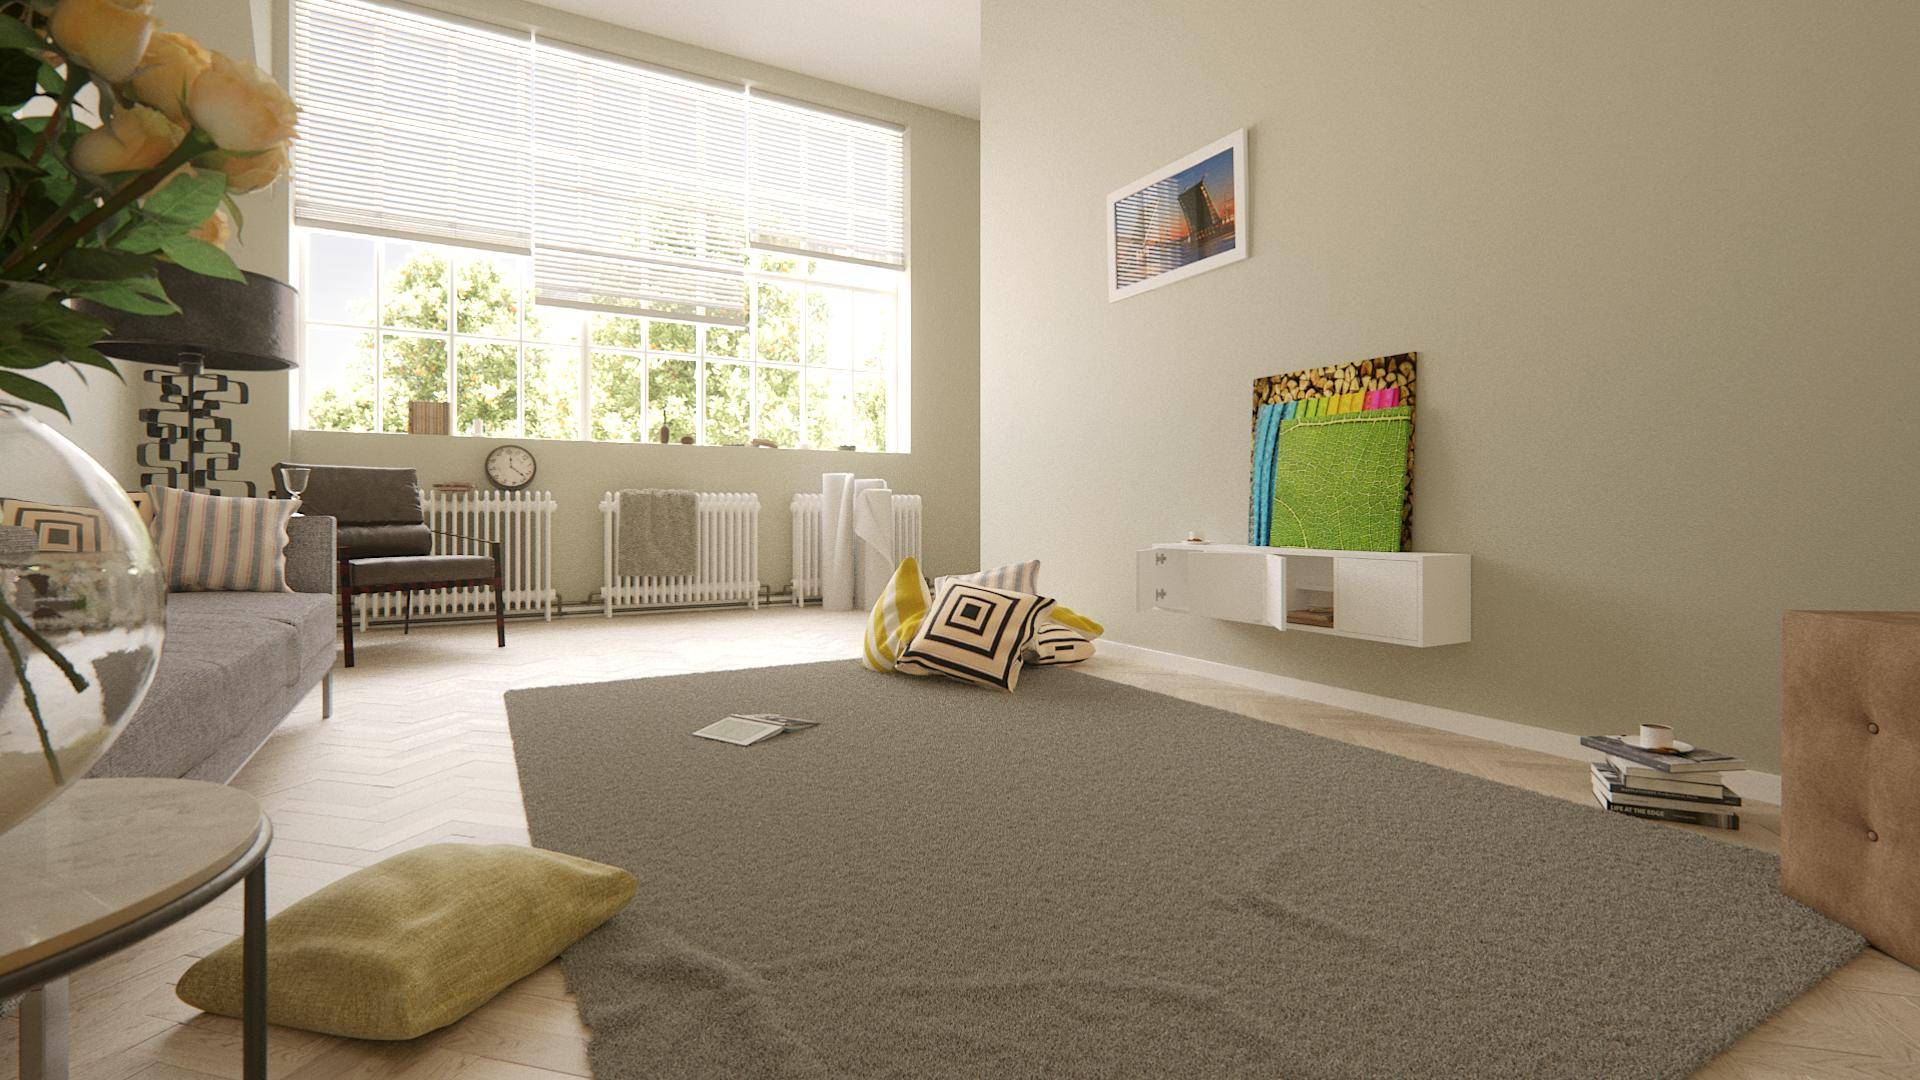
Rugs are much loved by interior architects and visualisers - they can provide a focal point, offer a soft counterpoint to the hard edges of a room, and invite the viewer inside the image to curl their toes into the soft pile.
In this tutorial we will look at how to use Forest Pack to create rugs by scattering small patches of actual geometry. This approach benefits from allowing you to precisely model the pile for your rug in as much detail as you need, a thread at a time if necessary. Thanks to instancing, in most cases it will also use less memory and render faster than displacement or Hair and Fur approaches.
While we’re considering what’s under our feet, we can also look at how to create two types of fully parametric wooden parquet floor using RailClone. Texture-based approaches have their limitations - by using real geometry we can add subtle transform randomisation as well as using a simple technique to disguise texture repetition and add a random value tint to individual planks.
The majority of this tutorial can be completed with the free versions of Forest Pack and RailClone. These Lite versions don’t allow you to scatter on undulating surfaces, so you won’t be able to create wrinkled rugs. But if you don’t plan on introducing trip hazards to your scenes, there’s no reason not to give it a try!
Create the spline and plank objects
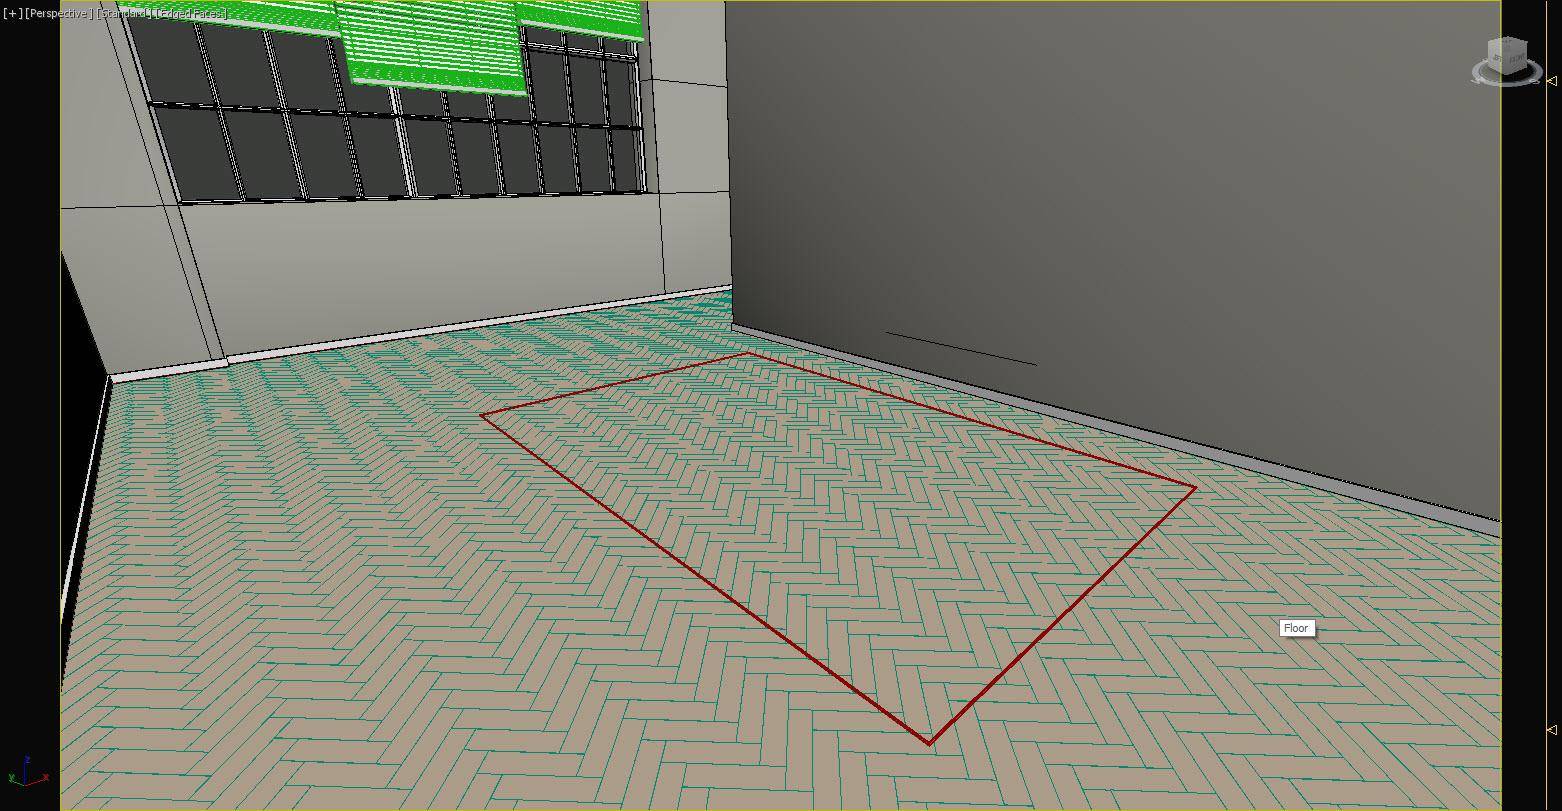
To create the floor we need to define the boundary of the room using a spline. To do this, enable Vertex Snap and draw a closed spline around the perimeter of the room. How accurately you adhere to this boundary depends on if you are creating renders in adjacent spaces. If not you can simply create a rectangle that’s large enough to encompass the entire area. We also need a single wooden plank for the floor. Create a box of the desired size and enable Generate Mapping Coordinates and Real World Map size. Add a Chamfer modifier to crack the arris.
Create a RailClone object
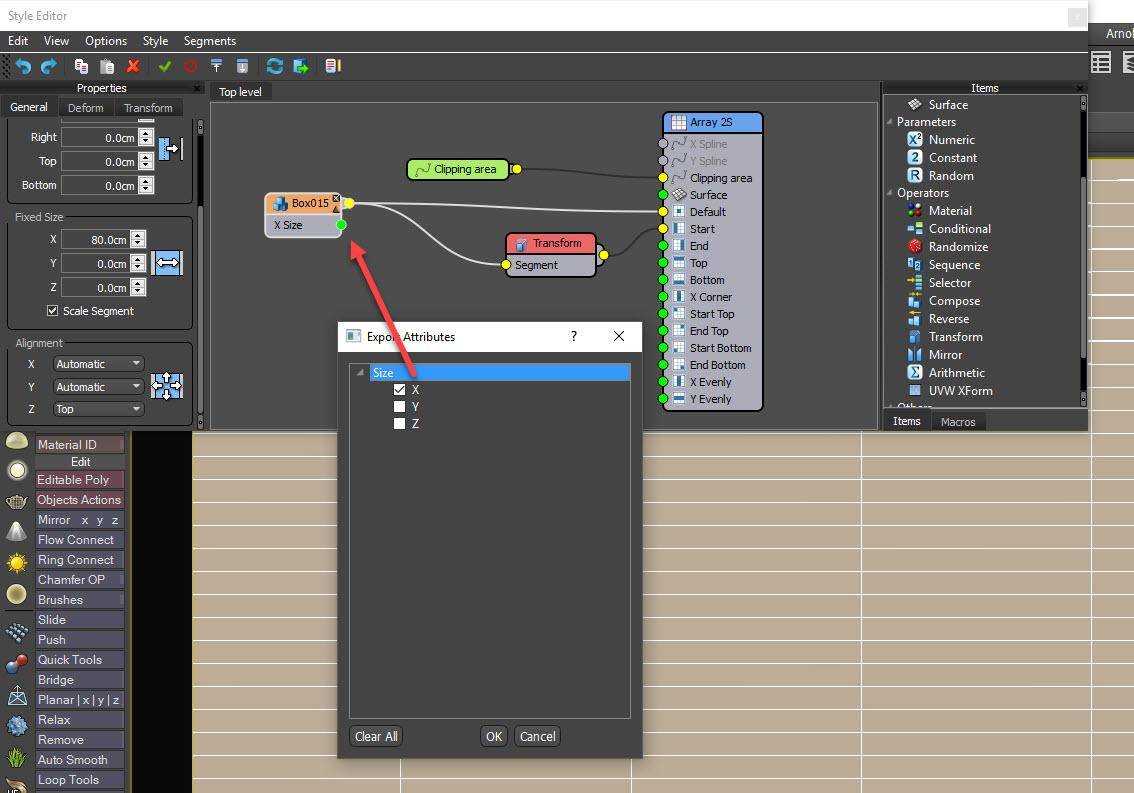
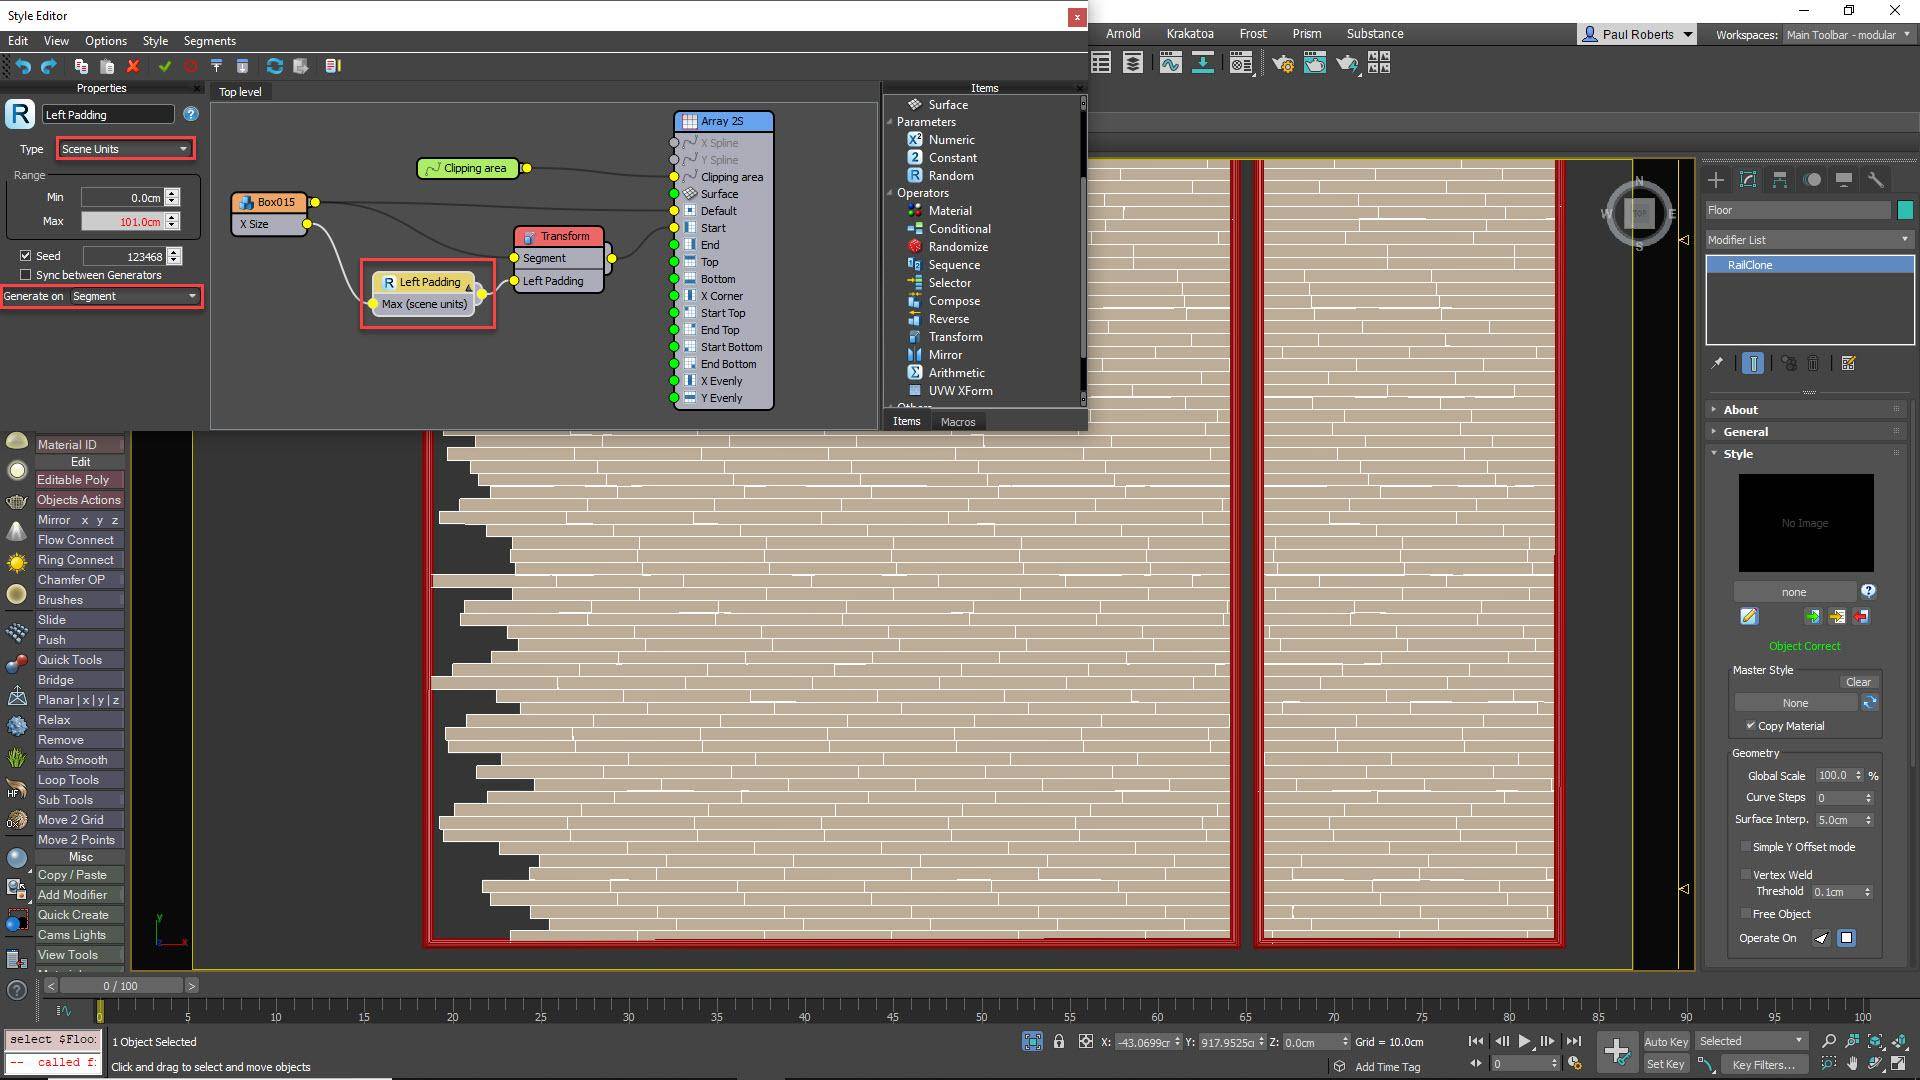
Create a new RailClone object and open the Style editor using the button in the Style rollout. Add a new A2S Generator. This node is used to create two-dimensional arrays. Automatically size the array to fill the spline created in the previous step by adding a Spline node, picking the spline from the scene and wiring the node to the Generator’s Clipping input. Enable Extend X/Y Size to Area. Next, create a Segment node, wire it to the Default input, and use it to pick the floorboard object from the scene. You will now have a simple floor, but all the joints will be in line.

Export parameters and attributes
To randomise the rows so that the joints are offset, first add a new Transform node to the Generator’s Start input. Then wire the existing segment node to the Transform node. We will randomly move these start segments to the left so that they’re clipped by the spline, but we never want this offset to be larger than the length of a single board. Usefully, we can automatically find the size of the segment and use it to drive any parameter. To do this, right click on the Segment node and select Export Attributes > X Size.
Use Random Number generators
Next, select the Transform node and export the Left Padding property. Click the Padding checkbox to enable the Transform node to override the Segment’s settings. Wire a new Random Number node to the Left Padding input, change Type to Scene Units and the Generate On option to Segment. Export the Max (Scene Units) property and wire it to the Segment’s X Size output. This will add a random Padding value to the start of each row, but because it is a positive value the boards are currently moved to the right, away from the boundary. To fix this we need to convert the Segment’s X Size to a negative value.
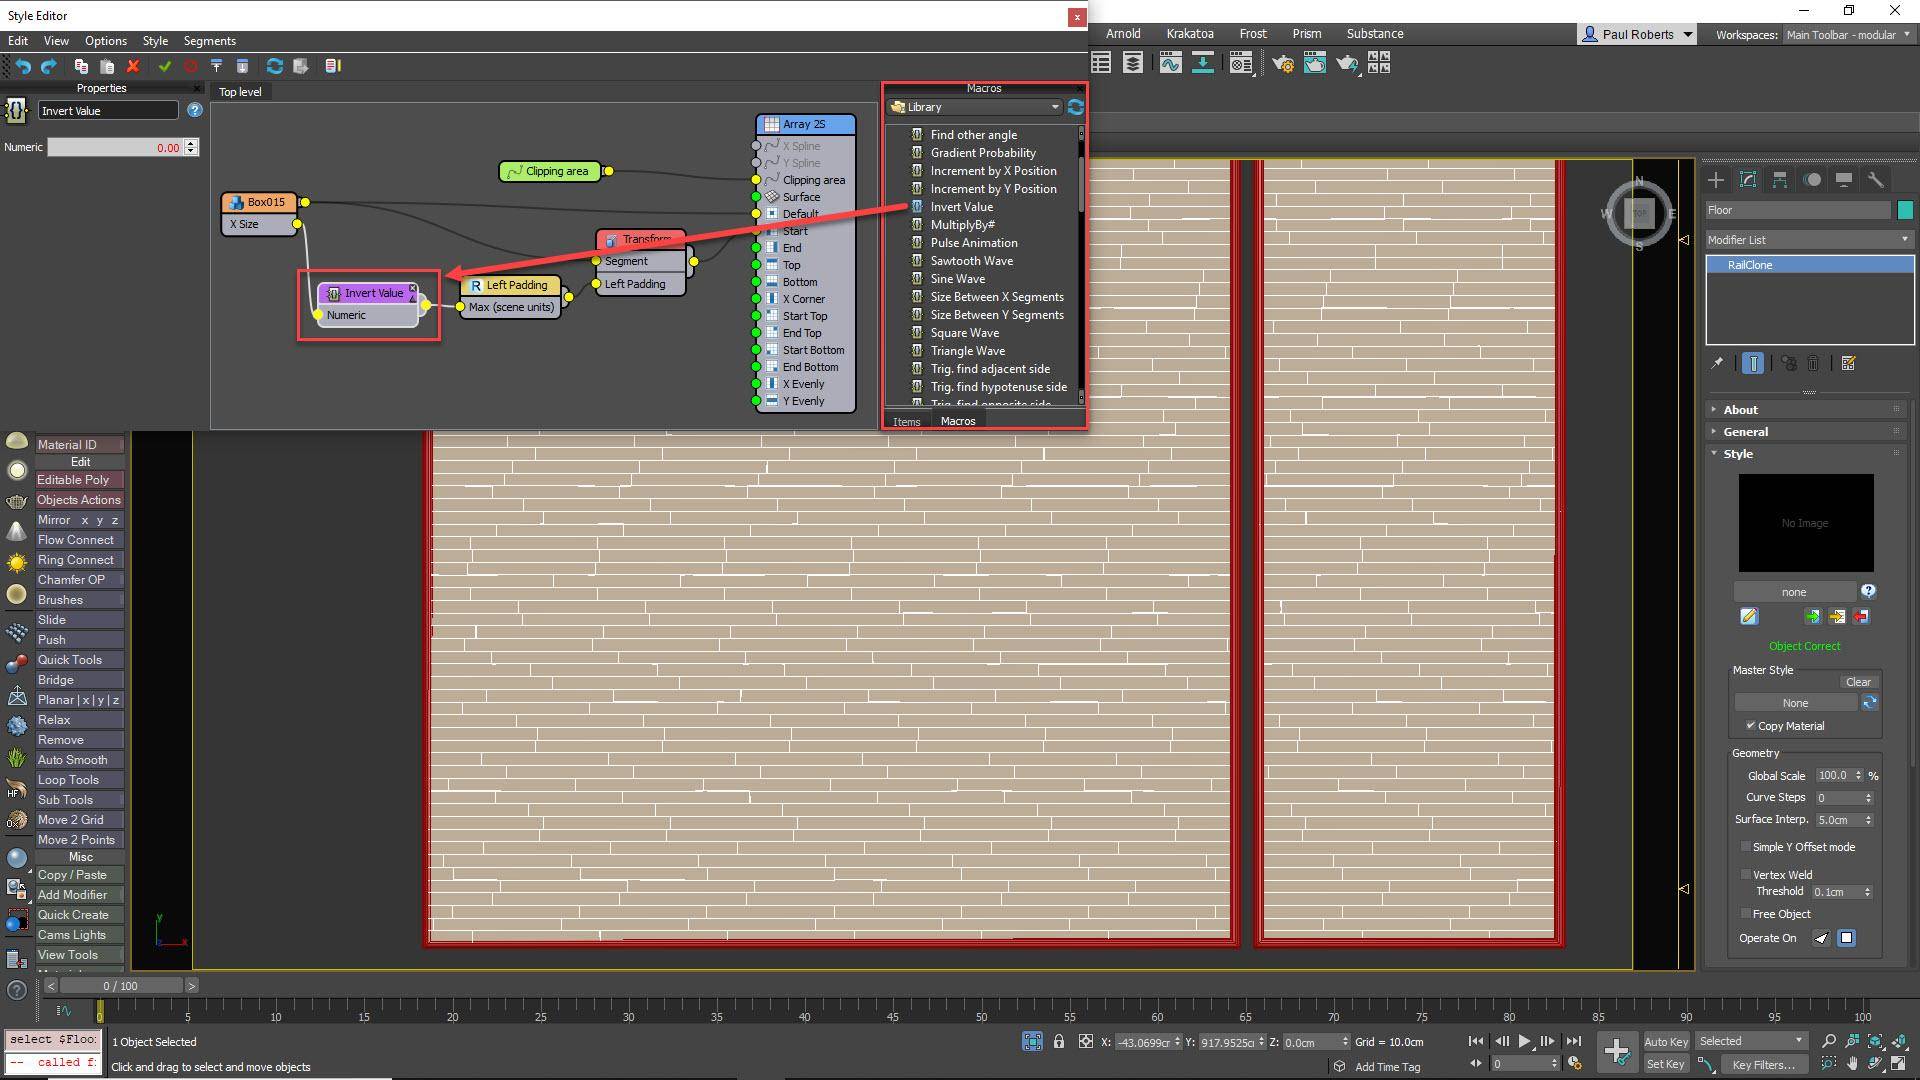
Using Macros
In addition to the core nodes, RailClone includes several handy macros to add extra functionality to your graph. You can see a full list of these by choosing the Macros tab in the Items list. In this example, we’ll use the Invert Value macro to automatically turn a positive number into a negative, and vice versa. Wire the Invert Value macro to the Random Number node, and wire the Segment’s X Size attribute to the Macro. You will now have a floor with randomly offset joints, and because the distance is based on the size of the segment, you can easily change the size of the plank and the style updates automatically.
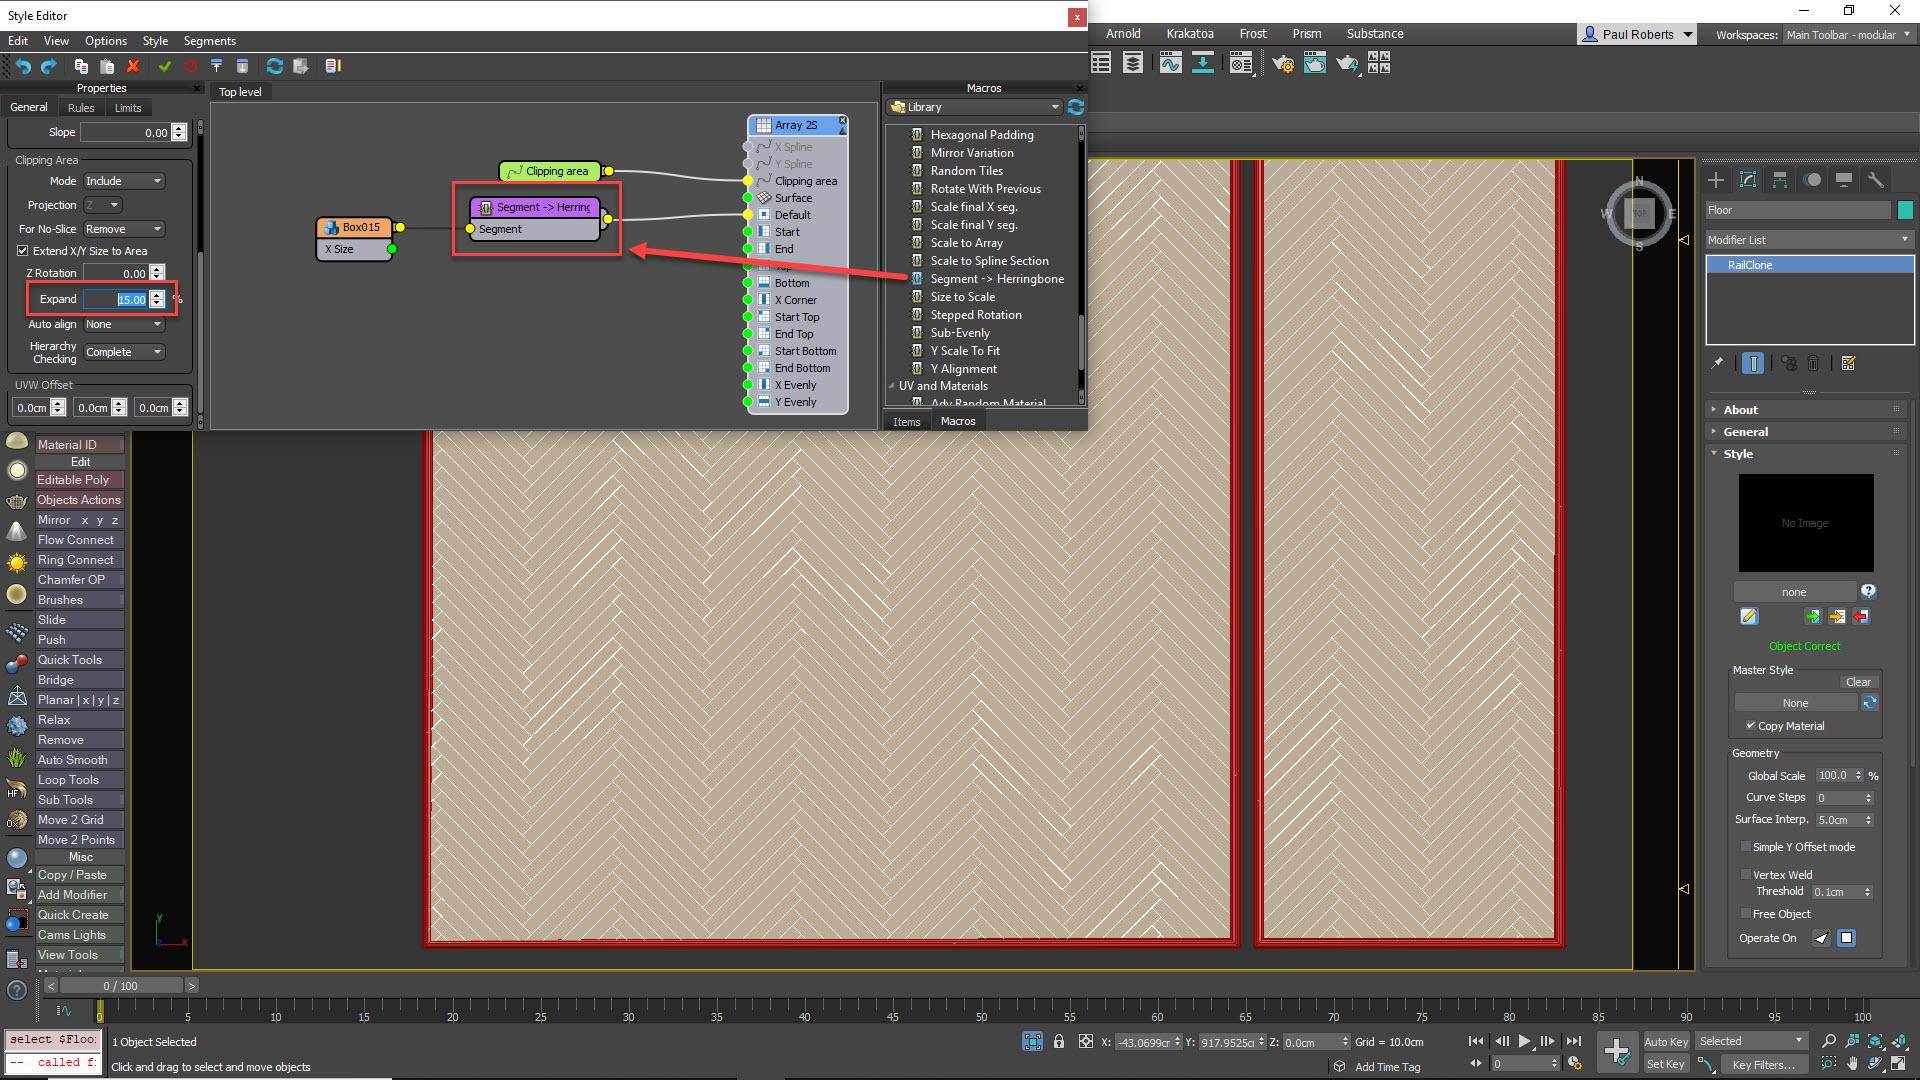
Create a herringbone floor
Let’s turn this into a herringbone style to create a second type of floor. Delete the nodes connected to the Start input. Find the macro called Segment -> Herringbone and wire it between the Segment node and the Generator. This macro takes care of all the calculations required to create a herringbone floor, all you need to do is change the size of the plank by editing the source geometry. If the boards don’t quite reach the perimeter of the floor, increase the Generator’s Clipping Area > Expand property to enlarge the array. You can now easily add randomisation to the planks using the Segment’s Transform > Random properties.
Randomise and Tint Maps
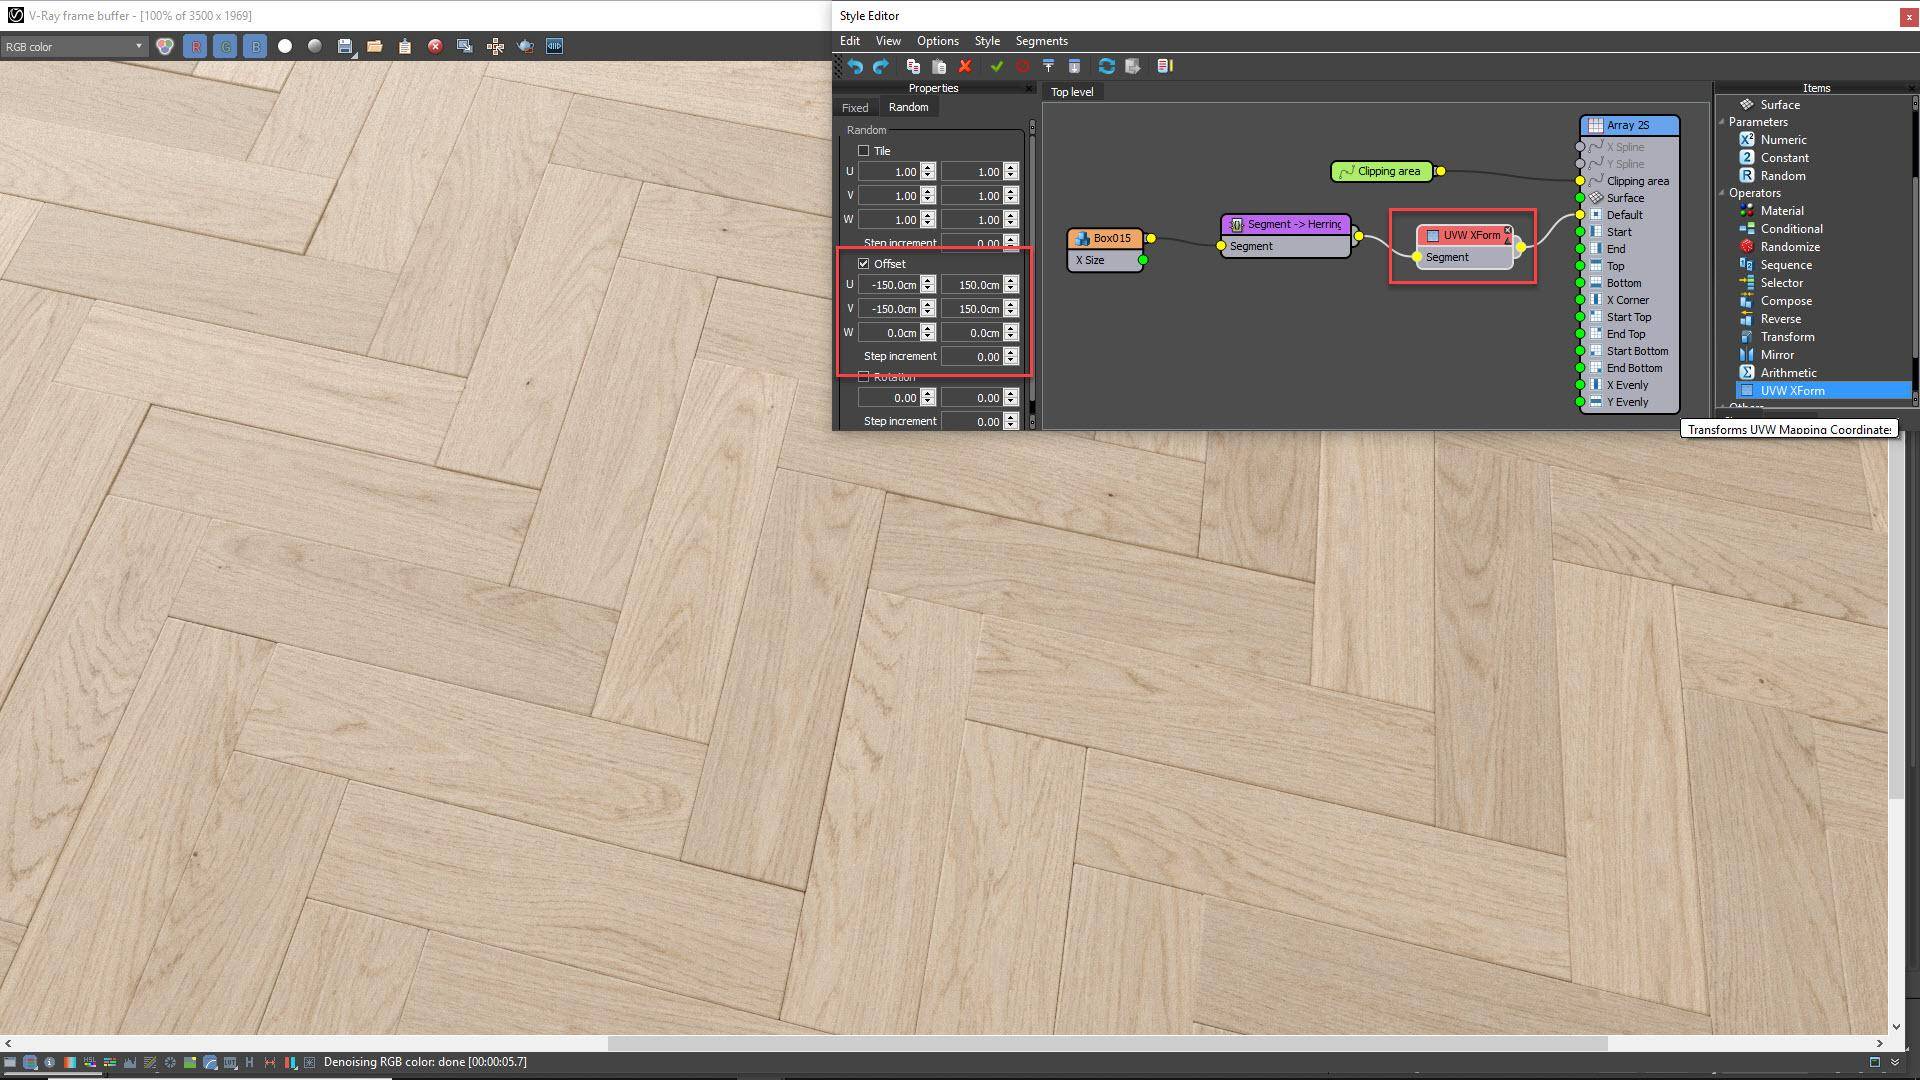
Avoiding repeated textures on a wooden floor is always a challenge, but RailClone has several features that can help to disguise it by manipulating the UVs and the maps themselves. In this example, the material uses a single tileable diffuse map that we’ll randomly offset to hide repetition. To do this, add a UVW XForm node between the Macro and the Generator. Enable Random Offset and enter the same values used for the map’s real-world size. You can also add a RailClone Colour map to the material and enable the Tint override feature to subtly randomise the colour or brightness per plank.
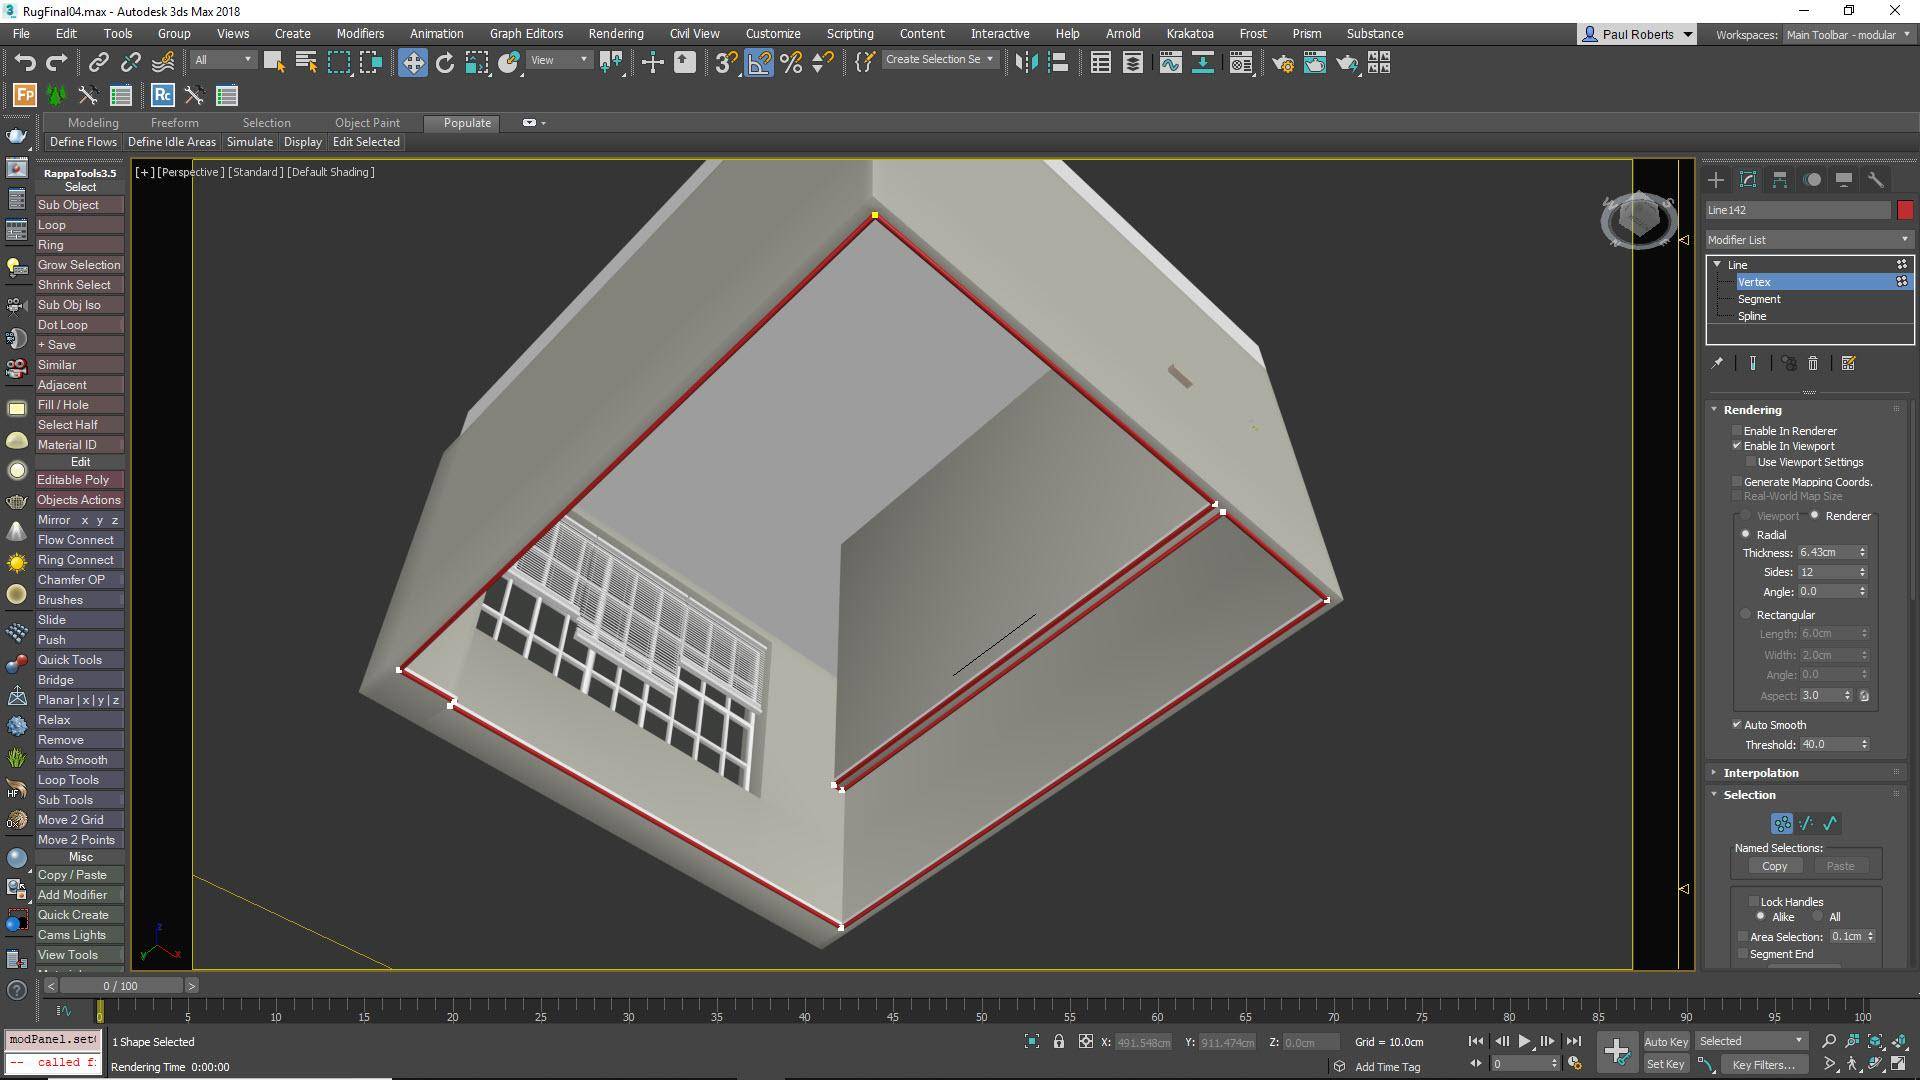
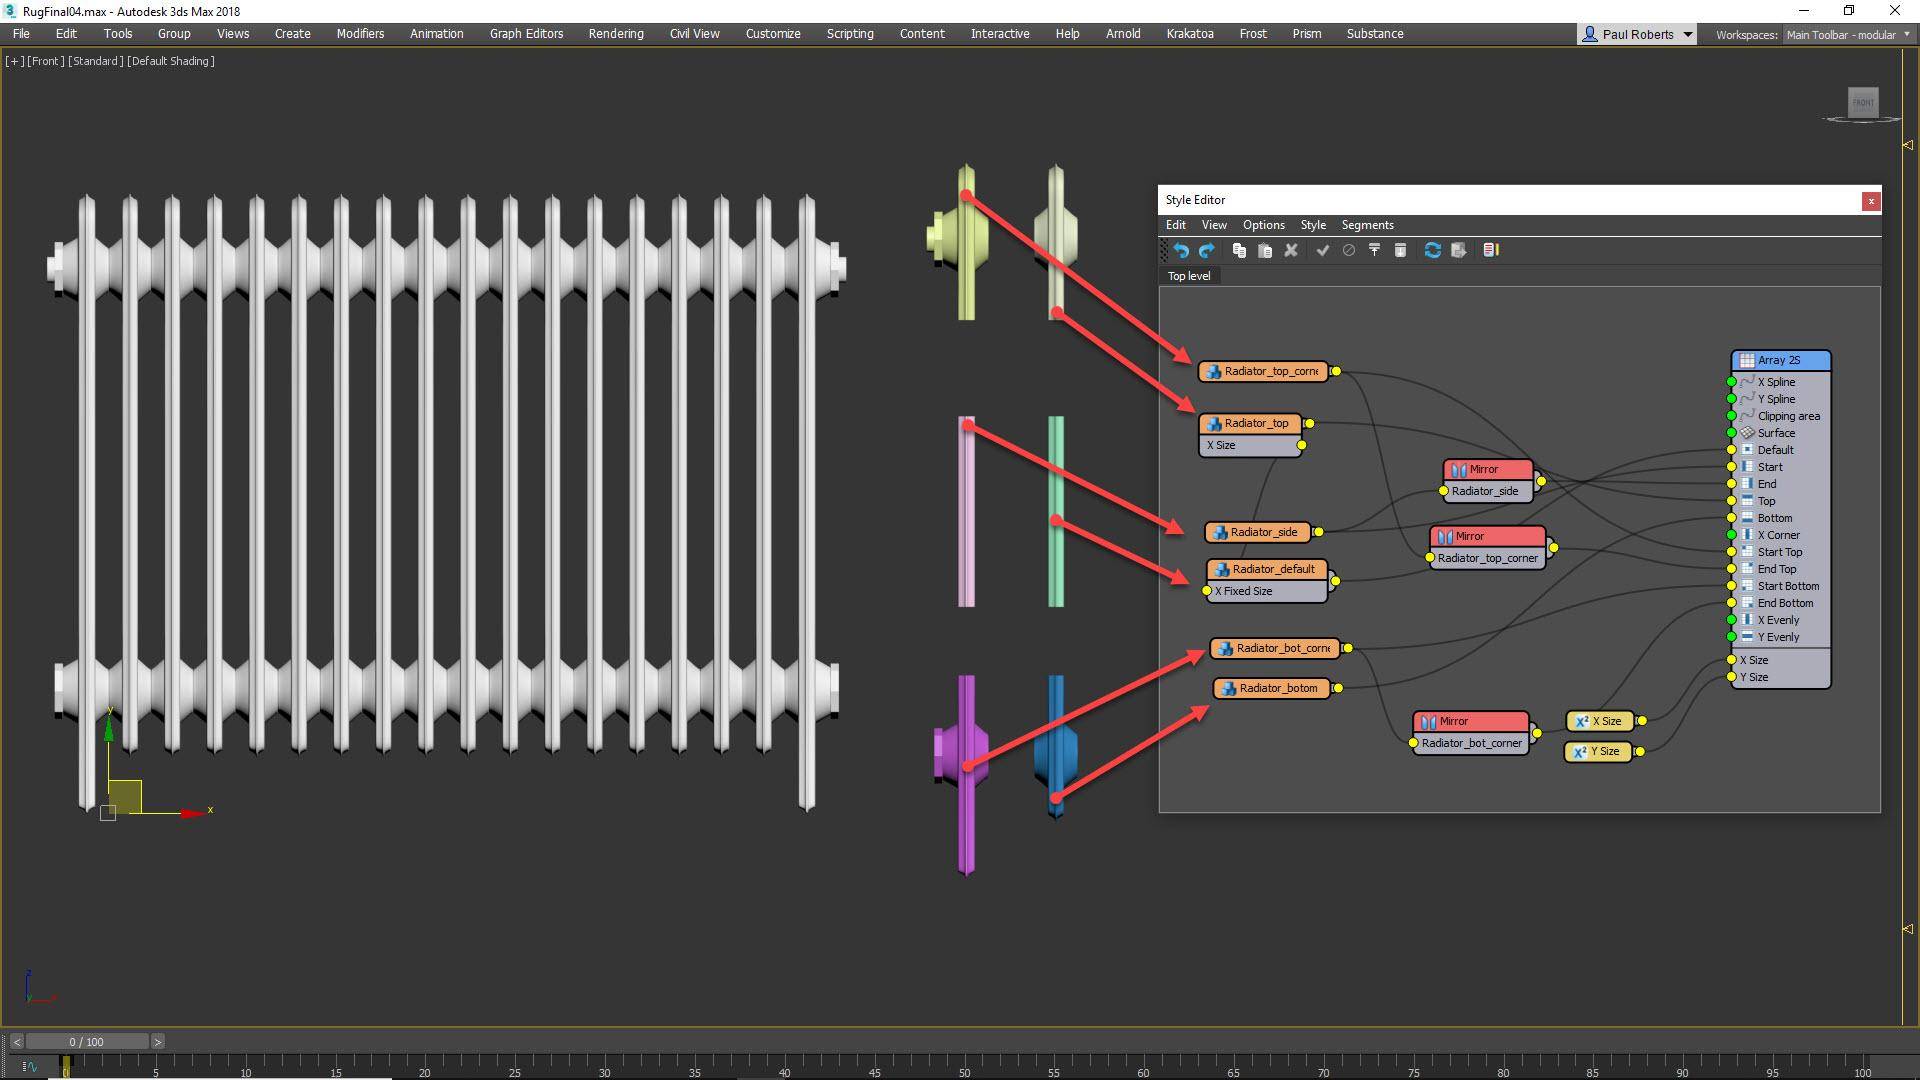
Creating parametric radiators
RailClone can be used to parameterise nearly anything that has repeating elements. For example, in this scene there’s a radiator model on the back wall. It has been created by slicing a radiator model into 6 repeatable parts. These are wired to an A2S Generator, using mirror operators to reuse the segments created for the left-hand side of the radiator to create the right. The length and height of the array have been exported to Numeric nodes so that it’s easy to change the size of the radiator directly from the Modify Panel.
Define the size of the rug
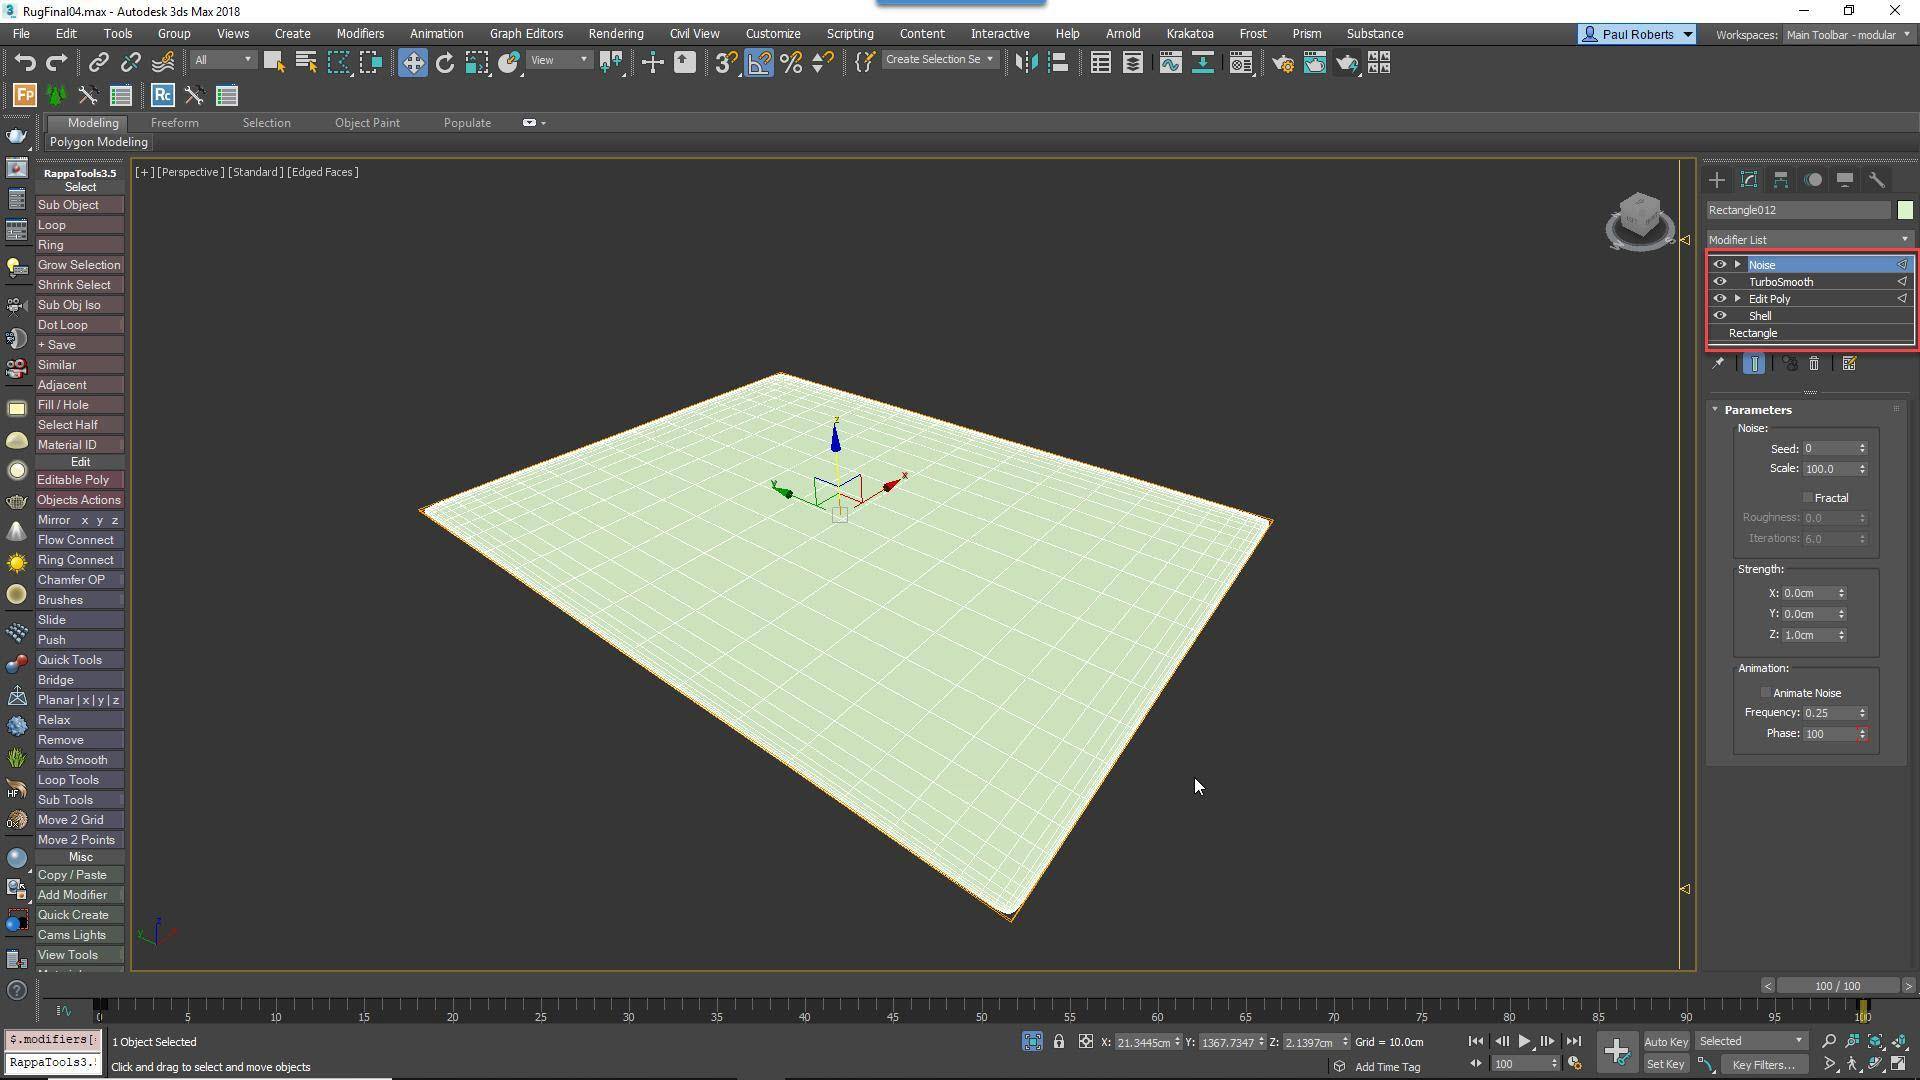
With the floor finished, we can turn our attention to the rug. These come in many shapes and sizes, so the easiest way to define the footprint is to draw a closed spline from the top viewport. We could use the spline to simply scatter rug geometry onto the floor, but in reality rugs have a fabric base which is often visible around the perimeter. To mesh the spline and add thickness, add a shell modifier and then an Edit-Poly modifier. Add edge loops and then add a Turbosmooth modifier plus Noise if you want to create a slightly uneven surface.
Model the rug base
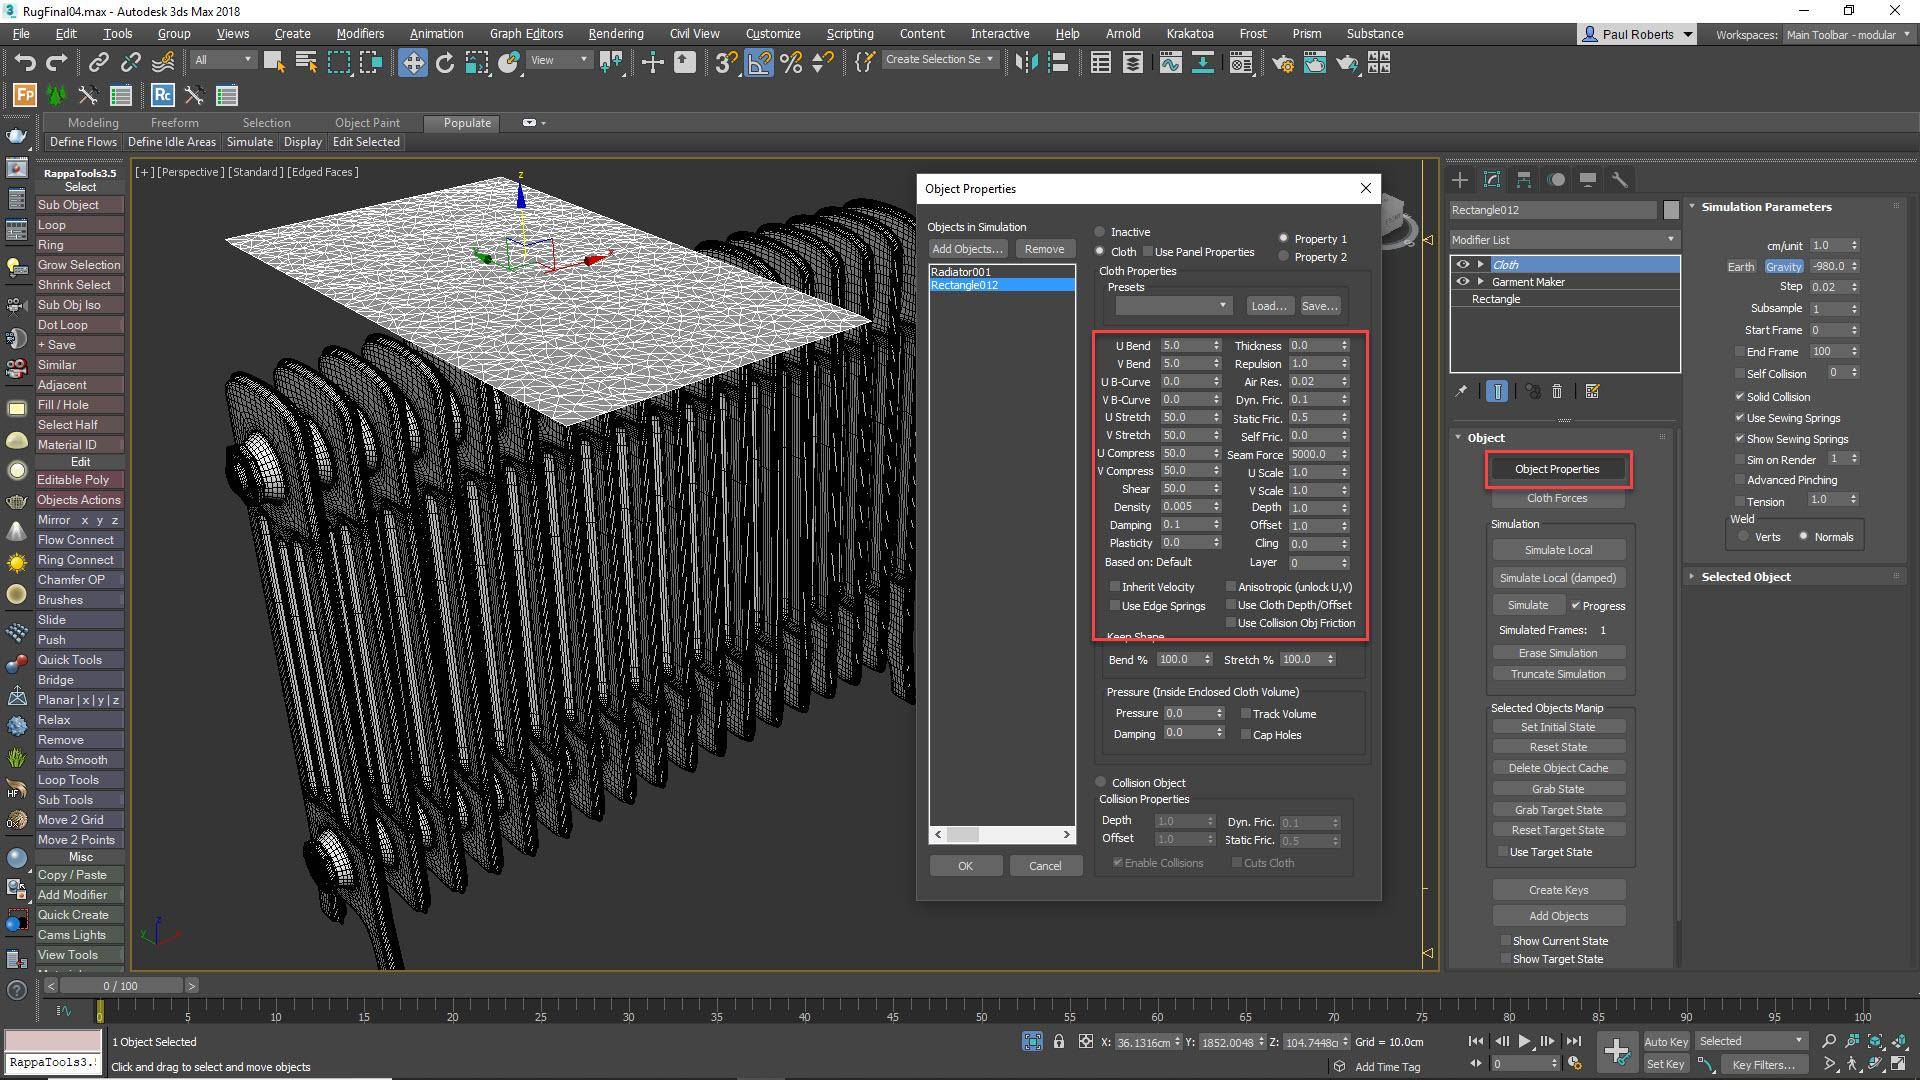
This base is fine for a flat rug (or if you are using Forest Pack Lite), but the advantage of using a spline to define the shape is that you can use the cloth modifier to add wrinkles to create a more lived-in appearance. Delete the existing stack and instead add a Garment modifier. Increase the Density parameter to add subdivisions. The more of these, the slower the simulation so you should aim for a balance between speed and detail. Create a large box below the rug to act as a temporary collision volume to speed up sim times. Finally, add a Cloth modifier to the rug.
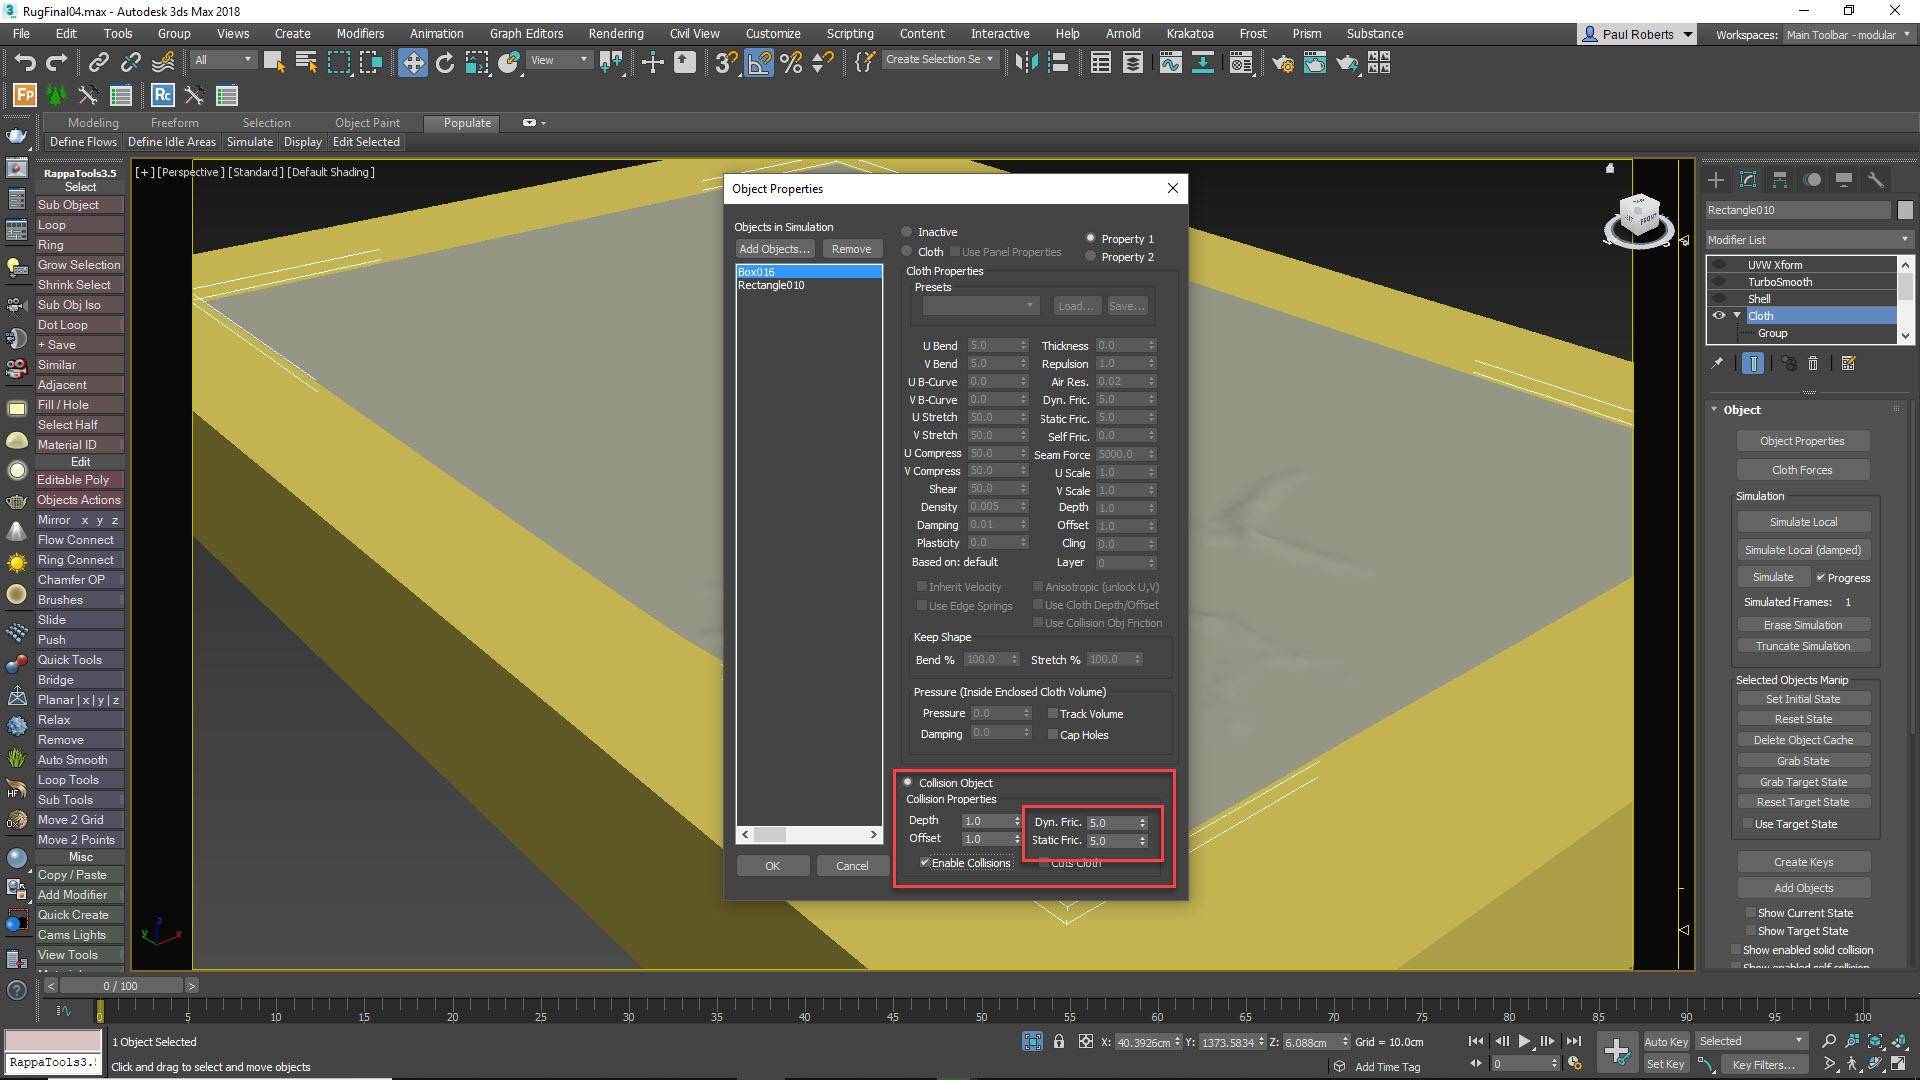
Set up the Cloth modifier
Open the Object Properties, change the current object from Inactive to Cloth, and pick an appropriate preset. Enable Use Collision Obj Friction. Click on Add Objects and select the box. Change the mode to Collision object. If we run a simulation now and drag faces to edit the rug, more often than not it will end up flat again. This is because there’s very little friction so the rug always slides back into its starting position. To fix this, increase the collision object’s Dynamic and Static friction values.
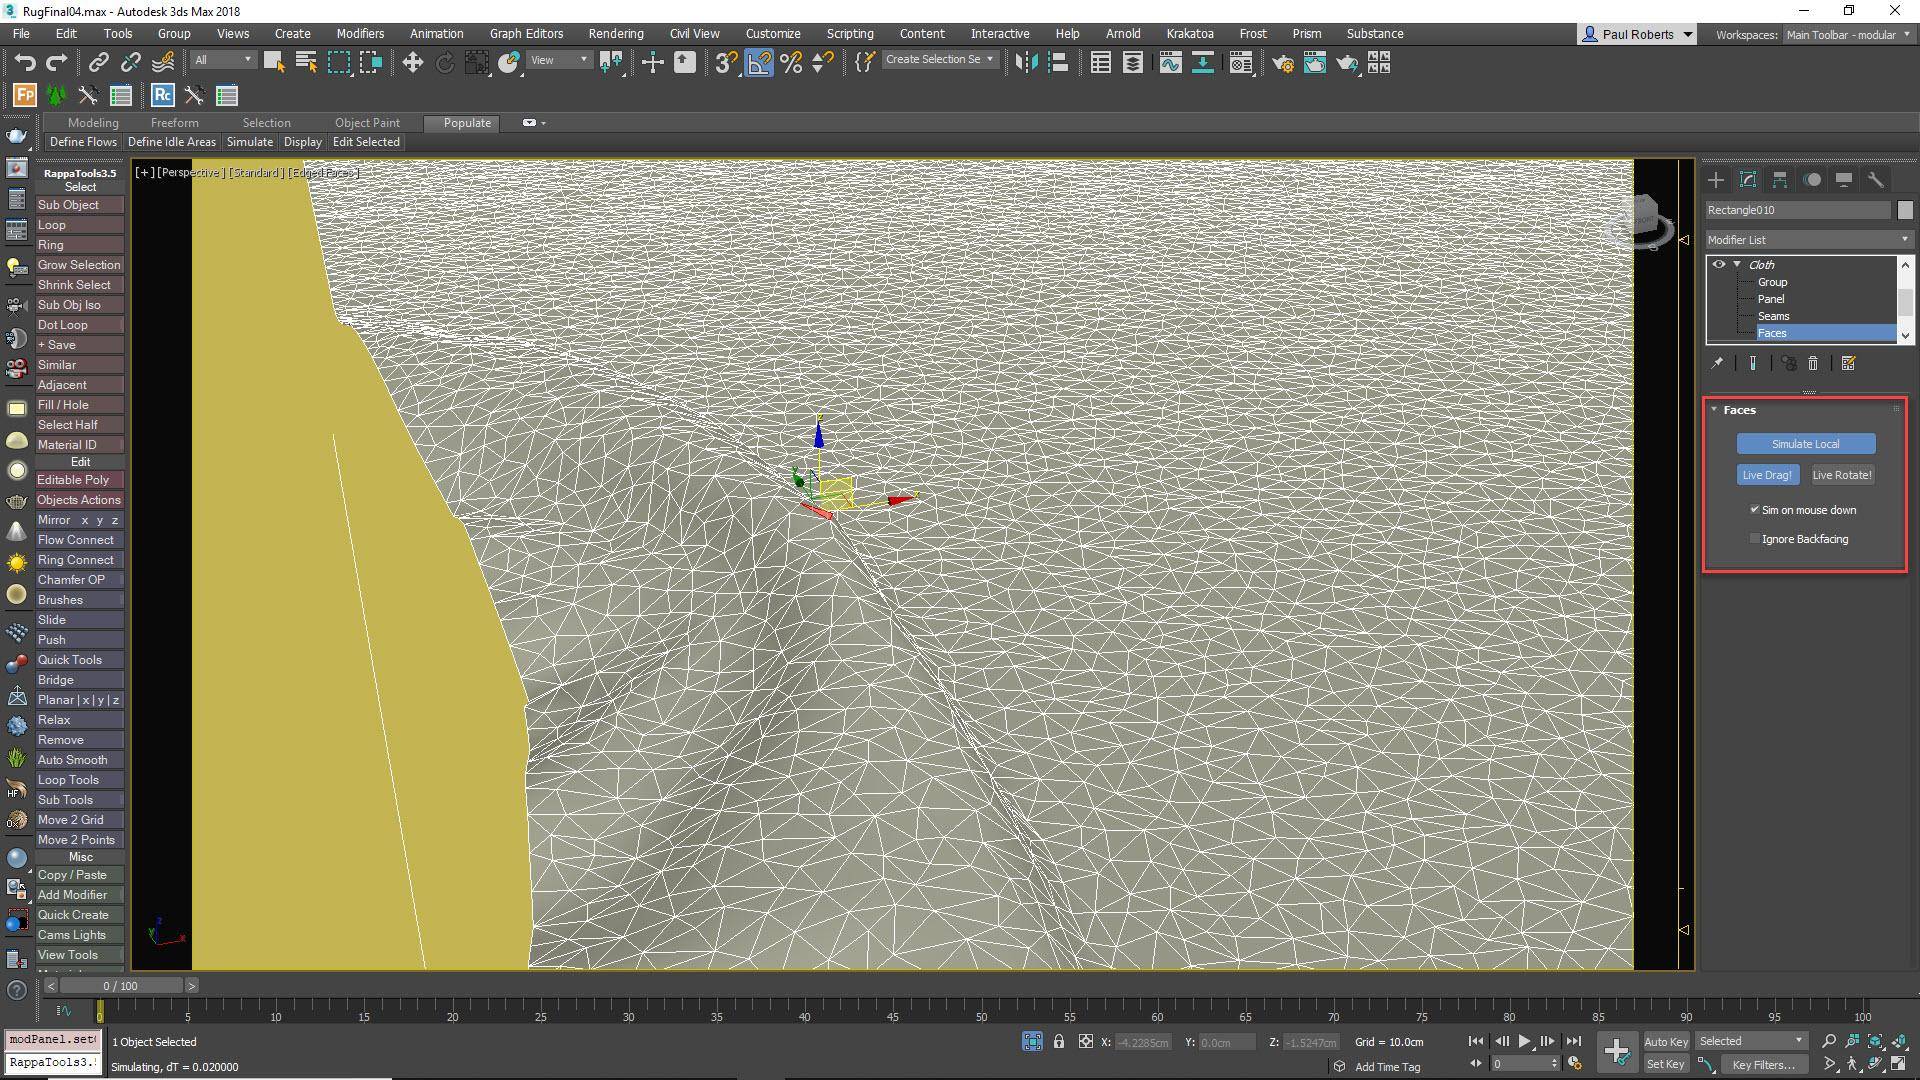
Add wrinkles with Live Drag
Now we can start manually manipulating parts of the rug to create wrinkles. In the Cloth modifier, change to Face sub object level and turn on Live Drag. Enable Simulate Local and select and move a face. The rest of the rug simulates for as long as the mouse button is depressed. To run the simulation continuously, disable the Sim on Mouse Down checkbox. Pick up edges and areas to create wrinkles by moving polygons up and to one side. If things go wrong you can easily restore the original shape by selecting Reset State from the Object rollout.
Finish the rug base
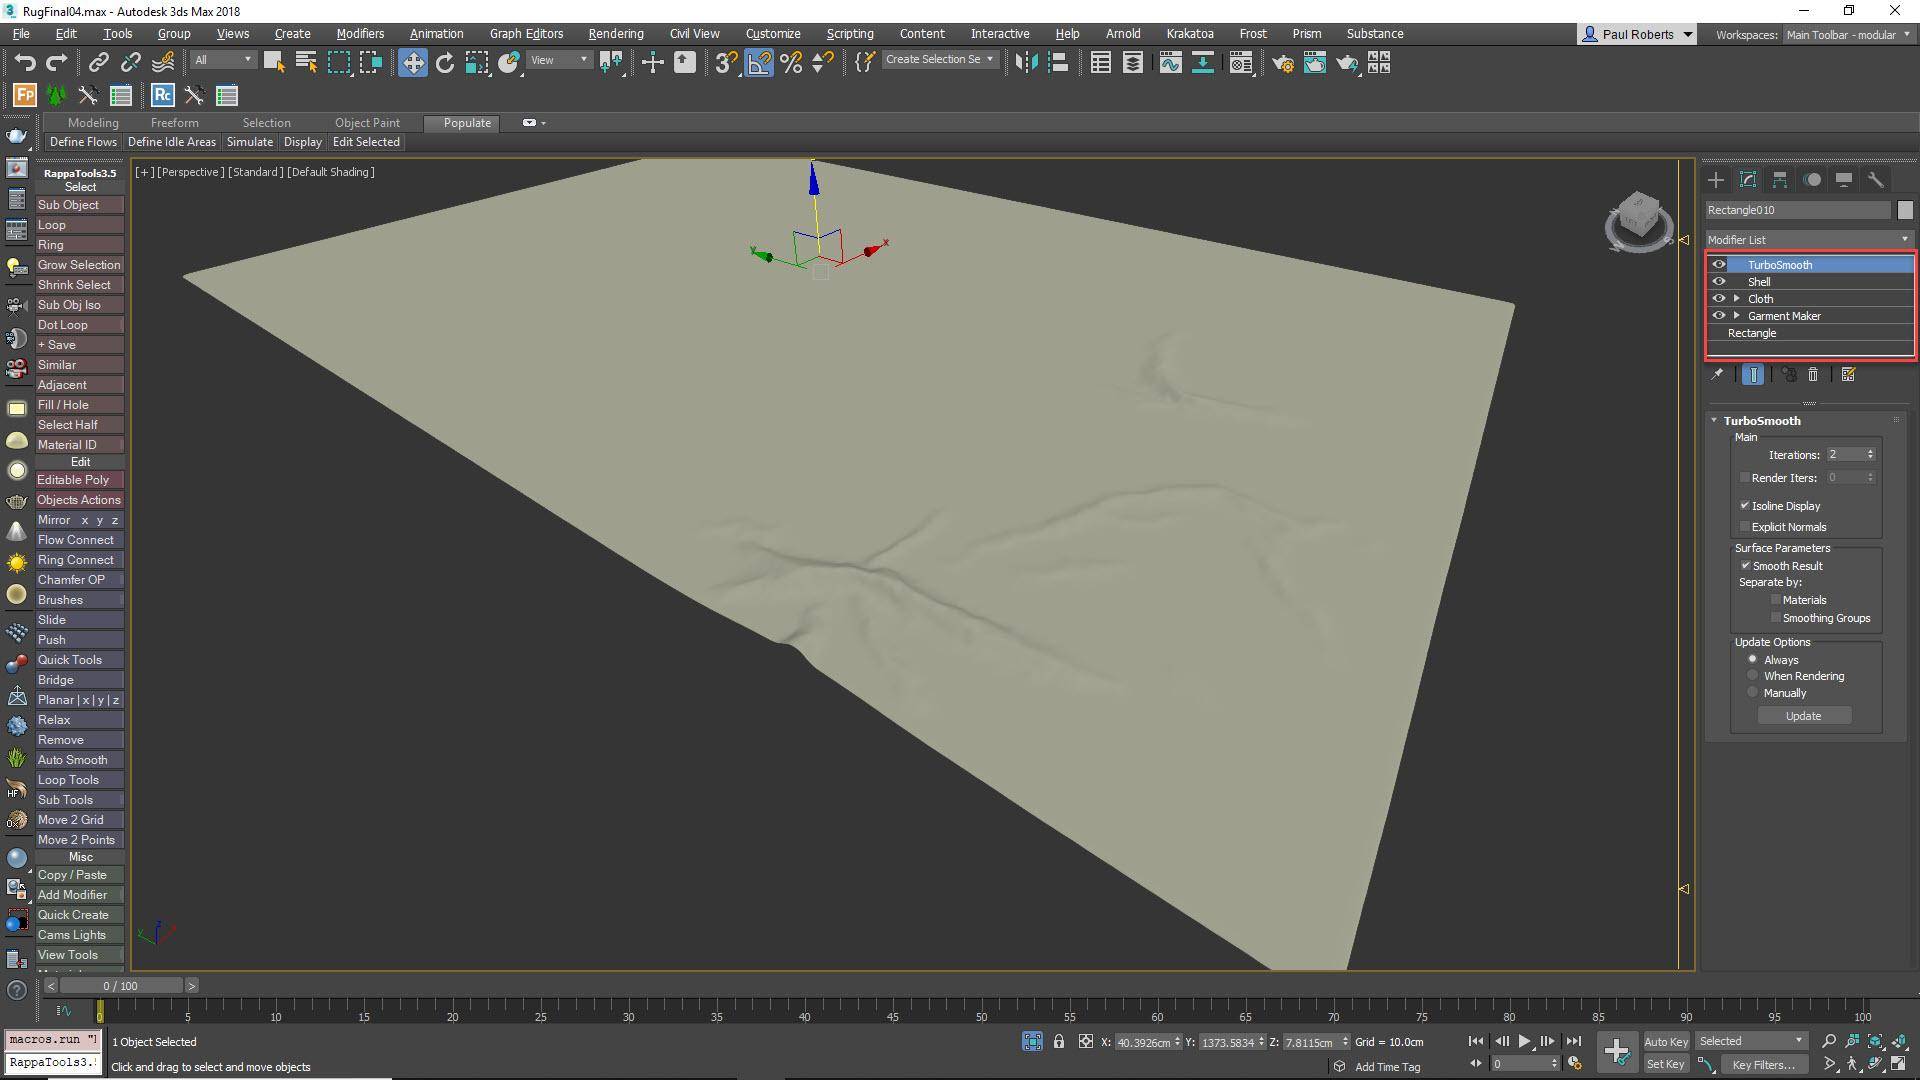
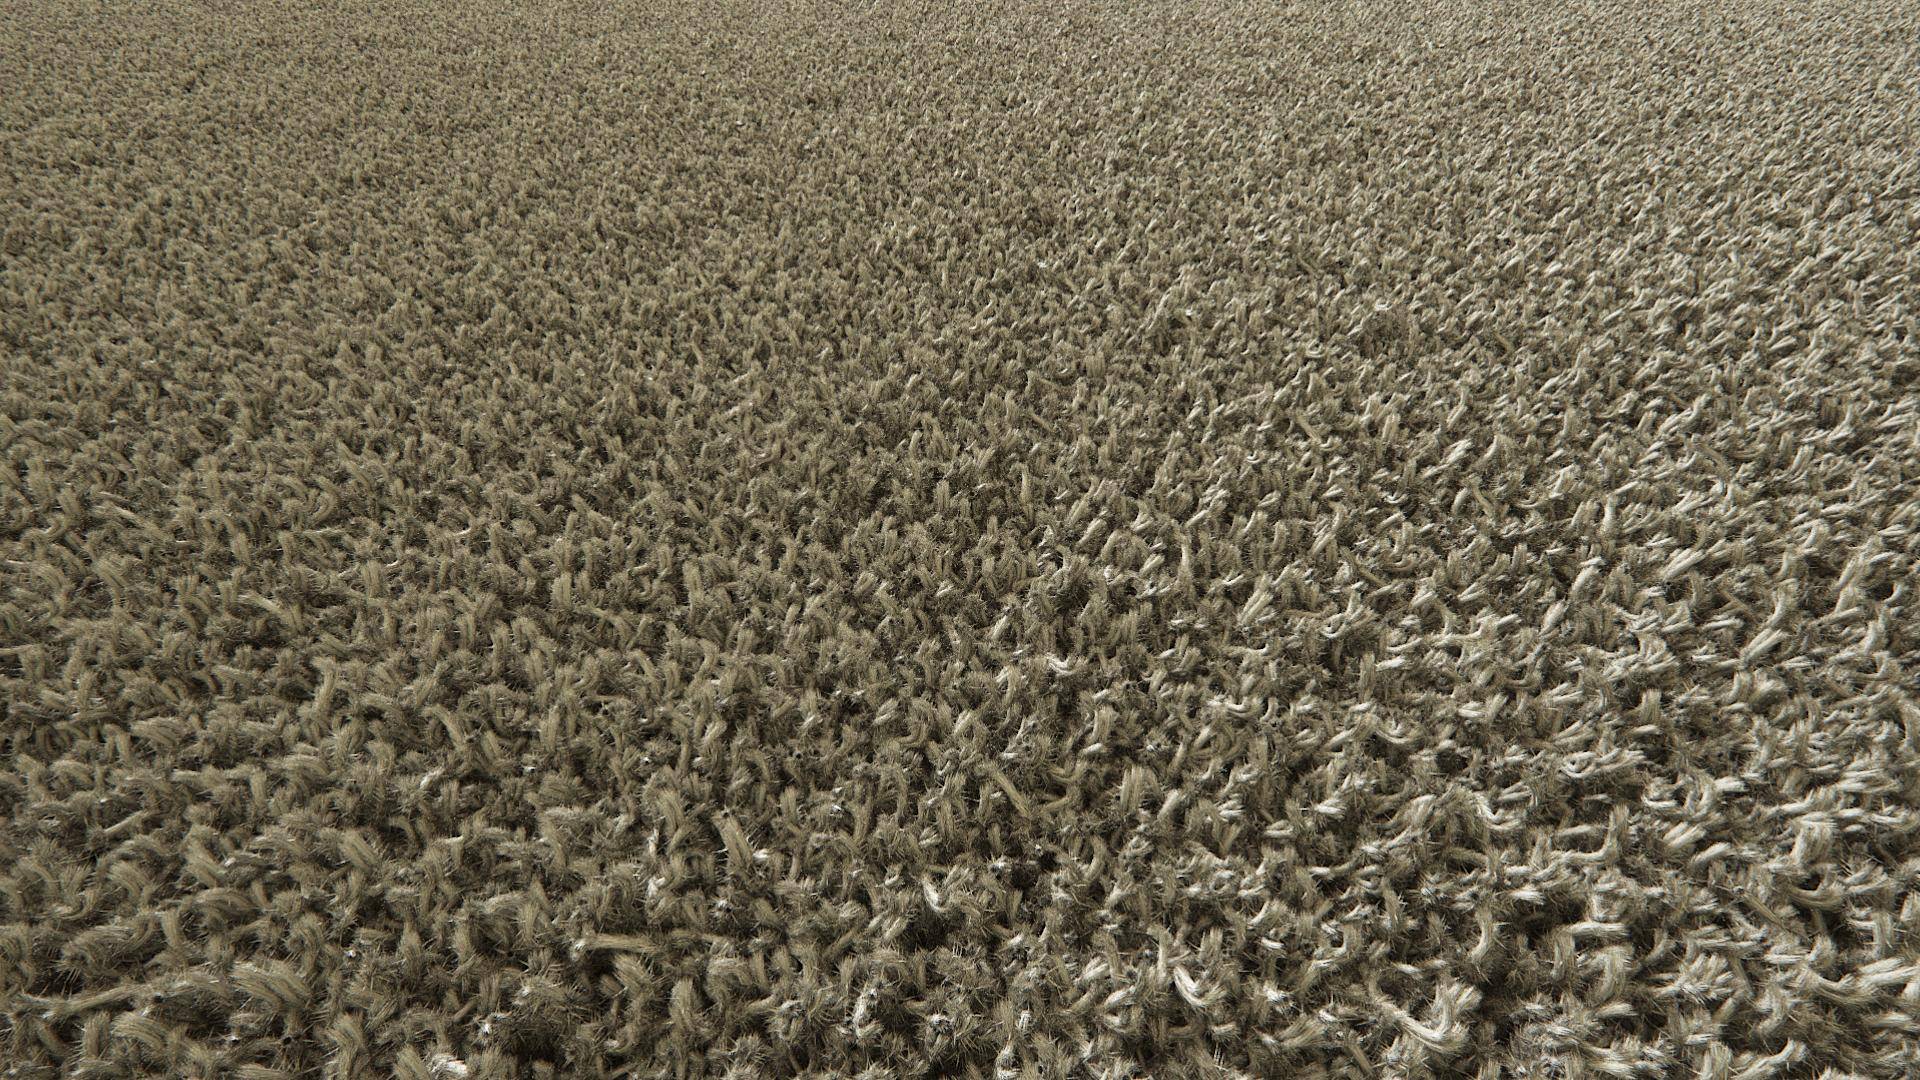
Once you’re happy with the shape of the rug, add a Shell modifier to give the surface some thickness and a Turbosmooth modifier to smooth out the wrinkles and soften the edges. Next, we need to create some small patches of fibres to scatter with Forest Pack to create the rug itself. The technique for modelling these depends on the type of rug you wish to create, but to illustrate the workflow we’ll create a typical shag pile.
Creating the thread geometry
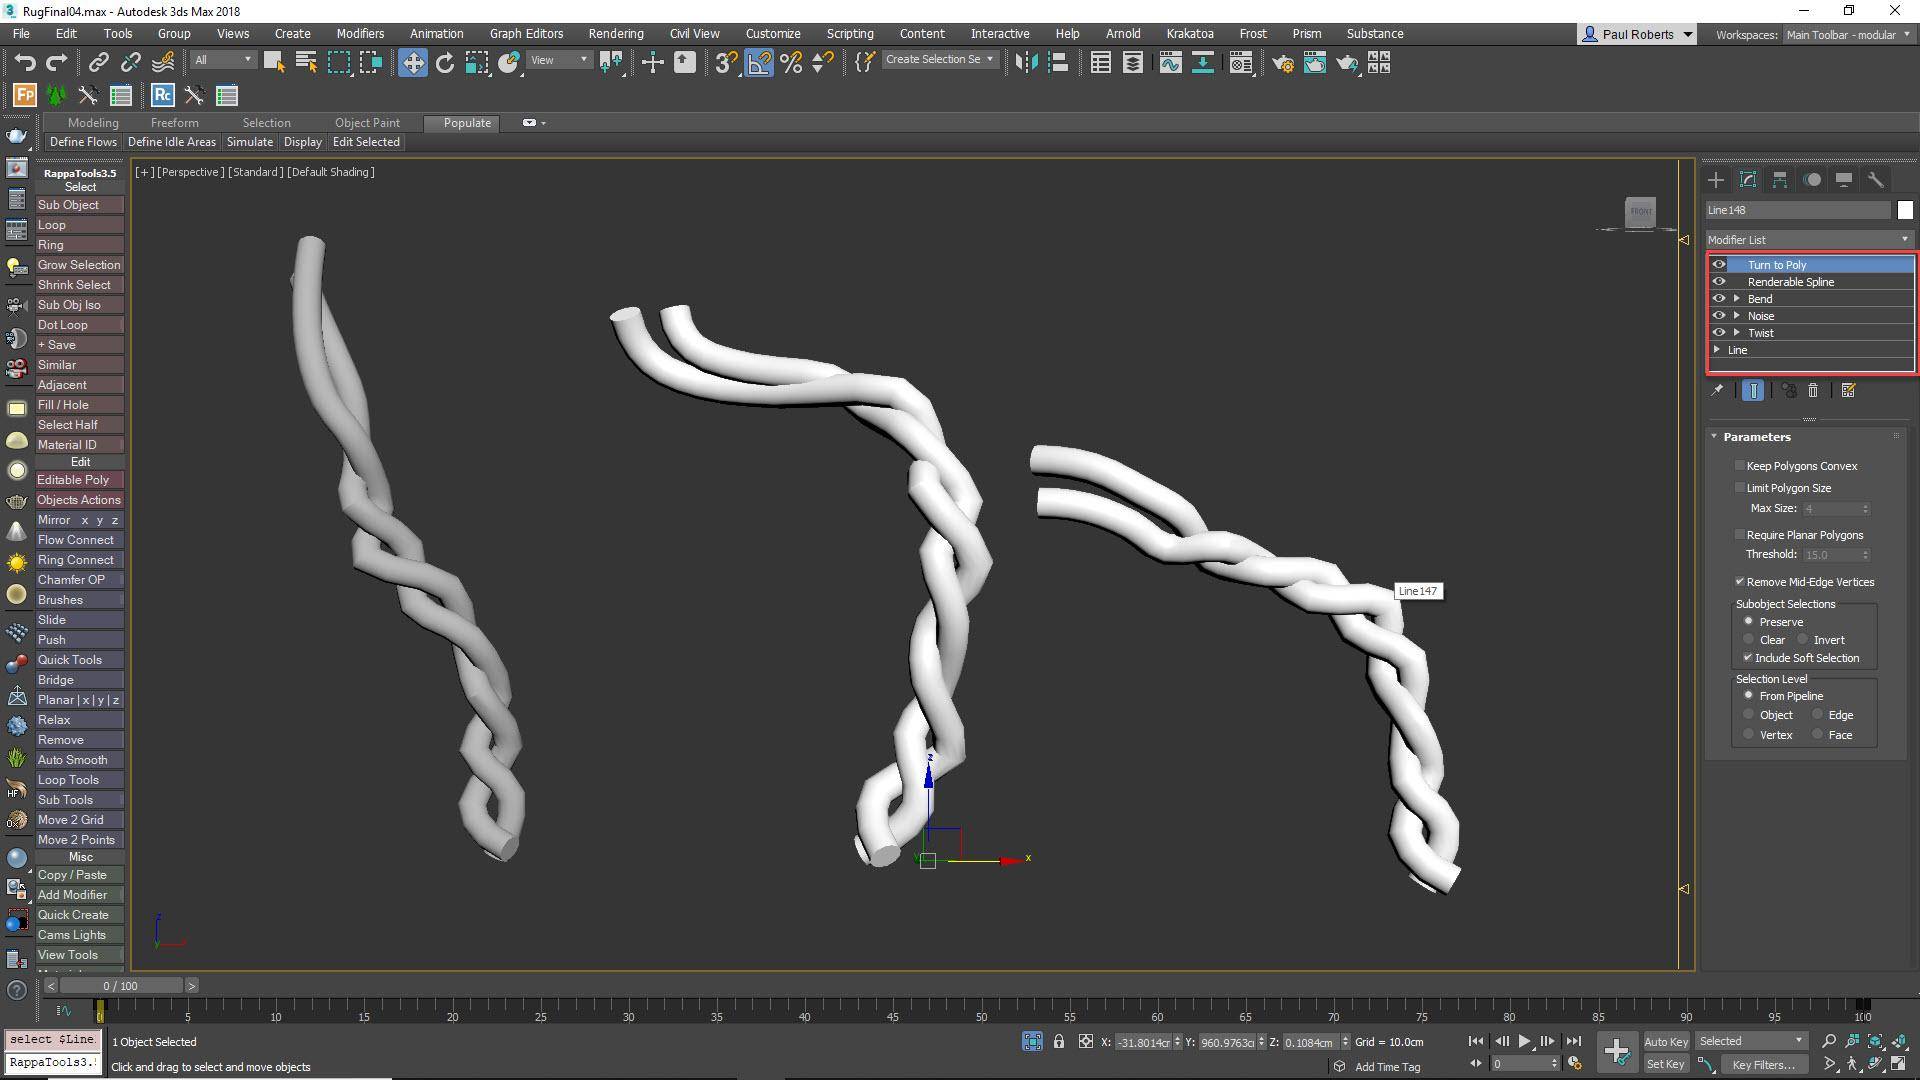
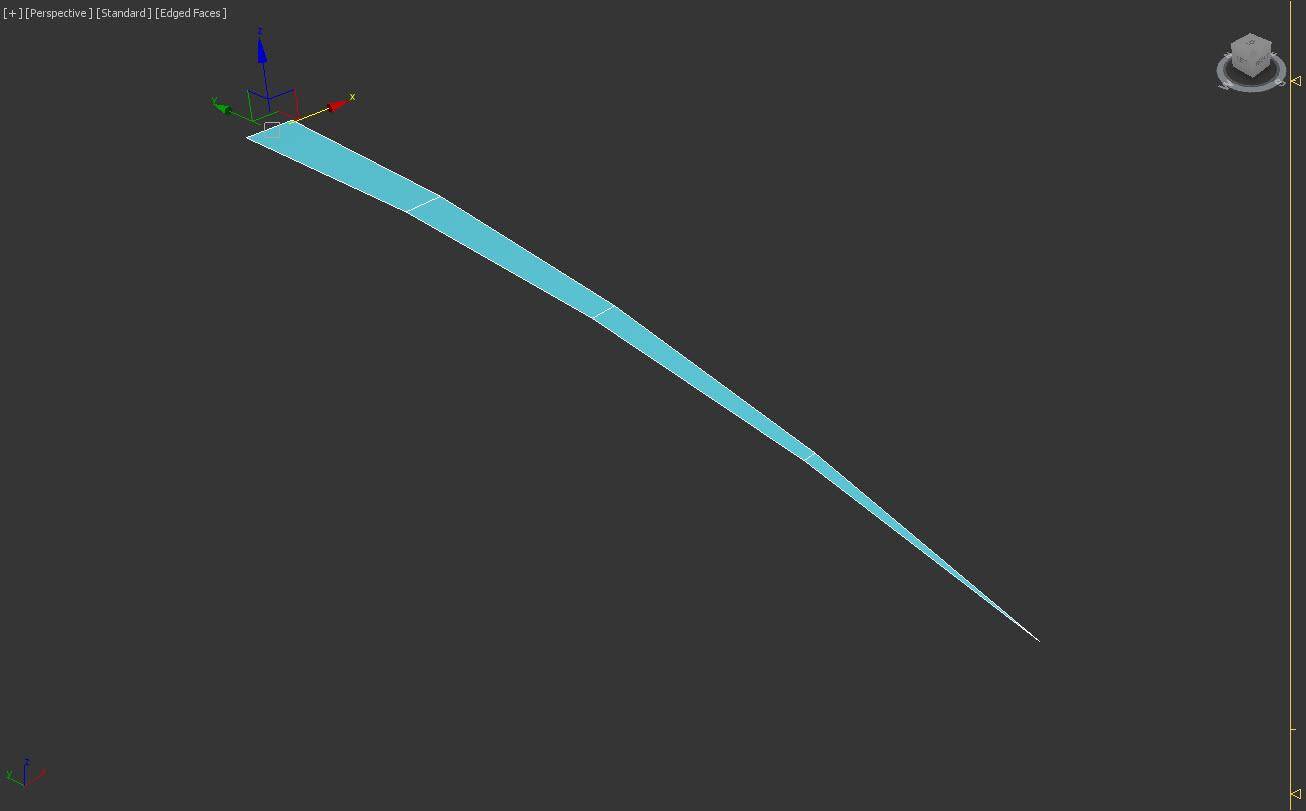
From the Front or Side viewport, create a spline approximately 3 - 5cm high. Divide the length into 10 so that there are enough vertices to deform smoothly. In spline sub-object level, move the spline slightly off centre and clone it so you have two parallel lines. Add a twist modifier to create a double helix, using the Limit controls so that the top end looks as though it is starting to unravel. Add a Noise and Bend modifier to add some chaos and a Renderable Spline modifier to generate geometry. Clone this object and edit the modifier’s settings to create 4-5 variations. When you’re finished, assign a fabric material to the threads.
Creating a patch of pile
If we scatter individual threads we will end up with hundreds of thousands of objects. To optimise the scatter, it is better to create one or more small patches of pile, and then nest them inside a second Forest Object for the final distribution. To create a patch, add a small circular spline, and use it as the distribution area for a new Forest Pack object. Add the threads to the Items list. Set the Distribution map to full and adjust the density to fill the area. Enable Scale and Rotate transformations and adjust the settings to add more variety.
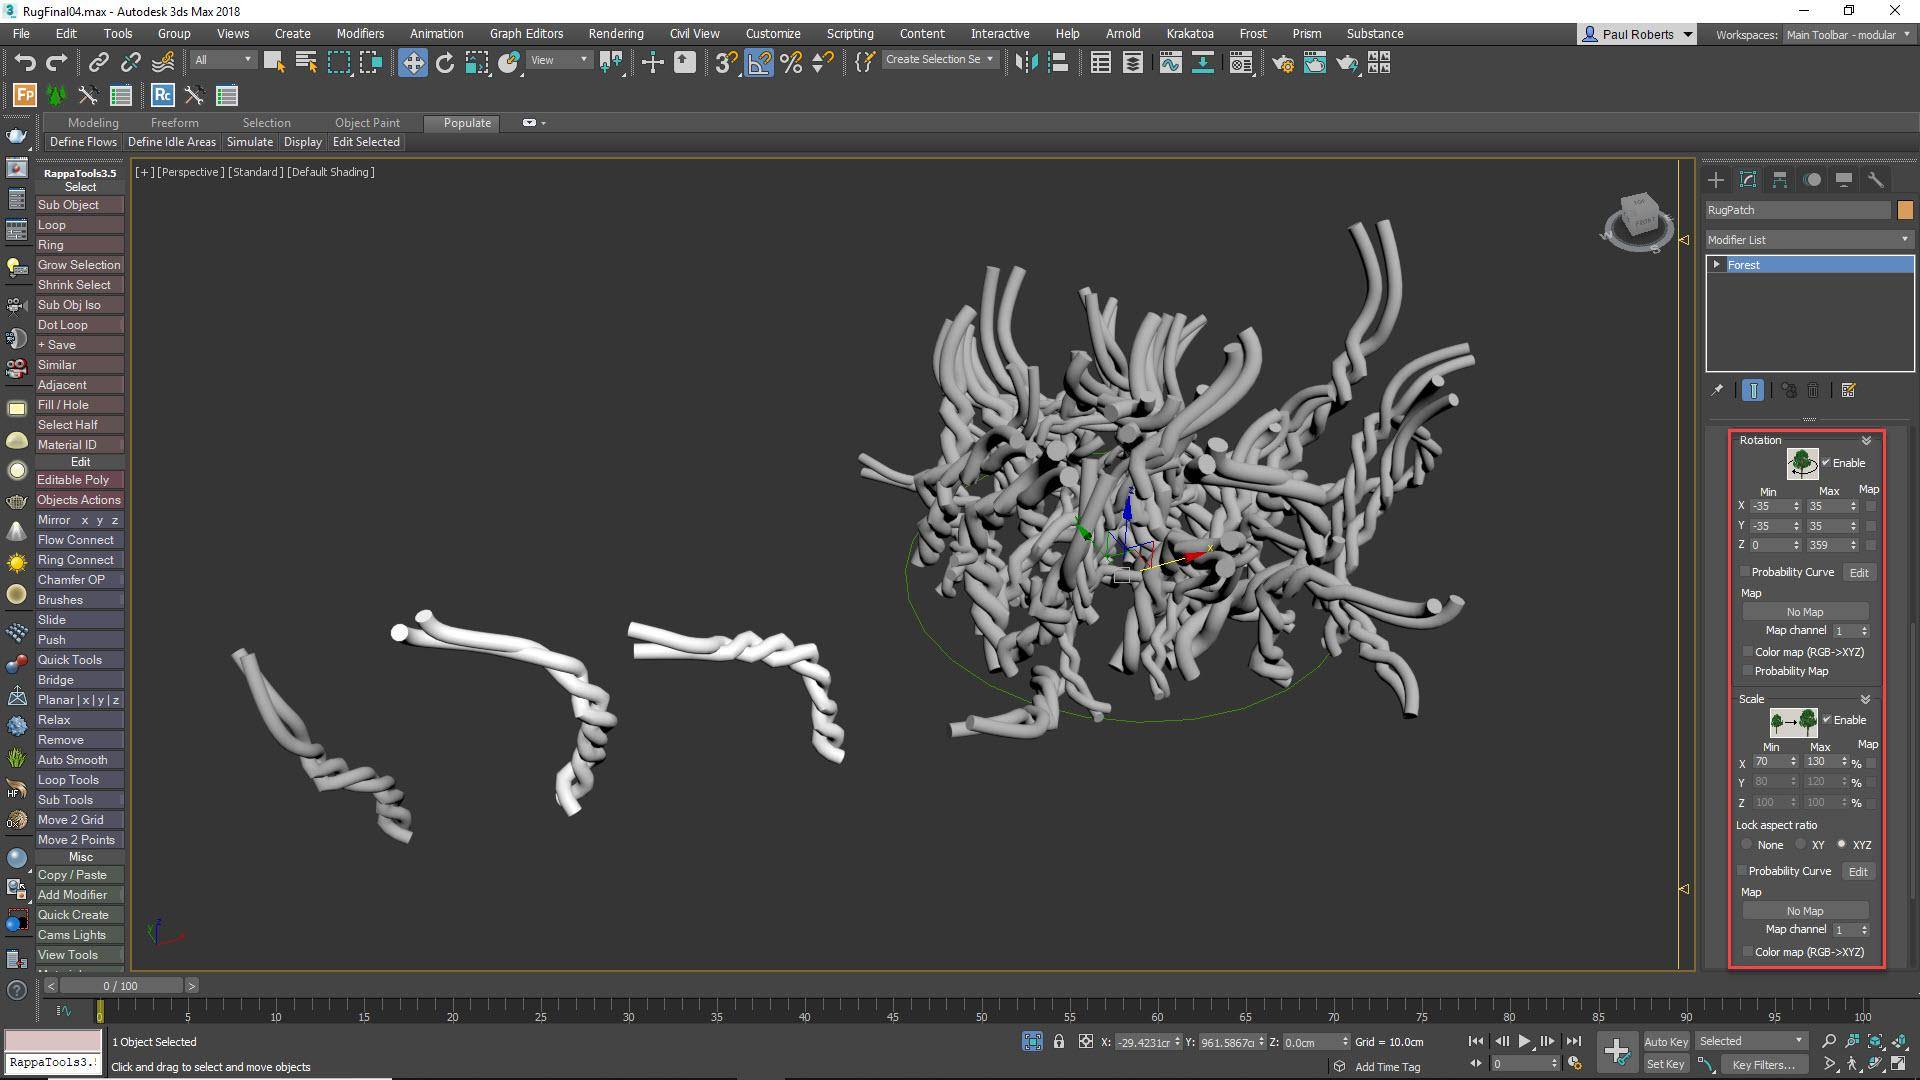
Scatter the patch
Now we can create the rug. Create another new Forest Pack object by selecting the rug surface created earlier. In the Surface rollout, ensure that the Direction slider is set to 0 so that the threads rotate to follow the wrinkles on the base. Add the patch to the Items List and change the Distribution map to Full. Reduce the Density parameter until no gaps are visible between the patches. Finally, add randomisation by enabling Scale and Rotation transforms and adjusting the Min and Max parameters.
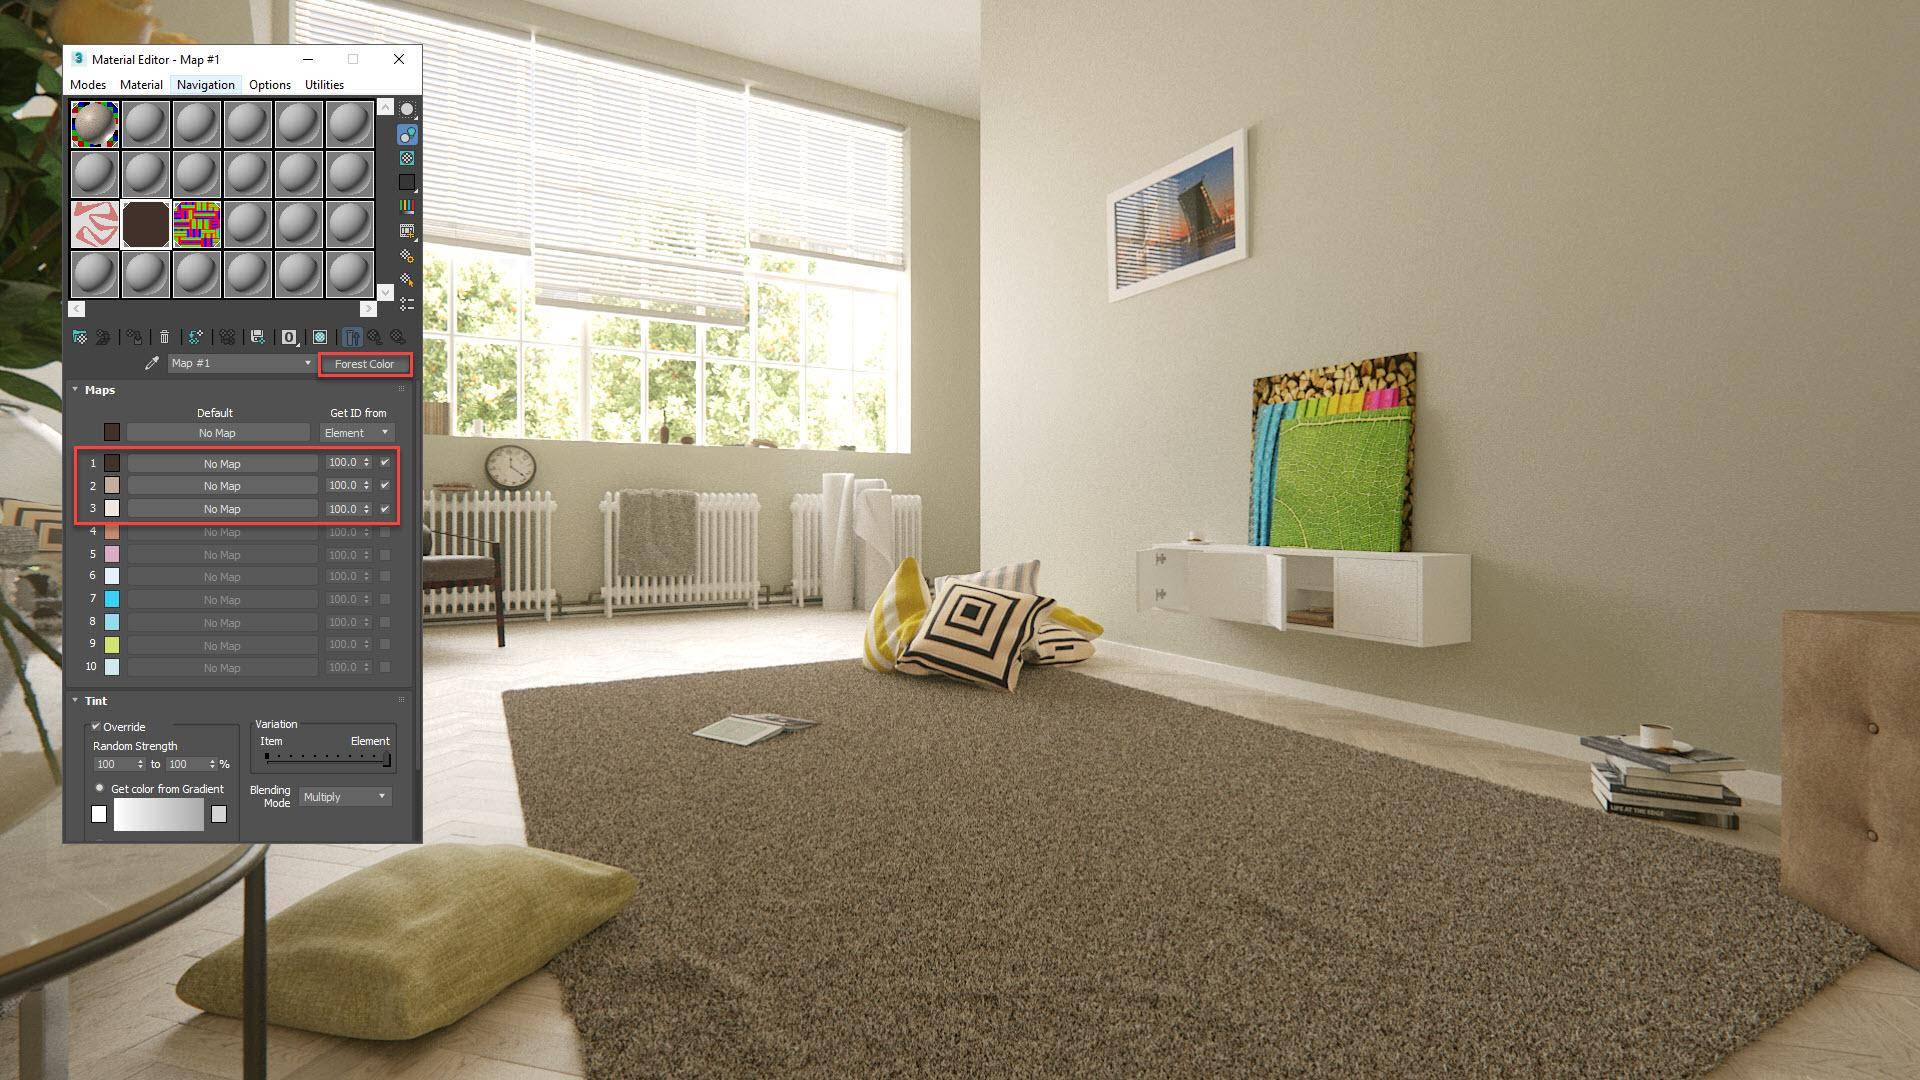
Randomise thread colour
If we render now, we have a nice single-coloured rug. We can add more interest by controlling and randomising the colours of the threads. For example, to create a rug with different thread colours, apply a Forest Colour map to the material’s Diffuse input. Enable a map slot and pick a colour for each variation. To apply a random colour to each thread as opposed to each patch, change the Get ID From setting to Element. You can adjust the chance of a colour being selected by using the Probability values.
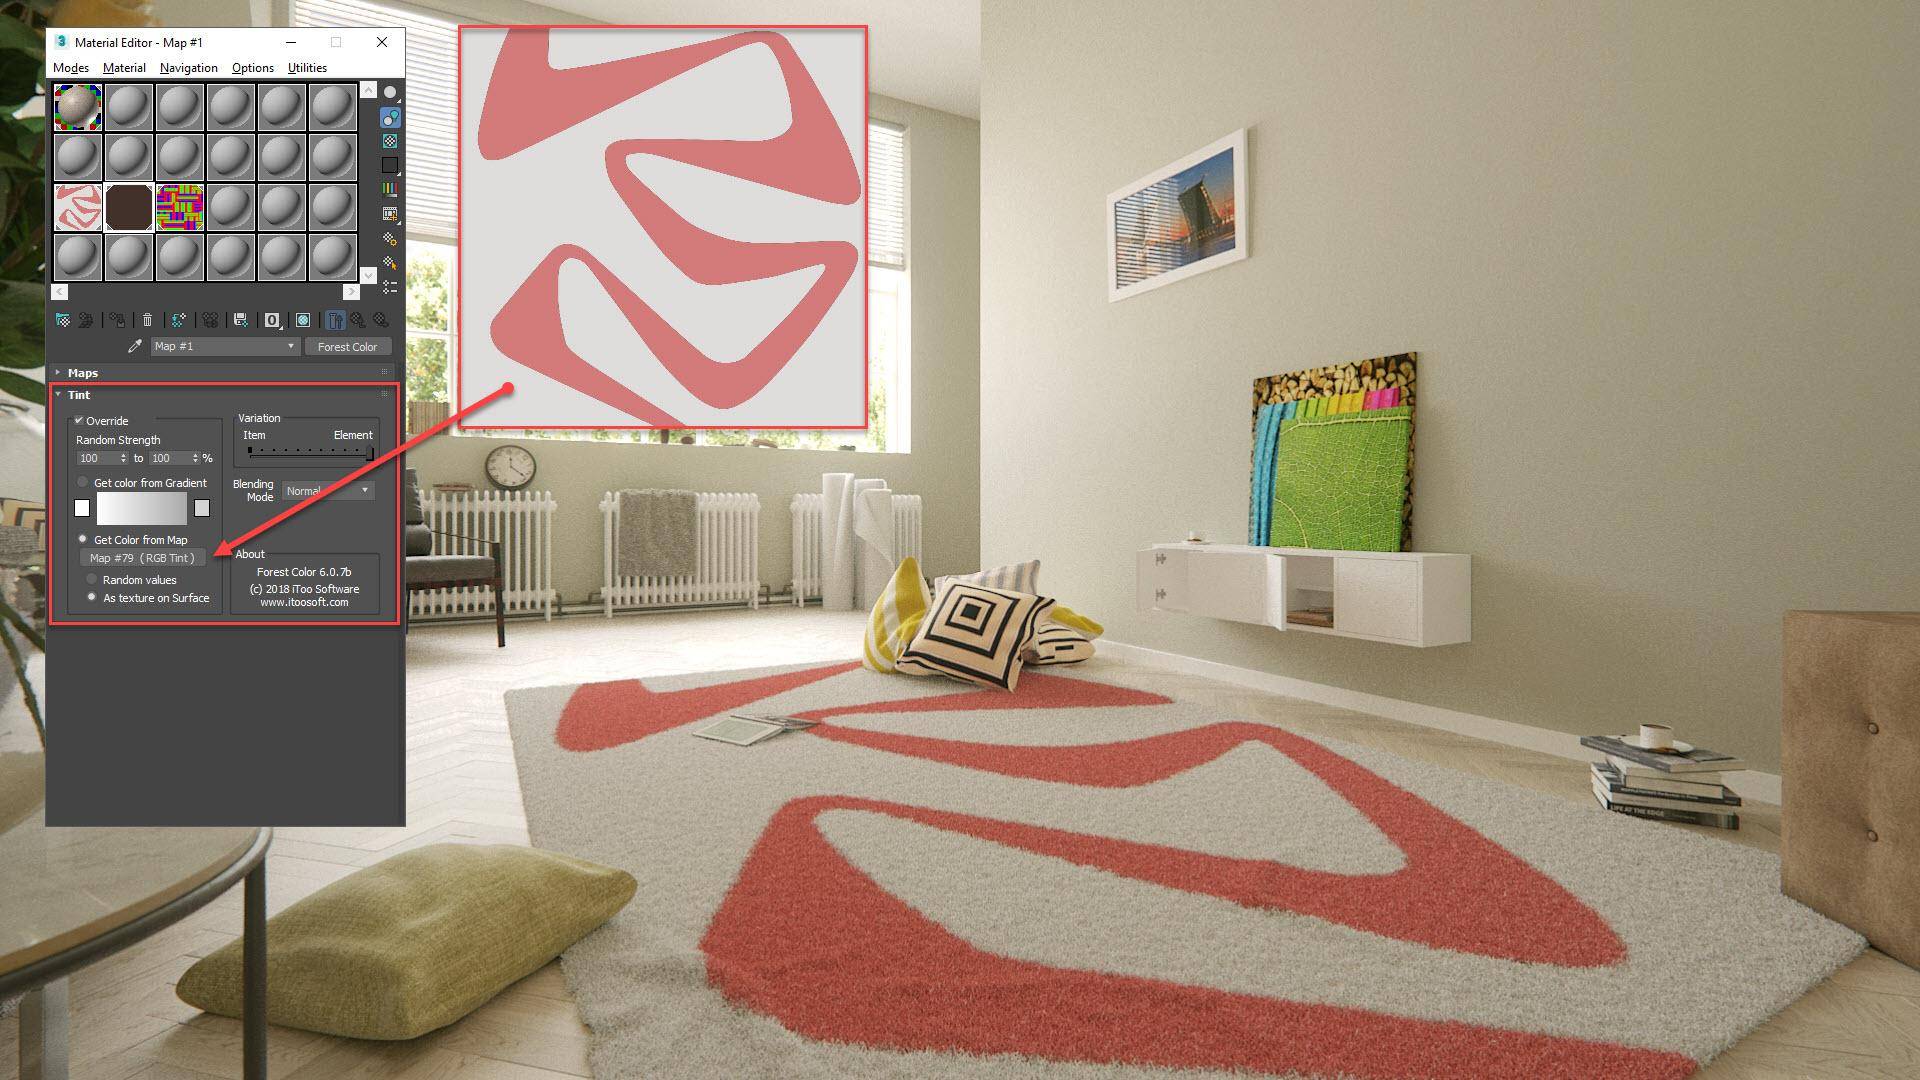
Tint Rugs using photographs
If you need to match a rug pattern you can easily tint threads using a bitmap. For this to work, a correctly UV-mapped surface must be used. In Forest Colour, enable the Tint Override settings and load your bitmap into the Get Colour by Map slot. Change the mode to As Texture on Surface and change the Blending Mode to Normal. This mode is not able to change colours by element, so you will need to use smaller patches if your pattern contains many tiny details.
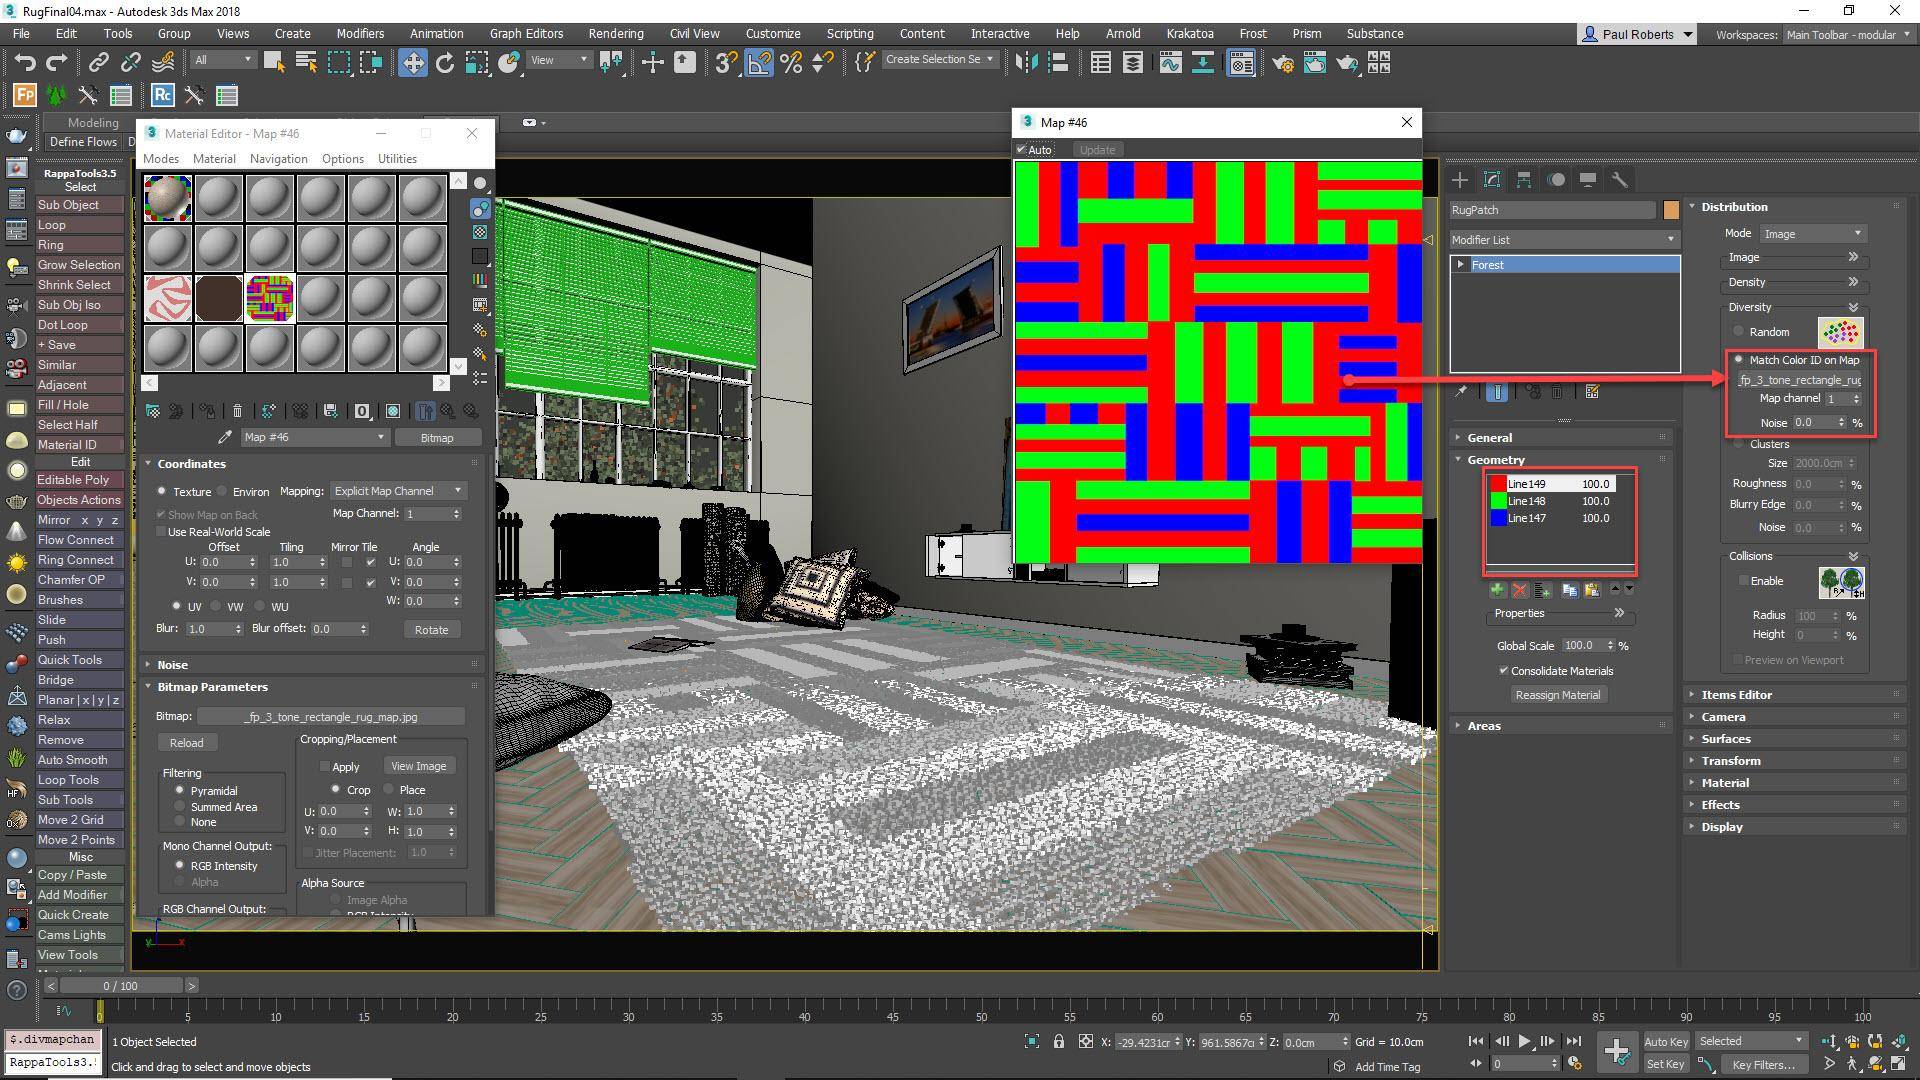
Controlling pile type using Maps
Some rugs combine several types of pile. In Forest Pack this effect can be recreated by matching an Items Colour ID to the colour on a map. Paint a map that has a clear and distinct solid colour for each pile type. Then add the patches as normal to the Items List and change the Colour ID to match the map. Go to the Distribution rollout and change Diversity mode to Match ID on Map and add your bitmap to the Map slot. If necessary you can choose a different Map channel and add some random noise too.
Model for extreme close-ups
So far so good, but what if you need to get closer? For extreme close-ups, the threads we’ve created so far may not contain sufficient detail to look realistic. To add more detail, let’s go back to the original shag pile geometry. We need to remodel this from individual strands instead of a sold mass. We could use Max’s native Hair and Fur modifier, but why not stick with Forest Pack? First of all create an individual thread by creating a bent triangle from a plane, with the point aligned downward on the world Y axis. Add this to a new Forest Pack object and use the existing thread geometry as a Surface.
Adding “Hair” with Forest Pack
Change the mode in the Surface rollout to UV and drag the direction slider to 0. In the Distribution rollout, change the map to Solid, uncheck the Lock Aspect Ratio option and then adjust the X and Y Density size to add more hairs. Adjust the rotation of the hairs from the Transform panel so that they follow the length of the threads. To add flyaway hairs, increase the X Rotation Max value, Enable Probability Curve and change the graph so that there is a high probability of hairs following the thread and much lower probability of flyaway hairs.

Update the patches
Duplicate the Forest Pack object to do the same thing for the other threads. Make sure that the pivot point is at the bottom of the threads and then choose the patch object. Update the objects in the Items List to the new high-detail threads. Remember the patch is nested in the main rug object, so the changes cascade through and it is updated automatically. If you move the camera close to the rug and render, you should find that the new detailed geometry stands up much better.
Other Fabrics
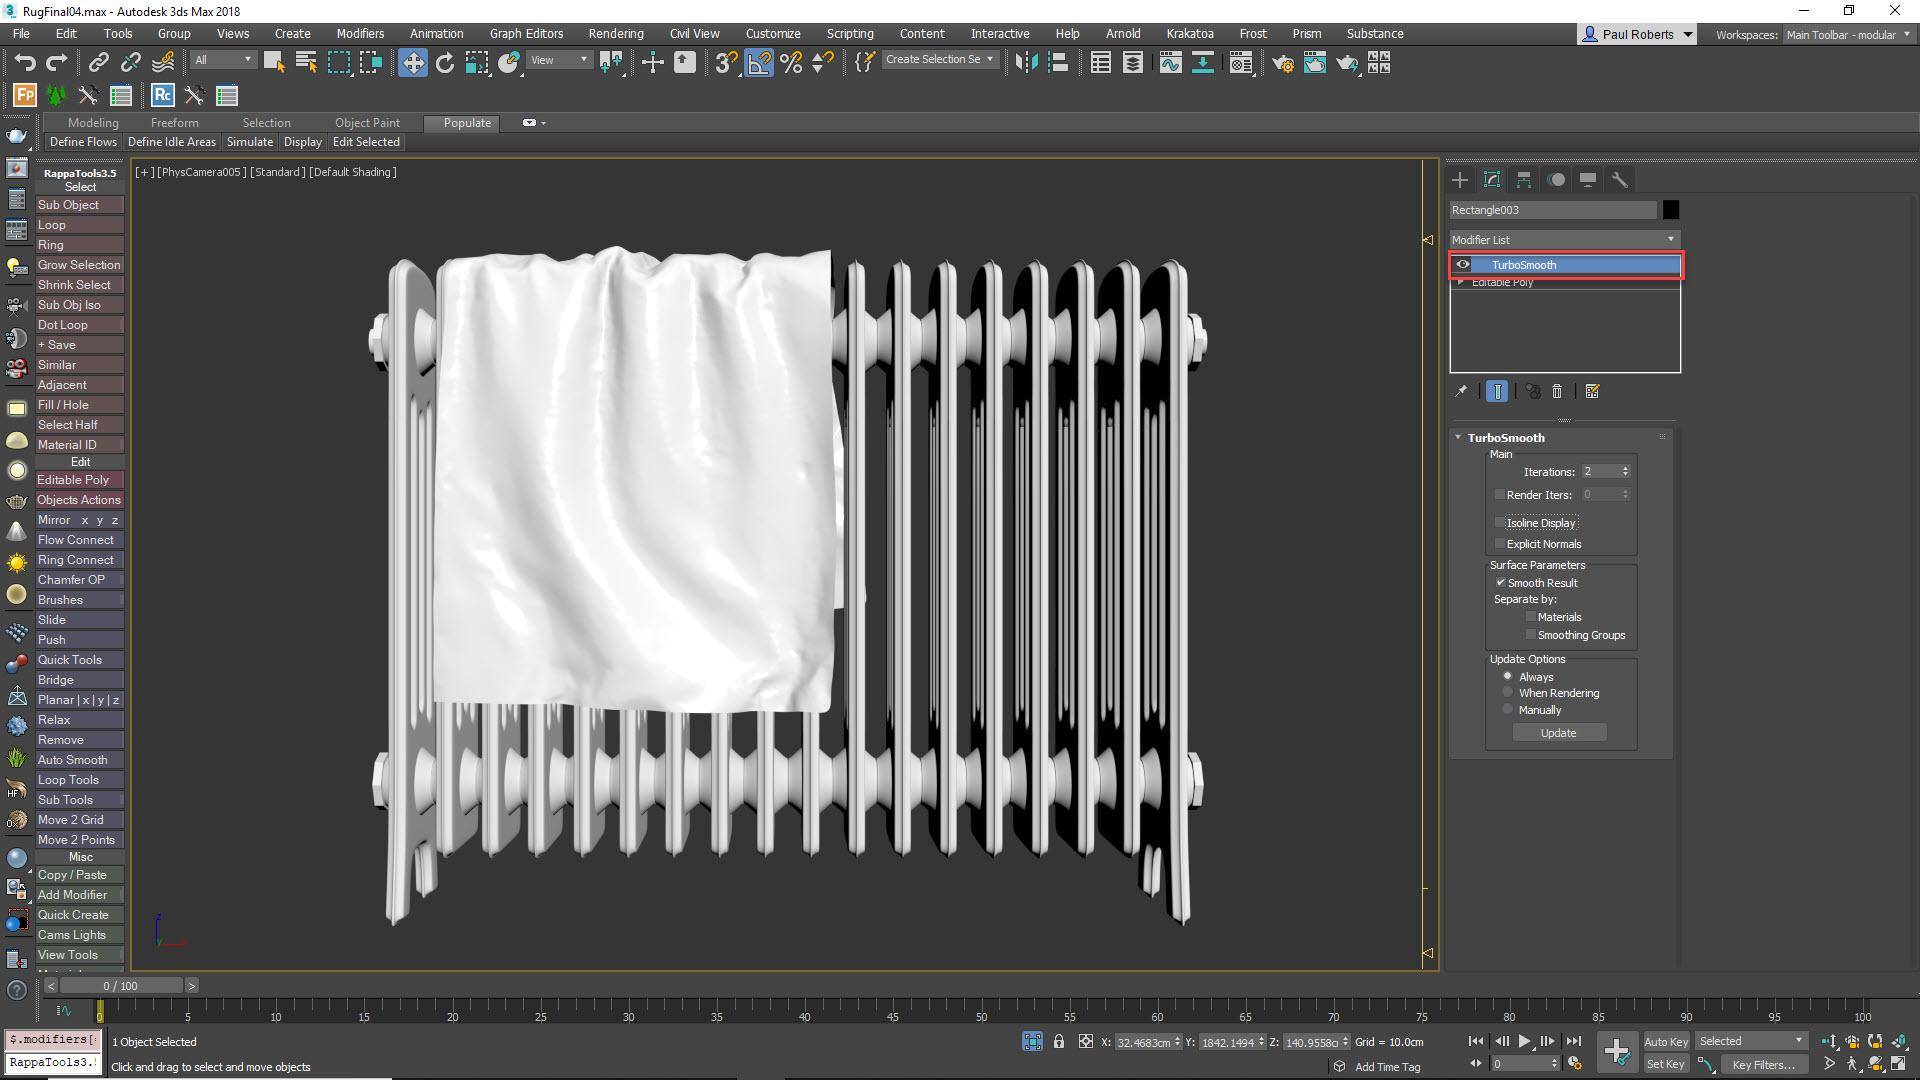
This technique works well for rugs, but it’s equally useful for any other fabric with a long pile. To finish this tutorial let’s look at another example that uses the same technique to add a towel on the radiator. Start by isolating the radiator and drawing a rectangular spline above it the size of the towel. Add a garment modifier and increase the Density value so that there’s sufficient resolution for smooth deformation. Add a Cloth modifier. Open the Object Properties and change the towel to a cloth object. Add the radiator as a collision object.
Cloth sim the towel
Rotate the towel before starting the simulation so that it lands on its edge. This will create more interesting wrinkles than letting it land flat. Click on Simulate Local and… wait. The detail in the radiator geometry can mean that it takes a while to simulate. Once you’re happy with the towel, add a Turbosmooth modifier to smooth out the folds. Unlike the rug, you probably don’t want this mesh to be visible so open the object’s properties and deselect the Renderable checkbox. We can now add clumps of fur.
Add fabric tufts with Forest Pack
Add a small clump of tufts to a new Forest Pack object and then add the towel mesh to the Surfaces list. Change the mode to UV and the Direction to 0 so that the items are distributed across the surface. Change the Distribution map to Full and adjust the density until the patches overlap by about 25%. Randomise the Z Rotation and the Scale to disguise repetition and hit render. You now have a towel with tufts of fabric. Many more types of soft furnishing can be created using these techniques, so experiment and have fun!
Quick Tip 1 - Simulate cloth in Marvellous designer
In this tutorial we’re using 3ds Max’s built-in cloth simulator, but if you have it, Marvelous Designer is a much more fully featured and faster cloth simulator that’s great for quickly creating base geometry for rugs.
Quick Tip 2 - Creating Patch Variations
In this tutorial we created patches using simple twisted splines, but many more styles of rug are possible by creating patches from different source geometry.
Quick Tip 3 - Modelling Clumps with GrowFX
GrowFX is a really flexible plant modelling tool for 3ds Max, but it’s also great for modelling all kinds of other objects including patches of fabric that can be scattered with Forest Pack to create rugs and carpets
Quick Tip 4 - Round off the ends of splines
If you’re creating threads from splines in Max 2019, try out the new Quad Caps mode in the Render Spline modifier. It allows you to automatically add a domed cap to the ends so that you avoid the unnatural flat cap effect seen in previous versions.