Resources

(this tutorial is compatible with RailClone Lite)
This is the first of our tutorials looking at how you can use Forest Pack and RailClone with Unreal. For this episode we’re going to tackle a question that many archviz artists working in 3DS Max have asked when bringing their interiors over to real-time: How do you import your floors? This tutorial came about thanks to a collaboration with Fabrice Bourrelly, Epic trainer who has several courses on Unreal and runs a popular Member Group with weekly webinars, training 1:1 support and more. He also runs a useful YouTube channel with free content.
In 3DS Max, we often use RailClone or other plugins to create parquet floors using real geometry. The geometry though isn’t the issue, for the majority of projects the polycount of a floor doesn’t even cause Unreal to break a sweat.
No, it’s the materials that are the problem. In 3DS Max our usual technique is to have several textures (and sometimes several can mean 60+) randomly applied to each plank. On top of that, we have the option to randomly tint each plank for even more variety. This is great because it basically eliminates visible tiling, but to achieve it we often use a specialised map like Multi-texture or RailClone Colour. The trouble is that neither of these will work in Unreal.
One solution would be to Randomise the material IDs and use a Multi-sub object material to create a similar effect, but this results in a shader that is very hard to customise, very inefficient in real-time, and still doesn’t support randomised tint. Neither of these approaches are really suitable
In this tutorial, we will demonstrate a different technique that uses a single standard PBR material. It works equally well in Unreal and 3ds Max, so it’s ideal for those projects where you need to output offline renders alongside real-time projects.
Creating the Textures
The first thing we need to do is create our textures. If you already use textures that combine multiple planks into a single bitmap, there’s nothing more to do and you can skip to the next section. If however, you normally use several individual plank textures, then you’ll need to combine them together into a single bitmap.
In both cases, the final resolution should be a power of 2 number, for example, 512, 1024, 2048, 4096 etc. This is so that Unreal can create mip maps, a kind of LOD for textures that “allows the graphic card to render faster when using the lower mips AND reduces the texture aliasing (shimmering) that can occur in high-frequency textures at certain distances.
You can, of course, create these textures manually, but I found Photoshop’s Contact Sheet feature can be used for this pretty well.
- First of all, you’ll need to decide how best to layout your planks to create as close to a square texture as possible (I made a little calculator that might help, you are welcome to copy it to your own spreadsheet application). In this example, I’m only using 7 planks each of which has a resolution of 3630x323. That’s easy, using one column will give me a final texture resolution of 3630 x 2261.
- You should also be aware of the DPI of your source images. You can check this by opening a sample in Photoshop and going to Image > Image Size and then take note of the Resolution value
- Now select File > Automate > Contact Sheet in Photoshop.
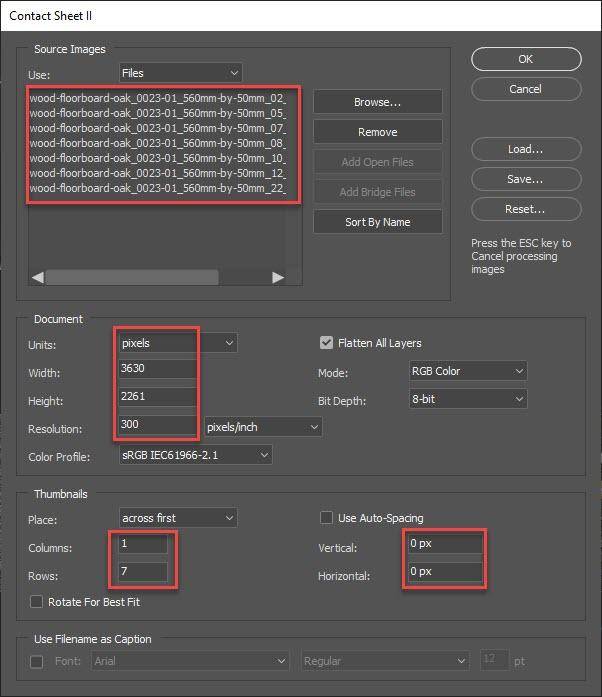
![Contact Sheet II]()
- Enter the Height and Width of the final texture, in this example 3630 x 2261, and the Resolution, which in our example is 300DPI.
- Enter the number of Rows and Columns you’ve calculated you’ll need. In this example, just 1 column is fine with 7 rows.
- Now you need to set the Spacing Vertical and Horizontal values to 0px so there are no gaps between planks. There’s a catch though, Photoshop will not let you set this value to zero. To get around that, change the units temporarily to CM, enter 0cm for both these values, and then change back to Pixels. The settings should now read 0px
- Finally, let’s pick the files. Click Browse and select your bitmaps. Click Open to add them to the Source Images list.
- Click OK to build your texture.
- Once the texture has been generated, resize it to the nearest power of 2 resolution and save.
You’ll need to do the same thing for the roughness, normal and any other maps you require to build your material. Now we have our source textures we can use RailClone to create a floor that randomly samples the individual planks.
Creating a single parametric plank
To create this floor and maintain compatibility with Unreal we are going to use 3 UV channels. Channel 1 will be for the main texture, channel 2 will be used to add tint variations, and the 3rd channel we will be reserved for light map baking. To maintain parametricism, I like to set the plank up using several modifiers. It’s pretty simple, in fact it takes longer to explain than to do!
- Create a box the required size of a single plank.
- Enable Generate Mapping Coordinates, but disable Real World Map Size. This creates the UVs for our main textures.
- Add a UVW Map modifier and set the Map Channel to 2. We’ll use this for tint variation
- Add an Edit Poly modifier, delete the bottom polygon since it’ll never be seen, and select the top polygon to pass up the stack.
- Add a Chamfer modifier. Set the Mitring type to Tri and disable Smoothing Output > Smooth. This is to prevent Max from trying to interpret the chamfer as a continuous smooth surface. Set the chamfer to the desired size.
The plank is now ready. Remember this is all still parametric, at any point you can change the size of the plank or the chamfer and it will update in the RailClone object that we’re going to create in the next section.
Part 2 - Creating an Unreal Engine compatible Parquet floor in 3DS Max
In this tutorial, we’ll be using a macro that’s included with the downloads for this tutorial. In the future these will be included with RailClone. Keep an eye out for updates, and if prompted you can make sure your macros are up to date by clicking the Update button in RailClone’s General rollout. This will open the update manager from which you can download the latest versions of our libraries.
(If you haven’t read part 1, please make sure you do so before tackling this video as the planks UVs should be setup in a specific way for this technique to work.)
- Import the RailClone object into your scene and open the Style Editor. You’ll find 5 macros already present, each one represents a different floor type. As I mentioned, these will soon be integrated into RailClone and you’ll be able to find them by going to the Macros tab on the right. In the Generators > Floors group you will find the same 5 macros created especially for this tutorial.
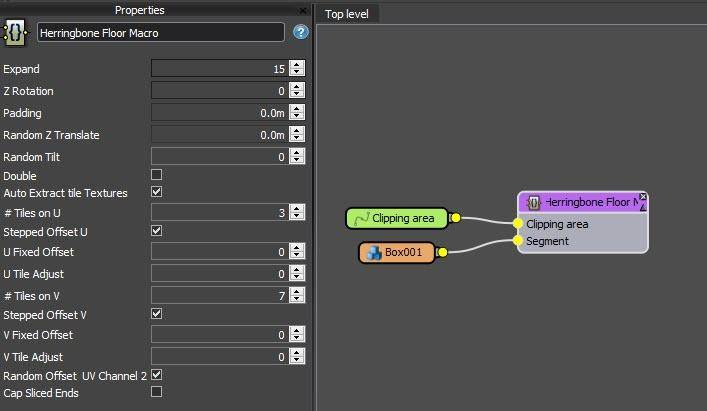
- In this example, we’ll be using the Herringbone Floor macro. RailClone uses closed splines to determine the floor area. To select one from the scene, add a new Spline node and wire it to the Macro’s Spline input.
- Next, you need to add the plank geometry. Add a Segment node, wire it to the Macro and go to the Properties panel. Click on the Object Picker button and select the plank geometry from the scene. Your floor will be generated - let’s take a look at some of the settings in the macro.
- Around the boundary of the floor (depending on the pattern), you may see some gaps. To remove these increase the Expand property.
- If you wish to change the direction that the planks run you use the Z Rotation property.
- Padding allows you to add spacing around the planks.
- Random Z Translate will create some stepped unevenness in the boards by randomly offsetting them on the Z-Axis. It’s best to use small values here unless you’re creating an old dilapidated room. In a similar vein, the Random Tilt property will randomise the rotation of each plank.
- There’s also a Double option for a different herringbone style.
- The other macros have a few different options. For example, the Chevron Macro requires you to enter the thickness of the plank in order to correctly calculate the spacing. The Basket Weave Macro has options to control the number of repetitions on the X and Y axes separately. Finally, the Planks macro has options to randomise the height of Rows and randomise the Offset of the boards.
Whichever macro you use, we’re focussing today on the options that allow you to automatically extract the planks from the textures we created earlier. Before we take a look at these, let’s create a material so we can see what’s going on.
- Create a new Material. The type you choose will depend on your preferred renderer. Since I’m just going to export to Unreal I’m using a Standard material here, but the same technique works in V-Ray, Corona etc. Because this is just to demo how the tiling works, I also won’t create the complete material, I’ll just demonstrate using the Diffuse.
- Import the textures as usual and wire it to the materials Diffuse input
- Assign the material to the floor.
When we created the plank, we ensured that UV Channel 1 was mapped to match the exact size of the geometry. You can see this by the fact that all 7 floor textures are displayed on each plank. Let’s use the macro to extract and randomise these individually by changing just two settings.
- IMPORTANT. Unless you are using V-Ray, go to the Display rollout and disable Instancing Engine. If you don’t do this then RailClone’s UV manipulation tools will not work. V-Ray users can skip this step
- Go back to the Macro’s properties. Enter the number of planks found horizontally in your texture for the #Tiles On U value. In our case, we had just one, but we can subdivide that into 3 to get a few more variations and to illustrate the principle.
- Enter the number of planks found vertically for the #Tiles on V value. In our example, we had 7. That’s all you need to do, we now have 21 variations of planks from one easy to manage shader setup. Best of all this doesn’t rely on any 3rd party shaders so it’ll export to nearly anything. You can also collapse it to an editable mesh without losing the randomisation effect if you want to share it with someone who does not have access to RailClone.
- The other settings here can be used to further crop into the planks. This can be useful if, for example, the source texture has grout or joints that you’d like to remove. There’s also an option to Disable Stepped offset. This can be useful if your textures are a continuous tiling texture like a veneer.
That takes care of materials - how about randomising tint? To do that we will use UV channel 2. But first the principle in the materials setup.
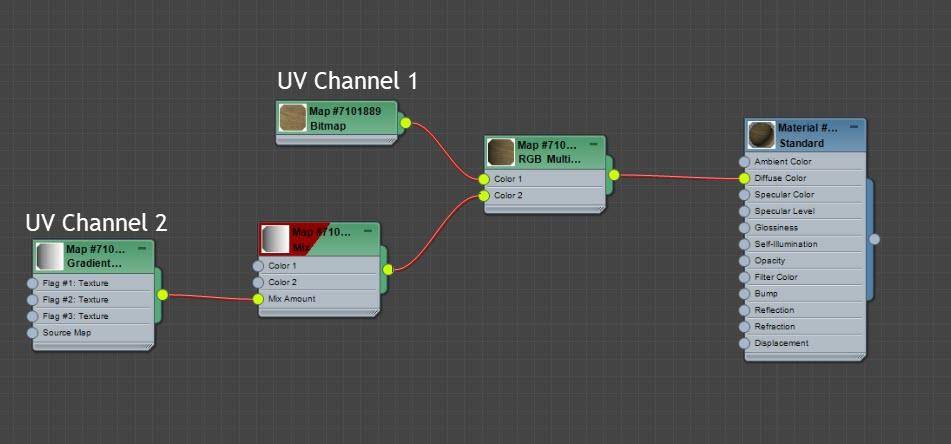
- Create a new Gradient map. Leave it at its default setting except for changing the Map Channel to 2. We’re going to sample a small part of this gradient and randomly change the U and V offset so that each plank picks up a different value. To make it easier to edit this effect though, let’s add Mix map.
- Wire the Gradient to the Mix map’s Alpha input. You can now easily change the tint values using the Colour #1 and Colour #2 swatches.
- Let’s combine this with the existing diffuse map. Wire an RGB Multiply map between the existing Diffuse map and the material. Wire the Mix map to the RGB Multiply Map’ssecond input.
- Previewing UV channel 2 in the viewports can be a pain in Max. One way to do it is to ensure that the material itself is not being previewed. Then you can select the gradient or the Mix map and enable Show Shaded Map in the Viewport. You can now see the gradient applied to each plank.
- Go back to the RailClone object. In the Macros Settings enable Random Offset UV Channel 2. Each plank now has a solid colour instead of the gradient. Great! This can be used to tint the texture, but what’s actually going on here? If we add an Unwrap UV modifier it’s easy to visualise. Change Map Channel to 2 (abandoning any changes) and open the UV Editor. You will see that the UVs for each plank have been shrunk and scattered around the UV Space. In this way, they randomly sample the image. Simple really, and this could be used with any type of image, not just a gradient. You could also of course use different Blending modes to recreate the options you have in the specialised maps like RailClone Colour. Delete this when you’re done.
- Finally, we’ll add a UVW Map modifier. Ensure Real World Map size is disabled. Set the mode to Planar and Change Map Channel to 3. This UV map will be used to bake the lightmap. For a floor, it can be more efficient to create it in this way than to let Unreal unwrap it for you automatically.
That’s the basic setup. Now we can export to Unreal. In this case, we’ll just export via FBX as an individual object, but you could also use Datasmith. We’ll cover using Datasmith with RailClone in a future tutorial.
- With the Floor selected, go to File> Export > Export Selected
- Choose FBX file format and give it a name.
- Ensure Smoothing Groups and Triangulation are checked and save
That’s it. In the next section we’ll import our assets into Unreal and recreate the materials
Part 3 - Importing a mesh into Unreal Engine and creating materials
In this video, we’ll import a floor made with RailClone and recreate the materials. We’ll then take this a little further to create a Material Instance that allows you to easily edit the tint variation and paint subtle variations using Vertex Colour
- Let’s stay organised. Create a new Folder in Unreal Content Browser.
- Import the texture’s you used when you set up the floor in 3DS Max to the Content Browser.
- Drag the Floor FBX you just created into the Content Browser. The Import options will open. You can disable Generate Lightmap UVs since we created them manually in 3DS Max. If this is left enabled it will add another UV channel by repacking the UVs found on Channel 0 (Channel 1 in Max). Click Import.
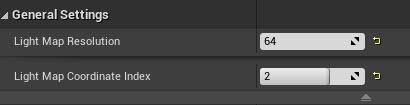
- We need to tell Unreal which of our 3 existing UV channels to use for Light Mapping. To do this, double click on the asset to open the editor. Find the Lightmap Coordinate Index parameter and change the value to 2. You might wonder why 2 and not 3? It’s because Unreal’s Lightmap channels start from 0, whereas Max’s start from 1.
![Light Map Settings]()
- To improve the quality of the shadows, you can also increase the Light Map Resolution if you like.
- Drag the floor into the scene. From the details panel, set the Location to 0. When saving out of Max via FBX the pivot is placed at the world origin. Setting the location to 0 will place the geometry at its original position.
Creating the material
Before we perform a light-bake, let's create the simplest of materials.
- Right-click in the Content Browser and select Create Basic Asset > Material. Give it a name and then double-click to open the material editor.
- Drag the Diffuse, Roughness and Normal textures from the Content Browser to the Material Editor.
- Wire them to the relevant Inputs on the shader.
- Click Save
- Drag the material on to the floor to assign it to the Static Mesh.
- Let’s bake our Lightmap to see how this looks.
- So far so good, the texture extraction is working well. Now let’s update the material to add the tint variations.
- Edit the material. Add a Linear Gradient map. We need to tell this map to use UV Channel 1 (2 in Max). Hold down U while clicking in the editor to add a Tex Coordinate map. Change the Coordinate Index Value to 1 and wire it to the Linear Gradient.
- In 3DS Max you’ll remember that we wired our gradient to a Mix map. An equivalent in Unreal is a Linear Interpolation or Lerp. To add one, hold down L and click in the editor window. Wire the gradient to the Alpha input.
- We’ll use this Lerp map to control the brightness of the diffuse map. Add a Multiply map by holding M on the keyboard while clicking. Wire the Diffuse to the first input and the Lerp to the second. Click apply to see how it looks on the floor.
- Not bad, but the tint effect is very strong. You can change this by adjusting the values in the Lerp node. Remember to click Apply when you’re done to see the changes.
- This is working well, but it’s a little slow to keep clicking the update button. Instead, we can convert these settings to Parameters that can be adjusted in real-time.
- To do that, hold down 1 on the keyboard and click to add a Constant. Wire it to the Lerp’s A input. Add another for the B input.
- Right-click on the Constant and click Convert to Parameter. Make sure you give it a meaningful name. Do the same for the second Constant.
- Click Apply. Now if you adjust these parameters you can control and preview the tint variation of the floor in real-time.
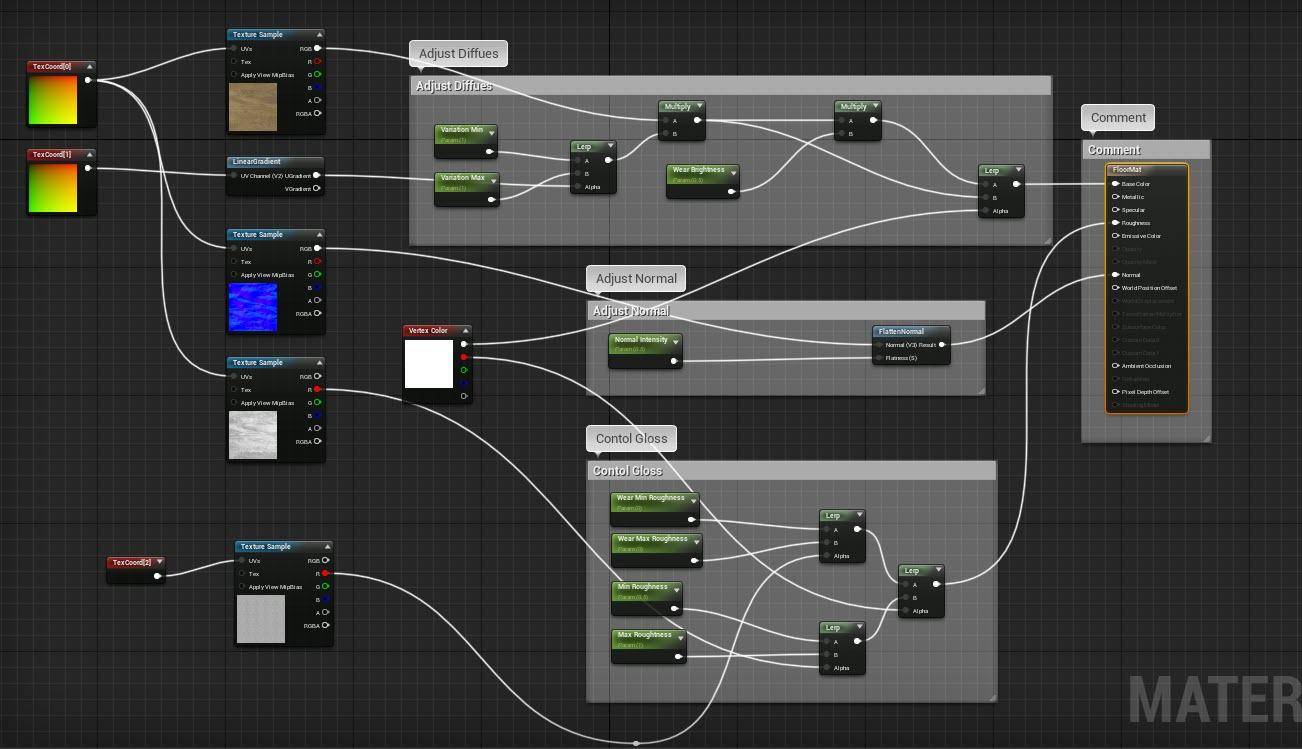
That’s pretty much a straight recreation of the Max material in Unreal. But let’s use these same node types to add a few more parameters. Starting with the ability to control the minimum and maximum Roughness.
- Wire a new Lerp between the Roughness map and the material. The Roughness will be wired to the Lerp’s Alpha input
- Create two new Constants wired the new Lerp’s A and B inputs.
- Convert them to Parameters name RoughnessMin and RoughnessMax.
- You can now adjust the minimum and maximum roughness of the boards as well as the tint variation very easily.
One of the advantages of having real geometry in the scene is that you can easily set up a material that uses Vertex Colours to paint in variation exactly where you need it. In the next section, we’ll use this approach to control the brightness of the diffuse by painting with a brush.
- Wire a new Lerp node to the Base Colour with the existing Multiply node in its B input.
- Create a new Multiply node and wire it to the Lerp node’s first input. Wire the existing Multiply node to its first input.
- Create a Constant and wire it to the Multiply Node’s Second input. Convert it to a Parameter called WearBrightness.
- Add a VertexColor node and wire it to the final Lerp’s Alpha input.
- You can now select the floor and go into Vertex Paint mode. Painting with Black will reveal the worn area. In this example I’m using the default colour settings and holding down Shift while painting to use the Erase colour (which is black).
- We can do the same thing for the Glossiness. Clone the existing Roughness, Lerp and Parameter nodes. Rename the parameters WearRoughnessMin and WearRoughnessMax.
- Change the map to a Grunge texture.
- Wire a new Lerp map to the Roughness input
- Wire the Grunge Roughness nodes to the first input
- Wire the Floor Roughness nodes to the second input
- Wire the Vertex Colour map to the Alpha.
You now have separate parameters to control the Roughness min and max for the worn and non-worn areas, the ability to control tint variation, and the ability to adjust the brightness for the worn area. Using these you can get some nice subtle variation. And of course, if you create a material Instance from this asset, you can control those settings easily without having to dig through the graph.
I hope you’ve enjoyed this tutorial. We spent a little more time on material creation and other aspects of the process beyond RailClone techniques than we would normally, I hope you enjoyed it. If you did, then look out for more tutorials coming soon on how to export Forest Pack and RailClone to Unreal using Datasmith to maintain instancing.