Tutoriels
Des cours de qualité pour devenir un expert
Fichiers de ressources
Conditions
RailClone 5 or above
Produits populaires
Obtenir des produitsVideo Transcript
Creating ivy can always be a tricky prospect in 3ds Max, and for a long time, we’ve relied on free or inexpensive procedural ivy plugins to help automate the task for us. But if you’ve found that recently these plugins have been harder to come across, or maybe if you just want to create your ivy with a bit more creative control, then this tutorial might help. It demonstrates how to use two Macros in RailClone that can be applied to a spline to create ivy geometry. Of course, you still have to create the spline, but as you’ll see, it’s pretty easy.
At present, the macros we’ll use are only available in the downloads for this tutorial - there’s a link above - but if people find them handy we might soon add them to the built-in library. There’s also a finished version of this style in the file, so if you just want to go ahead and use it as-is, then please feel free. At the end of the tutorial, we’ll go over some of its settings so you can just jump to that section.
The macro expects two types of geometry, a stem and some leaves. The stem has enough edge loops to deform around the spline but otherwise, it’s just a tapered cylinder. The leaves have the pivot moved to the end of the stem. I have a second set too, they’re the same leaves but I’ve bent the stem underneath and realigned the pivots. We will alternate between these two groups to create a pattern of ivy that alternates on either side of the splines, an effect that is usually most visible when the plants grow horizontally. We’ve provided geometry, but you can easily use your own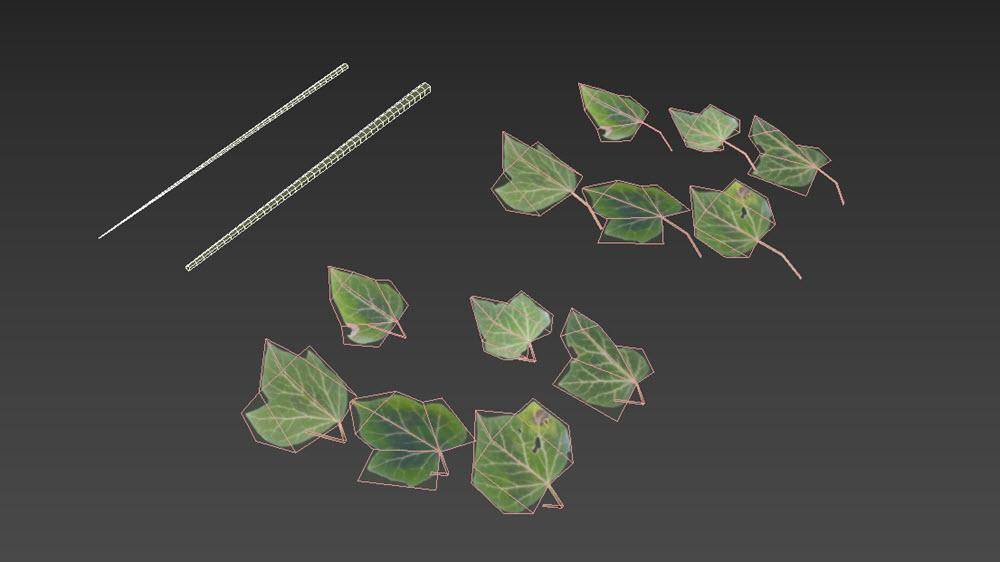
Let’s look at how to set up the Macros.
Select the RC_Ivy_Start object. The first thing to note is that the RailClone object is rotated to align to the wall you wish to use for the Ivy. This is important for two reasons, the macro will use this orientation to make sure the leaves are facing away from the wall, but it’s also necessary to ensure that they always remain vertical as is often seen in nature to maximise exposure to sunlight.
It’s also positioned at the bottom of the wall because as we’ll see, the macro has altitude parameters that are measured from the RailClone object’s coordinates.

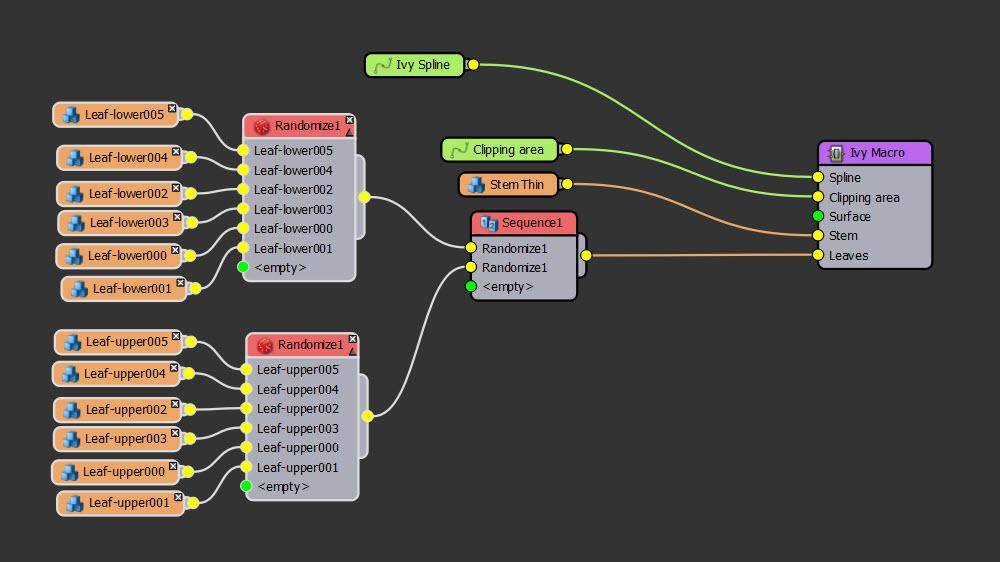
Open the style editor and you’ll find two macros. We’ll come back to the branch maker later. Let’s import the geometry:
- Create a Segment node. Right-click on it and choose Clone Multiple.
- Pick all the leaves from one of the groups. I’ll pick all the ones with a Lower suffix.
- Create a new Randomize Node and wire the new segments to its inputs.
- Now we’ll import the other group. Select one of the Segment nodes and Clone Multiple.
- Pick the other type of leaves, these have the suffix Upper.
- Wire the new Segments to a second Randomize node.
- Create a new Sequence operator and wire the two Randomise nodes to its inputs. This will create an alternating pattern of upper and lower leaves.
- Wire the Sequence node to the Macro’s Leaves input
- Add a new Segment node and pick the stem geometry. Wire it to the Stem input
- Add a Spline node and wire it to the Macro’s Spline input.
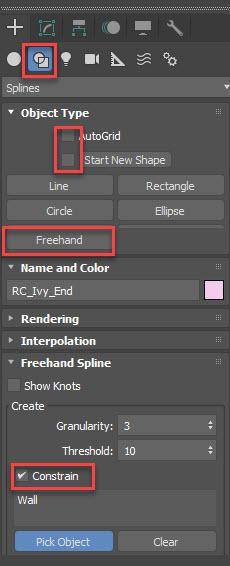
That’s the macro setup now we need a spline to use in that node. To create one I’ll use Max’s built-in Freehand drawing tool.
- Pick the Freehand tool and disable AutoGrid and Start New Shape. This second one is important because it will ensure that each new spline you draw is a part of a single spline object. It saves you from having to connect them all manually later.
![]()
- Turn on Constrain, and pick the wall.
- That’s it, you can just draw your shape. I rather like this step, you have a lot more control than letting an algorithm take care of it for you. Nonetheless, you should try to create a realistic(ish) pattern of branching stems.
- Assign the path in the Spline node and you should get an Ivy mesh!


Now we have our basic mesh, let’s take a look at some of the control you have to customise your Ivy.
- First of all, you have the Min and Max Altitude settings. These serve two functions. They act as a way of limiting the leaf growth to stop it from growing all the way to the ground, you can also set an upper limit. This range is also used for the next two types of settings to control the Spacing and Scale at the start and end of the altitude.
- So for example, if we want larger leaves at the bottom of the wall, you can set the Leaf Scale at Start to 100%, and the Scale at the End to 40%.
- You can do a similar thing to Spacing, reducing the spacing between the leaves as they get smaller so that the gaps between them aren’t too big.
- Finally, there are a couple of checkboxes to control how the size and spacing interpolation behaves.
- With Size and Spacing by Altitude, only the distance from the RailClone object’s pivot is considered. This works well where you want leaves to change based on their height. It doesn’t take into consideration the leaf’s position on the spline - so as you can see with these horizontal splines - the leaves are more or less the same size along their length.
- Conversely, if I turn this off and enable Size and Spacing by Spline Position instead, then only the position on the spline is taken into consideration. This works well if you’re drawing horizontal splines. It can look a bit odd though if you have many sub-splines because the scaling starts afresh with each new spline so you’ll potentially end up with large leaves starting in the middle of its parent’s branch.
- If you enable both of these you’ll get a kind of mix between them which works pretty well in this case.
That’s pretty much it for the main macro.
Finally, there is another macro called Ivy Brance Maker. This can be useful to create the effects you see when Ivy branches hang down from a wall in tendrils instead of climbing. It works in conjunction with the existing macro. To illustrate, I’ll draw some horizontal lines at the top of the wall.
- Assign the RailClone object to the new spline
- Wire one of the Randomise nodes to the Branch Maker macros Leaf input (it doesn't matter which)
- Wire the Stem Segment to the Stem input.
- Select the Macro and select Show Preview. A straight branch will be created at the RailClone object’s pivot point.
- As with the main macro, you have parameters to control the spacing and the size at the start and the end of the branch, as well as the overall length using the X Size property.
- When you have a branch size that you like, wire the branch maker macro to the Ivy Macro’s Leaf input.
- I’ll turn off the Altitude and Spline Position effects for this one. Be aware that there’s some advanced nesting going on here, so it may be a little slow to build.
- You’ll now have hanging tendrils of ivy instead of climbing vines!
- Note that you can also use a spline for the branch path, but you’ll need to ensure that the first vertex is aligned to the RailClone object’s pivot to ensure that the geometry aligns correctly.
- I’ll add a clipping spline to remove this ivy from the text - it could be a window you need to remove. It’s as simple as picking a spline and wiring it to the Clipping input.

That brings us to the end of this quick tips video. I hope you’ll find it useful for quick Ivy modelling. As I mentioned at the start, it won’t replace procedurally growing plugins, but it might be enough for quick jobs or if you want more control than an automated solution can provide. Also, for larger areas, you could use these presets to create small patches that are scattered with Forest Pack.