Fichiers de ressources
Conditions
- info 3DS Max 2010, Forest Pack Lite 3.9
Introduction
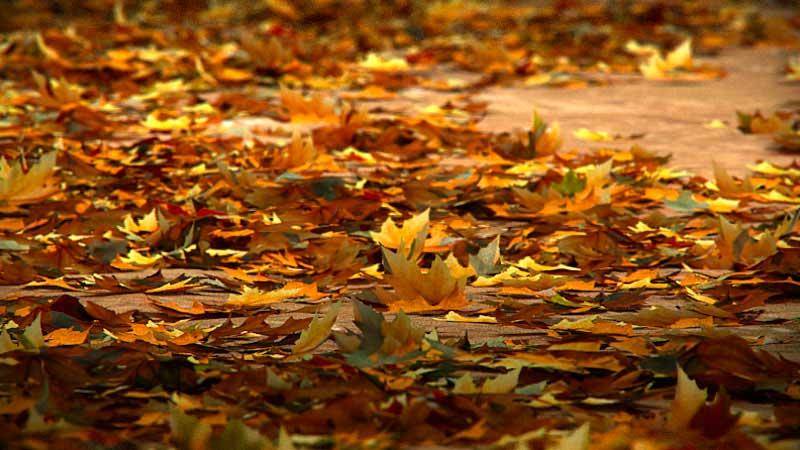
In addition to our ongoing effort to release free high quality scenes, we are committed to providing comprehensive training for our products. This short tutorial accompanies the Autumn Park scene and explains how Forest Color can be used to create unlimited variety in the maps and colors of your foliage.
The Autumn Park scene was created to demonstrate the powerful features of Forest Color, Forest Pack's texture map plugin that allows for easy randomisation of colours and textures on forest items.
This tutorial Covers:
- How to tint maps by randomly selecting colours from a gradient or source map
- How to add variety by randomly applying bitmaps to forest items
- How to control the probability of a bitmap being selected
- How to use randomise by element and randomise by item (Forest Pro only)
Scene Files - Autumn Park
To follow this tutorial you should download the starter file from the link above inside the folder /start. This is identical to the free Autumn Park scene final, except the materials don't yet use Forest Color maps. Please select the appropriate link for your renderer.
Before we get started let's take a quick look at the existing file. In addition to the ground, bins, and benches, 6 Forest Objects are visible in the scene.
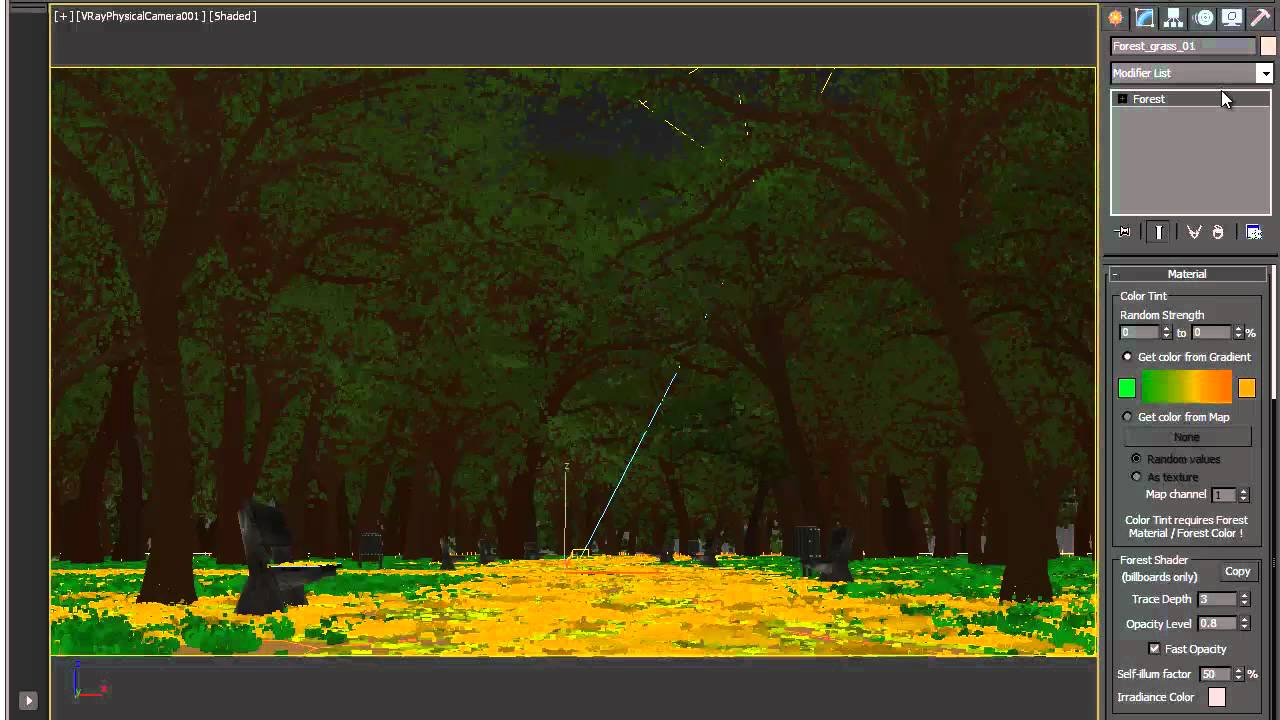
- Forest_grass_01: All the grass in the scene in created using this single Forest Object.
- Forest-dryleafs: Dead leaves covering the ground distributed using Forest's new spline painting feature.
- Forest-dryleafs-over-bench: Dead leaves on the bench - this is a separate forest object to ensure compatibility with the lite version of Forest Pack.
- Forest-trees: Creates the majority of the trees in the scene using a distribution map and randomised transforms.
- Forest-trees_horizon: A strip of distant trees, lower on the Z axis to give the impression of the land falling away over the horizon.
- Forest-trees-front: Uses custom edit mode to precisely place and orientate the trees nearest the camera
All the trees seen in the final render are actually only one model, created specifically for this scene. The sinuous, twisted branches and trunk evoke the feeling of an old park and the irregularity helps to create greater variety when the model is rotated. With Forest Pack's sophisticated distribution controls coupled with Forest Color, we can easily create the illusion of diversity with only a few models.
About Forest Color Map
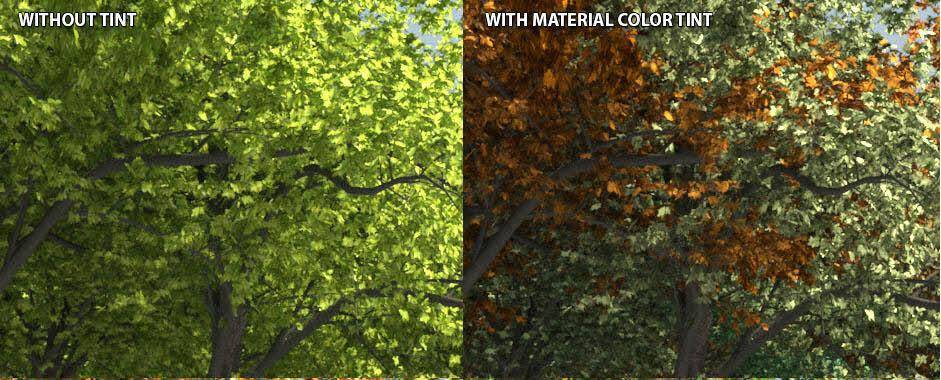
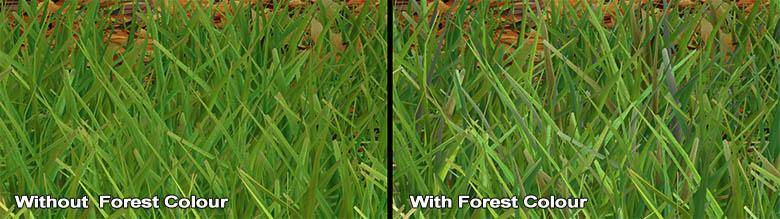
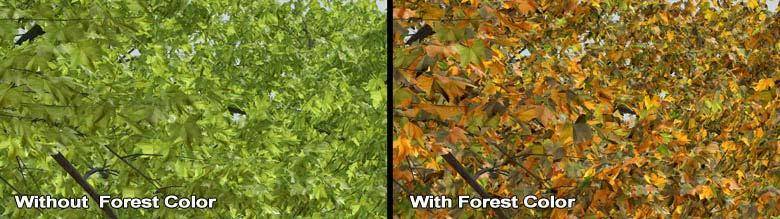
Forest Color is a procedural texture map that creates unlimited variations of texture and colour across instanced geometry. This unique feature allows you to create great looking images full of colour variations without increasing your render times. Forest Color is included with all Forest Pack editions, and supports Mental Ray and V-Ray.
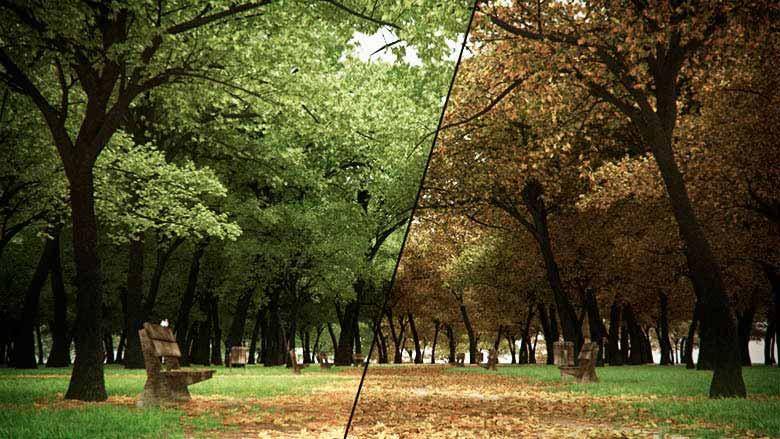
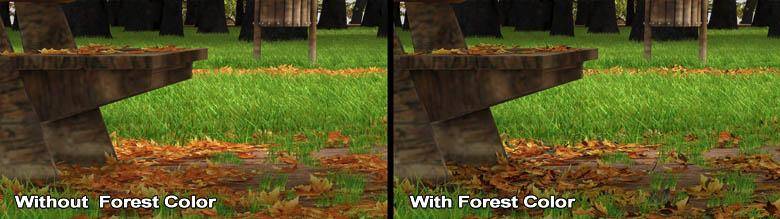
The same render with and without Forest Color
There are two ways of applying Forest Color; either manually in the slate and compact material editor, or automatically using Forest Pack's built-in Optimise Materials feature. This will automatically add Forest Color maps to the diffuse channel of all Forest Items.
Once you've applied a new Forest Color, you have access to two powerful techniques for adding material variations to instanced geometry. By randomly applying a colour tint or selecting from a list of up to 10 texture maps. As we will see, both these techniques can be used in combination to create limitless variations.
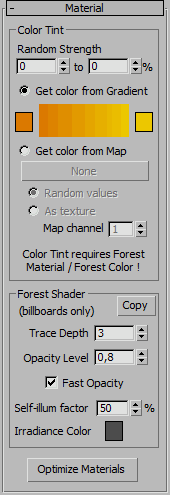
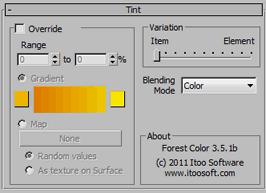
Basic Tint Controls
Color Tint is the simplest way to add variation. Using this feature Forest Pack will select a random colour from a gradient ramp or a texture map and apply it to individual distributed items..
Tint parameters are accessible from either the Forest Object itself, which acts as a master control that is applied to the full object, or individual materials can be controlled using the Override option in the Forest Color map.
Tint has two modes of operation:
Gradient: In this mode a colour ramp determines a range of possible colours to apply. The random strength setting controls the transparency of the mix. By default this is set to 0% —> 0%, effectively disabling this feature.
Map: This mode uses a texture map as a colour source. If Random Values is selected the colour is determined by a random pixel, using the texture as a palette of possible colours. If we choose As Texture the colours are governed by matching the texture to the UVW coordinates of either the distribution map or the surface projection depending of the current distribution mode. Each item's colour is then determined in relation to its position on the underlying texture map.
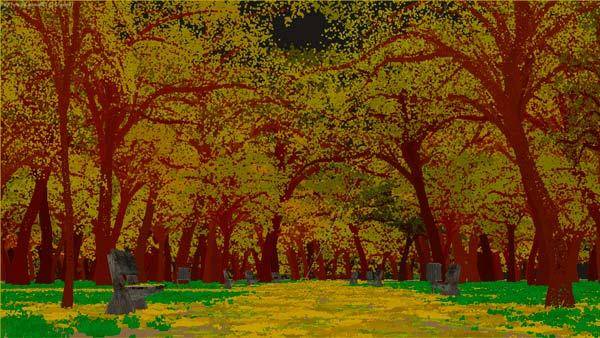
The image below demonstrates the effect of adding a simple Gradient Tint to the trees in the Autumn Park scene.
Advanced Tint Controls
The advanced options are only accessible from the Forest Color map in the material editor. The Tint Panel allows you to override the settings in the Forest Object and gives us access to extra settings for Pro users.
Blending Modes
The way in which the Tint colour interacts with the maps applied to the object is governed by a choice of 4 blending modes.
Color: Uses the hue and saturation from the tint colour and the value from from the map colour.
Addition: Adds each pixel's RGB value in the tint colour and the map colour.
Average: Adds the tint and the map colour and divides by 2 to give an average.
Multiply: Multiplies the RGB values of the tint and the map colour.
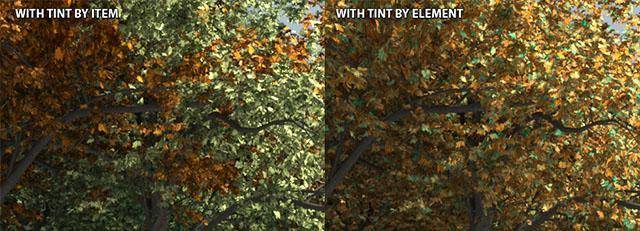
The Variation controls enable you to apply tint at an object level, e.g. all the leaves on an individual tree will take the same tint colour; or at an element level, e.g. each individual leaf will take a different, random tint colour. The slider mixes between these two extremes as illustrated in the image below.
Randomising Maps
Further variation can be added by randomly selecting from a list of up to 10 different maps. When activated Forest Color will randomly apply these according to the probability (in percent) specified alongside each map. Probabilities are normalised so there is no need to ensure that their combined total equals 100%, making this a very intuitive way to work.
The example below is taken from the Forest Park scene. The 5 images show the gradually ageing of the fallen leaves.

These bitmaps are the same as used on the trees, but by controlling the probabilities we can create different effect for the fallen leaves. The images below demonstrate how probability in used to create a greater number of brown leaves, and very few that remain green.
Forest Tint and map variation can be used in combination to create an enormous palette of colours in the scene.
Creating the Autumn Park Forest Color Maps
Now that we've covered the theory and interface of Forest Color, it's time to put it into practice on the Autumn Park base scene.
The 6 Forest Objects in the scene use only 3 materials: grass, trees, and leaves. We'll look at adding Forest Color to each of these in turn.
Grass
- Start by opening the material editor. Open the list of scene materials and create an instance of the grass material in the editor. (For this tutorial I will be using the slate material editor, but the same principles apply if you prefer the compact editor instead.)
- Create a new Forest Color map, rename it grass_front, and connect its output to the grass material's diffuse slot.
- Now connect the original bitmap (grassleaf-green.jpg) to the new forest color map's default map slot. The default map slot is used in the other maps are turned off, or if the material is applied to a non Forest Object.
- Import these bitmaps and connect them to the next 5 map slots: grassleaf_ilumin.jpg, grassleaf-brown.jpg, Grassleaf-gray.jpg, Grassleaf.jpg, Grassleaf_ilumin2.jpg. You should also connect the default map to one of the extra slots. See the image below of the shader tree for clarification.
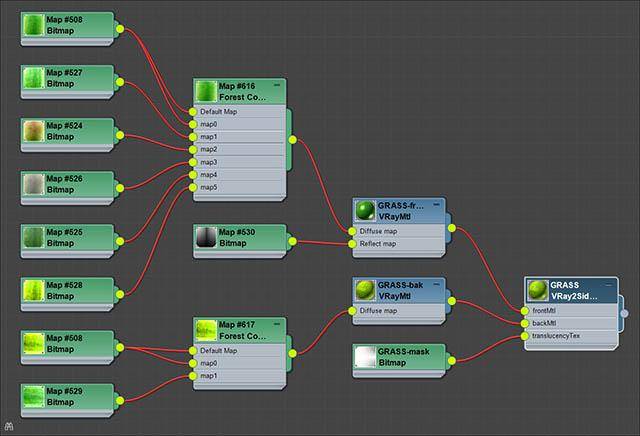
The material set up for the grass
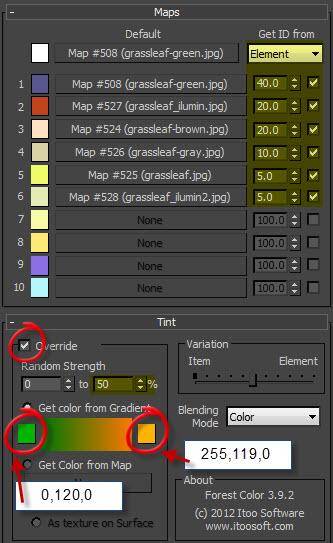
- To control probability so that the randomising algorithm favours two mid green and one brown map change the values as follows:
| grassleaf-green.jpg (default) | 40% |
| grassleaf_ilumin.jpg | 20% |
| grassleaf-brown.jpg | 20% |
| Grassleaf-gray.jpg | 10% |
| Grassleaf.jpg | 5% |
| Grassleaf_ilumin2.jpg | 5% |
Now we'll add further variety using the Tint settings:
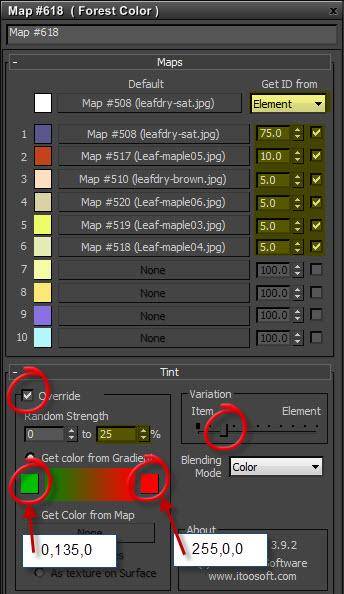
- Activate the tint controls by selecting Override. Change the RGB values of the tint gradient start to 0,120,0 by clicking on the swatch on the left hand side of the gradient. Change the end colour to 255, 119, 0.
- The Random Strength setting controls the mix of the tint colour with the bitmaps. Change the strength to 0% - 50%. Variation can be left at its default mid position.
Blades of grass and leaves often have a vibrant glossy side and a duller less saturated side. To simulate this, it is common to use a VRay2SidedMtl or a MR Translucency map depending on your renderer.
V-Ray
- If you are using V-Ray, create a new Forest Colour and connect it to the diffuse slot of the Back material.
- Load Grassleaf_ilumin2.jpg and grassleaf_ilumin.jpg into the material editor.
- Attach Grassleaf_ilumin2.jpg to the default input and map slot 1. Set the probability to 5%
- Attach grassleaf_ilumin.jpg to map slot 2 and set the probability to 20%
Mental Ray
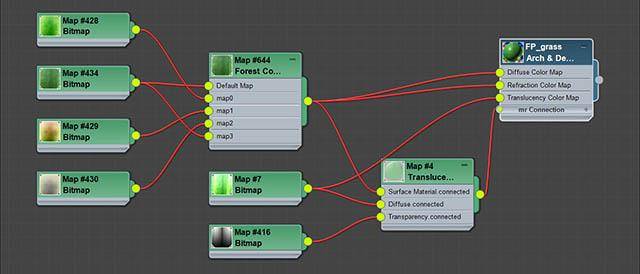
The Mental Ray setup is a little different. In this tutorial we connect the same Forest Color map as used on the front of the leaves to the Refraction Color map slot of an A&D material. This then also goes into the Surface Material of a Translucency map that is attached to the Mental Ray Connection>Basic Shader>Shadows map slot. See the image below for the Mental Ray shader tree.
(More information about these shader setups can be found on Peter Guthrie's blog for V-Ray)
Now do a test render to see the difference Forest Color makes to the grass.
Dry Leaves
The leaves on the ground use the same technique as above. Create an instance of the the leaf material and connect a new Forest Color map to the diffuse slot. Import the following images to the map slots of the new Forest Color and set the corresponding probability.
| Leafdry-sat.jpg (default) | 75% |
| Leafdry-brown.jpg | 5% |
| Leaf-maple03.jpg | 5% |
| Leaf-maple04.jpg | 5% |
| Leaf-maple05.jpg | 10% |
| Leaf-maple06.jpg | 5% |
- Pro users can set the Get Id from property to Element so that a different map is randomly selected for each leaf.
- Activate Tint Override and set the start colour to 0,135,0 and the end colour to 255,0,0. This time the strength will be lower at 0% - 25%.
- The Variation slider should be moved about 25% of the way from the left so that the tint is randomised from leaf to leaf.
Mental Ray
- Connect the Forest Color map to the Refraction Color slot of the A&D material and the Surface Material slot of the translucency map.
V-Ray
- Add a new Forest Color map to create the back of the leaves. This time we will load only three bitmaps and set the probabilities as follows:
| Leaves0026_5_TRANS.jpg (default) | 50% |
| Leaf-maple-green.jpg | 30% |
| Leafdry-sat.jpg | 20% |
- Connect this new map to the diffuse slot of the Leaf-Back V-Ray standard material. If we render the scene now we should see a naturalistic spread of colour on the dried leaves.
Trees
The trees are the final material that requires amendment. This time we will use Forest Pack Pro's Material Optimise tool to automatically add Forest Color maps.
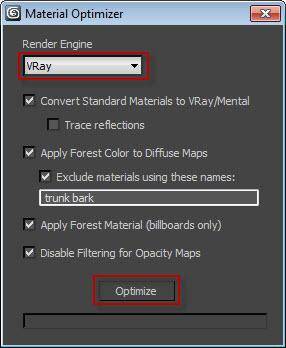
- Select the Forest-Trees object in the scene.
- In the Modify Panel locate the Material rollout and press Optimize Materials. Accept the default settings and press Optimize. (see right)
- Now if you open the Material Editor and locate the maple material you should see that a Forest Color map has been automatically added to the diffuse slots. This is a great way to save time and is especially useful if you want to control tint properties directly from with Forest Pack, without needing to manually adjust the materials.
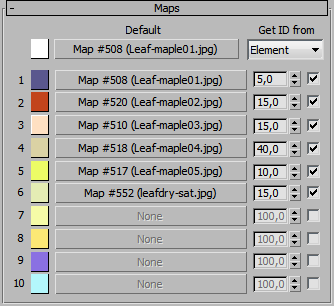
- By now we should be quite familiar with the way that Forest Color maps work. Load up and connect the following maps to the Forest Color map for the leaves front and set their probabilities:
| Leafdry-sat.jpg (default) | 40% |
| Leaf-maple01.jpg | 15% |
| Leaf-maple02.jpg | 5% |
| Leaf-maple03.jpg | 15% |
| Leaf-maple04.jpg | 15% |
| Leaf-maple05.jpg | 10% |
- Activate Tint Overide and use the following settings:
| Gradient Start Colour: | 0,95,0 |
| Gradient End Colour: | 207,64,0 |
| Stength: | 15 - 75% |
Mental Ray
As above, connect the Forest Color map to the Refraction Color slot of the A&D material and the Surface Material slot of the translucency map
V-Ray
Add a new Forest Color map to create the back of the leaves. This time we will only use tint to add variety to the rear of the leaves. Activate Tint Override and use the following settings. Note that the start and end strength is much higher so the leaf will always take a 100% of the gradient colour.
| Gradient Start: | 190,218,245 |
| Gradient End: | 67,201,91 |
| Stength: | 100 - 100% |
If you do a test render now, you will be able to see the great variety and realism that Forest Color can bring to your foliage.
Closing Notes
The final image was rendered at a high resolution of 3600x2025 pixels to allow for large format printing. The raw render was exported in EXR format with layer passes to allow for maximum control in post production. Using the Z-Depth pass we added background fog, and created volumetric lights by masking and painting by hand. The images below demonstrate before and after post-production.
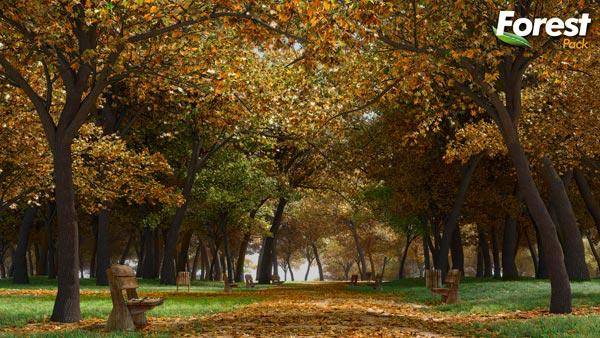
Raw render from VRay:
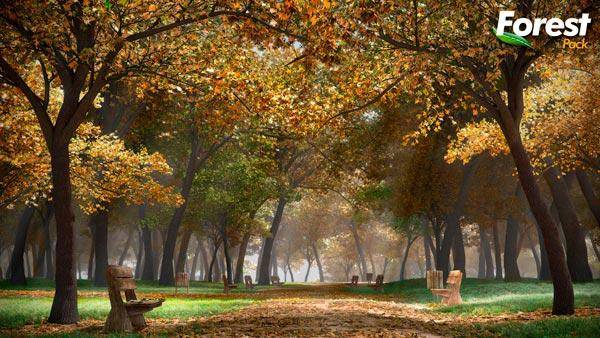
Final Image, with level adjustments, z-fog, and painted volume lights:
By completing this tutorial you should have a good knowledge of the Forest Color map type and be able to easily create colour variations in your forest scenes.
If you have any questions about this tutorial, scene, or any of the techniques demonstrated here, please feel free to ask on our forums. For more instruction on Forest Pack please visit our tutorials page.