Fichiers de ressources
Conditions
- info Forest Pack Lite or Pro, RailClone 2.5 Lite or Pro

Introduction
Just like trees, vehicle models are often complex with very high poly counts making Forest Pack the perfect way to add them to your scenes. In this tutorial we look at how to prepare your assets, randomise colours and scatter vehicles to populate roads and car-parks using areas, splines and markers.
By the end of this tutorial you will be able to:
- Prepare multi-part models for use with Forest Pack.
- Randomise material colours using Forest Colour map.
- Scatter cars in areas, positioned using a custom distribution bitmap.
- Scatter cars along splines.
- Scatter cars on markers created using RailClone.
- Adjust scatters in Tree Editor mode.
Download Contents
The exercise files for this tutorial include the following .max scenes compatible with Max 2010 - 2016 V-Ray and Mental Ray.
- fp_car_park_start.max The starting file if you want to follow the tutorial.
- fp_car_park_end.max The completed tutorial
- maserati_quattroporte.max A car model provided by AXYZ design.
This tutorial requires Forest Pack Lite or Pro and RailClone Lite or Pro.
Preparing car models
You'll find that most car models you purchase require a little preparation before they can be used with Forest Pack. These types of models are usually divided into several parts and grouped, and while Forest Pack can import grouped geometry, it isn't intended to be used for this purpose. The first step therefore is to ensure that each car model is combined into a single object.
You have two choices, either attach the parts together into a single editable mesh, or export the model to a proxy object. Either option is fine, but there are a few pros and cons that will help to inform your decision.
Meshes:
- Geometry is loaded into memory at render time (only one copy per model). This takes up more space in the .max scene, although you can get around this if you use XRefs.
- Any geometric object can be used as source, including parametric and animated objects (RailClone, GrowFX or another Forest object).
- Animation samples are generated on the fly, allowing you to create unlimited variations, but this may be slow depending of the type of object.
- Some Forest features such as Tint by Element only can be used with meshes.
Proxies:
- Geometry is loaded/unloaded from disk dynamically when it is required by the current rendering bucket. This optimizes the use of the memory, but it can be slower.
- The proxy object doesn't increase the size of the scene file.
- Proxy objects must be created manually before rendering and the referenced files must be reachable by all render nodes.
- You can store animation in the proxy file which means it is much faster to load samples from disk, than generate to generate them for each frame.
- Does not support Tint By Element (unless you use the Alembic file format)
Generally our recommendation is to use proxies when your systems is low in RAM. But each project is different so it can be a good idea to test both methods for a specific configuration, specially when creating huge scenes. We'll illustrate now how to convert the Maserati car model provided in the downloads for this tutorial to a proxy object, and then the alternative, how to combine the grouped objects into a single mesh. In this example I'm using V-Ray.
- Open maserati_quattroporte.max.
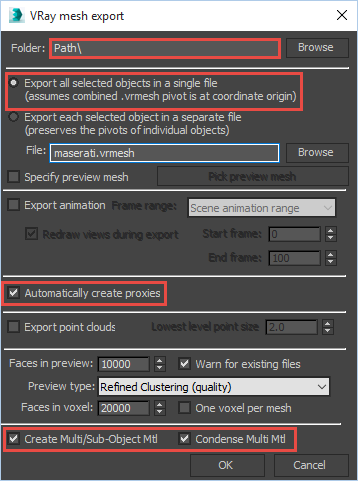
- Selectthe car object or objects and right click. Select your renderer's Export to Proxy feature.
- If these features are available, turn on Export as a single file, automatically createproxies, and Create Multi Sub Object material.
![Parking Cars-image2015-11-4 15:49:56.png]()
- Choose a Path and Filename for the proxy file.
- Click to Export.
If you prefer not to use proxies or if your renderer's proxy export process does not automatically generate a multi-sub object material, you can simply attach the meshes together to create a single object. To do this:
- Select the car and go to Edit > Group > Ungroup.
- Select any part of the car and convert it to an Editable Poly if it's not already.
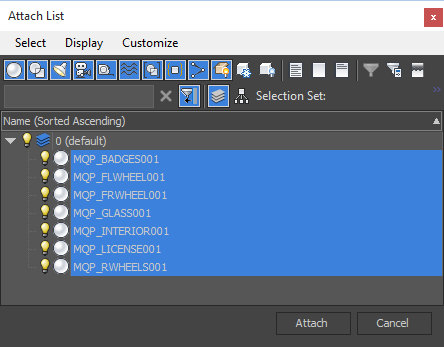
- Go to the modify panel and click on the Attach List button
![Parking Cars-image2015-11-4 15:53:35.png]() .
. - Select the remaining car parts and click Attach.
![Parking Cars-image2015-11-4 15:54:35.png]()
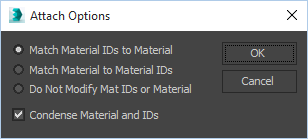
- You will be presented with attach options, these are important as they allow you to automatically generate a new multi-sub object material for the car and automatically remap the geometry's material IDs. Make sure the default settings of Match Material IDs to Material and Condense Material and IDs are both selected.
![Parking Cars-image2015-11-4 15:56:3.png]()
- Click OK. You now have a single object. If you open the material editor and use the eyedropper
![Parking Cars-image2015-11-4 16:3:1.png]() to pick the material from the object you'll see that a new material has been generated and the materials have been reassigned to match the new model.
to pick the material from the object you'll see that a new material has been generated and the materials have been reassigned to match the new model.
 .
.
 to pick the material from the object you'll see that a new material has been generated and the materials have been reassigned to match the new model.
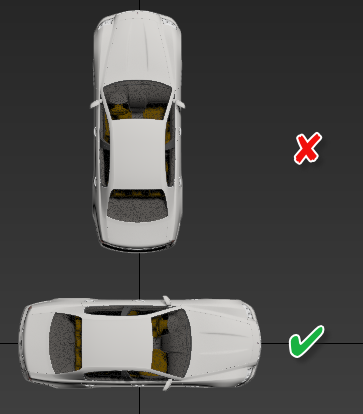
Another important consideration is the position of the car's pivot point and the models alignment in relation to the world axis. It may seem trivial, but this actually has an affect on two features that can be very useful when placing vehicles. In this tutorial we will use the Center Offset and Horizontal Mirroring features to position and randomise objects and in order for this to work correctly, the cars must be aligned so that they point along the World's X Axis. You may therefore need to rotate your car model by 90 degrees.
Finally you'll also need to place the pivots. To a certain extent where you place these depends on how you intend to scatter the cars. For example if you intend to create splines at the top of the parking spaces you might put the pivot at the ends of the cars. Alternatively you might put the pivot in the middle. I recommend the latter because you can easily adjust the pivot to the start or end of the vehicle using the Centre Displace properties for the object which can be found in the Geometry rollout.
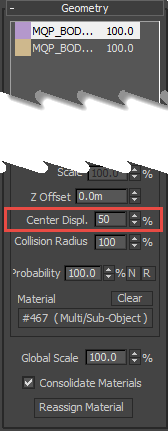
With the pivot in the centre of the object and this simple parameter you can slide the anchor point along the length of the car without having to edit the source model, it offers the most flexibility to reusing your model in a number of different scenarios.
The Centre Displace value's spinner is limited between 0% and 100%, however this can be overridden by changing the value using Maxscript. For example to change the offset of the first object in the geometry list to 120% use the following:
$.centerlist[1] = 120
If you'd like to change all the objects in the geometry list to 120% you can use this construction:
for i = 1 to $.centerlist.count do $.centerlist[i]=120
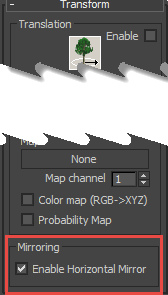
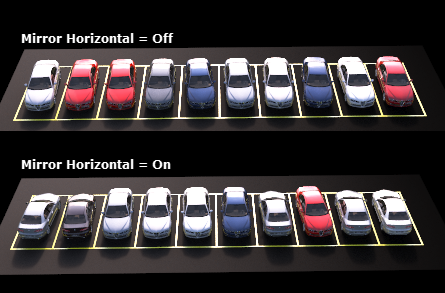
It's unusual that everyone parks facing the same direction, so you can use the Horizontal Mirroring feature found at the bottom of the Transform rollout to randomly flip cars over the spline.
This works best when centre displace is set to 50% and the cars pivot is in the middle of the car, otherwise the cars will flip from one side of the path to the other. The table below illustrate different combinations of Centre Displace and Horizontal Mirror on a car object with a pivot set to the centre of the vehicle.
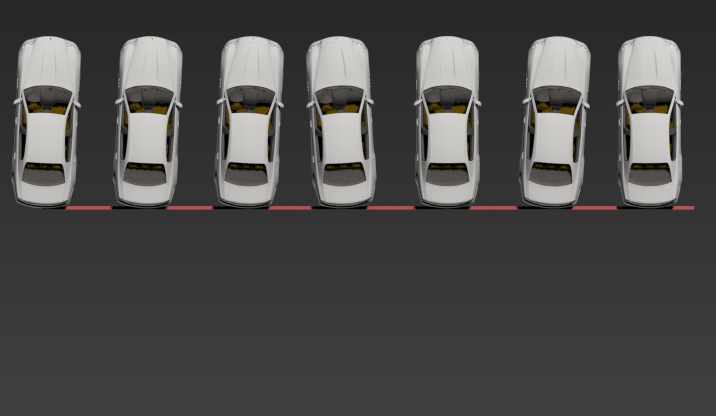 | Centre Displace = 0% |
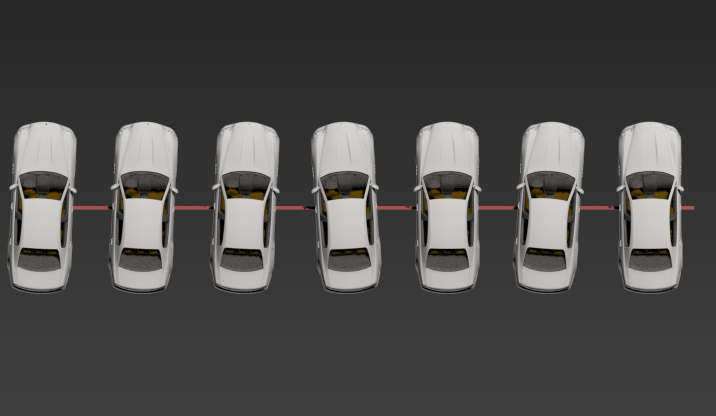 | Centre Displace = 50% |
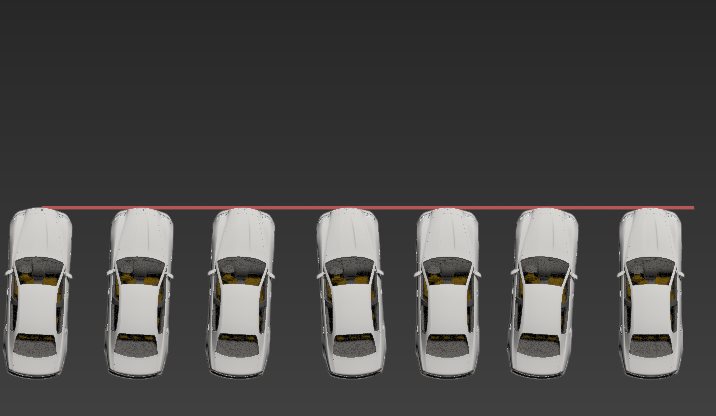 | Centre Displace = 100% |
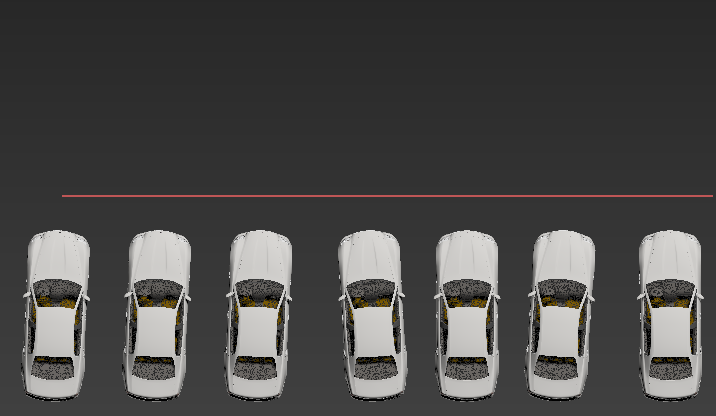 | Centre Displace = 120% |
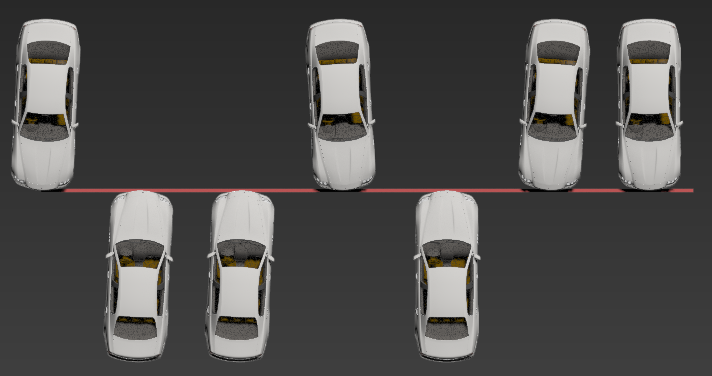 | Centre Displace = 0% or 100% Horizontal Mirror = On |
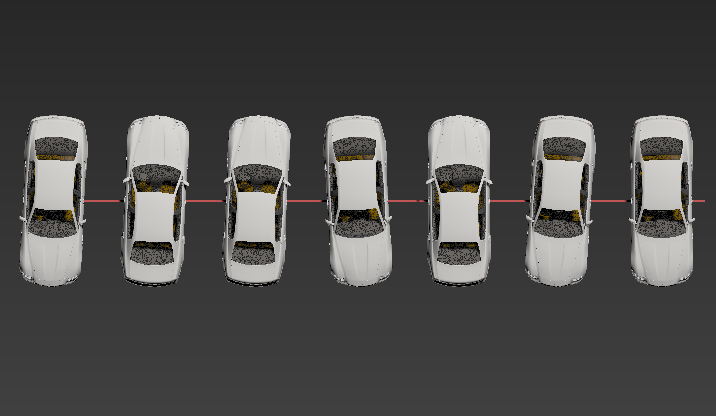 | Centre Displace = 50% Horizontal Mirror = On |
As you can see, the last option is probably the best for creating rows of believably randomised vehicle, it's the technique we'll use in the this tutorial. This will involve drawing splines through the centre of our parking spaces, but before we look at that we can add some further randomisation by creating colour variations.
Randomising materials
Scattering many makes and models of cars can created some nice randomisation, but being able to scatter cars in many different colour combinations allows us to get so much more from our limited assets, and really helps to disguise visible repetition. Most car models you buy can be easily adapted to use Forest Colour. Here's how you can go about doing this using our sample car.
- Open the Material Editor.
- Pick the multi-sub object material from the car using the material picker
![Parking Cars-image2015-11-4 16:3:1.png]() and identify the material that is used for the car's bodywork. In the example file it is called Car Paint.
and identify the material that is used for the car's bodywork. In the example file it is called Car Paint. - The current material uses a blend material, but for the sake of simplicity I'm going to change this to a VRayCarPaint material. (Other renderers will be different but it shouldn't matter what material type you use, the important part is that we're going to add Forest Colour maps to the slots that control the car's paint colour).
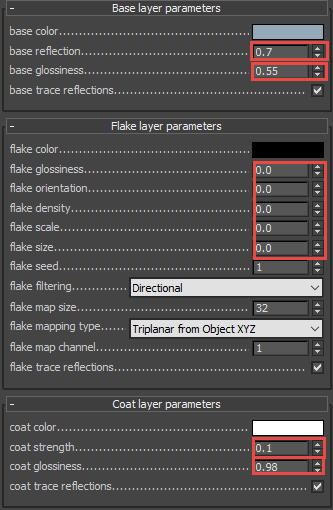
- This isn't a V-Ray tutorial so we'll quickly set up this material by changing the Base Reflection to 0.7 and and the Base Glossiness to 0.55. Set Coat Strength to 0.1 and Coat Glossiness to 0.98 and zero all the Flake Layer parameters, we won't see the effects from the distance we're rendering.
![Parking Cars-image2015-11-4 17:10:24.png]()
- Add a Falloff Map to the Base Color map slot and set the mode to Fresnel. Click on the first map slot and add a new Forest Colour map. We'll use this to randomise the colours.
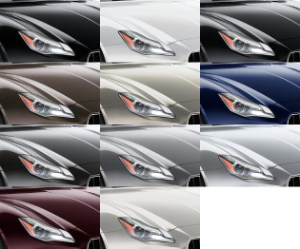
- According to Maserati's website, this model comes in 10 possible colours, of course it may not be that important for your visualisation how accurately you match the actual colours of the cars but we'll use these as a reference in this example. First lets load a reference image to sample colours from. Add a new bitmap and load maserati_colours.jpg. We'll pick colours from this map.
![Parking Cars-maserati_colours.jpg]()
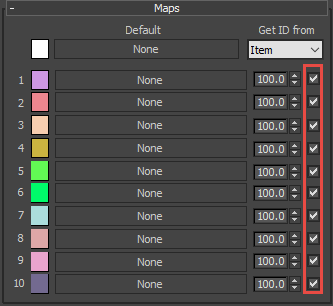
- Select the Forest Colour map created in step 5 and check all the map slots to enable them.
![Parking Cars-image2015-11-5 10:16:50.png]()
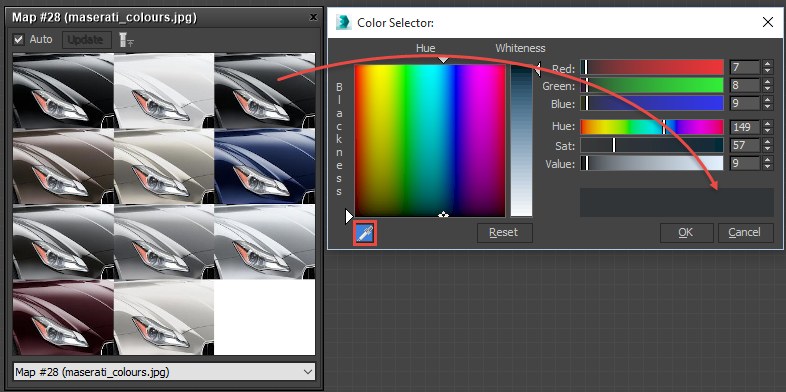
For each map slot, click on the colour swatch to open the Colour Selector. Click![Parking Cars-image2015-11-4 17:41:36.png]() to sample a paint colour from the reference image. By the time you've finished you should have 10 colour samples.
to sample a paint colour from the reference image. By the time you've finished you should have 10 colour samples.
![Parking Cars-image2015-11-4 17:44:59.png]()
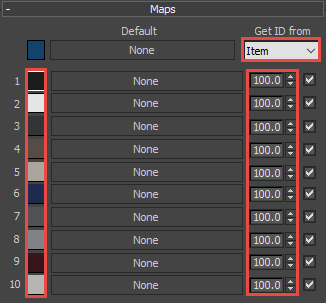
- Change get Item ID From to Item. This will generate a new random colour per car.
- You can also change the probability of a colour being selected using the percentage spinners to the right of the map slots. For example, if we want fewer white cars you would set the probability to a low value like 10%.
![Parking Cars-image2015-11-4 17:45:35.png]()
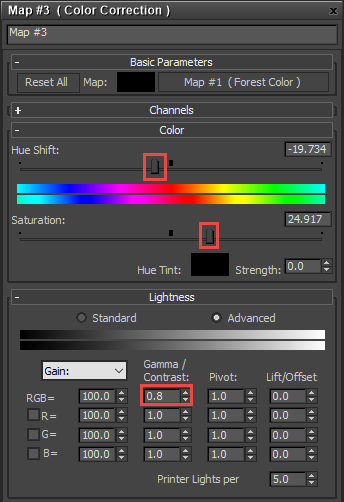
- Go back to the Falloff map and add a Colour Correct map to the second map slot. Instance the Forest Colour map into to the Colour Correct's input. This is the colour that will be seen at the grazing angles so we'll adjust it a bit to give the paint effect more "depth". Reduce the Lightness > Advanced > Gamma to 0.8, decrease the Hue Shift and increase Saturation.
![Parking Cars-image2015-11-5 11:13:5.png]()
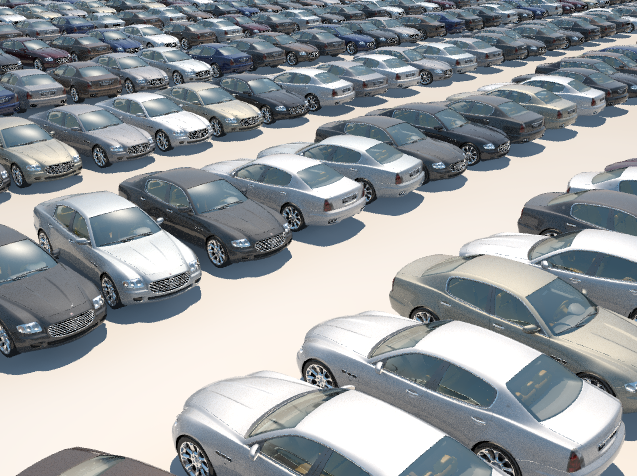
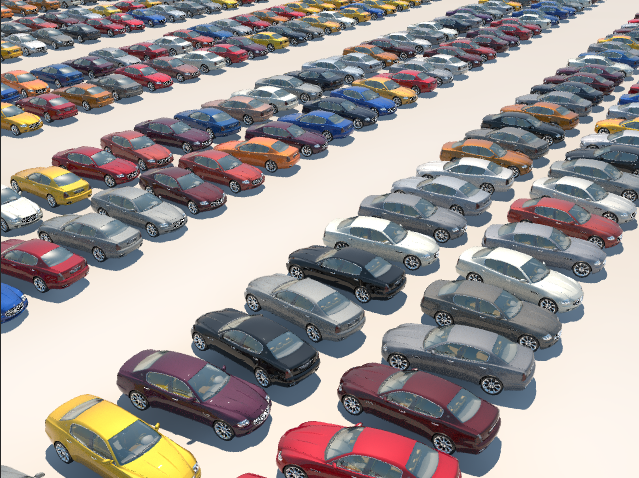
- To see the effects of a forest Colour map you'll need to add the Car object to a Forest Object. Click render and you now have a car with several randomised colour variations!
![Parking Cars-image2015-11-5 11:16:13.png]()
 to sample a paint colour from the reference image. By the time you've finished you should have 10 colour samples.
If you want to add more that 10 colour variations instead of using the slots in the Maps rollout you can choose instead to randomly select colours from a map. To do this follow these steps:
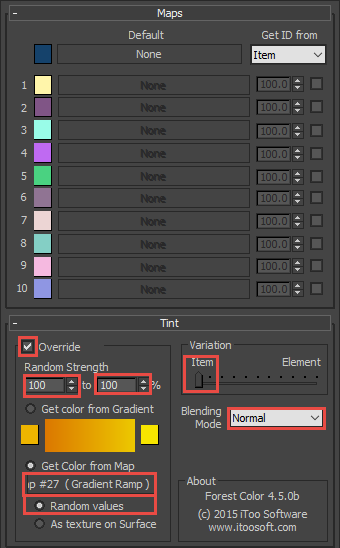
- Activate Tint > Override.
- Set Random Strength Min and Max to 100%.
- Check Get Color from Map and Random Values
- Change the Blending Mode to Normal, thismeans that the colours selected randomly from the map will completely replace anything in the Maps rollout.
![Parking Cars-image2015-11-4 17:26:41.png]()
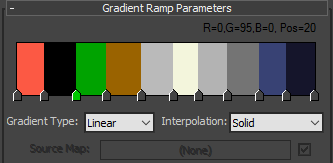
- Click on the Get Colour from Map map slot and add a Gradient Ramp.
- Set the Gradient Ramp's Interpolation to Solid, this will allow you to create a blocks of colour, once for each paint variation.
- Add a new Flag for each colour variation. The amount of space you give each colour determines the probability of it being selected.
![Parking Cars-image2015-11-4 17:34:37.png]()
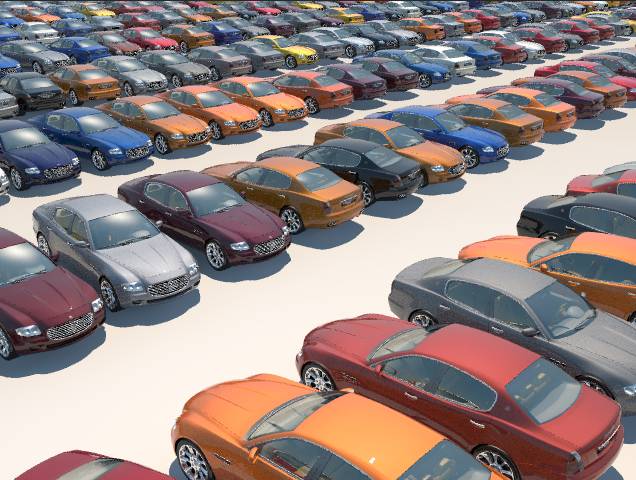
Alternatively you can create a swatch in an image editing package and use this as a colour source. Here is an example swatch used on the Audi A3 in the example scene, it allows only 10px x 10px for each colour variation.  . Below is the Maserati rendered using this colour map.
You will find other example swatches you can use in the downloads for this tutorial.
Now that the car model has been prepared we're ready to look at some different approaches you can use to distribute it.
Scattering using Areas
Before examining how to populate the car park shown in the scene file, I first wanted to mention a quick way of filling areas with cars using a grid-like patterns. This isn't much use if you have parking arrangements that are more complex, but for filling large areas like airport parking for aerial shots, this might be all you need. To do this you can use our built in or custom distribution patterns.
Forest Pack comes with a number of distribution patterns but you're not limited to using these options as you can easily create your own. To do that it's helpful to understand exactly how they work:
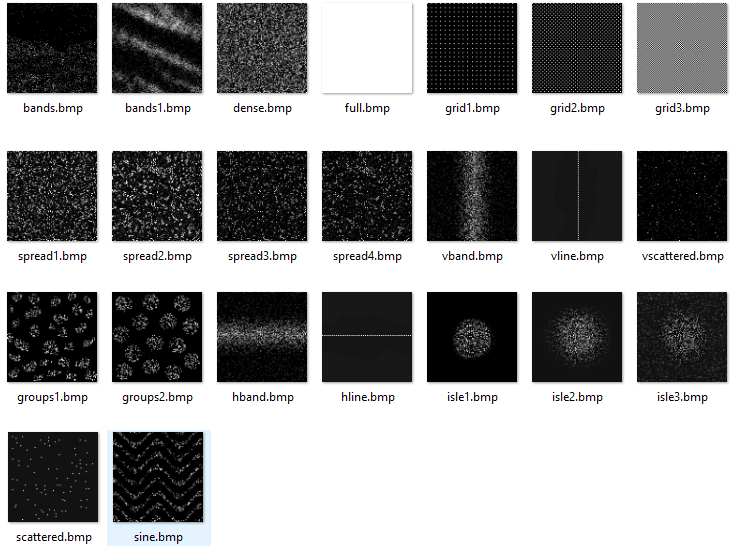
- In the Distribution rollout and click on the Bitmap slot. This will open the default directory where Forest Pack's built in maps are saved so we can take a look at them.
![Parking Cars-distribution maps.png]()
- The first thing you'll notice is that these maps are small - only 100 x 100 pixels. Each pixel represents a potential scattered object, if a pixel is white a scattered object is created, if it is black it is left empty. This means that although each map is only 100 pixels square, it actually has the potential to place 10,000 objects (100 x 100 = 10,000).
- Most of these are intended to create a chaotic distribution pattern but a few might be useful for distributing cars, for example the Full map has no black areas so it creates a dense grid of objects. By adjusting the Density X and Y units it is possible to create single rows of cars.
![Parking Cars-image2015-11-5 11:40:14.png]()
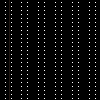
You might also find the Horizontal and Vertical rows and Grid patterns useful for these kinds of geometric layouts. - Alternatively you can create your own custom distribution maps. For example if we wanted a two row of cars with a space in between you could easily create a map like this with double columns of dots.
![Parking Cars-carmap.bmp]()
This creates a distribution of cars similar to found in large car parks. Just adjust the Density.> X and Y values to get the desired spacing.![Parking Cars-image2015-11-5 11:45:50.png]()
Scattering using Paths
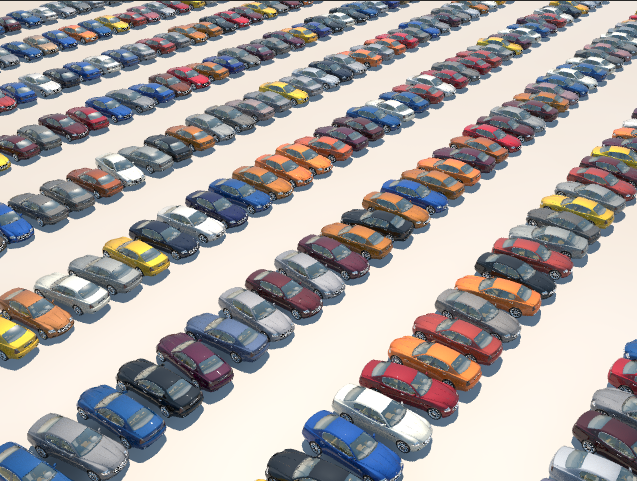
It's seldom the case that car parks are so conveniently arranged, aside from filling huge areas like airport parking it's not likely that these grid based patterns are going to work for your designs. Take the car park layout in the sample file for example, which is more horseshoe shaped in plan view.
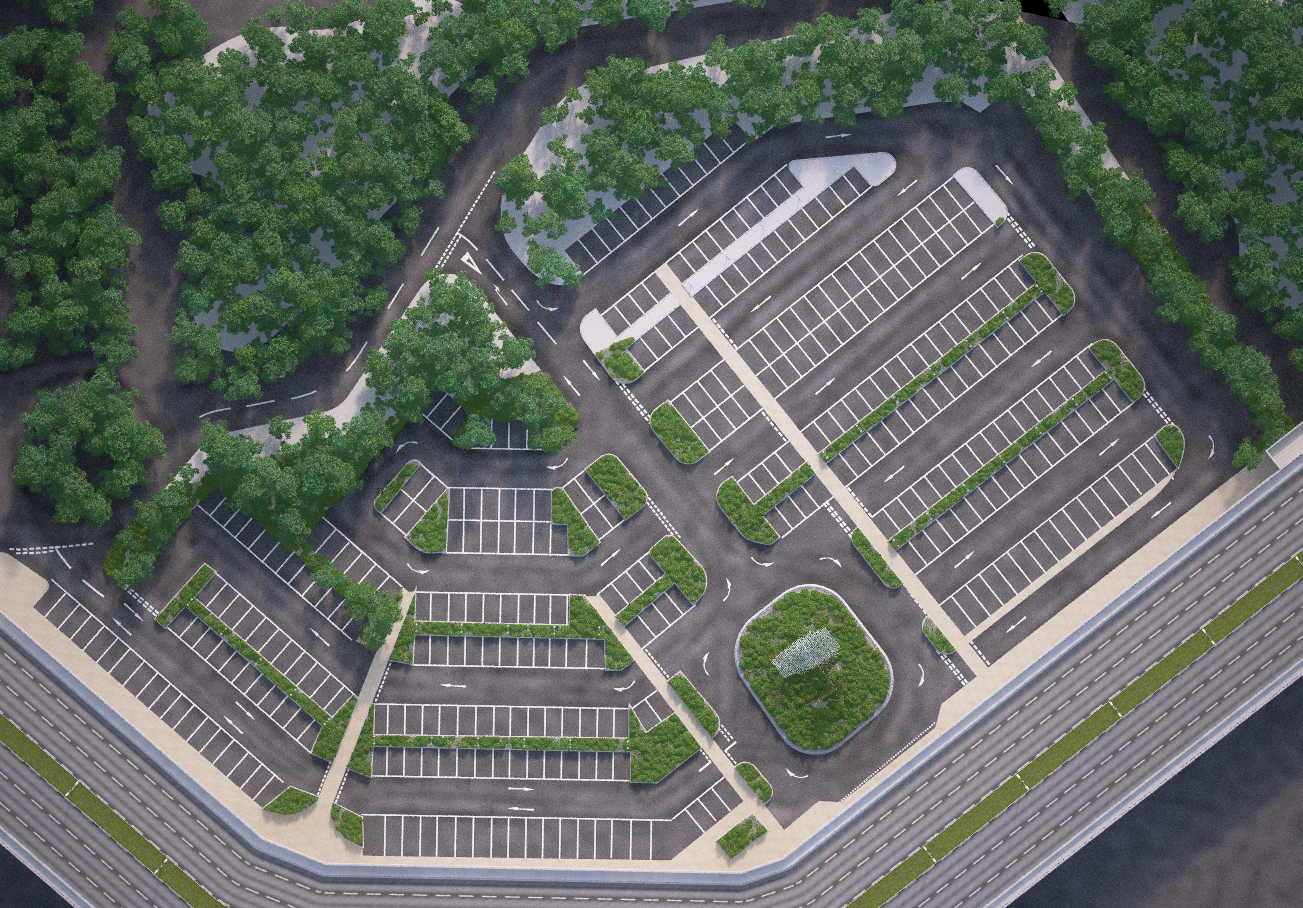
With layouts like this the easiest way to distribute cars is by positioning them along splines. In Forest pack you can do this using Tree Editor mode, and you have two options. You can either distribute objects at regularly spaced intervals, or you place them precisely on vertices. If your parking spaces are all exactly the same width then the fastest way to place the cars is using spacing mode. To do this, follow these steps:
- Open car_park_start.max.
- First we need to import the car model we prepared earlier into this scene. Whether you import it as a proxy, an XRef or simply merge it into the scene is up to you.
- To illustrate the technique I'll start with just a small area called Yellow parking lines that can be found to the left of the scene when in top view. It's 10 simple car parking spaces originally created using RailClone. We need to create a spline to place the cars in these parking bays, understanding how Forest Pack scatters along splines will help you to place them accurately.
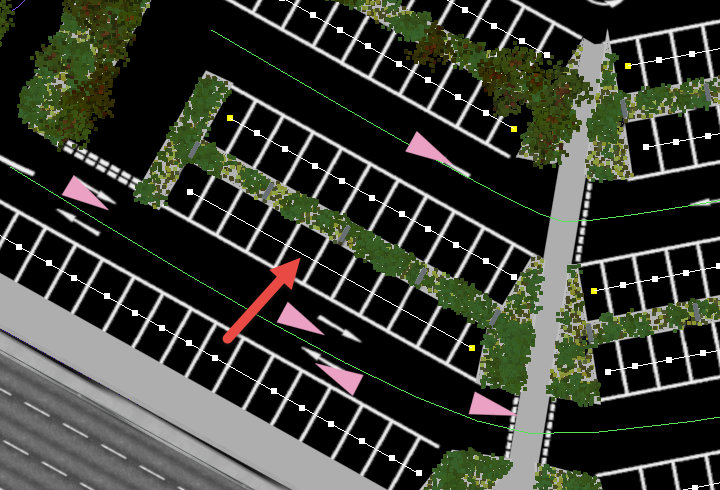
- The first object will be placed on the spline's first vertex and and regularly spaced intervals measured from that point along the spline. This means that a spline should be created so that it starts half way along the first parking space and finishes halfway along the last parking space. If you want to use the mirroring tip described earlier the spline should also be through the middle of the spaces vertically, not at the top or the bottom.
![Parking Cars-image2015-11-5 14:9:38.png]()
Next you need to know or measure the width of a single parking space - in this example it's 2.5m. - Create a new Forest Pack, go to the Geometry rollout and add the Car model.
- Go to the Tree Editor rollout and turn on Custom Edit mode.
![Parking Cars-image2015-11-5 14:21:40.png]()
- Scroll down to Creation tools. Click
![Parking Cars-image2015-11-5 14:23:5.png]() next to Along a Path and select the spline created in step 4.
next to Along a Path and select the spline created in step 4. - Activate Spacing and enter the width of a single parking space for the Distance
![Parking Cars-image2015-11-5 14:24:58.png]()
- Ensure follow Path is active so that the cars orientate to follow the path and click
![Parking Cars-image2015-11-5 14:26:50.png]()
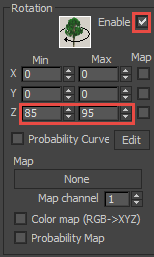
- You'll now have cars following the path, but they need to be rotated. To do this go to the transform rollout, activate Rotation and enter a value of 85 degrees for Min > Z and 95 degrees for Max > Z. The deviation either side of 90 gives you a little rotation randomisation to improve realism.
![Parking Cars-image2015-11-5 15:42:14.png]()
- The cars are now rotated correctly but they're all facing the same way. To randomly flip them over the spline turn on Enable Horizontal Mirror found at the bottom of the Transform rollout.
![Parking Cars-image2015-11-5 16:1:27.png]()
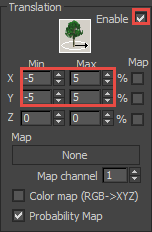
- Finally, add a little position variation by turning on Translation and setting the Minimum values for the X and Y axis to -5 and the Maximum values to 5. Be aware that translation takes place in world space so smaller values work best.
![Parking Cars-image2015-11-5 17:7:1.png]()


 next to Along a Path and select the spline created in step 4.

In some cases car parking spaces are not all the same size perhaps for example because they're a mixture of standard, mother and child, or disabled spaces. So another option to ensure that the cars are placed accurately in the bays is to add additional vertices to the splines and then place a car at each vertex. To illustrate this we'll add a few vertices to the existing splines in the Car Park scene.
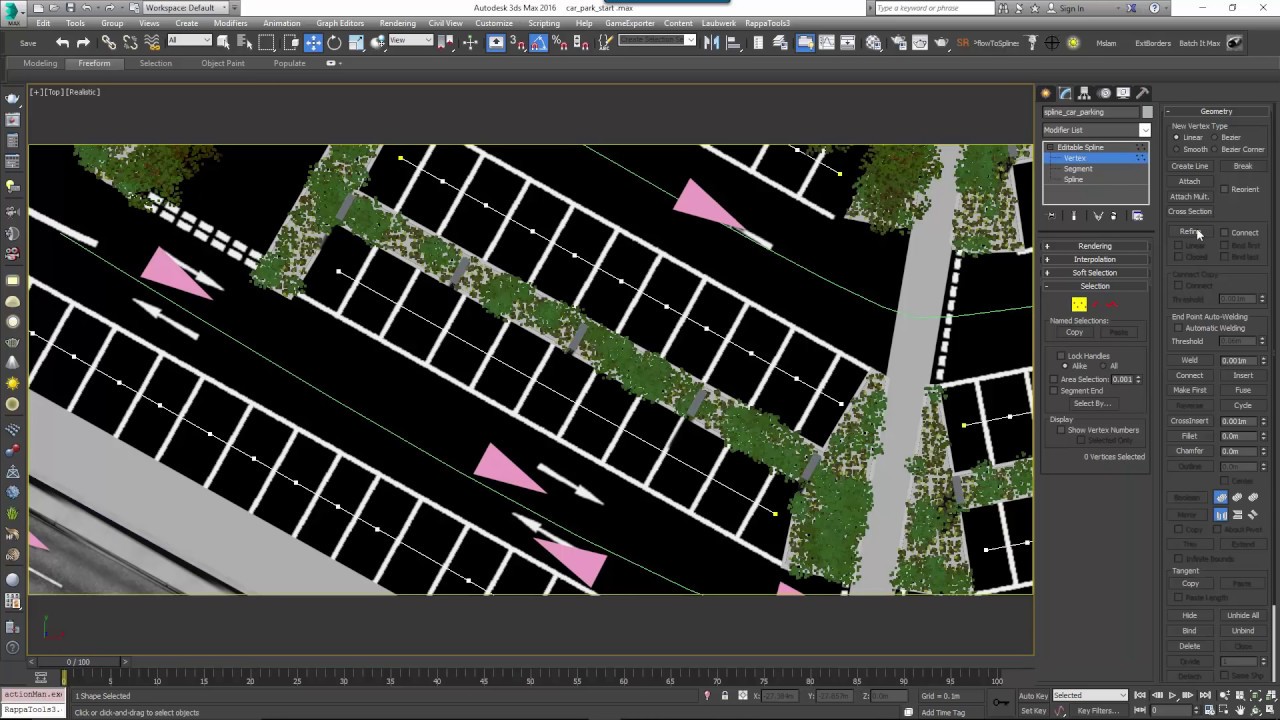
- With car_park_start.max still open, select spline_car_parking.
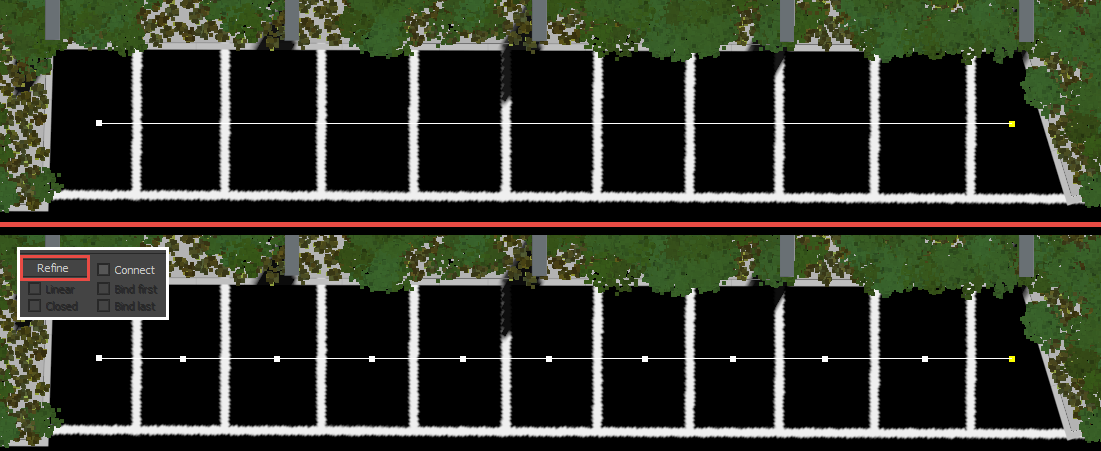
- Go to vertex sub-object mode and find the spline without any vertices to mark parking bays
![Parking Cars-image2015-11-5 16:13:51.png]()
- Select the Refine tool and click in the middle of each parking bay to add a vertex
![Parking Cars-image2015-11-5 16:16:8.png]()
- Select the cars Forest Pack object and go to the Tree Editor rollout. Click the Along Path spline picker and select spline_car_parking.
- Change the Mode to In Vertex positions.
- Click
![Parking Cars-image2015-11-5 14:26:50.png]() . You'll now have cars in all the parking bays. Now lets randomly add some spaces.
. You'll now have cars in all the parking bays. Now lets randomly add some spaces. - Go to the Geometry rollout and click
![Parking Cars-image2015-11-5 16:20:52.png]() to add a new geometry item. Change the properties to Disabled. This will prevent the geometry from showing but it will still be used when calculating distribution, creating gaps.
to add a new geometry item. Change the properties to Disabled. This will prevent the geometry from showing but it will still be used when calculating distribution, creating gaps. - To change the number of gaps you can edit the Probability values of the car and space objects.
![Parking Cars-spaces.png]()
- To update the scatter and see the changes click
![Parking Cars-image2015-11-5 14:26:50.png]() in the Tree Editor rollout. To get variations, just keep clicking Create.
in the Tree Editor rollout. To get variations, just keep clicking Create.
 to add a new geometry item. Change the properties to Disabled. This will prevent the geometry from showing but it will still be used when calculating distribution, creating gaps.
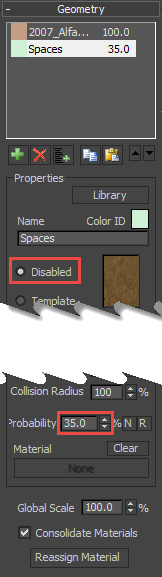
Now we've places all our parked cars, let's add some traffic to the roads.
Scattering on Markers Using RailClone
For more sophisticated layouts you may want to use markers. These could be imported from CAD data or created in 3ds Max using other tools. In this example I'm going to demonstrate using RailClone to create traffic markers that Forest Pack can then use to place vehicles. This will give you the advanced spline based arrays of RailClone coupled with the material management advantages of Forest Pack. I'm not going to go into how the RailClone object is created in this tutorial but the style is included if you're a RailClone user and you'd like to examine how it works. The important thing is that the RailClone object's Display mode is set to Mesh and that markers are triangles that have a definite direction.
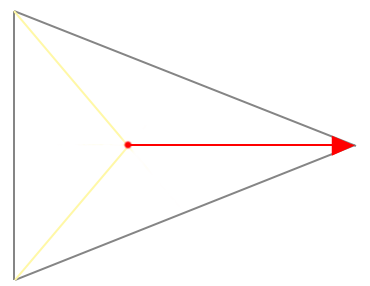
Alignment is calculated using a vector calculated from the center to the farthest vertex.
There are already some markers set up in the scene for the car park, we'll illustrate how this was done by adding markers to the overpass.To do this follow these steps:
- Select RC_markers_overpass
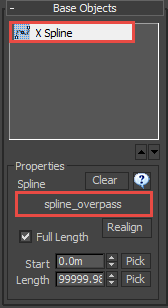
- Open the Base Objects rollout, click X Spline and assign spline_overpass as a path.
![Parking Cars-image2015-11-5 16:55:4.png]()
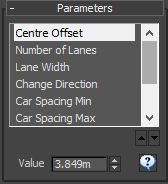
- This RailClone style has a number of values accessible from the parameters rollout so that you can use it easily without having to understand the graph.
![Parking Cars-image2015-11-5 16:55:33.png]()
First lets increase the centre offset value until the triangles are in the first lane on each side. - Change Number of Lanes to 3.
- Increase the Lane Width value until the triangles are placed correctly in the remaining two lanes.
- If you want to edit the style further you can use Change Direction to flip the direction the cars are travelling, change Car Spacing to change the distance between vehicles and add some side to side randomisation with Lane Wiggle.
- With all our markers set up, let's use them to place the cars. To do this duplicate the existing cars Forest Pack object and rename it fp_traffic.
- In the Geometry rollout, delete the object that is being used to create empty spaces. We want a car on every marker.
- Go to the Transform rollout and turn off Translation and Rotation and Enable Horizontal Mirror as the alignment will also be handled by the markers.
- Go to the Tree Editor Rollout > Reference Objects and click Select Objects. Pick the 3 RailClone marker objects in the scene and click Create
![Parking Cars-image2015-11-5 16:42:44.png]()
- Change Distribute mode to Face Centers, and ensure that Alignment is turned on
- Click
![Parking Cars-image2015-11-5 16:44:48.png]() and a car will now be places on each marker!
and a car will now be places on each marker!

 and a car will now be places on each marker!
Editing individual cars
Once you've scattered all your cars, you still might want to make some manual adjustments. Fortunately this is easy in Forest's Tree Editor mode.
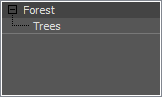
- To edit individual objects, click on
![Parking Cars-image2015-11-5 16:50:32.png]() or select the Trees sub-object level
or select the Trees sub-object level
![Parking Cars-image2015-11-5 16:50:58.png]()
- Individual objects can now be moved, rotated, scaled, and cloned just like regular objects.
- To randomly select a different car model you can click
![Parking Cars-image2015-11-5 16:57:27.png]() .
. - You can also re-seed random values like transform randomisation and colour, click
![Parking Cars-image2015-11-5 16:58:17.png]() .
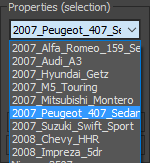
. - To change an object to a specific item, use the Properties drop-down list
![Parking Cars-image2015-11-5 16:59:18.png]()
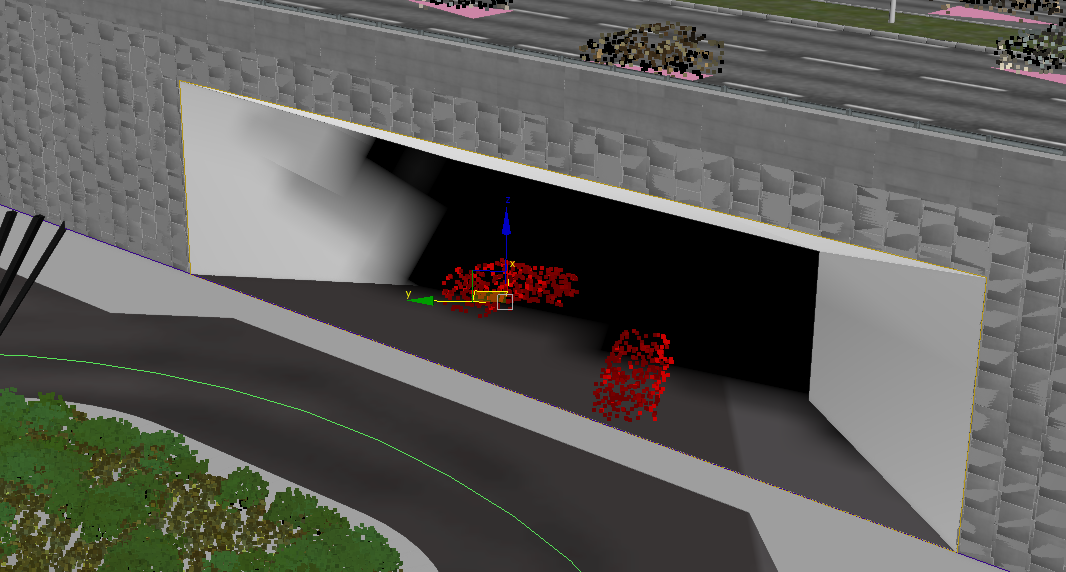
- And finally to add new Cars use the
![Parking Cars-image2015-11-5 17:0:4.png]() button and click in the scene. You can either randomly assign an item or specify which one to add using the Properties drop-down list. We can use these tools and simply click to add two new cars under the bridge.
button and click in the scene. You can either randomly assign an item or specify which one to add using the Properties drop-down list. We can use these tools and simply click to add two new cars under the bridge.
![Parking Cars-image2015-11-5 17:2:40.png]()
 or select the Trees sub-object level
 .
. .
.
 button and click in the scene. You can either randomly assign an item or specify which one to add using the Properties drop-down list. We can use these tools and simply click to add two new cars under the bridge.
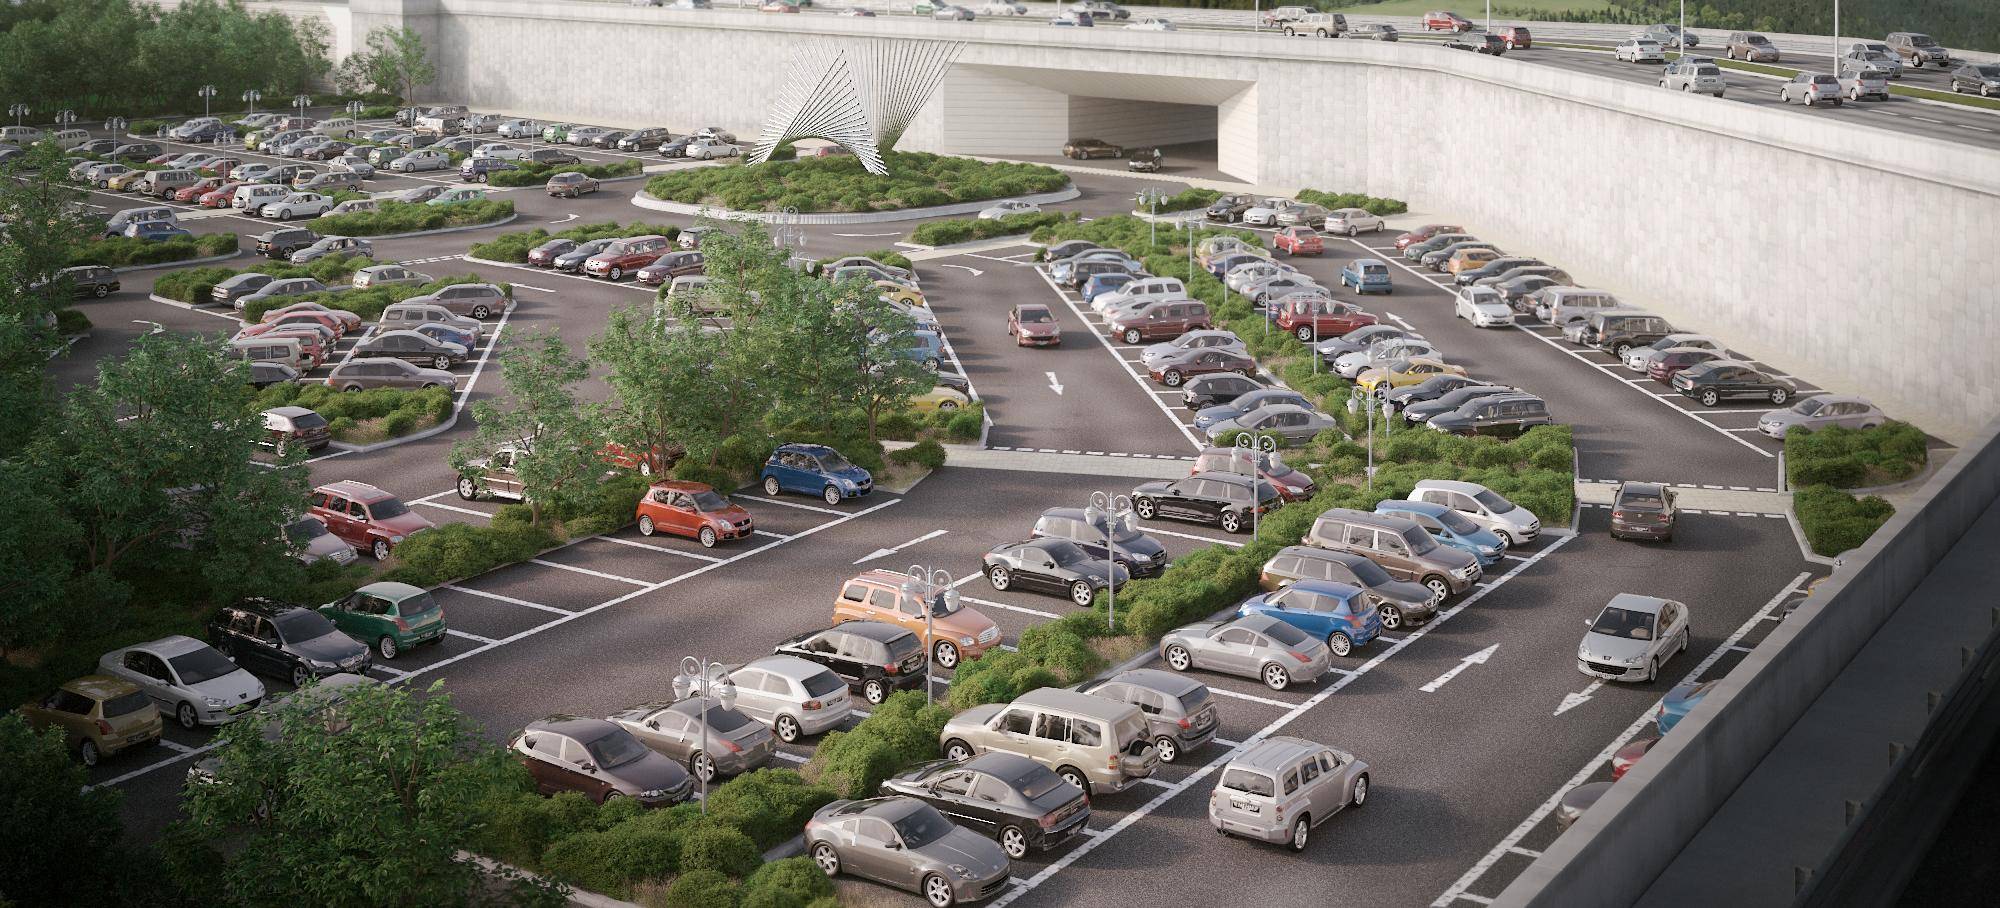
That concludes the tutorial, select the camera and hit render to see the finished effect!
Conclusion
In this tutorial we've covered many tricks for adding cars to your scenes, including a detailed look at some of the tools in tree editor mode. I hope that as well as this application you will be able to find many other uses for these tools and if you create an interesting project using these techniques, please feel free to share it on our forum. Keep an eye on our site and social media for even more Forest Pack and RailClone training coming soon and for more information about the features demonstrated in this tutorial, check out our reference section or visit the tutorials page for more Tips & Tricks videos and in-depth tutorials.