Resources
Requirements
- info 3DS Max 2011, RailClone Pro 2.1

Introduction
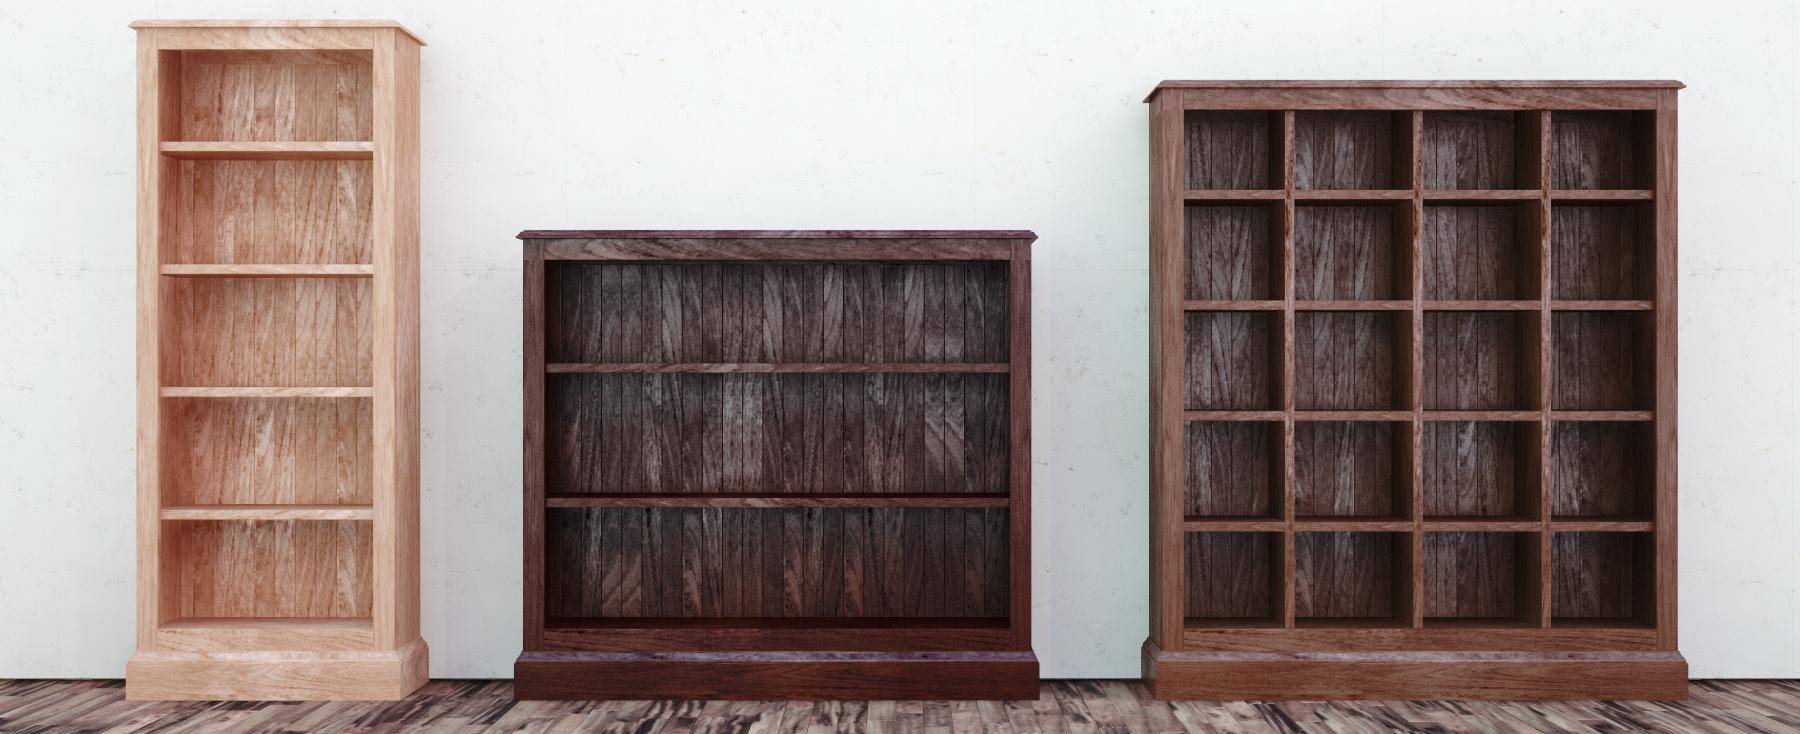
In this Tips&Tricks tutorial we look at how RailClone can be used to create procedural furniture. Anything with a regularly repeating pattern or that features modularity as part of its construction is an ideal candidate for a RailClone style. Instead of needing a library of bookshelves in various sizes, creating procedural furniture will allow you to generate a model with any dimensions that fits the scene exactly, and with very little effort. The image below shows the style created in this tutorial in 3 different configurations.
By completing this tutorial you will be able to:
- Use all the segment inputs of the A2S generator.
- Export parameters for easy adjustment from the modify panel.
- Use the mirror operator.
- Use multiple generators.
- Create procedural book shelves and cabinets.
Preparing the geometry
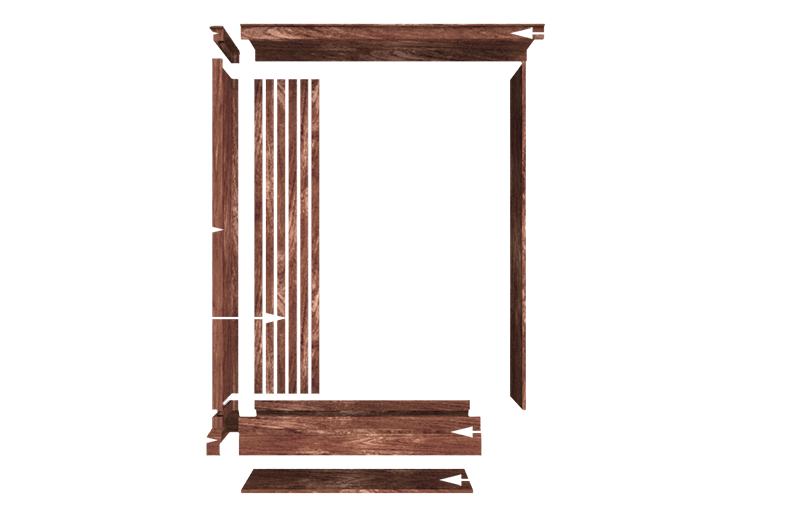
The bookcase geometry has been broken down so that it can be easily reconstructed using RailClone's A2S array. To make building the style easier, the pivots have all been aligned on the Z axis.
The A2S generator creates rows and columns of segments with the ability to target elements of the perimeter and regularly spaced vertical and horizontal lines. The image below demonstrates how this bookcase has been decomposed into individual repeatable segments.
It's important to remember when modelling for A2S arrays that the height of an individual row will be determined by the tallest segment in that row. If using segments with uneven heights, it is possible that gaps may appear in the array. If you need to use segments of uneven heights, as in this style, the easiest solution is to split the style up across several generators.
Creating the style.
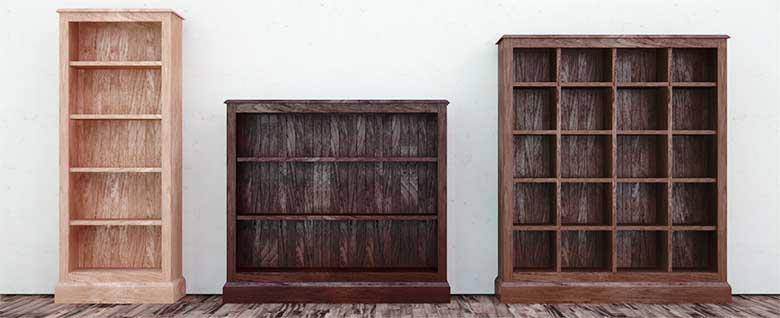
Click to enlarge
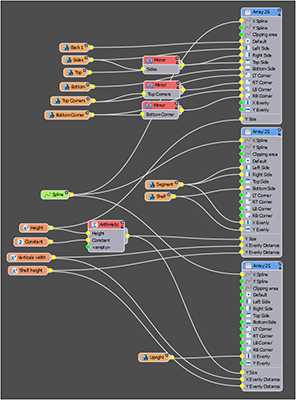
To make creating this style more efficient we'll create three different generators: one for the carcass, one for the shelves, and a third for the vertical separators.
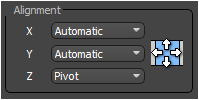
To save time the segments have already been added to a style and the first generator has been created. All the segments' Properties>Alignment>Z values have been set to Pivot to ensure the segments align correctly.
Step 1. Create the Carcass:
- Select RC_shelf_unit from the scene and open the style editor.
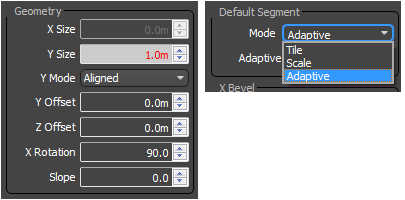
- Select the A2S Generator, set the Rules>Default Segment>Mode to Adaptive and the General>X Rotation value to 90 degrees.
![Creating parametric shelving-segmentSetAdaptive2.png]()
- Create a new Spline object and wire it to the generator's X Spline input. From the spline node's properties pick SPL_shelf from the scene.
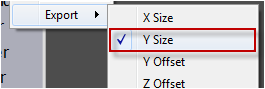
- Right click on the generator and go to Export>Y Size. Connect the Y Size input to a new Numeric parameter. Set the Properties>Type to Scene Units and the value to 1.7m from the Parameters rollout in the modify panel.
![Creating parametric shelving-exportYsize.png]()
- Connect the Top segment to the Top input of the generator.
- Connect the Bottom segment to the Bottom input of the generator
- Connect the Sides segment to the Left input of the generator.
- To add the right side, create a new Mirror operator and connect the Sides segment. Wire the Mirror operator to the Right input of the generator.
- Wire the Top Corners segment to the Left Top (LT) input. As in the previous step, add a new mirror operator, connect to the Top Corners segment and the Top Right (RT) input.
- Wire the Bottom Corners segment to the Left Bottom (LB) input. Connect the same segment to the Right Bottom (RB) input via a new Mirror operator.
- Finally to add a back to the bookcase, wire the segment named Back 1 to the Default input.
The carcass in now complete, the dimensions can be easily controlled by changing the base spline and the height parameter, in the next step we'll add adjustable shelves.
Step 2. Add the Shelves:
- Clone the existing generator by selecting it and pressing CTRL+C to copy and CTRL+V to paste. Clear all the inputs except the X Spline and Y Size.
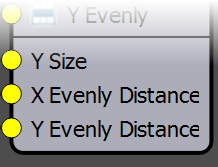
- Right click on the new generator and go to Export>X Evenly Distance and Y Evenly Distance.
![Creating parametric shelving-exportYXEvenly.png]()
- Wire a new Numeric parameter to the X Evenly Distance input. Name it Verticals Width, Set the Type to Scene Units and assign a value of 0.5m from the Parameters rollout.
- Create a second Numeric node called Shelf Height. Wire this to the Y Evenly Distance input and set the value to 0.35m.
- Attach the segment named Shelf to the Y Evenly and Bottom inputs of the second generator.
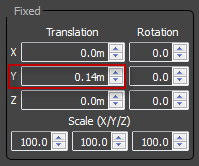
- You will see that because of the plinth, the bottom shelf is too low. To fix this, select the shelf segment and set the Properties>Transform>Fixed>Translation>Y value to 0.14m
![Creating parametric shelving-fixedYtransform.png]()
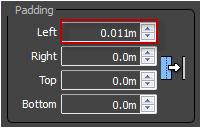
- The shelves are now done but we may wish to leave a space to accommodate the vertical separators. To do this simply add a new empty segment to the X Evenly input and set the Left Padding to 0.11m . To push the shelves away from the sides to ensure there are no coplanar polygons, wire the same segment to the Left and Right inputs.
![Creating parametric shelving-set padding.png]()
The shelves are in place. We'll add the vertical elements using another generator. This is being done to avoid the vertical element's height being restricted by the thickness of the shelves. If We'd created them as part of the previous style there would be significantly more segments, a higher polygon count, and a little more difficulty using a seamless texture.
Step 3. Create the Verticals:
- Copy and paste the generator created in the previous step and detach all the segments.
- Attach the Upright segment to the X Evenly input. You should have vertical divisions filling in the spaces in the shelves created in the previous step.
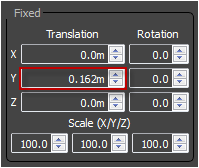
- Change the Upright segment's Properties>Transform>Fixed>Translation>Y value to 0.162m so that the segments sit neatly on the bottom shelf.
![Creating parametric shelving-upright translation.png]()
- Because the shelves and segments have been moved up the height is now incorrect. To fix this create a new Constant and a new Arithmetic operator and set the mode of the latter to Subtract. Wire the Height parameter and new Constant parameter to the Arithmetic node, in that order, and then connect the Arithmetic node to the shelf and verticals generators' Y Size inputs.
- Adjusting the Constant value will now allow us to reduce the height for the shelves independently of the carcass, a value of 0.182m works well.
Conclusion
The completed style can be used to create a bookshelf of any width and height with easily accessible control of shelf height and spacing. The same principles can easily be applied to other shelving styles as well as a huge range of other furniture. Stay tuned for future tutorials including creating books and other objects to populate shelves, for more information about many aspects of RailClone's features please see our reference section or visit the tutorials page for more Tips&Tricks videos as well as in-depth tutorials.