Resources

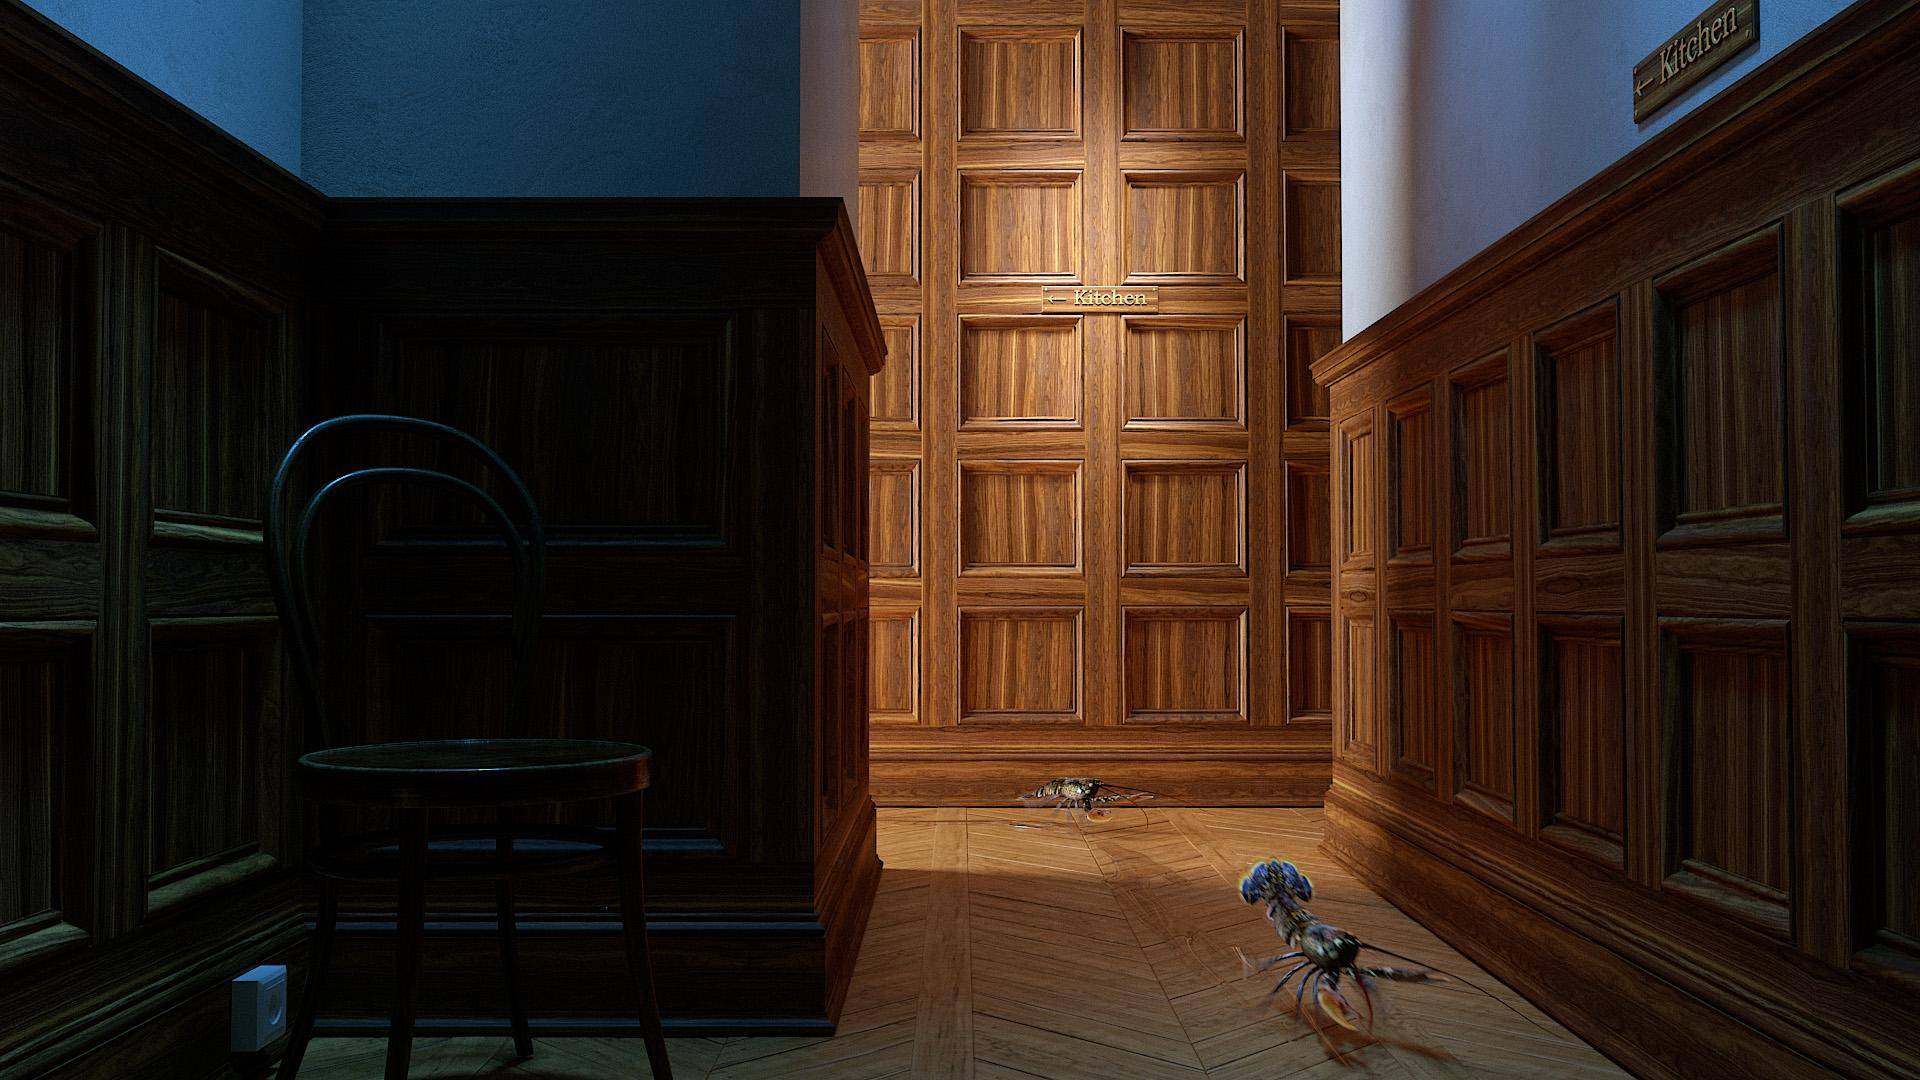
Welcome to the latest instalment of our regular tips and tricks episodes, this week we'll look at a technique for creating wooden panelling, or wainscoting. Along the way we'll learn how to combine multiple generators that fit together seamlessly, as well as the mysterious delights of using null segments and expressions!
You'll also lean how easy it is to use RailClone to automatically box map geometry and then randomise the UVW offsets and rotation to create variation in the textures. These feature are currently only supported by V-Ray while maintaining instancing. Other renderers can use these features by disabling the instancing engine.
By completing this tutorial you will be able to:
- Combine multiple generators to create a single unified object.
- Export the size of segments and use them in equations.
- Randomise UVW offset of segments to create texture variations.
- Use expressions and system variables.
- Use Null segments to create gaps in an array.
The Principles.
How the A2S Generator works
Our wooden panelling style is going to have an adjustable height, so we'll be using the A2S generator which is used to create two dimensional arrays. Before we dive in though, it is important to understand a little about how the array is built and a few of its limitations.
The best way to understand the A2S generator is to think of each row as a separate one dimensional array, each once stacked on top of another, but all still essentially independent. This understanding is essential if you want to create geometry to populate an array that is intended to fit together perfectly without leaving any gaps.There are two golden rules to consider when modelling of designing styles that work with the A2S Generator.
Rule 1: Segments can be any X length
If each Row is a separate one dimensional array that is calculated independently, there's no problem at all with using segments with unequal sizes on the X axis. Adjacent segments in the same row will simply move along the array to accommodate any size of geometry. Rows above and below remain unaffected and no gaps appear.
Rule 2: To avoid gaps, Segments should have the same Y size
This is the important one. Because the A2S array is a stack of L1S generators, if you use Segments with unequal sizes on the Y axis in a row, the overall height of that row is determined by the tallest segment. The row directly above will be positioned after the tallest segment and if the heights of segments differ, gaps will appear.
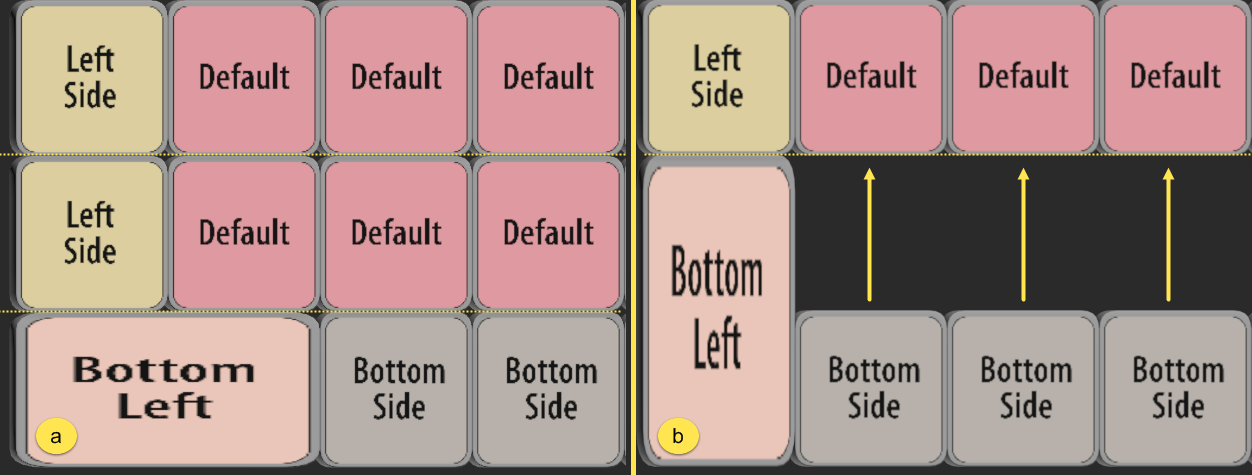
a. The corner segment has been scaled to twice it's normal width, adjacent segments in the same row adjust automatically an no gaps appear | b. The corner segment has been scaled to twice it's normal height, the row above moves to accommodate the largest size and gaps appear in the array.
Therefore if we want to create an array similar to our panelling, where the uprights are continuous between the top and bottom, but there are several panels in between, we split the array into 2 generators: one for the frame, with verticals that extend the full height of the array; and a second generator to fill the remaining gaps with the panels.
Creating Gaps with Null segments
Which brings me to a second point. Sometimes we need to create gaps in the array deliberately. In this example, a 2nd generator that adds the panels needs to have spaces left for the frame to fit into. To create spaces in the array you can add a Segment node, but not select any geometry. The Fixed Size parameters of these segments can then be adjusted to determine the size of the space, whereupon the empty segment will more or less behave exactly as though there was geometry present. We'll use this trick in this tutorial to make sure the two generators fit together as though they were one.
Practice
Creating the frame
Let's start by creating the frame.
- Create a new RailClone object in the scene and open the Style Editor.
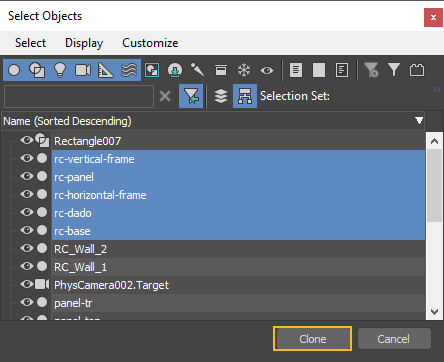
- We need to import all the segments for this style. Instead of doing this one-by-one we can save a little time and use the batch importer. To do this, first create a segment, then right-click and select Clone Multiple. This option will allow you to create multiple segments from objects in the scene in just a couple of clicks.
- When the Select Objects window opens, pick rc-panel, rc-horizontal-frame, rc-base, rc-vertical-frame, and rc-dado and then click Clone.
![Creating Panelling and Wainscoting-image2017-2-20 11:37:9.png]()
Five new segments will now be created, one for each selected object. You can delete the original. - Now create a new A2S Generator. Change the Default mode to Scale. This will scale a single segment from start to end, or between corners and evenly segments if they are present.
- We'll drive the X size of the panelling with a spline, and the Y size with a numeric value, so create a new Spline node and wire it to the X Spline input. Pick a spline from the scene.
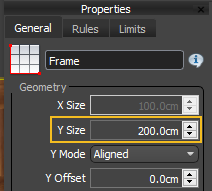
- To set the Y Size of the array we'll go to the Generator's settings and increase the Y Size value to 200cm. Later on in this tutorial we'll automatically calculate this height based on the number of panels in the array.
![Creating Panelling and Wainscoting-image2017-2-20 12:37:3.png]()
- Attach the rc-base segment to the Bottom input, and the rc_dado Segment to the Top input.
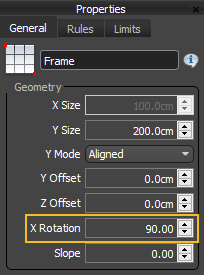
- At this point you'll notice that the array is being built on the X/Y plane. The array needs to be rotated so that it is vertical. To do this change the generator's X Rotation property to 90 degrees.
![Creating Panelling and Wainscoting-image2017-2-20 12:49:3.png]()
- We have a top and bottom, now we need to fill in the vertical sections and scale them so that they fit in between. There isn't an automatic scaling mode for the Y axis, but we can create one with some simple maths. To find the height of the segment we just need the Y size of the array, and then subtract the height of the top and bottom segments. We are going to control a segment's parameters with an expression, so first of all we need to add a Transform operator. This is because, in most cases, you can't wire an expression directly to a segment's parameters.
- Wire the Transform operator to the Left, Right and X Evenly inputs. Wire the rc-vertical-frame segment to the Transform node.
- Right click on the Transform operator and export the Y Fixed Size property. Don't forget to tick Fixed Size in the Transform Node's settings to enable it.
- We're going to control the height of this segment with an expression, so wire a new Arithmetic operator to the Y Fixed Size parameter.
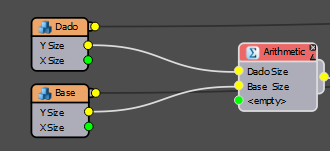
- Before we create the expression we need to know the height of the Top and Bottom segments. To automatically derive these values from the geometry's bounding box , right-click on each of the two segments and click Export Attributes > Size > Y. While you are here export the X size as well - we'll need it later on in the style.
- Wire the Y size of the rc-dado and rc-base segment's to the Arithmetic operator.
![Creating Panelling and Wainscoting-image2017-2-21 16:40:10.png]()
- Select the Arithmetic node and change the mode to Expression. Click Edit Expression, and an editor opens that will allow you to enter a custom equation and gives you access to a few variables that aren't available elsewhere.
- In this case, as mentioned, we want to find the Y size of the array and then minus the height of the Top and Bottom segments. RailClone has a variable called YSplineLength that returns the size of the array. This works irrespective of whether or not the array's height is determined using a Spline or the Y Size parameter. To create the expression therefore we write.
YSplineLength-Input1-Input2
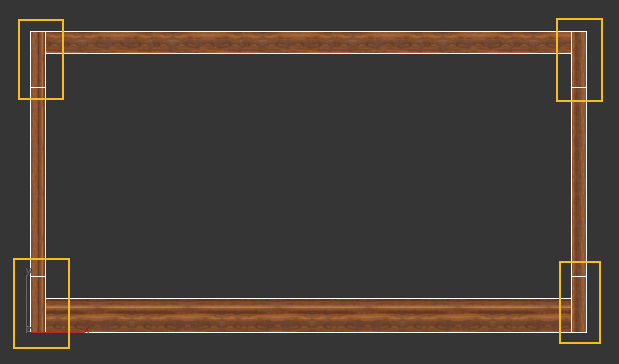
Input 1 and Input2 refer to the values connected to the arithmetic node's inputs which is the height of the top and bottoms segments! - The expression is complete but you'll notice that there is still an issue. There's a vertical frame segment in the corners of the array, interrupting the top and bottom. We'd like the top and bottom to run right through to the end.
![Creating Panelling and Wainscoting-image2017-2-21 17:11:21.png]()
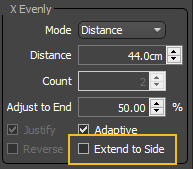
This is due to the rules that RC uses to construct the array. If there is not a segment connected to the RB,LB,LT, or LR Corner inputs then it uses the geometry in the Left or Right inputs instead. Fortunately that makes the solution pretty easy, to get rid of those problematic corners, just create a new segment but don't select any geometry. I call these Null segments, and they can be useful for all kinds of purposes. In this case it is to trick the array into thinking geometry is present in the corners, but later on we'll see how Null segments can be used to deliberately create spaces in the array. In that way multiple generators can jigsaw together to make a seamless style. - Likewise the X Evenly divisions shouldn't cut through the top and bottom, so to prevent this, select the Generator go to Rules > X-Evenly and turn off Extend to Side. When this is enabled the segment attached to the X Evenly input is also used in the bottom row. Leave this unchecked and no evenly segments are used the top or bottom rows, which is what we need for this style. While you're here, change the mode to Adaptive to make the spacing between evenly segments identical.
![Creating Panelling and Wainscoting-image2017-2-21 17:26:9.png]()
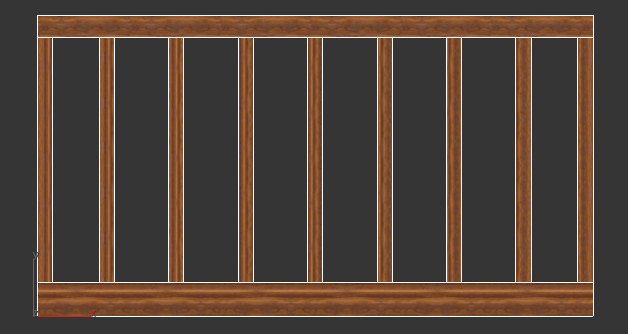
- Now the vertical segments will now scale perfectly between the rc-dado and the rc-base segments.
![Creating Panelling and Wainscoting-image2017-2-21 17:43:30.png]()
- At the moment the distance between the Evenly segments is set manually. Ideally the evenly distance would adjust automatically to the size of the panels. To do this select the generator and export the X Evenly Distance parameter.
- Now select the rc-panel segment and export the X and Y size attributes.
- Wire the rc-panel segment's X Size Attribute to the generator's X Evenly distance. The frame is now complete and final graph should look like this.
![Creating Panelling and Wainscoting-image2017-2-21 18:38:15.png]()

Filling the frame with panels
To fill in the gaps we'll use a second generator. The frame is already created so we'll need to create gaps in this new array. To do this we'll use more Null segments, by wiring their Fixed Size properties to the attributes of the frame segments we can create gaps in the array that are the exact same dimensions as the geometry.
- Clone the existing Generator and remove all but the corner inputs. This saves a bit of set-up time as most of the settings will be identical.
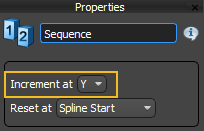
- To fill in the gaps we want to alternate between horizontal frames and panels. To create a repeating pattern like this you use a Sequence operator. Wire this to the Default input and change the mode so that the pattern increments on the Y axis.
![Creating Panelling and Wainscoting-image2017-2-21 18:51:15.png]()
- Wire the rc-horizontal-frame segment to the Sequence operator's first input, and wire the rc-panel segment to the second.
- That's all the geometry you need for this generator, but we need to make the gaps for the existing frame. To do this create create a new Segment, rename it Null and export the X and Y Fixed Size parameters. Wire this segment to the Left, Right and X Evenly inputs.
- Wire the rc-vertical-frame segment's X Size attribute to the Null segment's X Fixed Size input. Because this null segment is now the same size as the frame, gaps are created in the array and the panel fit correctly on the X Axis. Now let's take care of the Y axis.
- To create a gap for the base, clone the existing Null segment and wire the rc-base's X and Y Size attributes to the X and Y Fixed Size parameters. Wire the Null segment to the Bottom Side input. All the panels move into the correct position!
- Now do the same for the rc-dado segment. Clone another Null segment and wire the rc-dado X and Y Size attributes to the X and Y Fixed Size parameters. Wire this to the Top Size input. These two generators now interlock perfectly.
At the moment the array's size is set to an arbitrary value causing the topmost panel to be sliced. We'll change this so that the size of the array is automatically calculated to accommodate a specified number of panels.
- For both generators, export the Y Size property. In order that the two arrays perfectly match identical values must be used so we'll control them using the same nodes.
- Add a new Numeric node and name it # of panels. This will allow you to control the number of panels from the modify panel.
- Create a new Arithmetic node and change the mode to Multiply. Wire the Numeric node and the rc-panel segment's Y Size attribute to the inputs. This is calculating the size needed for a given number of panels.
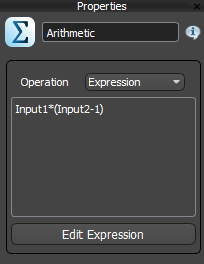
- Next we'll calculate the amount of space required for the horizontal frame elements. There is always one less of these that there are panels. To save creating loads of nodes we'll calculate this using an expression. Create a new Arithmetic node and wire the rc-horizontal-frame segment's Y size to the first input. Wire the # of panels node to the second input.
- Select the Arithmetic node and change the mode to Expression. Open the Expression Editor and enter Input1*(Input2-1). This is multiplying the Y size of the horizontal framing segment by the number of panels minus 1.
![Creating Panelling and Wainscoting-image2017-2-21 19:50:11.png]()
- Now we need to add the results of these two arithmetic nodes together along with the size of the base and the dado to determine the overall height of the array. To do this add another new Arithmetic operator and wire the two existing Arithmetic operators and the Y size of rc-base and rc-dado to its inputs. Wire the output of the new Arithmetic operator to the Y Size parameter of both generators.
Changing the number of panels will now update the height of the array, making sure that only whole panels are used. Also because we're not using any hard coded values, changing the size of the panel will also cause the height to adjust correctly.
Auto Box Mapping and Randomising UVWs
Because we're scaling geometry, the textures can become stretched too. To fix this, one solution is to use RailClone's automatic box mapping feature to create new UVWs for the segments. In addition, for more variety you can randomise the UVW offset and rotation so that each segment looks slightly different.
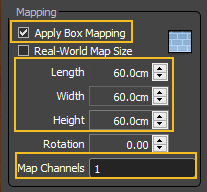
- To turn on automatic box mapping, select a segment, go to the Deform tab and turn on Mapping > Apply Box Mapping.
- Set a size for your box mapping. and if necessary a Rotation and Map Channel.
![Creating Panelling and Wainscoting-image2017-2-21 19:36:4.png]()
- It's as easy as that! The geometry is now has new UVW mapping applied after it has been scaled. Do the same thing for the other segments
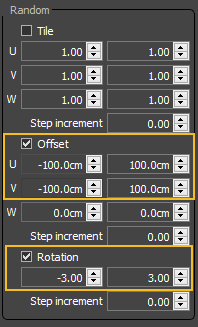
- If you'd also like to randomise the UVW position, apply a UVWXform operator between each segment and the generator.
- Go to the Random tab and enter Min and Max values for Offset and if desired Rotation.
![Creating Panelling and Wainscoting-image2017-2-21 19:37:52.png]()
The UVW Xform operator only works with V-Ray. To use these features with other renderers it is necessary to disable instancing by going to the Display rollout and unchecking Use Instancing Engine. Be aware that for styles that generate a lot of geometry turning off instancing can negatively affect memory usage.

Linking RailClone styles
If you are following along with the scene files, you may have noticed that the Panel geometry is also a RailClone object. This allows use to easily resize the panels to create an even more flexible style. At the moment though I have to swap between RC objects if I want to update the size and number of panels . Surely it would be better if they were all in the same place?
This can be done using 3DS Max's native wiring tools. We can just connect together the parameters of one RC object to the Parameters of another. If you've ever tried this you may have encountered an issue. The wiring tools do not display parameters added in RailClone's style editor. Thankfully there's an easy fix, just do the following:
- Turn on Autokey and for a parameters you'd like to connect add a frame of animation. It doesn't matter what the value is because these keyframes will be deleted.
- Turn off Autokey and delete the animation frames.
- Do the same thing for all the parameters you'd like to wire together.
- Now if you right on the RailClone Objects and to to the Wire settings you'll see that the parameters are exposed and can be connected together.
This is a great ways for connecting together RailClone styles and the best thing of all is that now the RailClone panel object can be deleted. It's still stored inside the other RailClone object and the wiring still works!
Reuse Styles
In this tutorial we demonstrated how to create a wainscoting style with verticals that stretch unbroken from the top to the bottom of the array. These techniques are not limited to panelling though, the same style can be easily used for other objects that have the same requirements, at any scale. For example, if we use the same style but substitute the existing segments for these new ones...
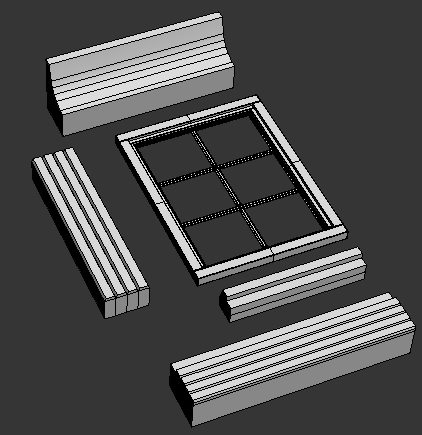
... then we can create a kind of neoclassical facade with an adjustable number of floors.
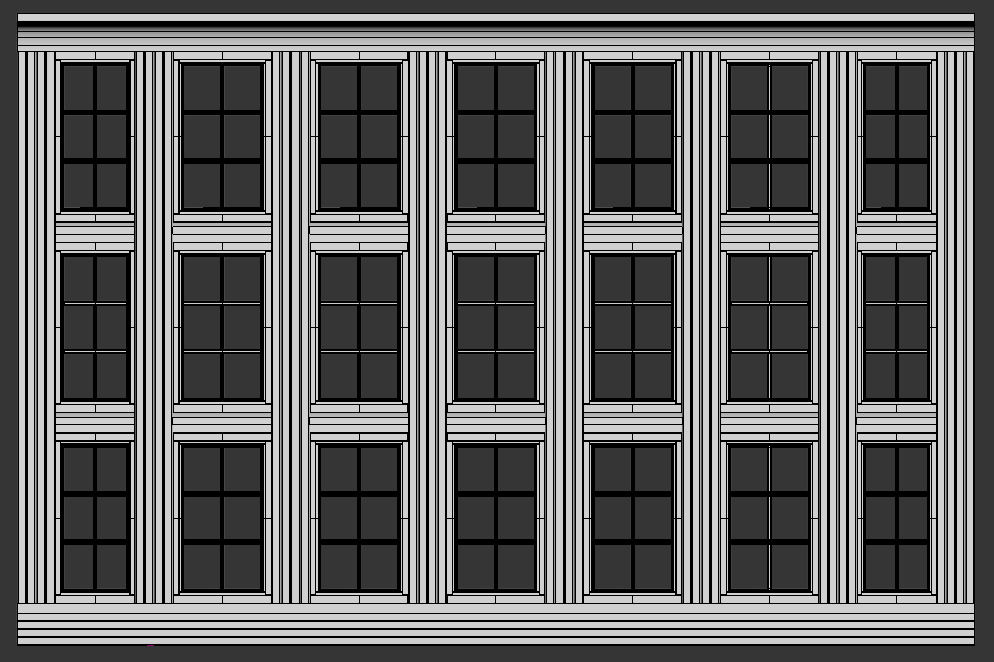
We created the original style using exported attributes combined with equations to set all the various attributes of the array, so as you can see it's easy to just swap the geometry and everything updates automatically. It's always a good idea wherever possible to make RailClone styles so that they can be easily reused. If you find alternative uses for this style, we'd love to see them on our forum. Otherwise, stay tuned for our next tips and tricks instalment and check out our other videos in the tutorials section of the website.