Resources
Requirements
- info 3DS Max 2011, RailClone 2.x
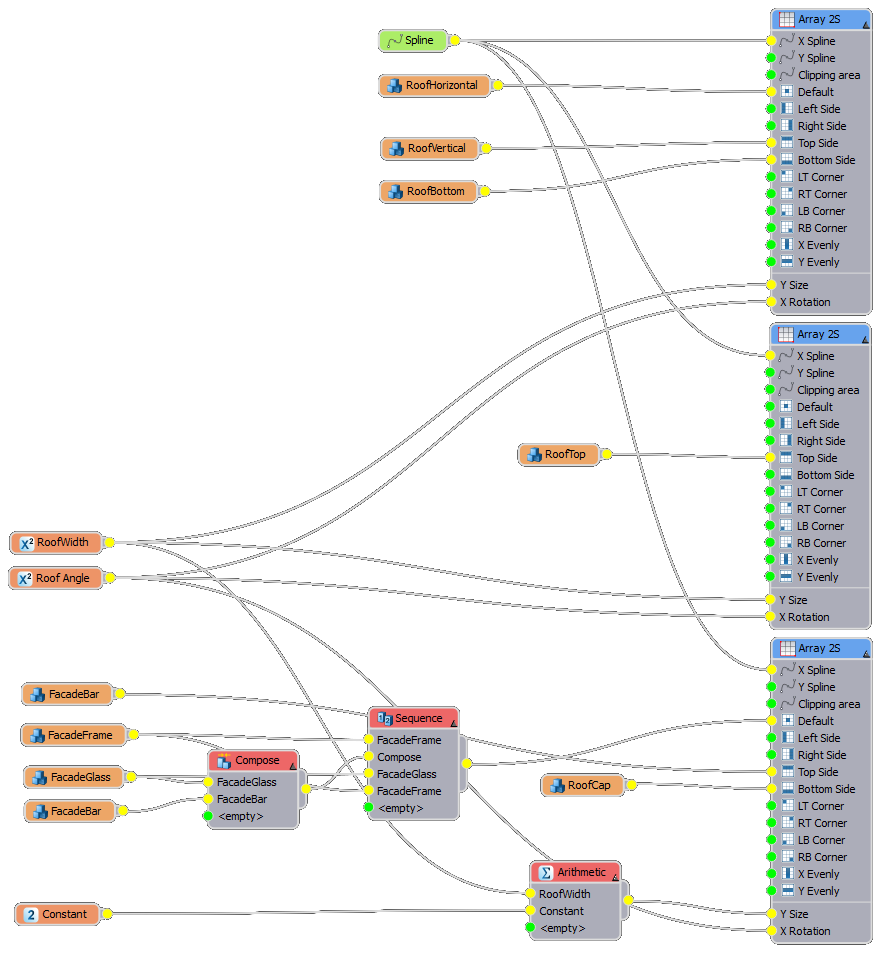
In the final instalment of the stadium tutorial we'll focus on making the undulating roof. This is the first tutorial in this 5 part series to features RailClone2's new two dimensional array generator. In this tutorial we'll explore how to use this generator to make a parameterised roofing style, with controls for angle and depth. The style is made from 3 generators as in the image below.
Click to enlarge
At first glance the node tree looks complicated but by breaking it down into three sections, it should be much easier to understand. In the first part we'll create the main metal framework, using the top, bottom and default inputs. In the second we add a simple cantilevered truss, and in the final section we'll create a glass skin with the compose, sequence, arithmetic and constant nodes.
If you've completed the previous tutorials, you can continue with your scene. If you'd rather start with this tutorial, you can download the current scene files from the links on the left hand side of this page.
Creating the main trusses
- Create a new RailClone object.
- Open the style editor and add a Array 2S generator
![Roof-10-06-2013-22-28-22.png]()
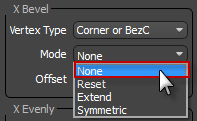
- Go to Properties>Rules>X Bevel>Mode and set it to "none" from the drop down list.
![Roof-10-06-2013-22-25-30.png]()
- Add a spline object and pick "spline_roof" from the scene, connect to the X Spline input.
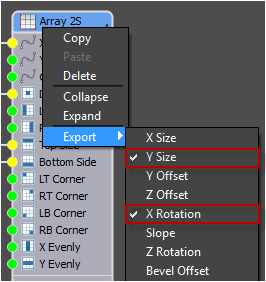
- In this example we're going to use a parameter to determine the Y dimension and X Rotation. Expose these parameters by right clicking on the generator and going to Export>Y Size and X Rotation.
![Roof-10-06-2013-22-26-41.png]()
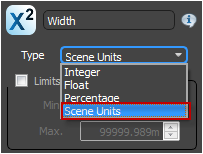
- Create a new Numeric parameter node and connect to the newly exposed Y Size input. Set the numeric type to Scene Units and set the distance to 36m from the Parameters rollout in the modify panel.
![Roof-10-06-2013-22-27-30.png]()
- Create a second Numeric parameter node and connect to the X Rotation input. Set the value to 15 degrees.
- Create a new Segment and pick "RoofBottom" from the scene. Set the Z Alignment to Pivot and the top padding to -0.1m. Wire the segment to the Bottom Side input of the generator.
- Clone the segment and pick "RoofHorizontal" from the scene and wire to the default input. Change the Top Padding to 0.0m and Right Padding to 11.6m. Set the X Alignment to Center.
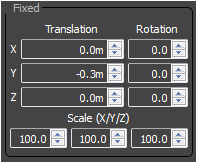
- Clone the segment a third time and pick "RoofVertical" from the scene. Ensure all the padding values are 0.0m, that X Alignment is automatic and set Properties>Transform>Y to -0.3m. Wire this segment to the Top Side input.
![Roof-10-06-2013-22-29-16.png]()

Creating the cantilever
- Copy and paste the existing generator and disconnect all the segments leaving only the spline and numeric nodes
- Create a new Segment object, pick "RoofTop" from the scene and connect to the Top Side input of the new generator.
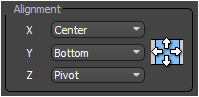
- Set the X alignment to Center, the Y to Bottom and Z to Pivot.
![Roof-10-06-2013-22-31-15.png]()
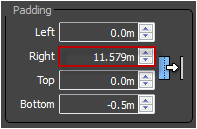
- Adjust the Right Padding to 11.579m and the Bottom to -0.5m.
![Roof-10-06-2013-22-30-35.png]()
Creating the glass roof
- Copy and paste an existing generator to create a third Array 2S node. Disconnect any segments leaving just the spline and numeric nodes.
- Create a new segment and pick "RoofCap" from the scene. Wire this to the Bottom input of the new array.
- Set the Y and Z Alignment to Pivot and change the Top Padding to -0.6m. Set the Properties>Transform>Fixed>Translation>Z value to -1.65m.
- Create three new Segments and pick "FacadeFrame", "FacadeGlass" and "FacadeBar" from the scene.
- Create a new Compose operator and connect "FacadeGlass", then "FacadeBar".
- Create a Sequence operator, connect "FacadeFrame", then the Compose node we just created, then "FacadeGlass", and finally "FacadeFrame" again. This gives us a repeating pattern for the glass.
- Connect the sequence to the Default input of the generator.
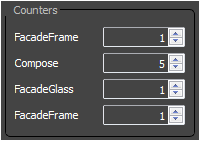
- Select the sequence node, go to Properties>Counters, and set the Compose counter so that it repeats 5 times. The larger glass and roof bars should now align.
![Roof-10-06-2013-22-40-11.png]()
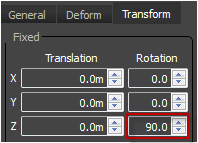
- Copy and paste the "FacadeBar" segment, change Properties>Transform>Fixed>Rotation>Z to 90 and attach to the Top Side input.
![Roof-10-06-2013-22-43-18.png]()
- Finally, because the glass roof does not cover the cantilever, add a new Arithmetic operator and a Constant node.
- Set the constant value to 13.0m.
- Wire the existing "RoofWidth" numeric node and the new Constant to the Arithmetic node's inputs.
- Wire the Arithmetic node to the glass roof generator's Y Size input.
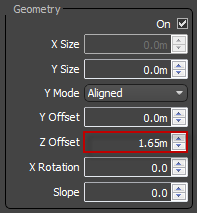
- Finally, change the generator's Z Offset value to 1.65m to position it on top of the roof structure.
![Roof-10-06-2013-22-44-16.png]()
Assign the correct spline
- Close the style editor and go to the Base Objects rollout in the modify panel. Assign "Spline_Roof" as the new path.
- To create a smoother deformation, open the Style rollout and change the Curve Steps to a high number, 500 works well.
Conclusion
Over the last 5 tutorials we've looked at how RailClone can help you to model detailed stadiums by creating glass walls, railings, advertising, seating, audiences and finally a fully parametric roof structure. Though stadiums were the focus of these videos many of the techniques are applicable in a wide range of other situations. For more videos visit our tutorials page.