Resources

Since the release of Forest Pack 7, we’ve had a few questions about how to place individual objects using Custom Edit mode, an option that used to be available from the Create Menu in previous versions. Don’t worry, all the tools are still there, but the process to activate that mode from a new Forest Pack object has changed slightly. In this tutorial, we’ll quickly explain how to use Custom Edit mode in Forest Pack 7.
To start placing models from the scene individually you should do the following:
- Select the objects in the scene that you want to place with Forest Pack
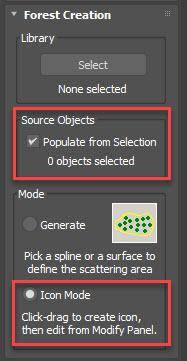
- Go to the iToo Software group in the Create Panel and click to open the Forest Pack create options.
![Create Options]()
- Click the Populate from Selection option. This will automatically add the selected objects to the FP items list and it saves you from having to do it manually later. Alternatively, you could always select objects from the Library which will take priority.
- Change to Icon mode, and click and drag somewhere in the scene to create a Forest Pack object.
- Go to the Modify panel, and open the Items Editor rollout. Change the mode to Custom Edit and click on the Tree button
![]() to enter the sub-object selection level. When this is active you can add new items or move, rotate and scale existing ones.
to enter the sub-object selection level. When this is active you can add new items or move, rotate and scale existing ones. - To add an item, click on Add Items > Add and click in the scene to place an object. Easy as that!
 to enter the sub-object selection level. When this is active you can add new items or move, rotate and scale existing ones.
 We could stop there, but while we’re looking at this subject, let's go over some of the other settings in this rollout that are perhaps not as well known by our users.
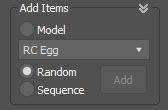
- You have several options when adding items. By default when you add a new object, the source will be randomly chosen from the items list, but you can also specify which model to create by simply selecting it from a drop-down list. And a third mode allows you to create a sequence based on the order of the geometry in the Items list.
![Options when adding items]()
- It’s important to know that even though you’re in manual editing mode, you can still use the handy options in the Transform rollout to randomise the Scale, Rotation and Translation of sub-objects.
- On top of these randomised properties, any object can still be selected and edited using Max’s Translate, Rotate and Scale tools. See it as an additive process, first the manual transforms are performed, then the randomised transforms are applied.
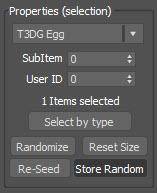
- For even more control, there are several more useful tools:
![Properties]()
Item Dropdown allows you to change the object used for an existing sub-object.
Sub Item allows you to pick the parts of a group and User ID allows you to assign an ID for post production and other tasks.
Select By Type allows you to quickly pick all the sub-objects that use the same source item as the current selection.
Randomise will randomise the source items used for the selected sub-objects.
Reset Size will remove any manual scaling applied while in Custom Edit mode.
Re-Seed will create new variations of any randomised transforms applied to the selected objects.
Store Random bakes in the current rotation, scale and translation and then disables the randomisation features.
Using Surfaces with Custom Edit mode.
Just because you’re in custom edit mode, doesn’t mean you can’t still use surfaces. This can be particularly useful when you need to add individual trees to a terrain and saves you the task of aligning them on the Z-Axis.
- To use surfaces with Custom Edit mode, just add them to the Surfaces Rollout > Surfaces list in the usual way.
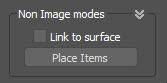
- By default, items added in Custom Edit mode will be locked to the surface. Sometimes you may not want this behaviour because it means you can no longer move these items on the Z-Axis. If that’s the case it can be disabled by unchecking Link To Surface.
![Surface options]()
- With Link To Surface disabled, there's still an option called Place Items that quickly snaps all the object to the surface, but doesn’t link them so can still adjust their Z position should you need.
Attaching and Detaching Forest Objects
Finally, let’s take a look at a couple of other options in the Items Editor rollout that allows you to split and combine forest objects.
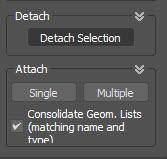
To use it, make a selection of Sub Objects and click Detach Selection to create a new Forest Object containing the chosen items. Attach Single does what it sounds like, whereas Attach Multiple opens up a list of Forest Objects in the scene making it easier to combine several together in one operation.