Requirements
- info RailClone Pro, Forest Pack
Introduction
Welcome to this festive instalment of our regular tips and tricks episodes, this week we decided to try something a little different so we've imagined what a RailClone Christmas tree might look like. I'm not sure I'd trust it near my presents, but our "tree" illustrates some invaluable tips to help you master randomising values in RailClone. Most of the built in Randomisation controls work on a per-segment basis, but sometimes we want to generate a new value for each generator, row, spline section, or spline sub object. In this tutorial we'll show you how that's done.
By completing this tutorial you will be able to:
- Create Pipe Styles.
- Randomise the segments per spline.
- Randomise size per spline.
- Randomise multiple material IDs per spline.
- Scatter RailClone objects using Forest Pack.
Download Contents
The exercise files for this tutorial includes the following .max scenes compatible with Max 2010, V-Ray and Mental Ray.
- rc_xmas_pipe_tree_end.max - The starting file if you want to follow the tutorial.
- rc_xmas_pipe_tree_end.max - The result of the completed tutorial
Making the Pipes style.
In the downloadable starter scene we have a bundle of splines to represent our mechanical tree, these were created using GrowFX but they've been collapsed to editable splines for this tutorial so that anyone can follow along. RailClone can be used with absolutely any object that is able to output splines - you might for example also try Ivy generator, plexus or other mograph scripts or try converting the trajectories of animated objects or particle to splines and use them to drive RailClone objects. There's certainly a lot of creative possibilities for RailClone when it is combined with other scripts, and I think we've barely scratched the surface.
Back to our example, before we add pipes to this tree I'd recommend creating the style using a much simpler spline so that updates are fast and it's clearer to see what's going on. For this purpose, in the scene you'll find a spline object called Test Lines. We'll use this tocreate the style before swapping it for the more interesting tree splines. Also, to save a little time, the scene file already contains a RailClone object containing all the necessary segments, a generator and a spline object. A couple of parameters have also already been added, including:
- All the segments' Z and Y Alignment choices have been set to Pivot. The pivot is in the centre of the pipe's bore so that they sit on the spline correctly.
- The Evenly distance value has been exported and attached to a Numeric node so that it can be easily edited from the Modify panel.
- The Generator's Default Segment Mode has been set to Scale. In this mode only 1 default segment is placed between each evenly segment and it is scaled to fill the available space.
If you need help creating these items I recommend our Getting Started with RailClone guide which is ideal for helping new users get up-and-running with the plugin.
In this tutorial we'll focus purely on mastering randomisation, starting with changing the type of pipe and joint segments.
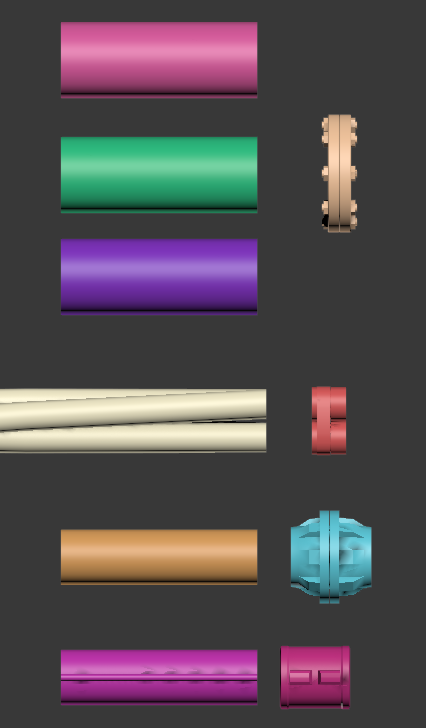
- There are six types of pipe in this scene, the first 3 have different textures and use the same joints and the remaining 3 have their own joint types.
![Creating a RailClone Tree-image2015-12-14 15:20:44.png]()
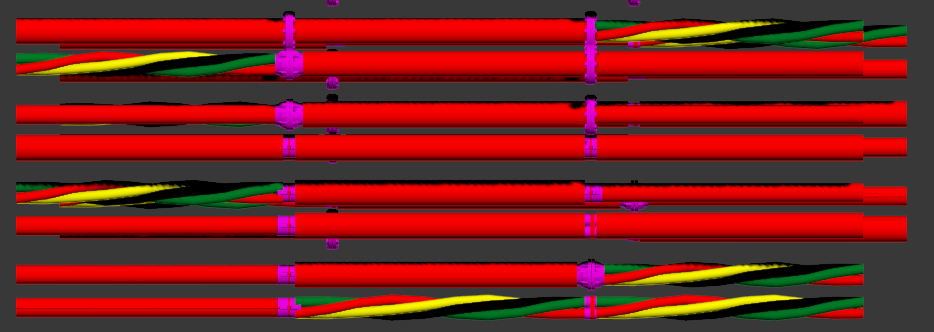
- If you select the rc_pipes RailClone object, open the Style Editor and use Randomise operators to connect the Pipes to the Default input and the Joints to the Evenly input you'll notice a problem. The randomisation take place per-segment meaning that each section uses different pipe and joint geometry.
![Creating a RailClone Tree-image2015-12-14 15:22:58.png]()
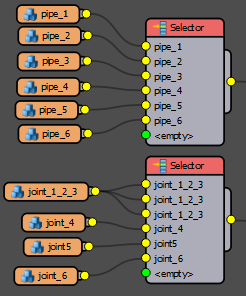
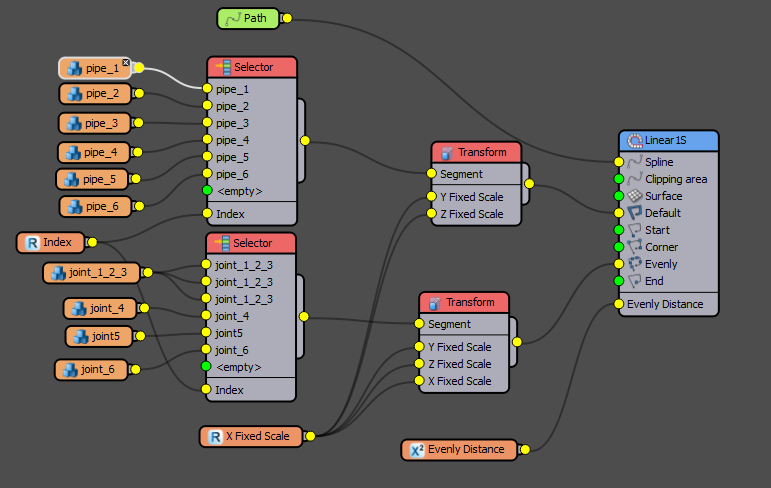
Sometimes this may be desirable, but in this case we want to use just one type of pipe and one type of joint per spline. - To do this we need to employ a different technique to randomise the segments that gives us much more control over when a new random number is generated. This involves using Selector instead of Randomise operators. Normally Selector nodes are used to select a specific segment using a numerical input. But by attaching a random number generator to this value we can create a randomise function with considerably more control. To set this up, create a new Selector Node and wire all the pipe segments to the inputs. Create a second Selector operator for the joints, but wire joint_1_2_3 to the first three inputs. This is because pipes 1-3 use the same joint segment. Wire the remaining 3 joints to input slots 4 - 6.
![Creating a RailClone Tree-image2015-12-14 15:26:18.png]()
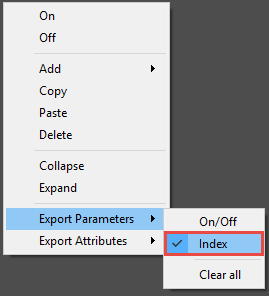
- In order to use a random number generator to select these segments it's necessary to create an input for the Index value. To do that Right click on the Selector node and go to Export Parameters > Index. Do the same for both Selector operators.
![Creating a RailClone Tree-image2015-12-14 15:32:33.png]()
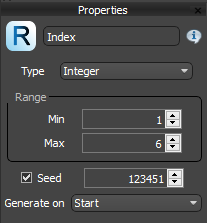
- Create a new Random node and wire it to both the exported Index inputs. Select the Random node and go to the properties to set the Range. We have 6 possible segments so enter a value of 1 in the Min field and 6 in the Max.
![Creating a RailClone Tree-image2015-12-14 15:51:25.png]()
- All the pipes will now be identical because the Random node is generating only a single number. However the reason we use the Random node is because it's actually extremely flexible, it allows you change this to one of 6 possible options.
- Start - Generates a new random number once for each instance of the RailClone object.
- Segment - Generates a new random number for each individual segment.
- X Spline Start - Generates a new random number for each spline sub-object found in the X Spline input of the Generator.
- X Spline Section - Generates a new random number for each spline segment. For the purposes of this calculation a segment is the section of spline between two Corners or Evenly segments.
- Array Y Row - Generates a random number at the start of each new Row. Only works in conjunction with the 2D arrays - Generator A2S
- We want a new random number per spline, so change the mode to X Spline Start. You now have a new pipe type for each spline and because the two selector operators share a Random node, they are kept in synch.
Randomising transforms
With the type of pipes randomised, how about changing the size too? As you may know, Segment and Transform nodes already have translate, scale and rotate randomisation controls built in. Like the Random operator, these options generate a new value for each individual segment plus each axis is randomised independently, so it's not ideal when you need to maintain proportions. To solve this the Random parameter can be very helpful, and to illustrate I'll randomise the size of the pipes proportionately - once per-spline.
- Create a new Transform operator and wire it between the pipe's Selector operator and the Generator's Default input.
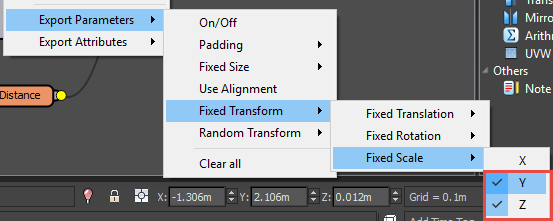
- Right click on the Transform node and export Fixed Transform > Fixed Scale > Y and Fixed Transform > Fixed Scale > Z
![Creating a RailClone Tree-image2015-12-14 16:9:50.png]()
- Create a new Random parameter and wire it to the newly exported Scale Y and Z inputs. The pipe is scaled between Evenly segments by the generator so we don't need to worry about the X axis.
- Select the Random node and change the Type to Percentage.
- Enter a value of 25% for the Min value and 200% for Max to create a large size range.
- Finally, to generate a new size for each spline, change Generator On to X Spline Start. The pipes will now be randomised, but the joints remain the same size.
- To affect the joints as well, duplicate the existing Transform node and wire it between the Joint's Selector node and the Generator's Evenly input.
- We also want to scale the joints on the X axis so export Fixed Transform > Fixed Scale > X and wire it to same Random node. The whole graph should look this.
![Creating a RailClone Tree-image2015-12-14 16:17:39.png]()
Randomising materials
We've randomised the type of segments and their size; now let's look at materials. The twisted pipe has 4 materials applied using IDs 3-6. Pipe 1 also uses ID 3 and we'd like it to be randomise as well so that it takes one of the same 4 materials. RailClone has a Material operator for this purpose that we can add between the selector node and the Default input of the Generator:
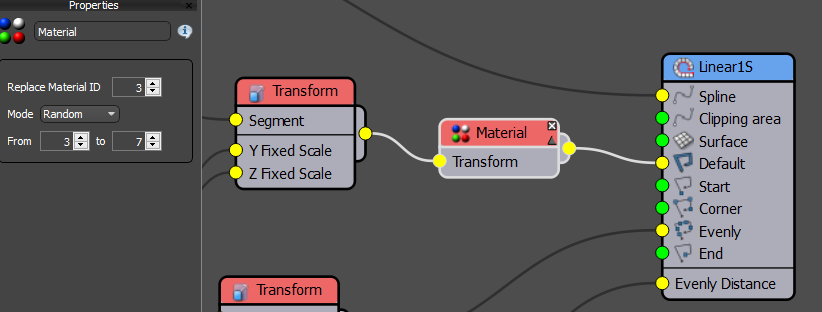
The material operator has a few limitations though: it generates a new random value per segment, and it can only randomise a single source ID at a time. The first problem is easily solved using a Random parameter node:
- Create a Material operator as shown above and change the Replace Material ID value to 3
- Right click on the Material node and export From and To.
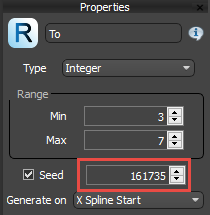
- Create a new Random parameter and wire it to both exported inputs.
- Change the Min value to 3 and the Max value to 7 to set the randomisation range.
- Change Generate On to X Spline Start to randomise the Material ID 3 between 3 and 7 for each spline.
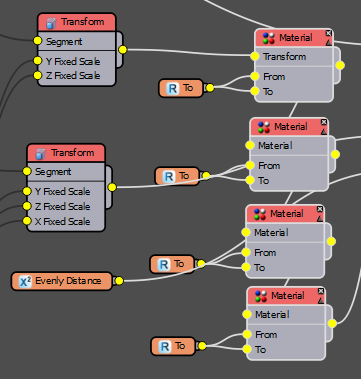
Now to tackle the second limitation. To randomise multiple IDs you can link together Material operators in a chain with one for each ID you wish to randomise. In this case we want to randomise IDs 3-6 so we'll need 4 material nodes in total. To do this:
- Select the existing Material node and its Random parameter node.
- Copy and Paste the selection to duplicate the nodes 3 times.
- Wire the material nodes together in sequence, with the transform operator in the first input and the generator's Default input wired the chain's final output.
![Creating a RailClone Tree-image2015-12-14 16:46:39.png]()
- Change each material node's Replace Material ID value so that the first is ID 3, the second is 4, the third is 5, and the final node is 6.
- Finally, change each random Parameter's Seed value so that they don't all generate the same number.
![Creating a RailClone Tree-image2015-12-14 16:50:20.png]()
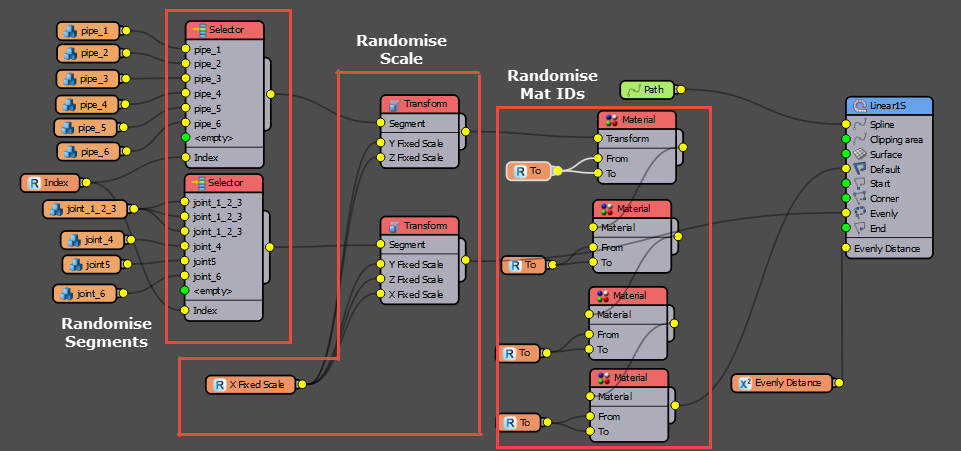
- And that's it! The final graph should look like this:
![Creating a RailClone Tree-image2015-12-14 16:54:8.png]()
Creating the "Tree"
Now that we've got the style set up, we can create the tree.
- With the RailClone object still selected, go to the Modify panel and select the Spline listed in the Base Objects rollout.
- Click the Spline picker button and select Tree Spline from the scene. This will now be used to create the pipes.
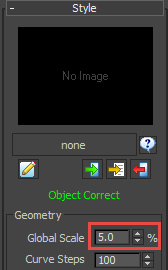
- The existing pipes are much too large so we need to scale them down. Fortunately RailClone has a Global Scale parameter found in Style rollout. Change this to 5% to make the pipes much smaller. Though we've shrunk the pipes, all the randomisation is retained.
![Creating a RailClone Tree-image2015-12-14 17:21:50.png]()
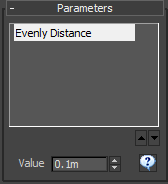
- Finally we also need to change the Evenly Distance to match the smaller spline lengths. A value of 0.1m works well.
![Creating a RailClone Tree-image2015-12-14 17:20:36.png]()
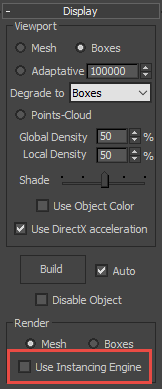
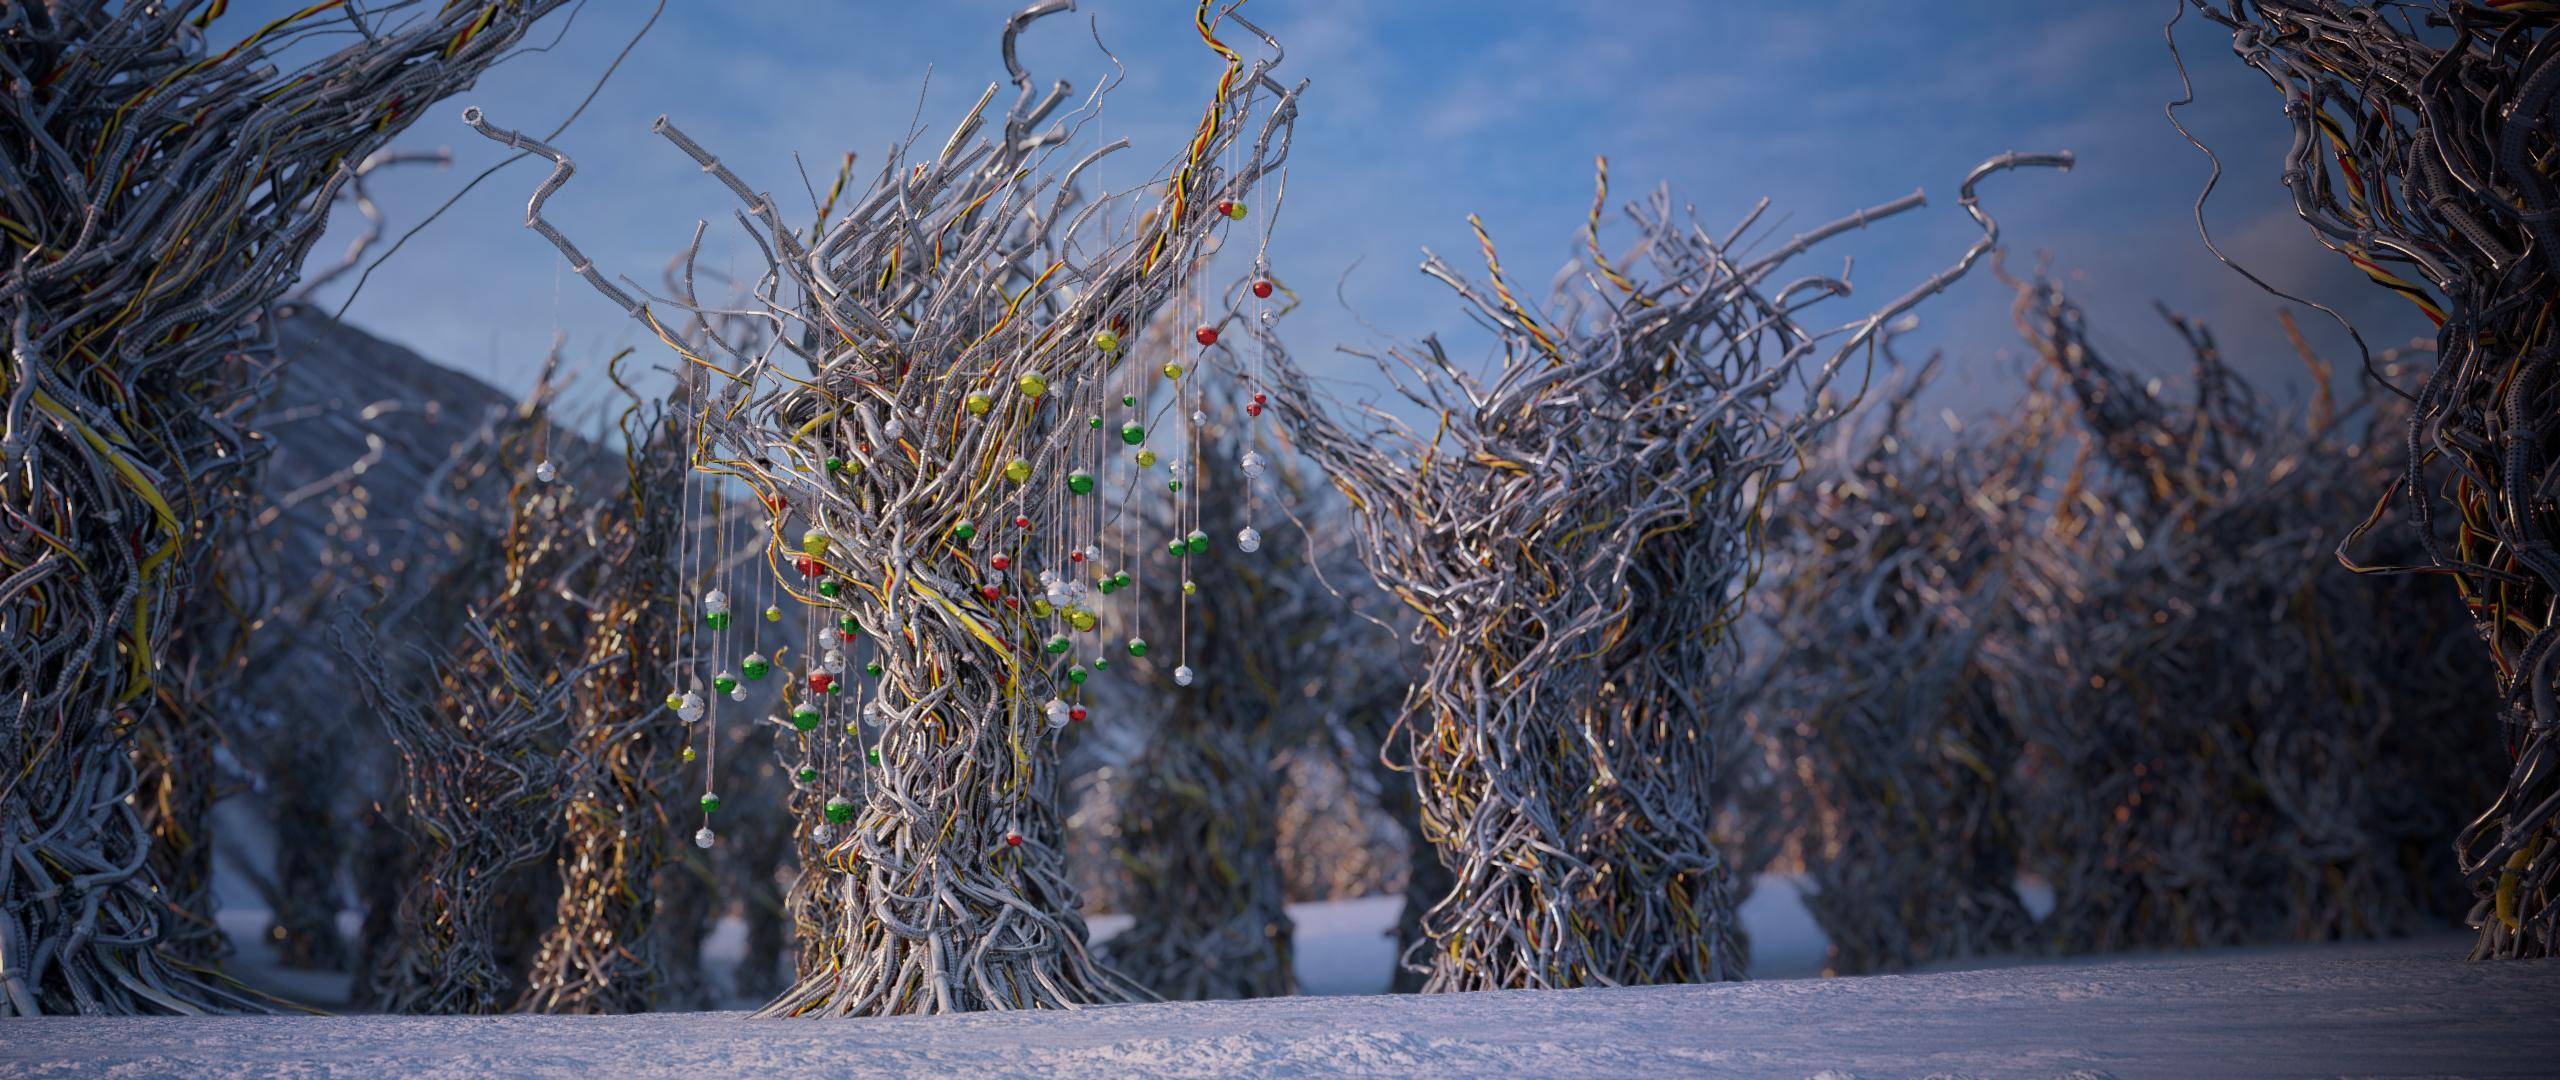
- Now let's add the rest of the scene. Open Layers or the Scene Explorer and unhide the environment, lights and camera, and forest_objects layers and the rc_baubles object. The Forest object is just using empty billboards as a placeholder at the moment, but to finish up I wanted to show that it's possible to scatter RailClone objects using Forest Pack. To do so you just need to make sure that the RailClone object's Instancing Engine is Disabled.
![Creating a RailClone Tree-image2015-12-14 17:39:56.png]()
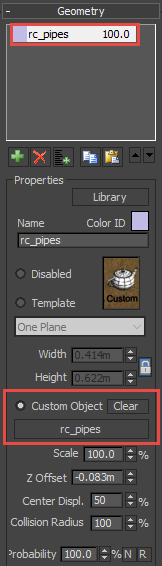
- Now select the Forest Pack object and go to the Geometry rollout. Change the Item to Custom Object and pick the RailClone tree from the Scene.
![Creating a RailClone Tree-image2015-12-14 17:41:46.png]()
- And that's all you need to do! Forest Pack is now scattering our RailClone tree - ready to render!
Click for full size
Conclusion
Although this is an unusual use for the plugin, these techniques are very useful for a huge range of applications. Even in this scene there is another example of this approach. Select the rc_baubles object and you'll find a style that uses a single Random parameter to control both the Z position of the balls and the length of the string that's needed to tie them to the tree. You could certainly use a similar idea for lights or chandeliers.
We're drawing towards the end of the year and this will be our final tutorial for 2015, so we'd just like to take the opportunity to say a heartfelt thanks for watching our tutorials and using our plugins. We wish you a very happy holiday and a fantastic new year. See you in 2016!