Requirements
- info 3DS Max 2010, RailClone Lite 2.0, Forest Pack Lite
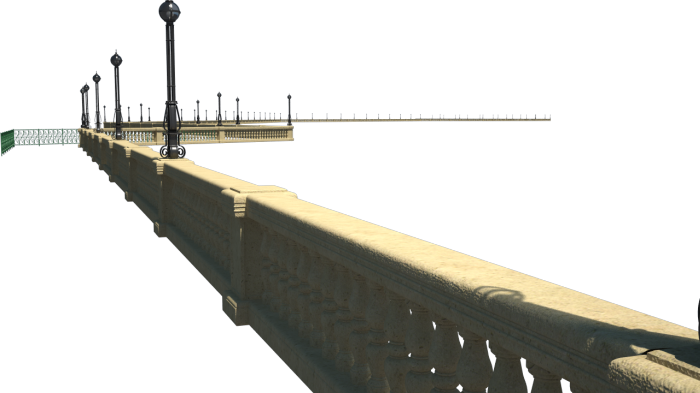
Seaside Promenade Tutorial (Part I)
Introduction
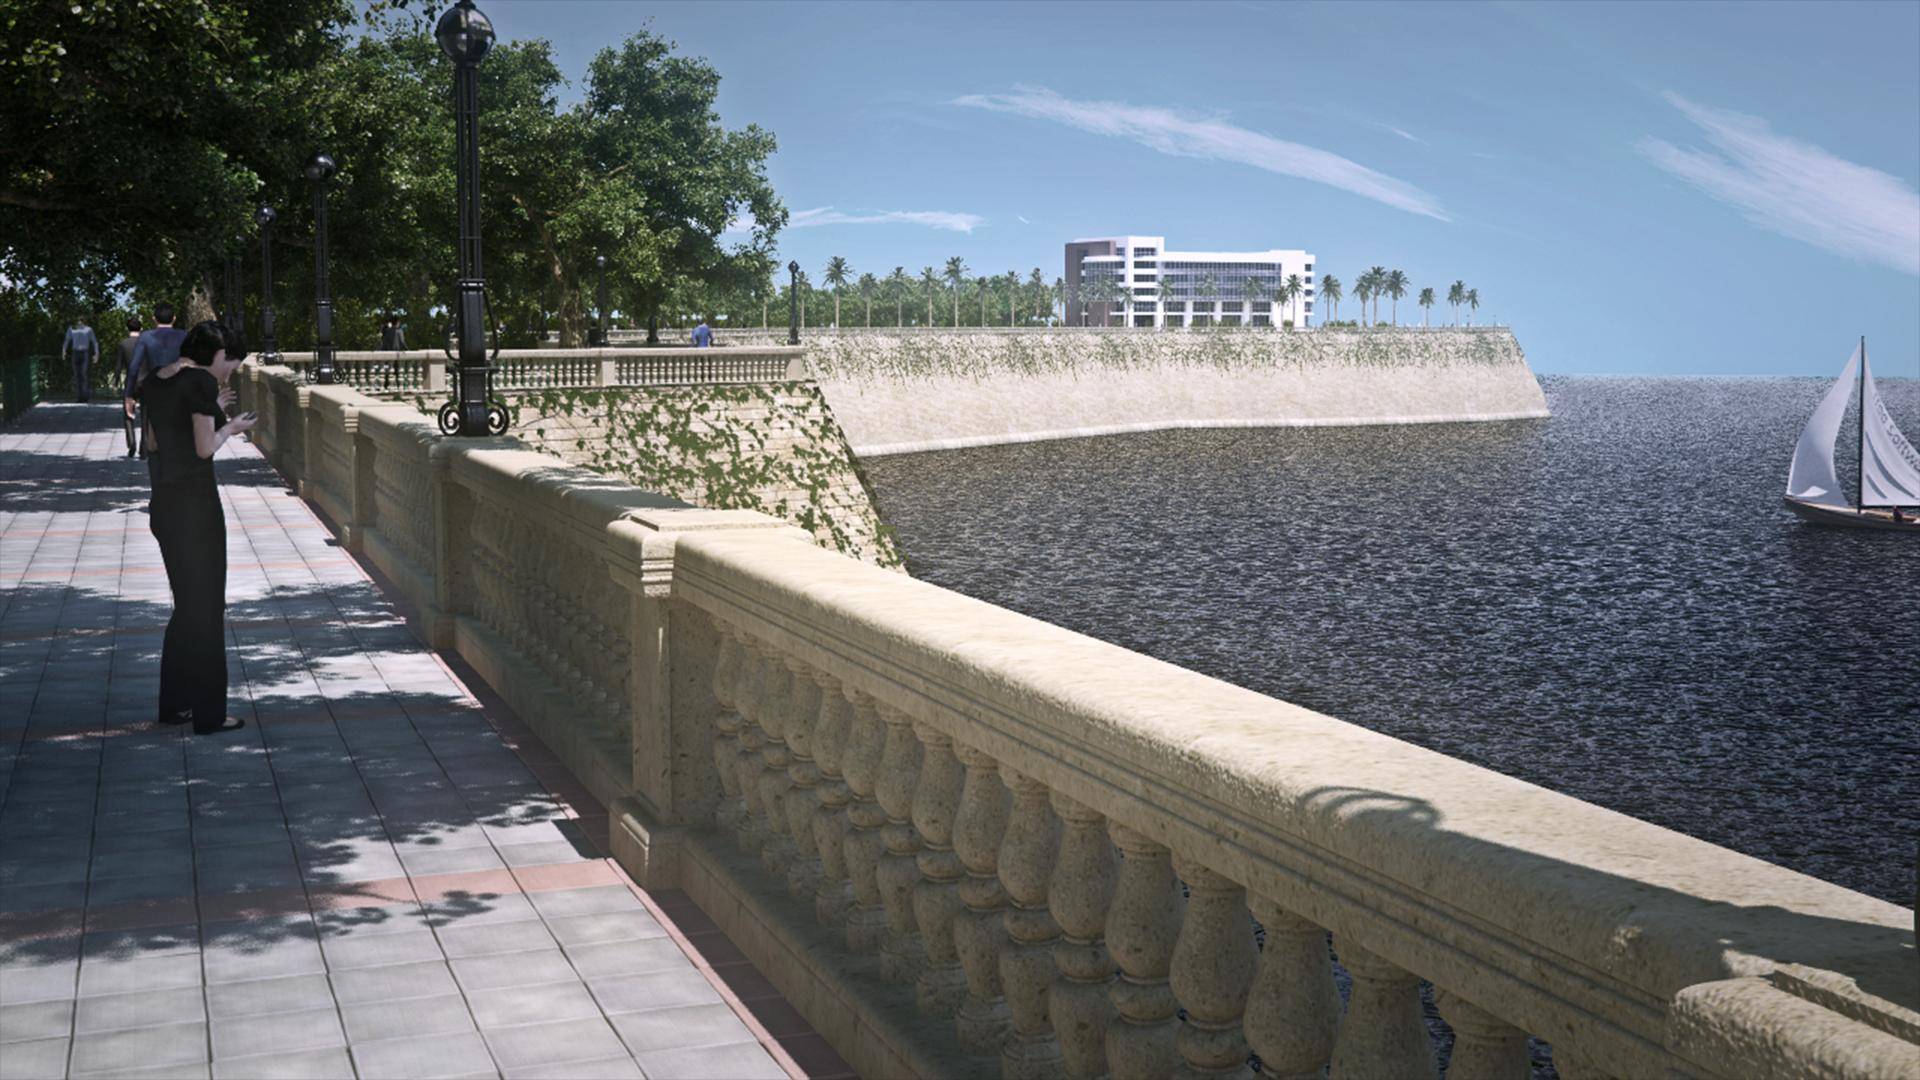
Using RailClone to create your own 1D and 2D arrays couldn't be easier once you know a few simple principles. In this tutorial we'll recreate the Seaside Promenade image above and demonstrate the most frequently used features of RailClone. The tutorial is split into the following sections:
- Using styles from the library
- Creating a new style
- Creating a 2 dimensional array from a single spline
- Creating a 2 dimensional array from two splines
To get started download the scene files from the left menu. The files are compatible with 3DS Max 2010 - 2013, and you should have the most recent version of RailClone and Forest Pack installed. The majority of this tutorial can be completed with the free lite version. The exercise files contain all the objects necessary to complete this tutorial, they are compatible with Mental Ray and V-Ray.
Several parts of this tutorial require RailClone Pro. See the differences between Lite and Pro versions.
Using the Style Library
RailClone comes with over 280 predefined styles allowing you to easily add common objects to your scenes. The built in styles include roads, curbs, sidewalks, railway lines, bridges, streetlights, ducting, trusses, curtain wall systems, theatre seating, railings, scaffold, walls and much much more.
Using these styles is simple, often requiring only the creation of a single spline to determine the path. In the Seaside Promenade scene we'll start by using a railing style to create the iron fence seen on the left of the path.
The Railings have now been created in the scene, finally we'll adjust the material from its default black metal to a dark green.
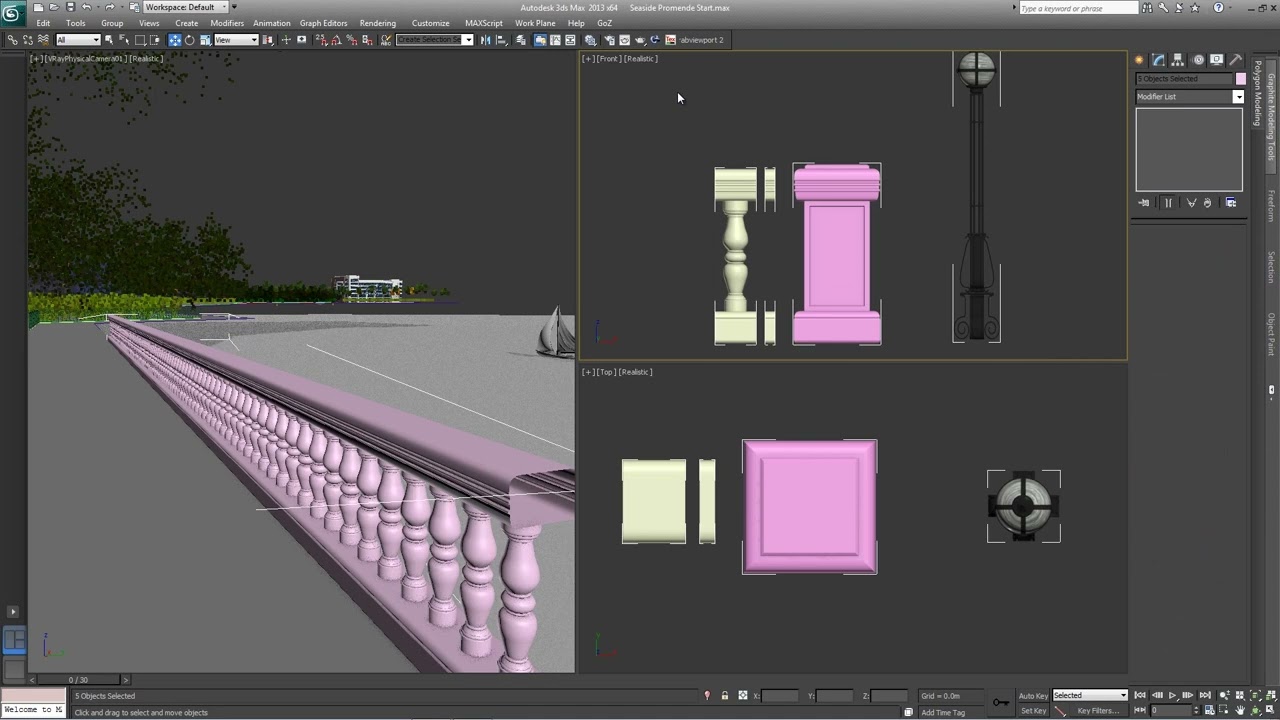
- Start by opening either vray_start.max or mr_start.max depending on your renderer. The current scene has some elements already in place including all the trees, created using Forest Pack, and a building perched on the distant headland. Also in the scene are all the splines and objects required to create the seawall using RailClone, including the pavement, balustrades, ivy and lights.
- Create a new RailClone object by going to Create>Itoo Software and selecting RailClone.
In the Viewport simply drag out a new RailClone object anywhere in the scene. An icon reading RC will be created, this displays when the RailClone object is not currently generating any geometry
![Create a seaside promenade-sp_p1_2.png]()
- Open the Modify panel and rename the new object rc_fence.
- Access the Library Browser by going to the Style rollout and clicking on the Style Name selector button, this will be displaying "none" as no style is currently loaded. The Library Browser will open in a separate window.
![Create a seaside promenade-sp_p1_4.png]()
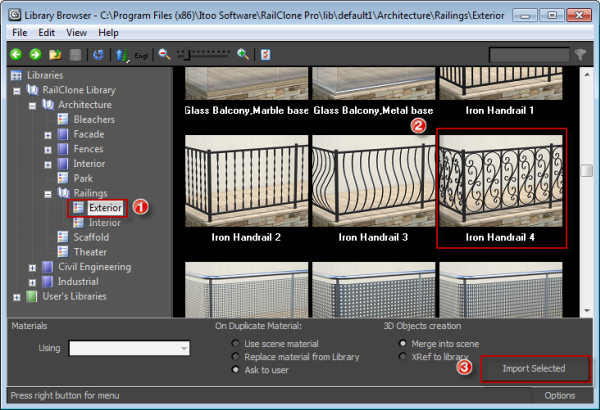
- In the Library Browser, from the File Navigator on the left hand side, go to Libraries>RailClone Library>Architecture>Railings>Exterior> and select Iron Handrail 4. Either double click, select Import This or Right Click>Use Item(s)
![Create a seaside promenade-sp_p1_5.png]()
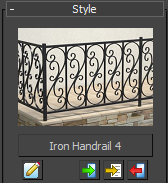
- With the style loaded you will see a preview image and the name update in the Style rollout.
![Create a seaside promenade-sp_p1_6.png]()
- The style will also have loaded any necessary inputs it requires into the Base Objects and Parameters rollouts, in this case the style needs a single spline to determine its path. Go to the Base Objects rollout and select "Spline" from the list. From the properties section click on "none" to activate the spline selection tool and pick the spline named "railings" from the scene.
- Open the material editor and use the Eye Dropper to pick the material on the new Railing object. This is a multi/sub object material used on a number of handrails in RailClone library.
- Double click on material called "Black Metal 1" (Mat ID 2).
- Change the diffuse colour to Red-3, Green-23. Blue-7
If you render the scene now, you'll see a green railing to left of the scene. In this section we have learnt how to create RailClone objects, navigate the style library, import library styles, pick base objects and adjust materials.
In the next section we'll make a new one dimensional array and create a sophisticated style for the balustrades on the right of the footpath.
Creating a new style
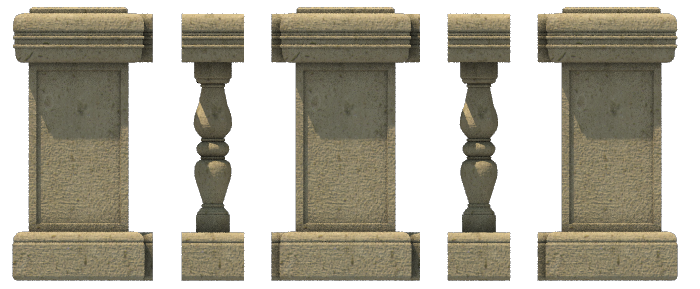
In this section we'll create a new style using the 4 segments picture below. A ruleset will be created to array this along a single spline, repeating the balustrades interrupted by pillars placed at regular 5m intervals. The lights will sit atop every other pillar. Having completed this section you should be able to:
- Create a new linear array
- Use multiple generators in a single style
- Use the compose operator
- Reverse the order of a compose Operator
- Be able to adjust overlap using padding
- Be able to position segments at regular spacings
- Use RailClone's box mapping feature
The Node tree for the Balustrade and Lights
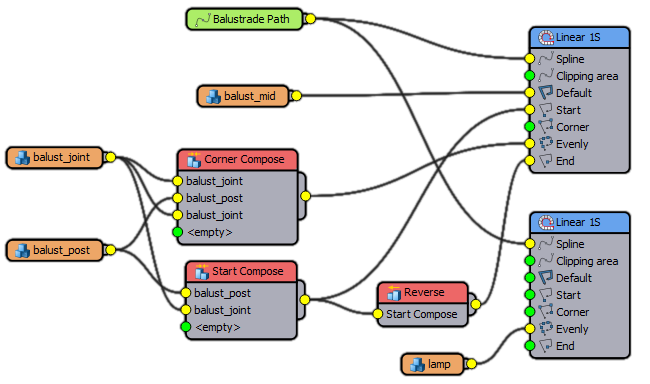
A RailClone ruleset or Generator (blue), may take several inputs as follows:
Segments (orange) are meshes picked from the scene that will be arrayed according the the rules set out in a generator
Splines(green) are used to determine the paths of a one or two dimensional array
Parameters(red) are used to provide easy access to a value contained in a style and construct adjustable arithmetic relationships between parameters.
Restricting the objects to a small part of the spline for testing purposes.

When dealing with large numbers of segment RailClone will automatically replace the geometry with Proxis or use a Point-Cloud display to maintain viewport performance. However, when creating a new Style is is often beneficial to see the full geometry to ensure is is generating as expected and allow for the precise placement of segments. To do this it makes sense to either use a much shorter temporary spline while you create the style, or to limit the railclone object to a small section of the existing spline. We'll use this technique throughout the tutorial using this procedure:
- From the Base Objects rollout select the spline you wish to limit
- Turn off Full Length. The length of the spline to be used by the generator is now governed by the start and length controls
- Adjust the Start property either by entering the value manually or selecting the Pick button to the right of the Start value and selecting a start point by clicking in the scene. The geometry will move along the path the designated amount in scene units from the first vertex.
- Adjust the Length, this is measured from the start point in scene units, or alternatively select a point from the scene using the Pick button to right of the Length spinner.
This part of the style is nearly complete but there are some gaps where the Joint geometry does not quite meet the post. In the next step we'll adjust the posts padding to fix this and turn on box mapping to create a seamless texture across adjacent segments.
Box Mapping
Using RailClone's Box Mapping feature it is possible to apply a UV space that seamlessly tiles across several adjacent segments. In the illustration below, the top image uses each segment's individual UV coordinates; you can clearly see the texture repeatings regularly. In the second example the box mapping has been adjusted so that the texture applies across multiple segments down the full length of the object. In this way obvious and regular texture repetition can be avoided.
When using box mapping it is possible to target any material ID and either set the Length, Width and Height in scene units, or use real world map size.
Render the image, you should now have a stone balustrade to the right of the path, with pillars at regular 5m intervals. Next we'll add a light to the top of every other pillar.
To complete this object we'll apply a material:
- Create a new RailClone object by going to Create>Itoo Software and selecting RailClone, as described in Part 1.
- To create a new style we use the node based Style Editor. This is opened from the Style rollout by clicking on the Open Style Editor button (img)
- Create a new L1S Generator by dragging it from the Items List on the right of the editor into the Construction View.
- Create a new Spline node by dragging a Spline object from the Items List to the Construction View. Name the spline node "Balustrade path" and wire it to the L1S generator's Spline input, as in the image above.
- To pick the spline from the scene, go the the Base Objects rollout in the modify panel. Pick "Balustrade Path" from the list, and pick the spline named "BaseLine" from the scene.
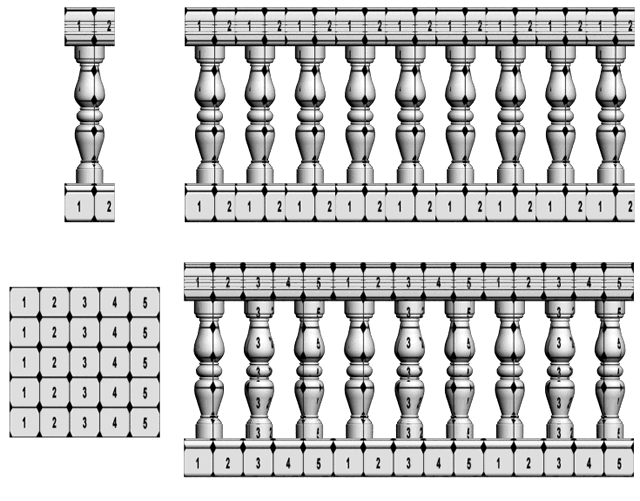
That balustrade is constructed from 3 segments, a pillar, a repeating mid section and a filler that is used to create a larger space between the two. The pillars and filler will be combined to create 3 composite objects as demonstrated in the image below. We'll look at how these are created using a compose operator:
![Create a seaside promenade-sp_p2_6.png]()
- Go back to the Style editor and add 3 new Segment objects by dragging them from the Items List to the Construction View
- Select one of the new Segments, from the Properties editor on the left, click on the object selection button and pick the "Balust_Post" object from the scene.
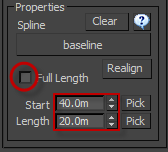
- Limit the distribution along the Baseline by turning off Full Length from the Base Objects rollout. Set the Start value to 40m and the Length to 20m.
![Create a seaside promenade-sp_p2_8.png]()
- Go to the Display Rollout and set the mode to Mesh.
- For the two remaining segment objects, select the "Balust_Joint" and "Balust_Mid" objects from the scene.
- Connect the "Balust_Mid" segment to the Default input on the L1S Generator.
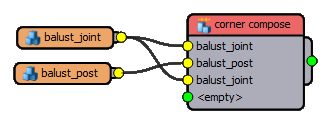
- Create a new Compose operator by dragging from the Item List to the Construction View. Rename it "Corner Compose".
- To create the corner section, connect segments to the new Compose operator in this order: Balust_Joint, Balust_Post, Balust_Joint. Attach the output of the Compose node to the Evenly input of the L1S Generator.
![Create a seaside promenade-sp_p2_13.png]()
- To create the start, create a new Compose operator, rename it "Start Compose" and attach the segments in this order: Balust_Post then Balust_Joint. Wire the output to the Start input of the generator.
- Finally, to create the end section we can invert the sequence of the previous Compose operator. To do this, create a new Reverse operator by dragging from the items list. Wire the "Start Compose" node's output to the new Reverse node and wire this into the End input slot of the generator.
![Create a seaside promenade-sp_p2_15.png]()
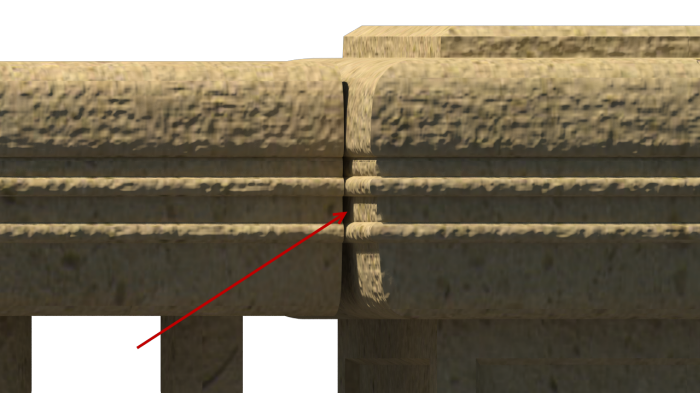
Space between the Joint and Pillar geometry.
- For each segment node go to Properties>Deform>Mapping and turn on Apply Box Mapping. Since the texture is also set to use real world scale, turn Apply Real World Mapping on as well.
- From the same menu ensure Slice and Bend is switched on for the "Balust_Mid" segment. (explain)
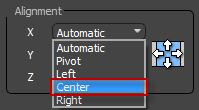
- To ensure the spacing of the posts is measured from the centre, go to Properties>General>Alignment and change the X value to Center.
![Create a seaside promenade-sp_p2_18.png]()
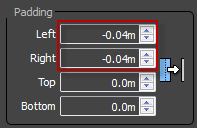
- To remove the gap between the joint and the posts go to the "Balust_Post" segment's Properties>General>Padding and change the Left and Right Padding to -0.04m. A negative value will move the adjacent segments closer, closing the visible gap.
![Create a seaside promenade-sp_p2_19.png]()
- To change the spacing between pillars select the L1S Generator, go to Properties and change the Rules>Evenly value to 5m.
- Select the Balustrade object and reopen the Style Editor, we'll duplicate the existing L1S generator to create the lights. Right click and select Copy, then Right Click anywhere in the Construction View and select Paste.
- Attach the existing Spline object to the new Generator's Spline input.
- Create a new Segment object and pick the "Lamp" from the scene. Connect this to the Evenly input of the new generator.
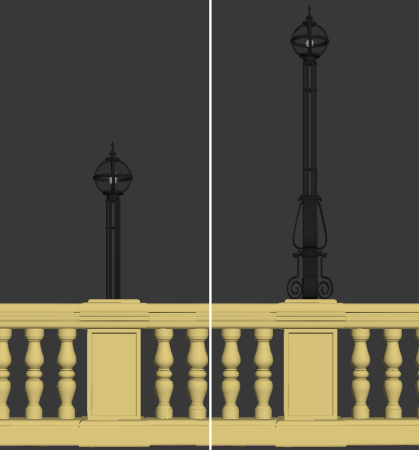
- There's now a lamp intersecting each pillar, to raise and rotate the lamp so it sits on top of the pillar adjust the lamp segment's Properties>Transform>Translation>Z value to 1.094m and rotate on the same axis by 90 degrees.
![Create a seaside promenade-sp_p2_24.png]()
Left: Before adjusting the Z position. Right: After adjusting the Z position.
- Go to the Properties>Deform and turn off Bend and Slice and turn on Use Real World Map Size
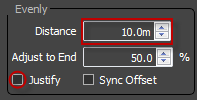
- Finally to create a lamp only every two pillars, Double the Evenly distance for the new generator to 10m. Turn of justify to ensure pillars and lamps align.
![Create a seaside promenade-sp_p2_26.png]()
- Open the Material Editor
- Access the scene materials and apply the material named "Stone" to the new RailClone object. This is a multi-sub object material that contains all the necessary shaders for the wall and lights.
- Finally, to display the full length of the spline go to the Display Rollout and set the mode to Points-Cloud, then go to Base Objects and turn back on Full Length.
In this section we create a sophisticated one dimensional array with evenly spaced pillars and lamps. In the next section we'll create our first two dimensional array to create the pathway.