Resources
Requirements
- info RailClone Pro or Lite
RailClone is easy to learn once you understand 3 basic principles. First of all, RailClone doesn’t construct an object from thin air, it works using a path to assemble and repeat existing modular pieces of geometry. To do this it needs a couple of things which we call base objects - a spline for the path and of course, some geometry.
Secondly, this geometry is assembled along a path using a set of rules defined using a Generator. Imagine you’re explaining to a manufacturer how to build this bus shelter, you might say: “Put a glass panel at the start and the end, add struts at 2m intervals, then fill in between with the roof and glazing. Oh and don’t forget to add regularly spaced chairs the full length of the shelter”
If you understand this, you understand RailClone.
Thirdly and finally, just like Max, RailClone has its own modifiers called Operators that are used to manipulate geometry. You can do things like switch between items, mirror geometry so you can reuse it, manipulate UVWs, randomise materials IDs or even create sequences, randomise geometry, create patterns along the spline and much much more.
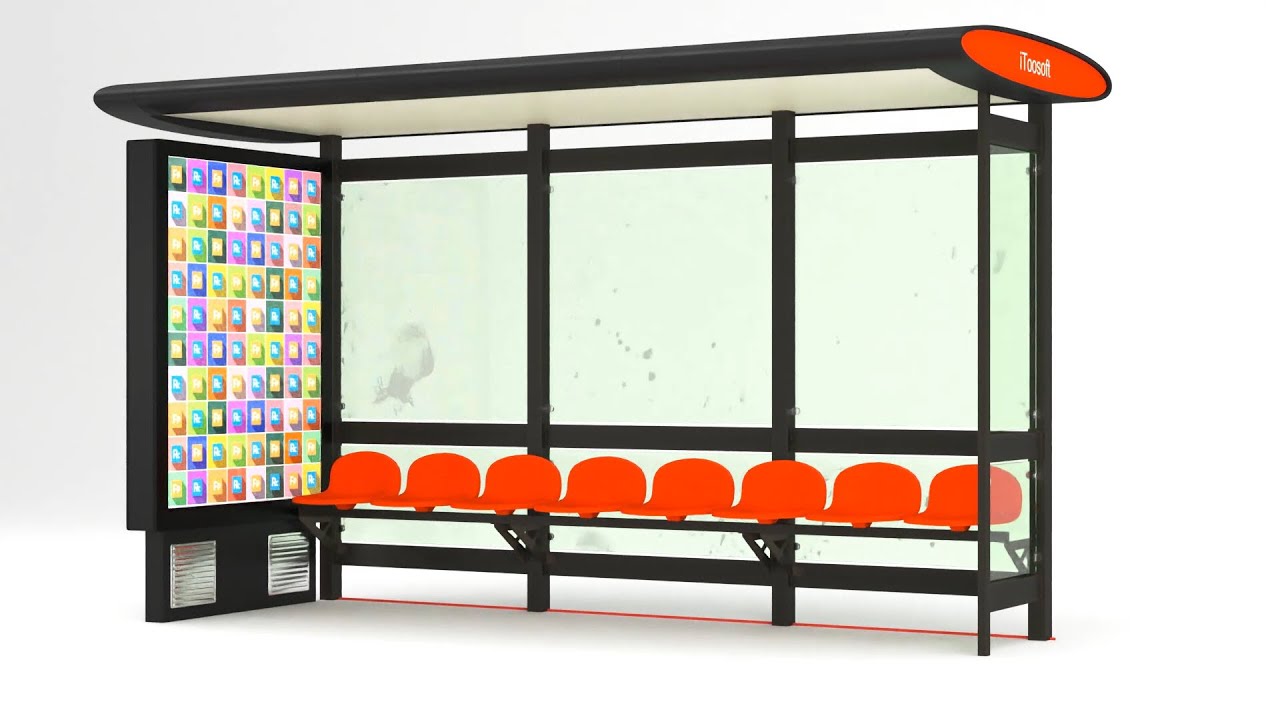
To illustrate these basic principles and help new users get started with RailClone, our latest tutorial explains how to turn a stock bus station asset into a flexible and reusable parametric model.
We’ll start with a look at how to prepare geometry.
Preparing geometry
Before we get started, I want to mention that this is not a tutorial about how to create a bus shelter. The bus shelter is simply a good example to help illustrate basic principles. To get the most from this tutorial and aid comprehension I would strongly recommend trying to apply the techniques to different models. However, if you want to follow along all the scene files are available from the link on the left.
RailClone takes advantage of your existing modelling skills. Either by allowing to use custom modular parts that can be reassembled to create parametric objects, or simply by dividing up existing models.
We’ll do the latter, but before we do, one of the most important preliminary steps is to set the pivots on the source geometry. To do that, one must understand how RailClone aligns objects to a path.
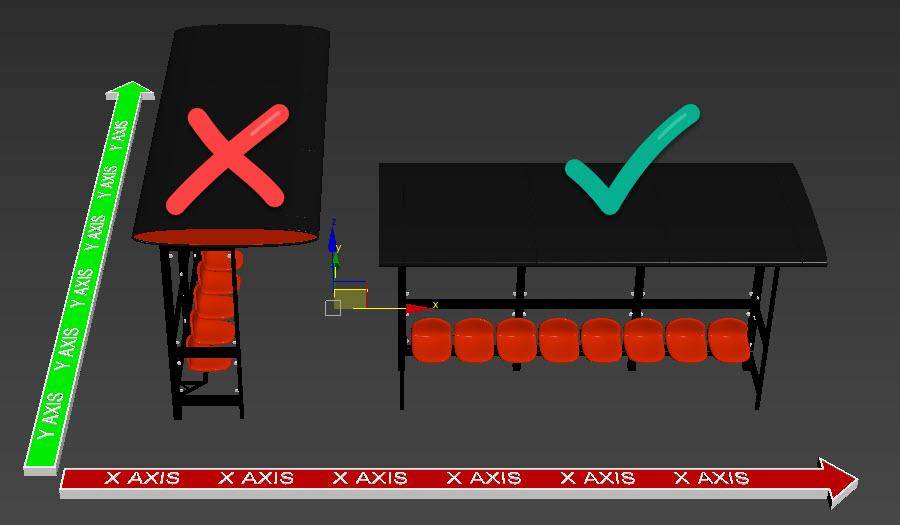
- Firstly, when an object is distributed using RailClone, its X-axis is oriented to follow the path. For example, the bus shelter stock model’s long side is facing along the y-axis, which isn't correct. To fix it, we’ll rotate the object to align with the world x-axis and reset the XForms.
- Secondly, let’s take the seats out of the equation. Anything that doesn’t easily fit into the repeating pattern of the main object can be dealt with separately. Although since RailClone’s main feature is repeating geometry, of course, we only need one chair.
- Thirdly, if you are starting with a model like that has multiple parts, I like to align all the pivots to a common point. This can make piecing it back together in RailClone much easier. In this case, I’ll set the pivots to the centre-front of the model to make it easier to align to the edge of a pavement.
Now it’s time to divide our stock model into pieces. To do this, analyse the model and ask yourself, “what’s the smallest number of repeatable pieces can I break this model into?”.
We need a piece at the Start, but probably not the end, since it is identical geometry just mirrored. I need a piece for the struts, and I need a piece to fill in between. But that’s it, three pieces for the shelter.

There’s no specific right way to divide up the model - you could either detach elements as we did in this tutorial or simply use Slice Modifiers to cut it into pieces.
Finally, I want to mention the materials. RailClone 3 requires you to have a single multi-sub object material that works for all of the geometry you add to RailClone. You may, therefore, need to consolidate the materials and update material IDs accordingly.
In the tutorial scene, you will also find a couple of other options that we’ll use later to illustrate some of RailClone’s other features. There are a couple of end variations, a couple of seat variations, and the material has some colour options for the chairs.
Lastly, you’ll need a spline we can use to determine the size and location of the new parametric version of the bus shelter.
From this point on the tutorial is split into 3 parts - one for each of the basic principles you need to understand become a RailClone ninja, starting with Base Objects
1 - Base Objects
Now the fun starts as we move on to RailClone.
- In the Modify panel, Choose iToo Software from the drop-down menu and select RailClone
- Click and drag to create a RailClone object in the scene.
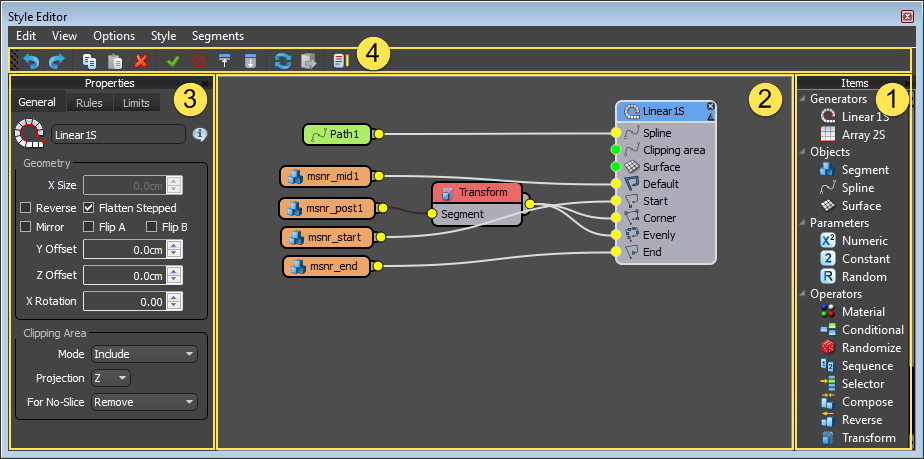
- In the Style rollout, click on the button to open the Style Editor. This is the node-based editor used to create the rules to assemble our object. On the right side (1), you have a list of all of the available Base Objects, Rule Generators and Operators. On the left side(3), we have the Properties for the selected node. In the middle is the construction view (3) where we create our graphs. Above this is the toolbar (4) that allows you to undo, redo, copy paste and more.
![Elements of the interface]()
- There are just 3 types of Base Object: Splines, Segments, and Surfaces. First of all, we need to bring in the geometry we just prepared. To import geometry to the graph you use the Segment base object. Go to the Properties panel and use the Object Picker button to select the end of the bus shelter from the scene.
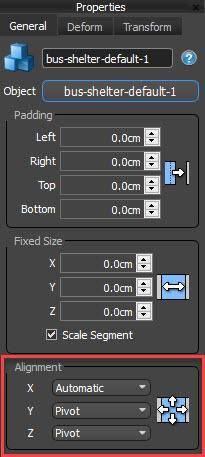
- We set the pivots earlier, so now let’s tell RailClone to use them. Select the Segment node and go to the Alignment settings in the Properties panel. Change the Y and Z setting to Pivot. You seldom need to change the settings for the x-axis.
![Set the pivots]()
- Now we need to do the same thing for the other bits of the bus shelter. Doing this one at a time would be a tedious repetitive task, instead, right-click on the existing Segment node and choose Clone Multiple. Select the other pieces and click Clone. New segments are created with the selected geometry, and if you check the alignment settings you will see that it has used the same values as the original node. A handy time saver!
- The remaining two Base Object types are Splines and Surfaces. These can be used to set the size of the object and conform it to a terrain. For now, we'll just add the path to the graph. Add a Spline node and use the button in the Properties panel to select a spline from the scene.
2 - Rule Generators
With the base object set up, we’re ready to create the recipe that tells RailClone how to assemble the model. To do this we need a rules Generator. The L1S, or linear generator is the simplest of the two found in RailClone, but don’t let that fool you, it’s enormously powerful! It has Six inputs named start, end, corner, evenly, marker and default that all simply identify different positions along the base spline on which geometry can be placed. Creating a parametric object is as simple as attaching the geometry to each of these inputs.
To illustrate, here’s how we’d recreate our bus shelter.
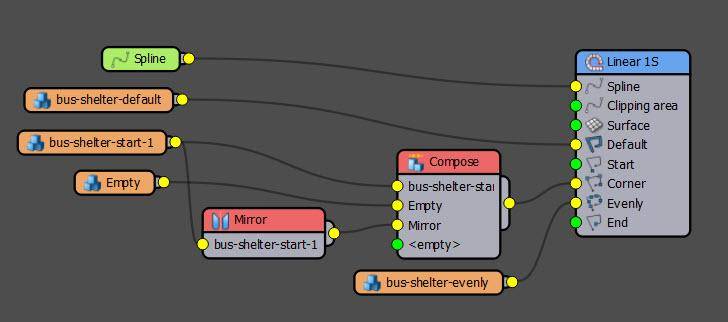
- Wire the Spline node to the Generator’s Spline input.
- Wire the bus-shelter-start-1 Segment to the generator’s Start input. Geometry will appear at the beginning of the spline.
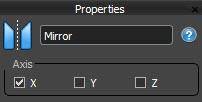
- Wire the same segment to the End input and it appears at the end of the spline, but of course, it is oriented incorrectly. To fix this we use a Mirror operator which gives you the option to flip geometry on the X,Y and/or Z axes.
![Mirror operator]()
- Now wire the bus-shelter-default-1 segment to the Default input. This input is used to fill in between all the others with geometry. In this case, it is adding the roof and glazing between the start and end. If you edit the length of the spline you will see you already have a working parametric model. Easy as that!
- The way in which Default geometry is distributed along the spline is controlled using the Generator’s Default Mode setting. By default, it simply tiles one piece after another until it reaches the end of the spline where any excess is simply sliced off. Other options include Count which allows you to set a specific number of times the geometry is repeated, Adaptive which is like tile except that is subtle rescales the geometry to ensure no slicing is required, and finally Scale which stretches one complete segment in between the other inputs. That’s the mode we’ll use for this object.
![Default Modes]()
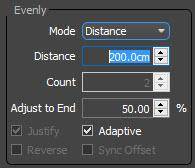
- Now let’s add the struts. Wire the bus-shelter-evenly segment to the Evenly input. The geometry in this input is repeated at regularly spaced intervals along the path. To control the distance, you select the Generator and go to the Rules > Evenly settings. Similar to the Default segment’s settings, you have options to decide if the Evenly divisions are based on distance or a fixed count. If you choose distance you can control the spacing, including how the spline is divided at the start and end using the Justify and Adaptive options. You now have a fully parametric version of the stock model with an adjustable size, and strut spacing.
![Evenly Settings]()
- But what about corners? Corners allow you to place geometry on specific types of vertex which are nominated using the Generator’s Rules > Corner > Vertex type settings.
- If you leave the settings at their default you will see that the Default segments are neatly bevelled around the corner.
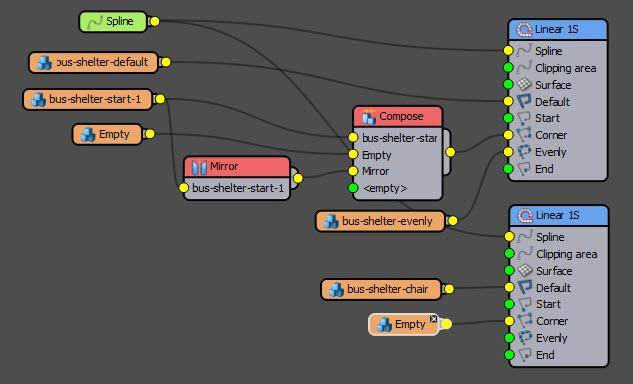
- Let’s add a gap on the corners instead. To do that we will need to finish the shelter just before the corner, and start the shelter again after the corner. We already have the geometry to do this, but it is output from two different nodes, and we have only one input on the generator. That’s where the Compose operator comes in. It allows you to glue several segments together and add them to a single input.
- To use it, wire a Compose node to the Corner input. Wire the output of the Mirror node to the first input and the bus-shelter-start-1 segment to the second input. So far so good, but how to create the space between them? You do this with what we call an Empty segment. This is simple a segment node in which no geometry has been selected and it’s incredibly useful for adding spaces to your object. To illustrate, wire a new Segment node to the Compose operator and use the Up/Down arrows to move the input so that it is second in the list. Because it is the 2nd of 3 inputs it will be centred on the corner vertex.
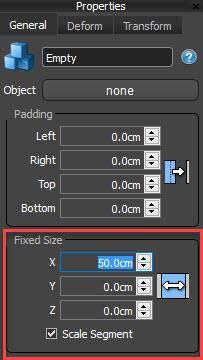
- Now you can use this segment to add a gap on the corners by simply selecting the node and increasing the Fixed Size setting found in its properties. As you increase the value the two other segments are pushed apart.
![Fixed Size]()
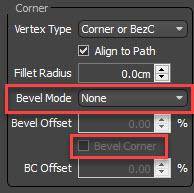
- You might wonder why the roof and glass continue through to the corner. This is because geometry in the Corner input does not interfere with Default geometry unless one of two settings are enabled. Either set the Bevel Mode to None, or enable the option to bevel the geometry that’s wired to the corner input. If either of these options are enabled, the default segment stops when it reached the corner geometry. Which is what we want in this case.
![Bevel mode]()
Don’t limit yourself - add as many generators as you need!
When starting out with RailClone, it is tempting to try to cram everything into one Generator, but in fact, it is often much much easier to spread out a style across multiple generators. To demonstrate, we will use a second generator to add the seats.
- Add a new L1S Generator to the graph and attach the existing Spline node.
- Add a new Segment node and use it to select the chair geometry from the scene.
- Wire the Segment node to the Default input. Change the mode to Adaptive so that we always have whole chairs.
- If the chair is in the wrong place, tell RailClone to use the pivots we set at the beginning of this tutorial by going to Alignment and set Y and Z properties to pivot.
- Another issue you will see is that the chairs continue to the corner of the spline. To fix this we can use the same empty segment trick. Add a new segment to the Corner input and increase the Fixed Size parameter until the chairs fit neatly inside the shelter.
![Fixed Size]()
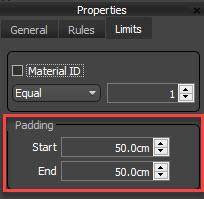
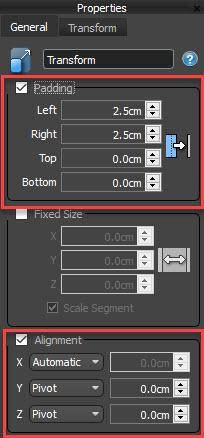
- The same problem is seen at the start and end. To fix it, select the generator and go to the Limits tab. Here you will see Padding settings which allow you to offset the start and end of the path. Increase these values until the chairs no longer intersect the sides of the shelter.
![Limits]()
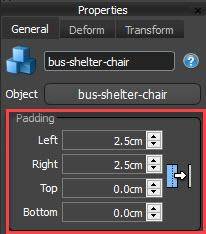
- On the subject of Padding, parameters of the same name can be found the Segment node’s properties. Here they can be used to control the spacing between segments. A positive value pushes segments apart, a negative value causes them to overlap. Here we will add a small positive value to create some space between the seats.
![Padding]()
- And that’s the basic style set up. All that remains is to assign the material by picking it from the source object and applying it to the RailClone object.
- If you fancy a challenge - do the same thing to add a digital display to the start of each bus shelter using a new generator.
3 - Operators - Manipulate Segments and create patterns
We could stop here, but let’s take our exploration of RailClone a little bit further and look at the third and final basic principle of using RailClone called Operators. As we’ve seen, operators are akin to Max’s Modifiers, in that they allow you to in some way process geometry. We’ve already used two of these: a Compose operator to combine segments, and the Mirror operator. Let’s take a quick look at several more of the most useful operators. To see how these work, check out the annotated RailClone object in the tutorial downloads called RC - Completed Style.
Material operator
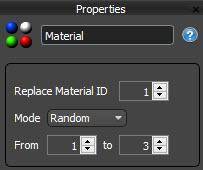
The Material operator allows you to choose a Material ID and replaces it with a new value. You can either choose to randomise between a range of IDs or loop through the IDs in a sequence to create repeating patterns.
Randomise operator
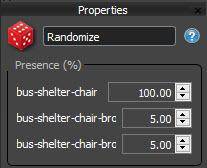
To demonstrate the next operator we’ll add a couple more Segment nodes and pick some broken seats from the scene. With that done we can take a look at the Randomise operator which allows you to pick a random Segment. Each segment has a presence value that determines the probability of it being selected. These values are normalised so there is no need to ensure they add up to 100%.
Transform operator
You’ll notice an issue with those last seats, they’re not in the correct position because I forgot to set the pivot points. This is a good excuse to demonstrate the Transform operator which allows you to make global changes to padding, alignment, and transform settings for segments that flow through it. It’s really handy for making big bulk changes without having to enter the same settings for loads of segment nodes.
Selector operator
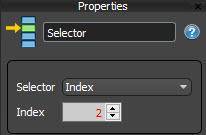
Let’s add an alternative Start segment to the graph and pick a piece with an advert from the scene. To make a kind of switch you use the Selector operator. Add one to the graph and drag it’s output to the bus-shelter-start node’s output. This will swap the wires. You can then wire bus-shelter-start-1 to the Selector operators first input, and bus-shelter-start-2 to the second. This gives you the ability to toggle between these two options using the index parameter in the Selector node’s properties. By copy-pasting the Selector node and wiring the new version to the mirror operator I have the ability to decide which piece I want to use separately for the start and the end of the shelter.
UVW XForm operator
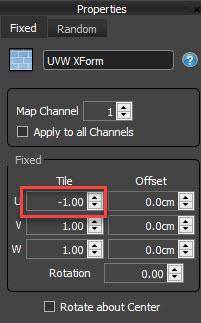
If you take a look at the advert on the end of a shelter you’ll spot a problem, because we mirrored the geometry, the poster's text is reversed. You can fix this using the UVW XForm operator which allows you to manipulate the mapping coordinates already applied to a segment. There are two modes available: Fixed mode which is pretty self-explanatory, or Random mode which shuffles within a range the tiling, offset and rotation of UVW coordinate to create unlimited variation. In this case we just want to fix this texture problem by setting the U Tile setting to -1. (I should mention that to get this generator to work with Corona you will need to disable the instancing engine from the Display rollout).
Sequence operator
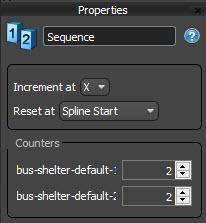
OK - But what if instead of a switch I want to create a pattern? For that, you turn to the Sequence operator. In this example we will create a pattern of glass panels with maps and glass panels without. Wire a Sequence operator to the Default input and wire the original Default segment to the first input. Wire the Segment called bus-shelter-default-2 to the second input. You will no have a repeating pattern. Of course, you can change that order simply by using the arrows on the Sequence operators. You can increase the count value of a particular input if you’d like it to display more than once.
Numeric nodes
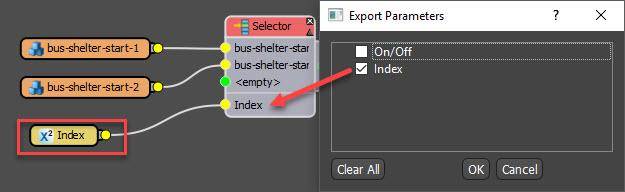
That covers most of the regularly used parameters. One other thing I wanted to mention is the ability to add Numeric nodes to this graph which allow you to control properties directly from the Modify panel. For example, imagine that I want to be able to control the ends of the shelter without opening the graph. To do that you must expose the property by right-clicking on a node and picking Export Parameters. Select the parameters you’d like to export, in this case Index, and click OK. The node will now have a new input. If you create a new Numeric node and wire it to this property you can control this value without having the graph open. The numeric node has settings that allow you to control the type of number and set limits to constrain the range from which a value can be selected.
More or less any property can be exported and controlled from the modify panel in this way.
Bonus - Deformation
To wrap up this tutorial I just wanted to say a couple of words about deformation. At present this bus shelter is on a straight spline, but of course one of RailClone’s most powerful features is its ability to deform geometry to follow curved paths. Best of all, it’s as easy as just assigning the style to a curved spline!
There are also a couple of advanced modes you can use when the path isn’t planar on the Z axis that are worth a quick look. Imagine that this bus shelter is on the hilly streets of San Francisco, in that case, the default adaptive mode doesn’t look right. The shelter sticks our from the pavement at a strange angle and anyone trying to sit on these chairs will end up in a pile in the corner.
Each segment has 3 deformation modes that can be used. Adaptive is the default, but the second, called Vertical, is particularly appropriate for this example. It keeps the verticals upright while allowing it to skew the rest to follow the path.
When it comes to the chairs that won’t work either though. For the chairs you can use the 3rd options which disables the deformation completely and simple creates a stepped distribution.

Using the vertical/flat top and bottom settings it’s even possible to combine these two modes based on a distance from the base spline. We’ll cover these settings in more detail in a future tutorial.
Conclusion
In this tutorial we looked at the 3 basic principles of RailClone: Base Object, Rule Generators and Operators which corresponds to the 3 categories of nodes found in the style editor. Spread across these 3 categories there are in fact only 21 nodes in total to learn, and we went through the majority of those in this short tutorial! Don’t be deceived though, this handful of options belies the enormous power of RailClone to recreate nearly any object that features repeating geometry!