Fichiers de ressources
Conditions
- info 3DS Max 2011, RailClone Pro 2.1

Introduction
RailClone's 2D array generator is ideal for creating many types of building facade. In this Tips & Tricks episode we'll look at how to create point-fixed glazing, sometimes also known as spider glass. The style created in this tutorial is designed to be simple to adjust for fast iteration and easy re-use in future scenes, additionally the same techniques can be applied to a wide range of different curtain wall and facade styles.
By completing this tutorial you will be able to:
- create a re-usable curtain wall style with adjustable glass height and width.
- use splines to create single and double curved 2d arrays.
- combine multiple generators.
- create segments that can be scaled to a specified dimension.
- create conditional rules to target the first and last segment in a column.
- use the mirror operator.
Preparing the geometry
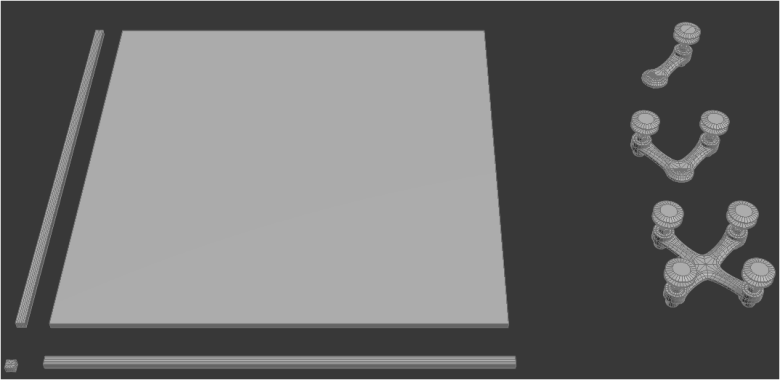
This style uses three types of spider fitting, a glass object, and 3 segments for the silicon seals. The glass pane is 1m x 1m, though the actual size is arbitrary as it will be adjusted as part of the style, but we need to know the original dimensions to enable us to calculate a scale value to produce the new size. For example if we know we want the glass to be 2500mm high we would do the following calculations to find the correct scale value:
Calculating scale factors
n = 100(new size/current size)
n = 100(2500mm/1000mm)
n = 100(2.5)
n = 250%
Download Contents
The exercise files for this tutorial includes the following .max scenes compatible with V-Ray and Mental Ray.
- spider_start.max The starting file if you want to follow the tutorial.
- spider_end.max The result of the completed tutorial
Creating the style.
Generator 1. Create glazing and joints
Click to enlarge
Steps 1 - 6 have already been carried out in the spider_start.max file that accompanies this tutorial.
- Create a new A2S generator and name it Glass Array. Set the Default Segment>Mode to scale.
- Create two new Spline base objects and pick spline_x and spline_y from the scene. Wire these to the corresponding inputs on the A2S generator.
- Right click on the generator and select Export>X Evenly Distance.
- Create a new Numerical parameter node, set the type to Scene Units, name it glass width and wire to the X Evenly Distance input.
- Copy and paste the generator twice and rename the new copies Spider array and posts array. We'll use these two generators later in the tutorial.
- Create 4 new Segment objects and pick Glass, Glass Joints Vertical, Glass Joints Horizontal, and Glass Joint Intersection from the scene.
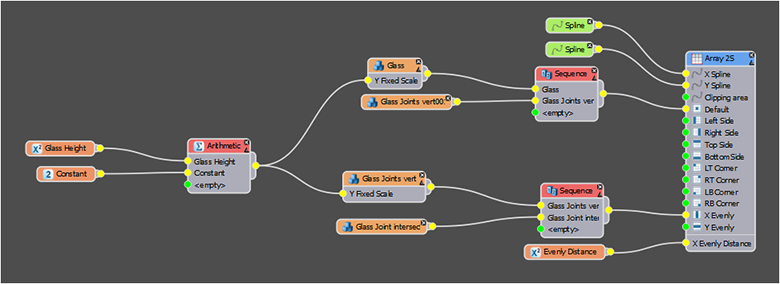
- To create a repeating vertical pattern of glass then joint, create a new Sequence operator and set it to Increment at Y Wire the sequence operator to the Default input.
![Creating Spider Glazing-increment_y.png]()
- Attach the Glass then Glass Joints Horizontal segments to the sequence operator.
- Create a second sequence operator and attach Glass Joints Vertical, then Glass Joints intersection. Wire the sequence node into the generator's X Evenly input.
- Next we'll create a expression that allows us to adjust the height of the glass. To expose the Glass and Glass Joints Vertical segment's scale value so that we can control it with an expression, right click on the segments and select Export>Fixed Scale>Y.
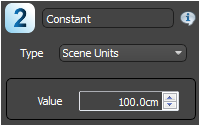
- Create a new Constant node and set the type to Scene Units and the value to 100cm, this is the original size of the glazing geometry.
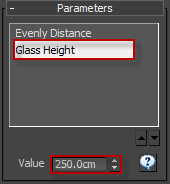
- Create a new Numerical node, name it Glass Height, and set the type to scene units. From the parameters roll-out found in 3DS Max's modify panel, change the property to 125cm.
![Creating Spider Glazing-params.png]()
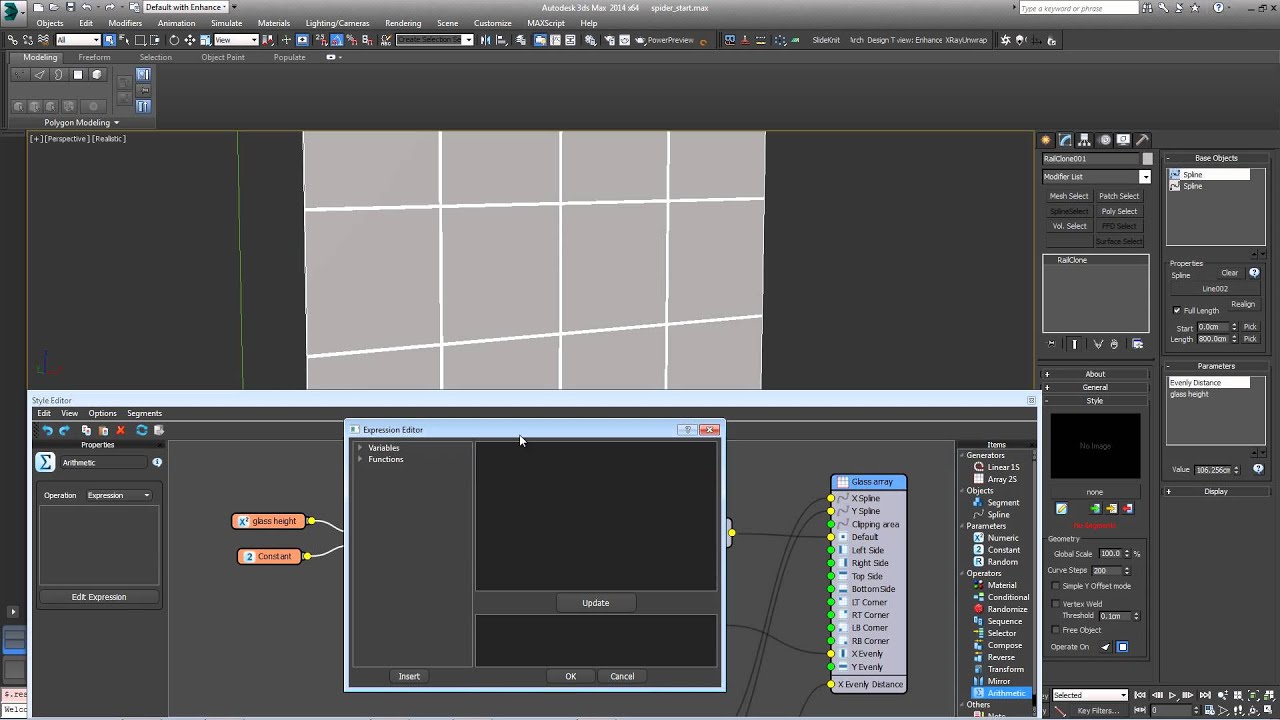
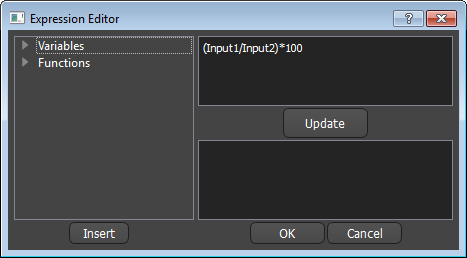
- Create a new Arithmetic operator, wire in the Glass Height numerical parameter and the constant node, in that order.
![Creating Spider Glazing-constant1.png]()
- From the Arithmetic operator's properties, change the operation type to Expression. Click on Edit expression and enter (Input1/Input2)*100. This will calculate the scale factor needed to resize the segment's height.
![Creating Spider Glazing-expressions.png]()
- Wire the arithmetic node to the Y Fixed Scale inputs exposed in step 10. You will now be able to control the height of the glass from the parameters roll-out.

Generator 2. Create spider fittings
Click to enlarge
- Create 3 new segment nodes, set the Y Alignment to Pivot, turn off Slice and select Spider 1, Spider 2 and Spider 4 from the scene.
![Creating Spider Glazing-sliceoff.png]()
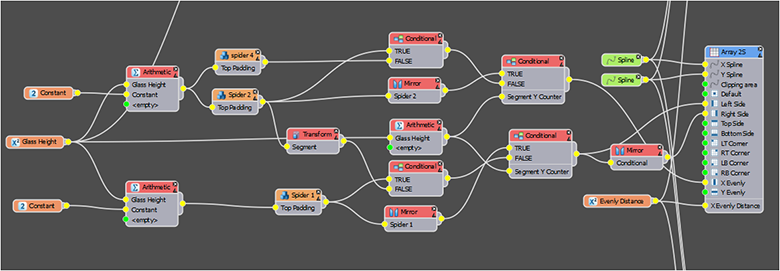
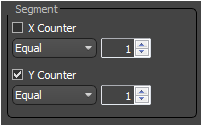
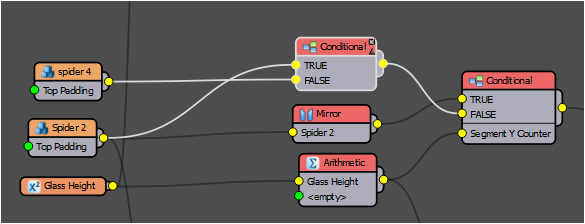
- We'll start with the sides of the array, in this column we need a Spider 1 segment at the top and bottom of the array, with a Spider 2 segment in between. To achieve this, create a new conditional operator and set the Segment>Y Counter>Equal property to 1. Wire Spider 1 to the true input, this will ensure that it appears as the first segment in the vertical array.
![Creating Spider Glazing-conditional1.png]()
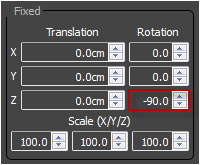
- Wire Spider 2 to a new Transform node and set the Transform>Fixed>Z>Rotation to -90 to rotate the geometry. Wire the transform node to the False input of the conditional operator.
![Creating Spider Glazing-transform1.png]()
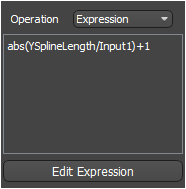
- Next we need to add a Spider 1 segment to the top of the column, to do this we need to calculate how many glass segments are likely to appear on the Y axis of the array so that we can use the Conditional Y Counter technique used above. To calculate this create a new Arithmetic operator and wire the Glass Height numerical parameter to one of its inputs. Change the operator type to Expression and enter ceil(YSplineLength/Input1). This expression divides the spline length by the glass height, rounds up and returns the value as an integer. Using this we can target the last segment on the Y axis.
![Creating Spider Glazing-expressions2.png]()
- Create a new conditional operator, right click and export Segment Y Counter. Wire this to the arithmetic node created in the previous step.
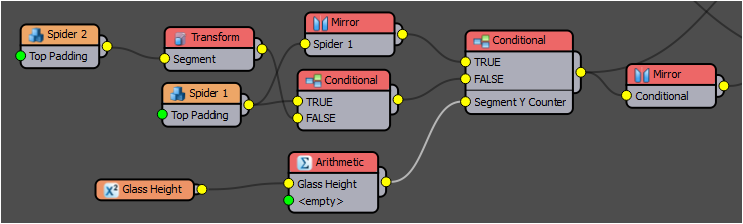
- Wire the Spider 1 segment into the True input of the new Conditional node via a Mirror operator with the Axis set to Y.
- Wire the conditional node created in step 2 to the empty False input of the new one.
- Wire the new conditional operator's output to the Left input of Spider Array.
- For the right side attach the same conditional node via a new Mirror operator with the axis set to X.
![Creating Spider Glazing-left_right.png]()
The node tree for the left and right inputs
- Next we need to do a similar process for X Evenly. Copy and paste the two Conditional operators we just created. This will give you two new connected conditional nodes. Disconnect any segments that are attached to them after being duplicated.
- Connect the new conditional nodes to the X Evenly input.
- Connect Spider 2 to the the True input of the leftmost of the new conditional nodes, also connect it to the True input of the second conditional node via a Mirror operator with the Axis set to Y to flip the geometry vertically.
- Connect Spider 4 to the remaining empty False input.
![Creating Spider Glazing-xevenly.png]()
The node tree for the X Evenly input
- For each spider segment, Export the Top Padding property. We will now add a simple arithmetic operation to add the spacing between rows.
- Create a new Arithmetic operator and attach the Glass Height numeric parameter. Set the operator mode to Subtract. Next create a new constant, set the type to scene units, and enter a value of 22.665cm. This value compensates for the size of the spider fixing. Wire this arithmetic operator to the Top Padding input of Spider 2 and Spider 4
- Create a new Arithmetic and Constant node as in step 15, except this time use a value of 15.63cm for the constant value. Wire this arithmetic node to the Top Padding of Spider 1.
- Finally, adjust the generator's Z Offset value so that the bolts sit correctly on the glass.
Generator 3. Create supports
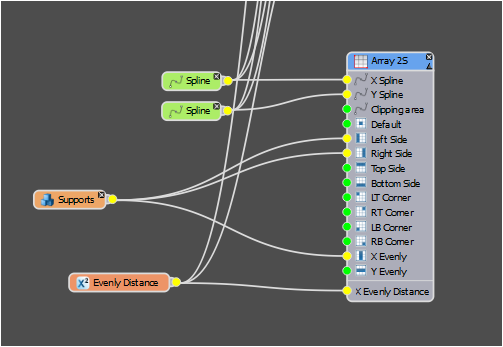
- Create a new segment and pick Supports from the scene.
- Set the segment's X-Alignment to Pivot.
- Wire the Supports segment to the X Evenly, Left and Right inputs.
Conclusion
Having completed this tutorial you will have a procedural object that creates point-fixed glazing defined by the shape and length of two splines. Though this style takes a little effort to set up, once created making adjustments is very simple, making it a great technqique for simplifying iterative workflows. The same principles can easily be applied to other curtain wall styles as well as a huge range of other facade elements. Stay tuned for future training, or for more information about many aspects of RailClone's features please see our reference section or visit the tutorials page for more Tips&Tricks videos and in-depth tutorials.