Resources
Requirements
- info Forest Pack Pro, RailClone Lite
We frequently get asked how to create trimmed hedges and topiary using Forest Pack. In this tutorial we'll look at two possible approaches: firstly using pre-built hedge components that fit together like a jigsaw; and secondly how to use hedge volumes modelled using standard poly tools to scatter leafs and branches using Forest Pack Pro. To finish up we include a bonus section that explains how to create a RailClone style that can be used as a scatter surface for Forest Pack to create a fully parametric setup.
By completing this tutorial you will be able to:
- Use Tree Editor mode to scatter objects along a spline and place objects individually.
- Prepare geometry to create hedges.
- Randomise bitmaps with Forest Colour with control for probabilities.
- Scatter on surfaces created using RailClone.
- Use the Surface Direction slider.
- Create clusters and control probability.
- Scatter on UV Surfaces.
This tutorial uses Forest Pack Pro. For the bonus section at the end RailClone Lite is also required, this is free and can be downloaded from the bottom of the product page.
The render for this tutorial contains several models courtesy of Evermotion and Laubwerk that are not included in the download. .
Technique 1 - Using pre-built hedge models
Several libraries include hedge models that can be dropped into the scene and used immediately. In addition to speed of setup, this approach benefits from the fact that library hedge models often include the trunk and branches, so if the interior of the hedge is likely to be seen, then this the way to go. Using these models is straightforward, just pick them from your scene and then use Tree Editor mode to position them exactly where they are needed. Here's an example of how to do this:
- Create a new Forest Pack object, change the mode to manual and click in the scene somewhere you'd like a hedge to be planted, don't worry about this too much as it can be changed later.
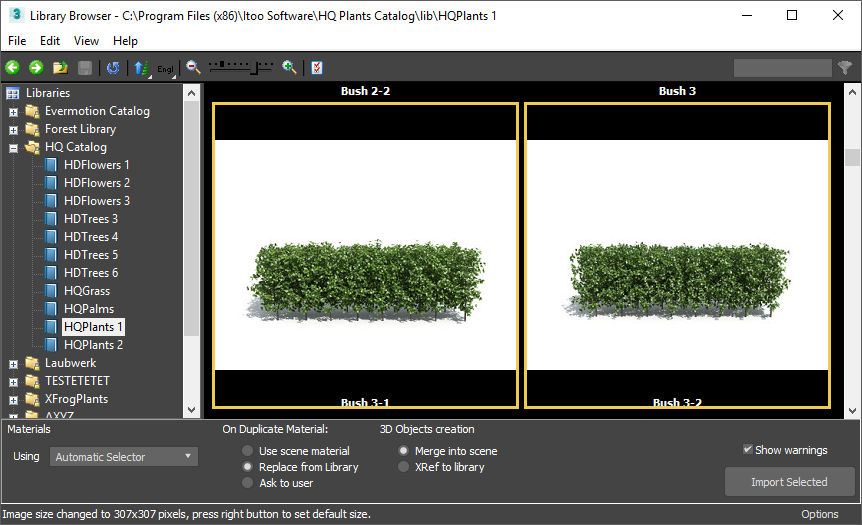
- Go to the Geometry rollout and add the hedge geometry to the items list. You can either pick it from the scene or, as in this tutorial, use an object from the library. Several 3rd party libraries include hedge models (for this tutorial I'm using models from HQ Plants vol 1). If there are several variations, add them too! This will help to break up any visible repetition.
![Creating Trimmed Hedges and Topiary-image2017-4-26_15-55-22.png]()
- Go to the Tree Editor rollout and click the tree icon
![Creating Trimmed Hedges and Topiary-image2017-4-26_15-24-18.png]() to enter Editing Mode.
to enter Editing Mode. ![Creating Trimmed Hedges and Topiary-image2017-4-26_15-24-0.png]()
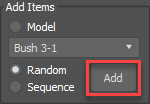
- In this mode new hedges can be added, deleted, moved, rotated and scaled. To add a new hedge either choose a specific model from the drop down list, or randomise and sequence them by selecting the corresponding mode.
- With the mode selected, to create a new hedge, select Add and click in the scene to place a new object.
![Creating Trimmed Hedges and Topiary-image2017-4-26_15-26-57.png]()
- Once created hedges can be manipulated by turning off Add and using 3ds Max's standard translation, rotation and scale tools. Hedges can also be cloned by holding down shift while you transform an object. In this way you can quickly assemble a scene.
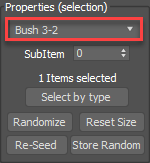
- Once placed objects can also be swapped for other models by simply changing them from the drop down options in the Properties group. It's also possible to randomise an existing selection by picking hedges from the viewport then clicking Randomise.
![Creating Trimmed Hedges and Topiary-image2017-4-26_15-31-49.png]()
- One issue with using stock models is that repetition can occasionally be seen. To help reduce this effect turn on Enable Horizontal Mirror in the Transform rollout.
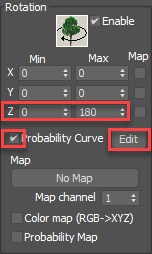
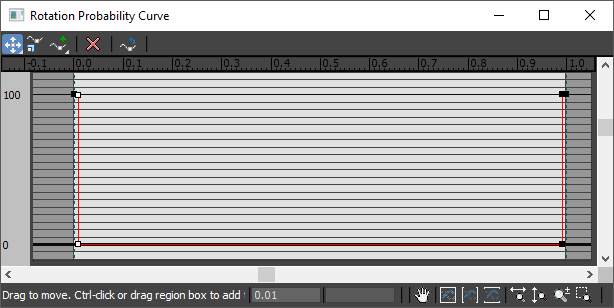
- You can create even more variety by randomly rotating the objects by 180 degrees. The easiest way to do this is to set the Z Rotation Max value to 180 degrees, then turn on Probability Curve and click Edit. We need to return values close to 0 and 180 so edit the probability curve so that it has peaks only at the very beginning and the very end of the curve. To further mask repetition you can also randomise maps using Forest Color but we'll tackle this in the next section.
 to enter Editing Mode.
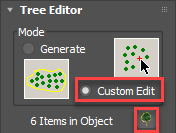
In addition to manually assembling the hedges in your scenes, you can also distribute them along a spline, to do this:
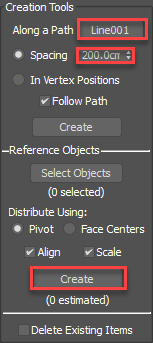
- In the Tree Editor rollout go to the Creation Tools group. Click on the Object Picker next to Along a Path.
- Enter a Spacing value, this should be the length of the hedge section, or slightly less if you'd like some overlap. For these hedges, 200cm works well.
- If you'd like to retain existing hedges, make sure you turn off Delete Existing Items.
![Creating Trimmed Hedges and Topiary-image2017-4-26_15-53-18.png]()
- Finally click Create to add hedges along the spline.

Using hedge models is as easy as that. Assuming you have access to a library of hedge objects for many scenarios this is the fastest way to populate scenes, however problems arise with this technique when:
- The hedge shapes in the libraries dont' match those required by the scene. Although many hedge shapes are available may not always suit the project.
- Hedge sizes required by the scene do not match those in the library. With library items, hedges are limited to increments of the size of the hedge geometry.
- Repetition becomes too obvious.
- Hedges are curved, or form other shapes not easily created by distributing prefabricated parts.
In these situations creating your own shapes by scattering leaves and branches on a hedge volume using Forest Pack Pro may be more appropriate, and is certainly the more flexible approach. Here's how it can be done.
Technique 2 - Scattering leaves and branches on hedge volumes.
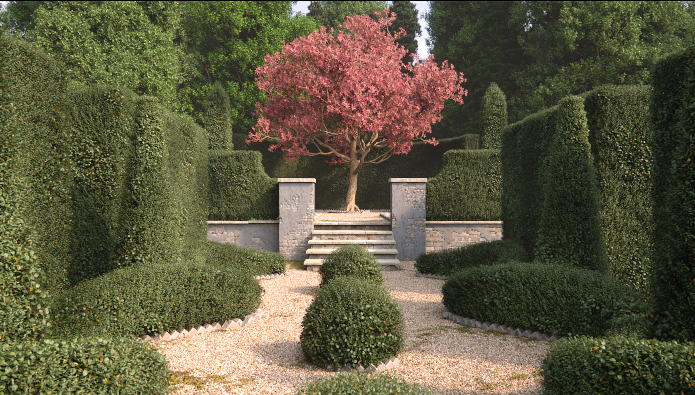
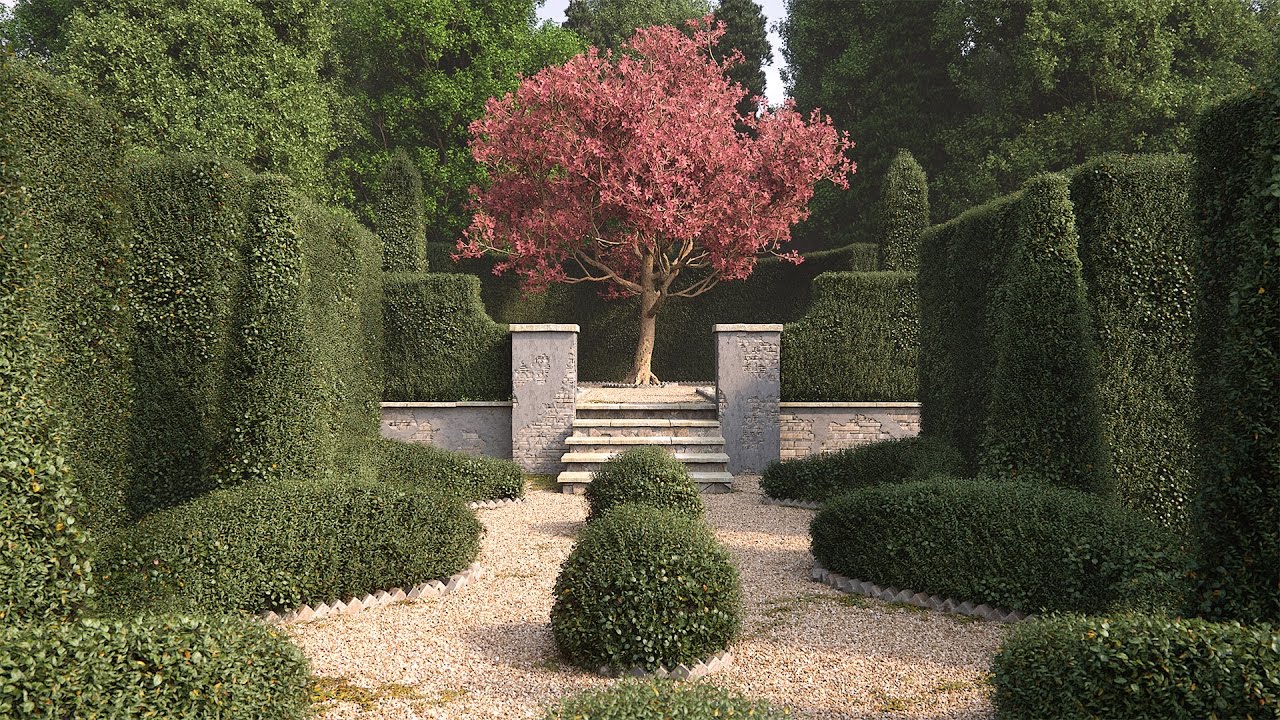
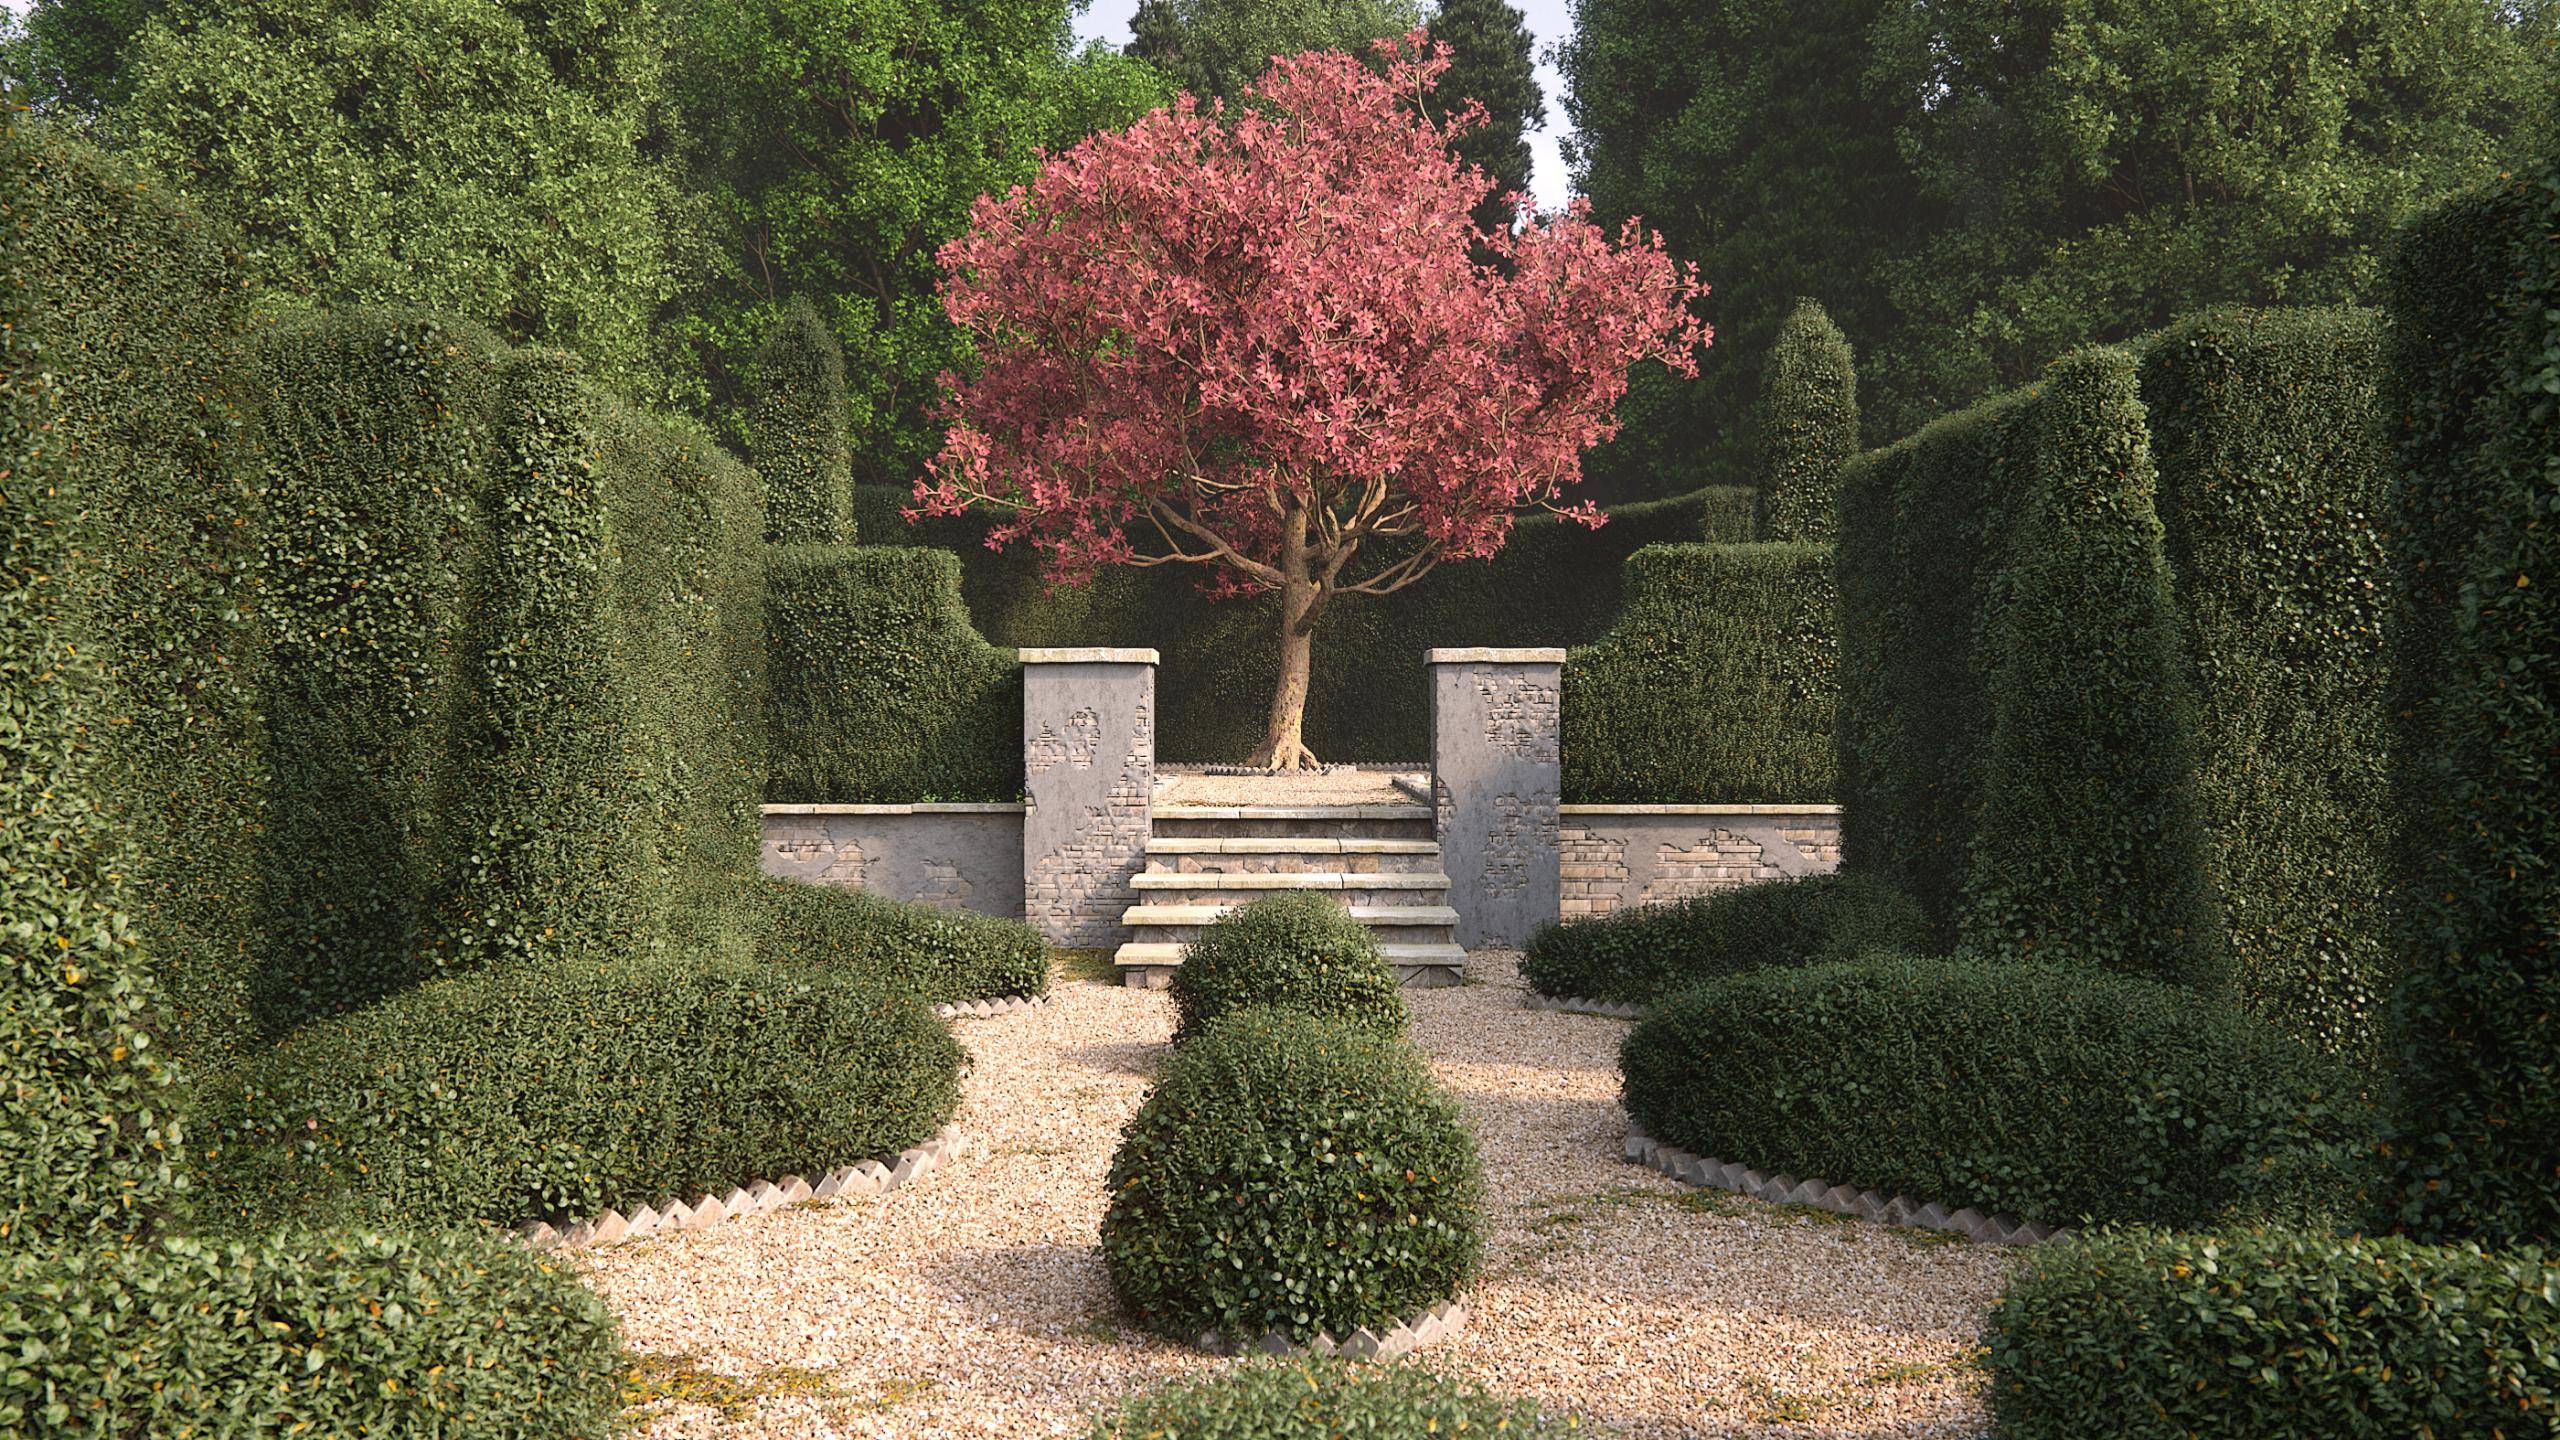
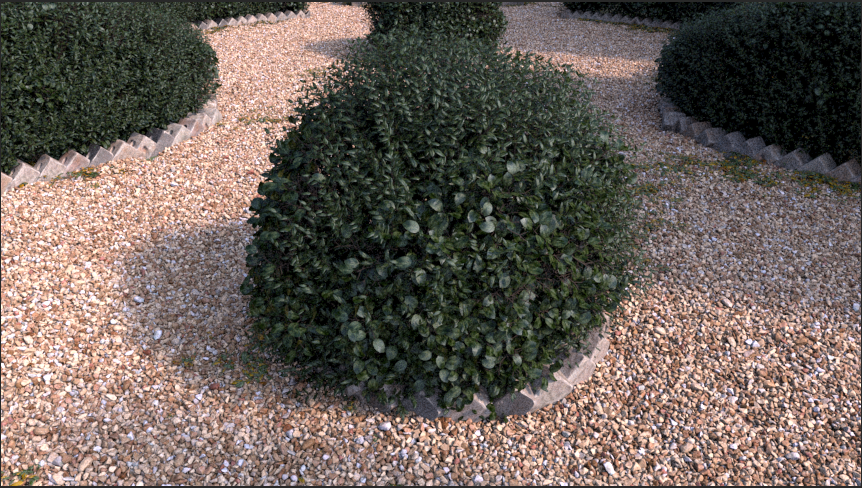
In this part of the tutorial we'll use our own volumes with Forest Pack to scatter leaves and branches on their surfaces. In the scene above for example we have several hedge shapes; some are simple rectangles, some are topiary balls, there's a curved hedge at the back , and even some cones and obelisks.
To create these hedges there are 3 things that should be considered: geometry, scatter settings, and materials. Let's take a look at each one in turn.
Geometry
The leaves and branches to be scattered is fairly straightforward to create. In this example they were modelled with GrowFX but it is also common to extract leaves and branches from existing plant models. In the downloads for the tutorial there are two types of hedge model , each with 3 variations. These differ slightly for extra variety, but crucially also include differences in leaf density. Hedges are often not evenly covered with the same density of leaves and some sparser patches are visible through which the branches can be seen. By scattering occasional branches with fewer leaves we are able to simulate that effect. In addition enough branch should be included so that we can give the impression that the hedge has an interior, and is not simply hollow. The objects used in the tutorial can be seen below.

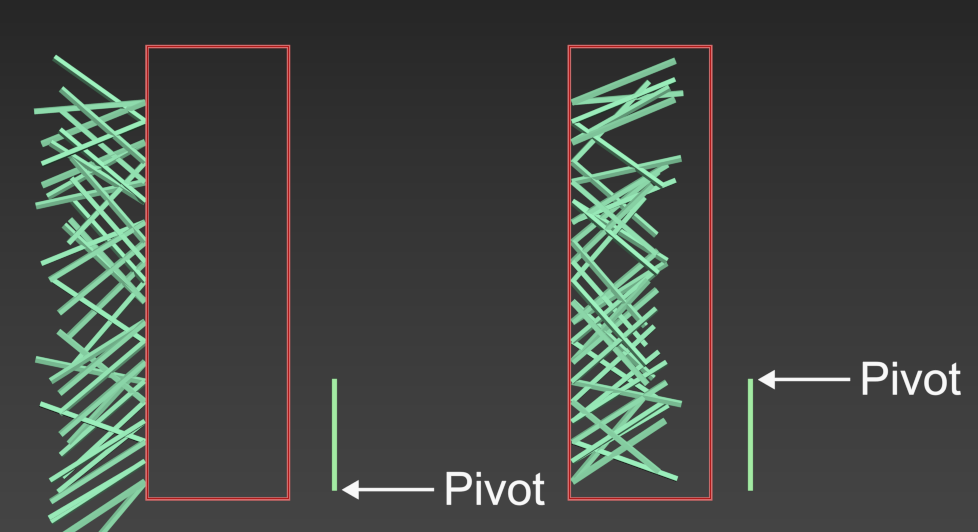
The pivot should be moved to the top of the plant. This is perhaps the most important step. It is tempting and seems logical to place the pivot at the bottom of the branch, but this introduces a couple of issues. First of all, it places the objects on the surface of the geometry, causing the size of the hedge to be larger than the volume. This make it hard to visualise the final size when you're modelling the hedge volumes. Another problem occurs if If you want to randomise the size of the leaves to add some variety as you will also introduce unevenness to the surface of the hedge. This is fine if you're creating a wild hedge, but not so good if the hedge is supposed to be freshly trimmed. Random rotation will cause similar surface unevenness.
To resolve this move the pivot to the top of the branch so that it acts as the pivot for all scale and rotation operations, maintaining more accurately the volume defined by the scatter surface.
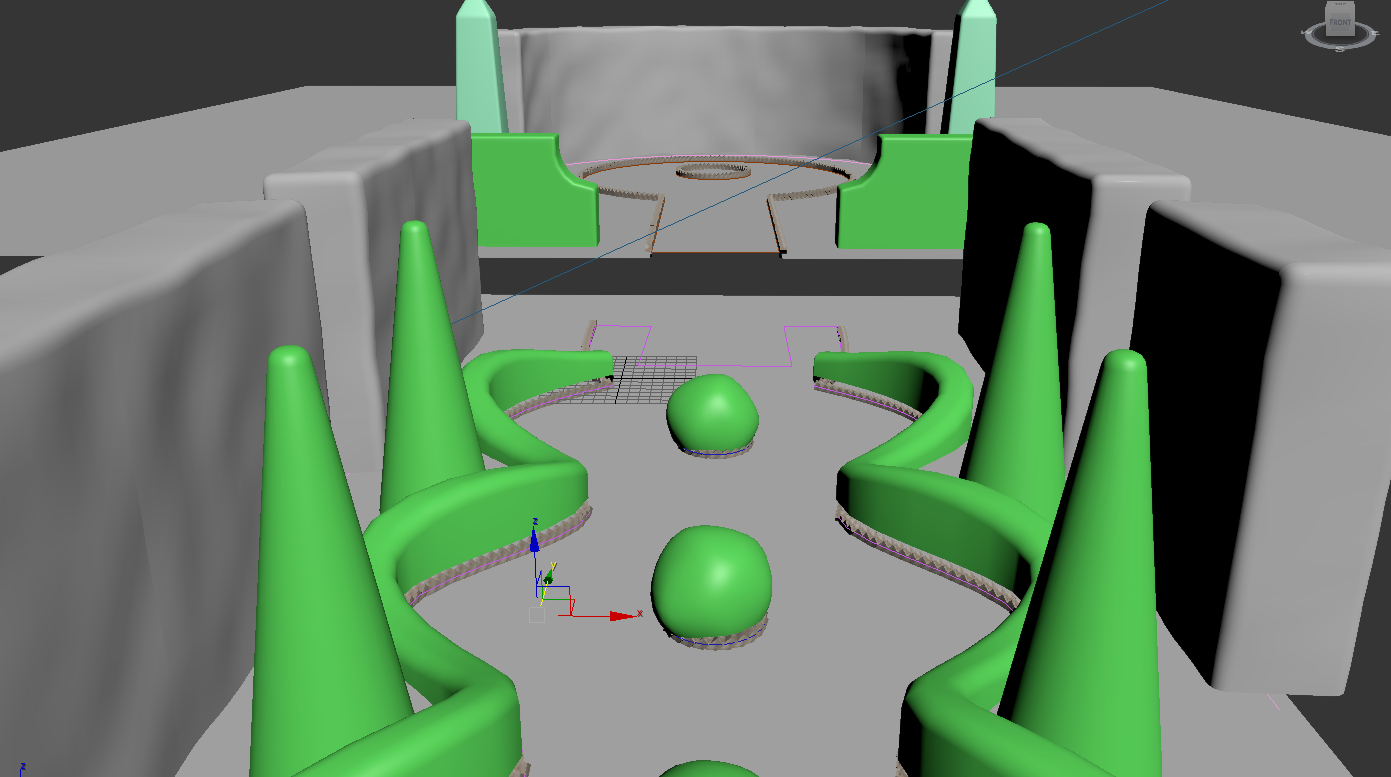
The second type of geometry is the scatter surfaces themselves. These are also straightforward. In most cases you should avoid 90 degree angles so chamfer hard edges, as well as removing polygons from the bottom of objects unless for some reason you need branches protruding downwards from the bottom of the hedge. Below you can see the scatter surfaces for our test scene.
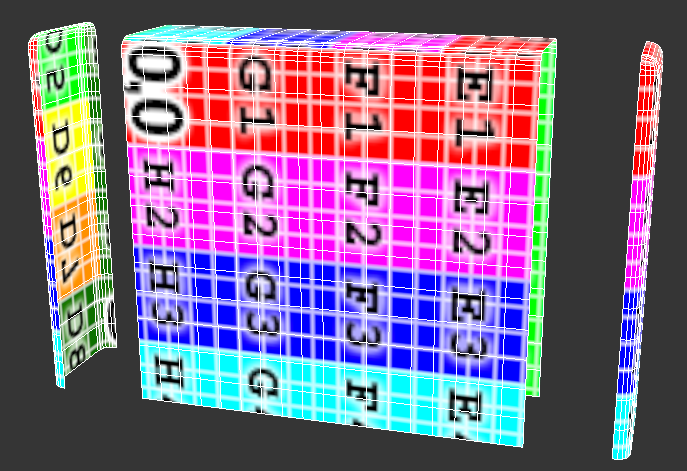
Most importantly, you need to create evenly distributed UVWs. Forest uses these to place the distribution map so they need to be approximately the same density throughout the model; not necessarily seamless, but roughly the same texel size. The size should also be the same for surfaces that will be used in the same Forest Object, it makes it much easy to get the correct distribution map settings. Below you can see how the UVW's in our test scene look when we apply a UVW override map.
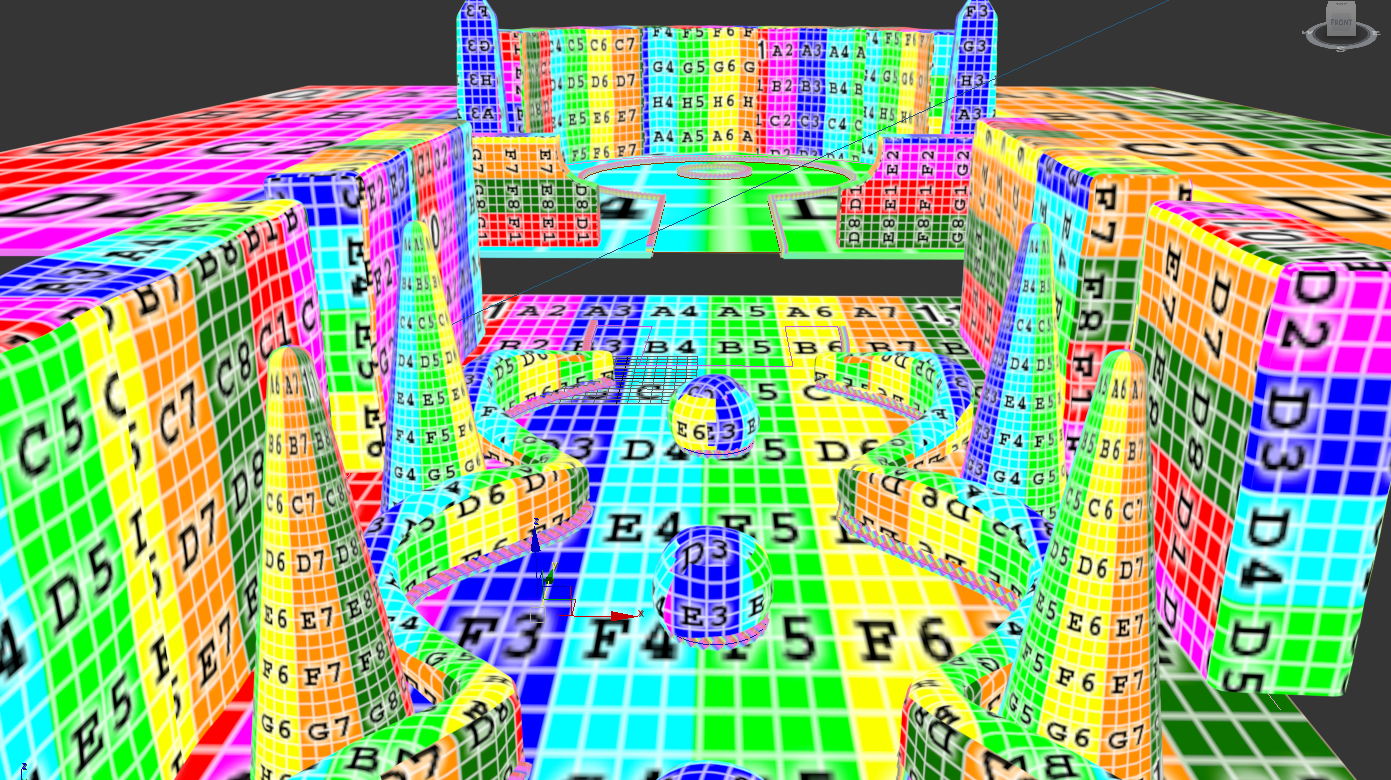
You'll notice on the larger hedges, the curved one at the back for example, that the UVWs are also randomly offset. This is important, as several of Forest Pack's features - for instance: clustering, choosing scatter items and random transforms - are generated internally based on an items position in UVW space. Randomising UVW offsets therefore avoids any visual repetition. Later on I'll demonstrate how RailClone can be used to create hedge volumes that offset UVWs automatically.
Forest Pack settings
To create the Forest Pack object and configure the scatter parameters we need to focus on only a few important settings:
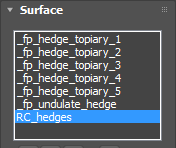
- Create a new Forest Pack object by picking any of the hedges from the scene. In the Surfaces rollout you should pick all the surfaces from the scene that you wish to use as a hedge volume.
![Creating Trimmed Hedges and Topiary-image2017-4-26_18-14-38.png]()
- Go to the Geometry rollout and add the 6 hedge branches we mentioned earlier in the tutorial to the items list. Change the Color ID of Hedge 1 to red, and the Color ID of Hedge 2 to green. We'll use these values later to create clusters
- We also want far fewer Hedge 2 branches, so reduce the Probability for these items to 15%. Changing probabilities will give you different effects, so feel free to experiment. You can also reduce the probability of the branches with fewer leaves to avoid the hedges looking too threadbare.
- Go back to the Surface rollout and change Mode to UV. This mode allows you to scatter objects on the surface of a geometry object. The default XY mode only scatters on polygons that face upwards in world space.
- Turn off UV Transform > Align.
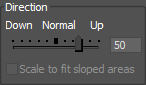
- The Direction slider controls how branches are orientated in relation to the Z axis and the surface normal. By default the slider is set to 100 causing all the branches to point upwards, which is correct on the top, but not the sides of the hedge. If we change the slider to 0 so that they follow the surface's normals, the sides are still not correct. Ideally the branches on the sides should angle up at about 45 degrees and the branches on top should points straight up. This can be achieved by setting the Direction slide to 50, which blends equally between the surface's normals and the world Z axis.
![Creating Trimmed Hedges and Topiary-image2017-4-26_18-20-4.png]()
- Now let's sort out the distribution. To make it easier to visualise our changes, go to the Display rollout and turn on Use Color ID. The colour IDs selected in the Geometry rollout are now used to tint the Points-Cloud.
- In the Distribution rollout, change the Distribution Map to Full. This map creates the maximum number of scattered items and it's ideal for high density items like this.
- Decrease the Density value until the branches are close enough that there's no gaps between them. In this scene a value of 570cm worked well.
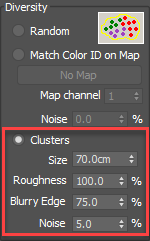
- Finally turn on Density > Clusters. This will create groups of plants with the same Color ID so it will look as though there are two hedges competing for space.
![Creating Trimmed Hedges and Topiary-image2017-4-26_18-39-37.png]()
- Adjust the Size, Blurry Edge and Noise values to get the desired results. The settings used in the scene are shown below.
![Creating Trimmed Hedges and Topiary-image2017-4-26_18-33-22.png]()
- Finally, add randomisation. Go to the Transforms rollout and enable Translation, Rotation and Scale.
- For Translation use -5 to 5 for all 3 axis. If you want a more ragged, and less trimmed looking hedge, use a larger range for the Z axis.
- For Rotation change the X and Y axis minimum to -10 and maximum to 10.
- You can leave the Scale settings at their defaults.

That's the scatter set up. We can now move on to randomising the materials to add even more variety.
Materials
In this section we'll look at randomising maps using Forest Color, before changing anything let's look at how the current material looks. It uses a single bitmap all the leaves.
Far too uniform! For greater realism it's a good idea to randomise between several leaf textures using Forest Color. Leaves on hedges are seldom all this healthy, so to add more realism and simulate some dying leaves we'll use 4 types of leaf map - one that is fully green and healthy, one that's starting to yellow, one that's yellow and then finally a dead brown leaf.
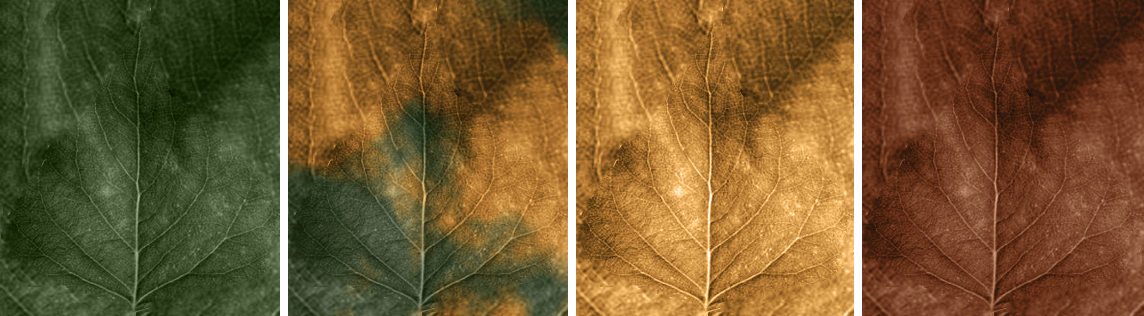
These are wired to a Forest Colour map. If we render it now there are far too many dead and dying leaves in the hedge (although it might be more useful for an autumn scene!).
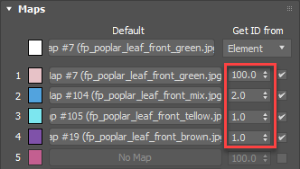
To reduce the number of brown leaves use the probability values found next to the map's name in the Forest Colour map. We need very few yellow and brown leaves so reduce the probability values to 1 - 2%. It is recommended to experiment withthese values to get the look you're after.
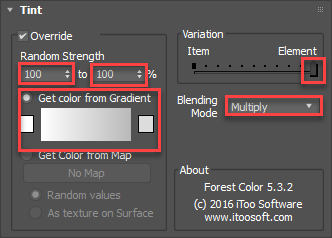
To add further variation you can randomise the brightness of the leaves. To do this
- Turn on Tint Override and change the Blending Mode to Multiply.
- Change the Variation slider to Element. Each leaf will now take it's own random value.
- Change the Random Strength From and To values to 100%.
- Finally change the gradient so that the start is white and the end is a light grey. These leafs are already quite dark so we don't want to change them too much.
Finally you can add some colour changes in larger patches on hedges to break up the uniformity. To do this:
- Create a Noise map and wire the Forest Color map to the first input.
- Wire the same Forest Color map to the second input via a Colour Correct node.
- Make some changes using the Colour Correct map, in this example I will lighten the map by increasing the Gamma as well as slightly increasing the Saturation.
![Creating Trimmed Hedges and Topiary-image2017-4-26_18-2-15.png]()
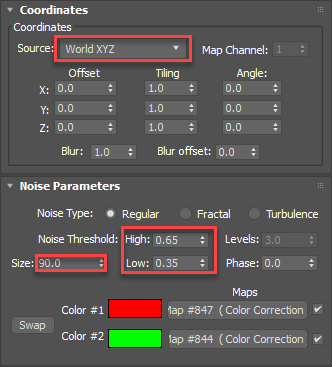
- In the noise map settings, set Coordinates > Source to World XYZ, change the size to 90 and adjust the Noise Threshold High and Low settings to get a decent effect that is noticeable without being too jarring.
![Creating Trimmed Hedges and Topiary-image2017-4-26_18-4-35.png]()
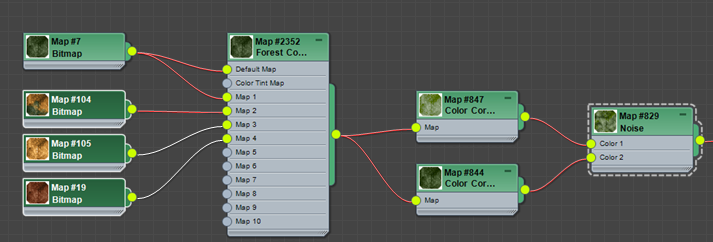
- Duplicate the setup for any other Forest Colour maps connected to the material. The final node tree for the Forest Colour in the Diffuse input looks like this:
![Creating Trimmed Hedges and Topiary-image2017-4-26_18-6-27.png]()

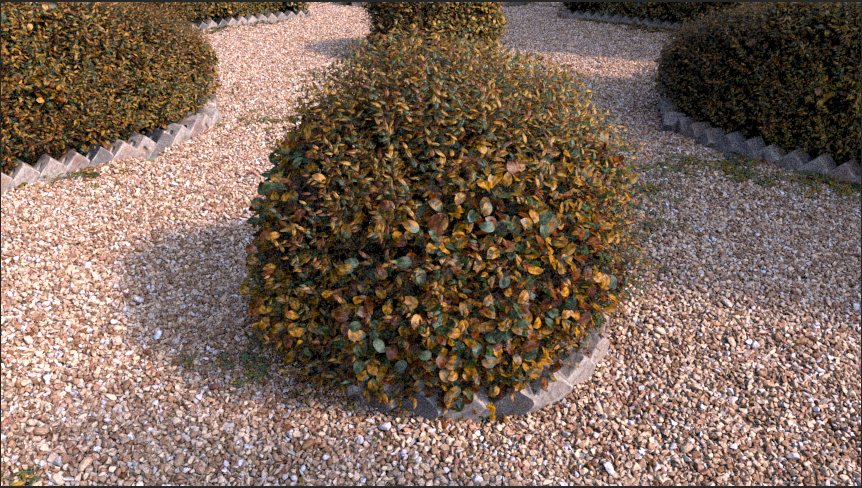
If you render now you'll have a lot more natural variation compared to our starting image.

Bonus - RailClone as a scatter source for hedges
To finish this tutorial it's worth looking at how RailClone can be used as a surface for Forest Pack. This is ideal for creating hedges as both scatter and hedge volume can remain fully parametric.
We need only three segments for this setup, a start, a middle and an end. Just like we discussed earlier in the tutorial, the geometry has been UV mapped, corners have been chamfered and the bottom has been removed.
To use these to build a new RailClone style:
- Create a new RailClone objects and click the Style Editor button to open the node based editor.
- Create a new L1S array.
- Create a new Spline node. Pick a spline from the scene and wire it to the Spline input.
- Create a new Segment node. Pick the starting geometry from the scene and wire the node to the Start input.
- Create a new Segment node. Pick the mid geometry from the scene and wire the node to the Default input.
- Create a new Segment node. Pick the end geometry from the scene and wire the node to the End input.
- It is helpful to be able to adjust the hedge of the Z axis so that you can raise it above the ground slightly. Due to the angle of the branches on the sides, they will extend to the ground and look as though the hedge is planted. To do this, right-click on the generator and export Geometry > Z Offset
- Create a new Numeric node, set the mode to Scene Units and wire this to the Z Offset input. You can now adjust this value from the Modify Panel.
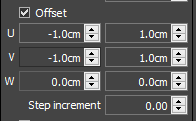
- We mentioned earlier that randomising the UVWs is useful for disguising repetition. This is something that RailClone can do automatically using a UVW XForm node. Create one and go to the properties then change the Random > Offset U, V, and W minimum to -1 (scene unit) and maximum to 1.
![Creating Trimmed Hedges and Topiary-image2017-4-26_19-5-20.png]()
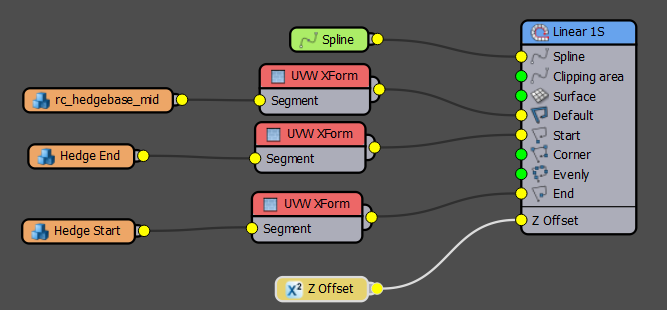
- Duplicate and wire the UVW XForm node between the existing segments. The final graph looks like this:
![Creating Trimmed Hedges and Topiary-image2017-4-26_19-4-48.png]()
- Finally, to use this as a surface for Forest Pack you need to disable instancing by going to the Display rollout and uncheck Use Instancing Engine.
- If you want a lumpier hedge feel free to add a noise modifier to the stack.
That's it! You can now add the RailClone object to Forest's Surface. The whole setup is parametric and the RailClone object makes it easy to add multiple hedges and curves, just be editing a base spline. Don't forget to enable automatic updates in the surface rollout so that Forest updates when the RailClone object is edited.
Conclusion
In this tutorial we demonstrated two ways of creating hedges, first using prefabricated models and secondly a more flexible approach that can be used to create many different sizes and shapes of hedge and topiary. This tutorial follows on from our Scattering on Vertical Surfaces tutorial and the Scattering on Surfaces 10 Second Tip, so please feel free to check these out to see some of these principles applied in a different context. If you create any hedges for your scenes using these techniques or you have any tips you'd like to share for creating these kinds of objects we'd love to see them on our forum. Otherwise, stay tuned for our next tips and tricks instalment and check out our other videos in the tutorials section of the website.