Requirements
- info 3DS Max 2010, Forest Pack Lite
Chapters
- toc Introduction
- toc Forest Pack Intermediate Course: Rendering a Modern Barn Scene - Part 1
- toc Forest Pack Intermediate Course: Rendering a Modern Barn Scene - Part 2
- toc Forest Pack Intermediate Course: Rendering a Modern Barn Scene - Part 3
- toc Forest Pack Intermediate Course: Rendering a Modern Barn Scene - Part 4
- toc Forest Pack Intermediate Course: Rendering a Modern Barn Scene - Part 5
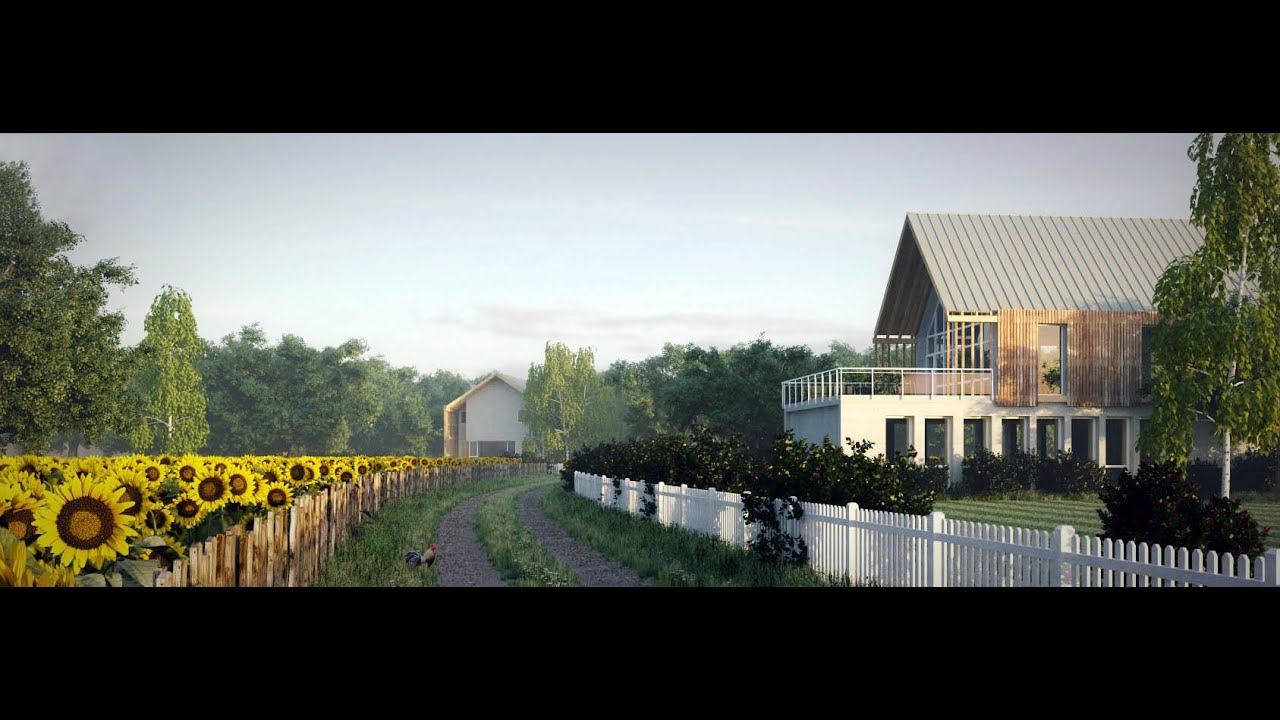
Creating the sunflowers and trees.
In this tutorial we will create the sunflowers and trees using object based exclude areas to alleviate the need to create complicated and precise splines shapes and maintain an easily modifiable workflow.
Start by opening either vray_start.max or mr_start.max depending on your renderer. The current scene is very simple, consisting of two buildings, a ground plane and a road. There are also a small number of splines ready to use in the tutorial.

The simple scene before forest objects have been added.
Create the tree forest object
Forest pack 3.9 now supports 5 types of area to control item distribution.
 Spline area. Multiple splines can now be added and individual splines can be set to either include or exclude items.
 Object area. Uses any geometry in the scene to exclude items.
 Forest area. Uses another forest object in the scene as an exclude area.
 Paint area. Allows you to paint splines, using a mouse or tablet, to create include or exclude areas.
In addition to these, surfaces (which have their own rollout), allow you to scatter objects over the faces of any geometry. As we will see in these tutorials, a surface is also often necessary to control other aspects of forest pack such as paint areas and using maps to control item transformations.
To create the first Forest object, follow this steps:
- Go to the Create Panel > Itoo Software and select Forest Pro. Select the "spline_trees" spline that surrounds the smaller of the two barns. This creates a new forest object using the spline as a distribution area.
- Rename the forest object "forest_trees", open the Geometry rollout and change the default object from a single plane template to a Custom Object. Select "TreeNarrow" from the scene as the reference object.
- Add a new item by clicking on the green plus sign
![Sunflowers-newItem.jpg]() , set it to Custom Object and select "TreeWide" as the reference object.
, set it to Custom Object and select "TreeWide" as the reference object. - Go to the Distribution rollout and set the density to 81800mm
- Add some variety to the trees. In the Transform rollout enable Rotation, use the following settings:
X minimum: -5 | X Maximum: 5
Y minimum: -5 | Y Maximum: 5
Z minimum: 0 | Z Maximum: 359 - Enable Scale and set the minimum to 80 and maximum to 140
 , set it to Custom Object and select "TreeWide" as the reference object.
Adding exclude objects.
Now that we have created the basic tree object we need to remove the items in the area of the small barn and the road. In previous workflows we would have needed to create another spline to exclude trees from these areas, this would mean that any change to the size or position of the objects would necessitate an equivalent change to the splines. By using object exclude areas we are able to use any geometry, irrespective of complexity, to exclude items. Any change to these objects instantly updates the item distribution.
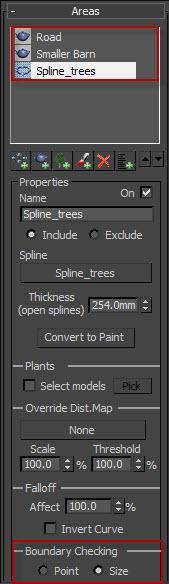
- Ensure you have the "forest_trees" object selected, then go to the Area rollout and click on the Add New Object Area button. Select the small barn object and the trees will be prevented from growing underneath the barn
- Though this last step has stopped items being generated directly underneath the barn the surrounding trees are still growing through the mesh. To prevent this, select the original spline area and change the Boundary Checking from the default Point to Size.
- Go through the same procedure to add the road to the simulation. Add a new Object Area and select the road mesh. If you move the road or barn you should see the trees automatically adjust to flow around them. Position the barn so that its steps meet the empty area framed by the trees and the fence.
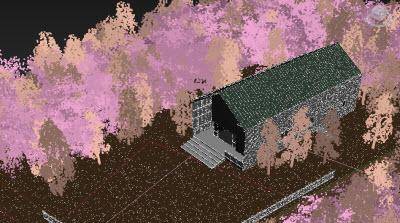
The barn in position.
When distributing items Forest's default setting only checks the position to see if it is affected by an area. By activating size the calculation takes into account the collision radius of each object (this can be adjusted from the geometry rollout.)
Custom Edit
Once we are happy with the position of the barn we will place some trees in the foreground to help frame the views. For this we will use Forest's custom edit mode, this lets us manually edit existing individual trees or create and position new ones.
- Go to Tree Editor rollout and select custom edit mode. You will get a warning that you are about to disable area and distribution parameters. Just click OK.
- Enable tree sub object level by clicking on the button
![Sunflowers-treesub.jpg]()
- To start with we will manually place some of the tall narrow trees. From the properties dropdown selector pick the "TreeTall" object.
- Click on add items.
- Click to add a tree on the lawn in front of the barn in the foreground - use the final render as guidance if you are unsure. You may find it easier to position this from the camera view.
- Add a few trees in the field on the left hand side. Try to guide the skyline through to the background barn. Switch to the "TreeWide" object and add one in foreground on the far left and one just behind the foreground barn's balcony.
- If you are not happy with the size or rotation of the trees they can be manually selected and adjusted with the transform tools.

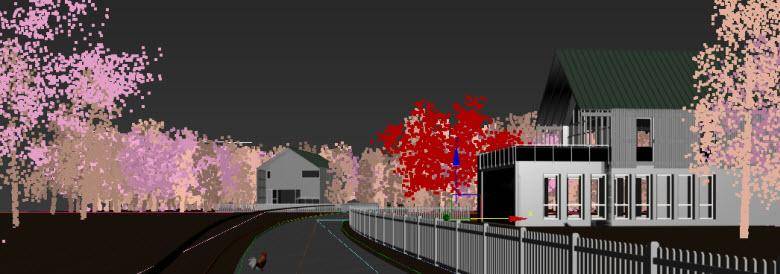
The finished trees with foreground items positioned manually
Include/Exclude order
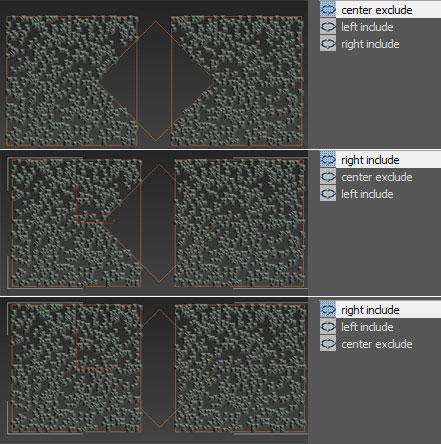
When using a combination of include and exclude areas, the order they occur in the areas list is important. The include/exclude areas are calculated sequentially starting from the bottom of the list and continuing upwards.
The figure on the right demonstrates the effects of changing the list order:
- In the first example the exclude area is at the top of the list, causing it to remove items from both the left and right rectangles.
- In the second example the right rectangle is above the exclude area, so it only affects the left rectangle as it is below.
- In the final example both the include areas are above the exclude, so remain unaffected.
Creating the sunflowers
The sunflowers are created in a similar fashion to the trees, using the road and the trees forest object as an exclude area.
- First create a new forest object using "spline_sunflowers" and "spline_sunflowers2" as distribution areas.
- In the geometry rollout click on add multiple objects and select "sunflower 1", "sunflower 2", and "sunflower 3".
- Delete the default object.
- The sunflowers appear a little small so set the global scale to 120%
- Set the distribution map to dense and change the density to 22600mm
- Limit the visibility to the camera
- In the transform rollout enable rotation and set the parameters as follows:
X minimum: -10 | X Maximum: 10
Y minimum: -10 | Y Maximum: 10
Z minimum: -40 | Z Maximum: 40 - Enable scale and accept the default settings.
- Add the road and forest_trees as an exclude area. At present the sunflowers run up to the edge of the road but we need them to be behind the fence. To push the sunflowers back further from the road we can increase the scale of the road object to 102%. Since the area is quite large to improve accuracy we will also increase the resolution to 1024. The trees have the opposite problem, the area is too large, decrease the scale to about 40%.
This completes the first part. In the next section we look at the creation of the dirt road that runs through the scene focusing on the use of falloff maps and probability curves.