Requirements
- info 3DS Max 2011, Forest Pack Pro
Introduction
In this Tips & Tricks tutorial for Forest Pack we look at the many options for scattering objects on uneven terrain. It's not often the case that we place scattered objects on a truly planar surface, instead in many scenes we have banks, mounds, hills, and even vertiginous mountains. Forest Pack not only allows you to place geometry on non-planar surface with a minimum of effort, but also gives you a high level of control, with the ability to control the density and scale of the scattered objects based on the altitude and slope angle of the terrain.
By completing this tutorial you will be able to:
- Use Surfaces in XY mode to distribute scattered objects.
- Align trees in relation the the normals of the surface.
- Control density and scale based on altitude.
- Control density and scale based on the slope angle of the underlying surface.
Download Contents
The exercise files for this tutorial includes the following .max scenes compatible with Max 2011 and V-Ray.
- terrain_start.max The starting file if you want to follow the tutorial.
- terrain_end.max The result of the completed tutorial
Getting started with Surfaces
Before looking at an example, we'll take a look at the surface controls in more detail.
To start a new Forest Pack object using a surface simply click on Forest Pack from the Create Panel and pick a surface from the scene. To edit or update surface settings, add and manage multiple surfaces, and add surfaces to an existing Forest Pack object open the Surface rollout.

At the top of the rollout is the Surface list, this allow you to add extra surfaces by clicking on the  button or
  to add multiple surfaces. If you change a surface and wish to update Forest Pack simply click
  , if you would Forest to update automatically or if the surface is animated and you need the scattered objects to follow the geometry then turn on Auto.
Surfaces can be used in two modes. The default is XY which projects objects along their Z axis until they meet the surface geometry, this is ideal for landscapes without steep inclines.
Normal Direction
XY mode uses the surface's face normals direction to place objects so if a surface doesn't appear to be working, try inverting the normals to check that they are facing in the correct direction. This can often be a problem with surfaces imported from other applications
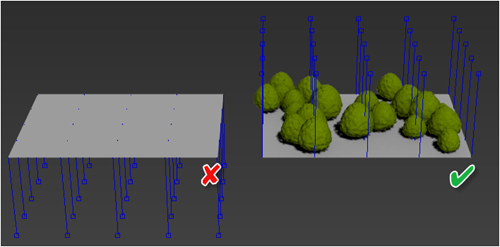
For steep inclines or geometry with slopes greater than 90 degrees from the XY Plane, UV mode uses the mapping coordinates of the surface to distribute the objects. In this tutorial we are going to focus on the XY mode, we'll explore UV modes in more detail in a future tips and tricks instalment.
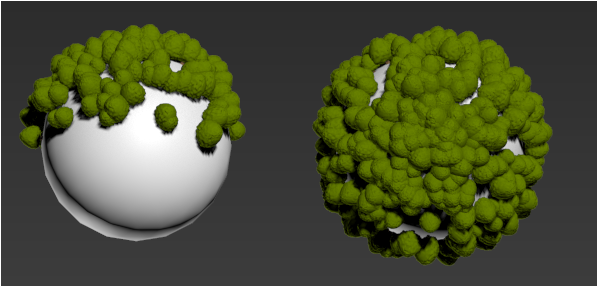
Left: XY mode on sphere | Right: UV mode on sphere
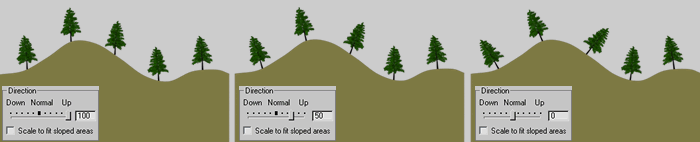
The direction slider allows you to align the segments in relation to the surface's face normals. At 0% the scattered objects follow the surface normal, at 100% they always face upward and at -100% they face down.
When using XY mode, if surfaces are placed one above another there are some differences in the way scattered objects are placed dependent on if the surfaces have been combined into a single mesh object or whether they have been added individually to the Surface list. If surfaces are added separately (stacked) then each surface will receive scattered objects, neither surface will affect the other. If however the surfaces have been combined in a single edit poly object, only the the highest polygons will receive scattered objects, faces below are masked.
Left: Planes added individually to the surface list | Right: planes combined into a single editable poly object
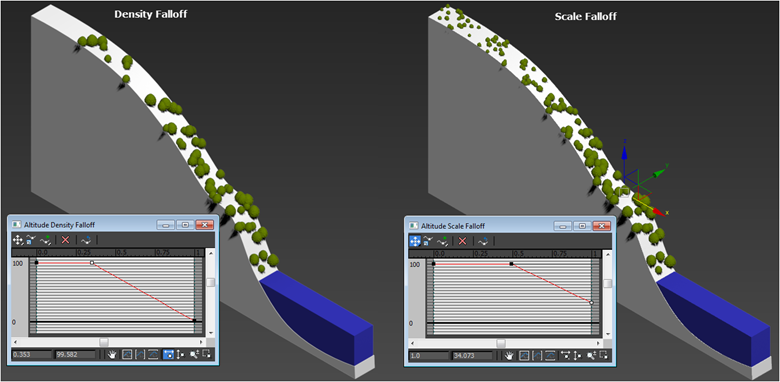
Altitude Range
When Altitude Range Limit is on, scattered objects will only appear within the height range defined by the Top and Bottom values. If you don't want a sharply defined boundary or if you want to create layers or other effects, then a falloff curve gives you precise control of the density of scattered objects across this range. The rate and extent of the falloff effect is defined by the curve editor where the X axis plots the altitude range between the Top and Bottom values.
The scale falloff curve works in a similar way, allowing you to control the scale of scattered objects over the altitude range. You could for example reduce the size of the trees at higher altitudes where in reality oxygen may be thinner.
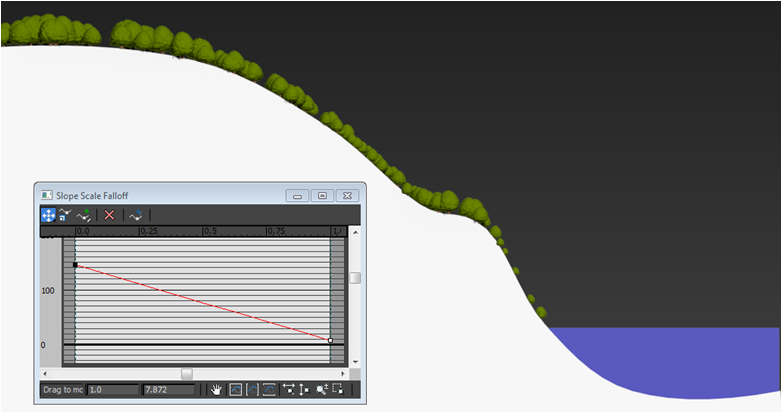
Slope Range
Activating slope range allows you to use the angle of the surface to limit the distribution of scattered objects. The Min and Max values define the angle, measured in degrees, where 0 is fully horizontal and 90 is completely vertical. As with altitude range, you are able to use falloff curves to precisely control the density and size of scattered objects based on the angle of the underlying surface.
That's the theory, let's put some of these features to use on a simple scene.
Afforesting the mountains
Maximum Density
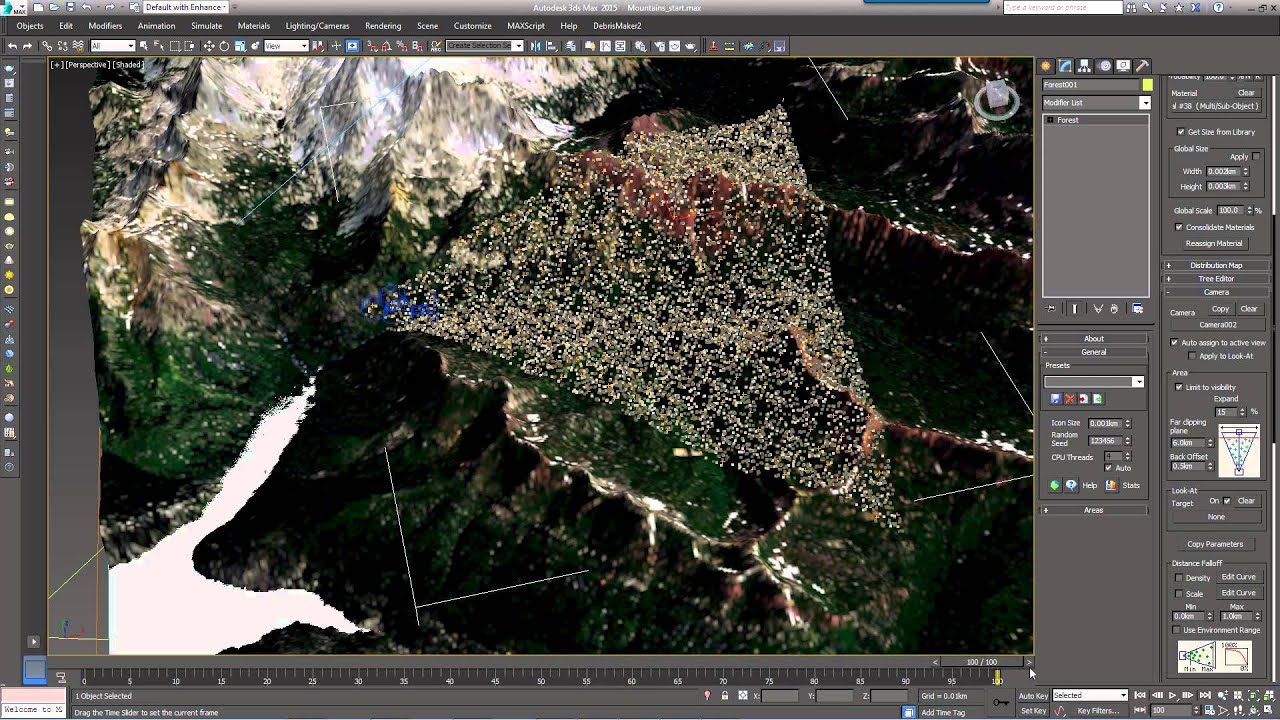
When first selecting the terrain you may get a warning that Maximum Density has been reached.
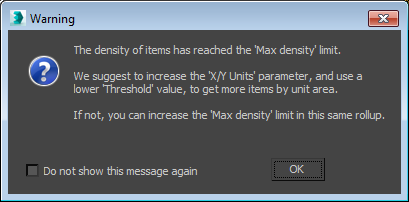
This is because the number of trees being created has exceeded the maximum number specified by the Max Density value found in the distribution map rollout. In this example we will be limiting the trees to within the camera frustum so the number of scattered trees will soon be substantially reduced. You can safely click Do not show this message again and then OK. If necessary you can also increase the Max Density value.
- Create a new Forest Pack object going to Create > Itoo > Forest Pack and clicking on the Terrain object in the scene
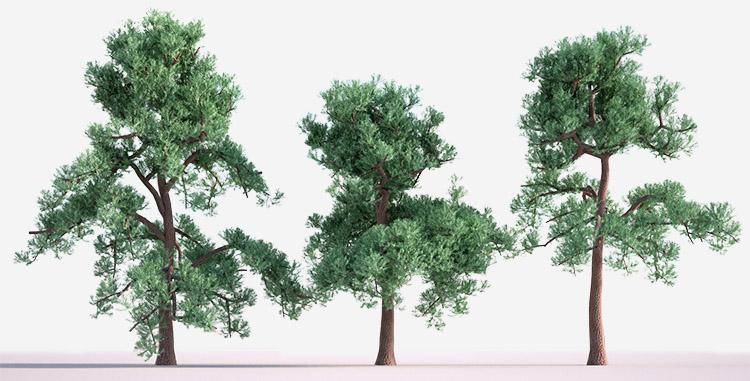
- Go the the Geometry rollout, click on Add Multiple Custom Objects and select Tree1, Tree2, and Tree3.
![library]()
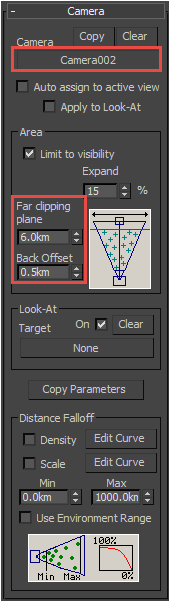
The tree models used in this scene.- The terrain is huge at 17km square! To optimise the scene and prevent Forest Pack from creating trees that are outside of the rendered view go to the Camera rollout and assign Camera002. Turn on Limit to Visibility and set the Back Offset to 0.5km and the Far Clipping Plane to 6km. This will limit the trees to within the camera frustum.
![library]()
- Open the Distribution rollout and set the map type to Full. Set the Density to 0.5km.
- The Full distribution map creates a grid-like pattern of trees. To avoid this, go to the Transform rollout and enable Translation. Set the Min values for X and Y to -200% and the Max values to 200%.
- Enable Rotation and Scale and set the scale Minimum to 75% and the Maximum to 110%.
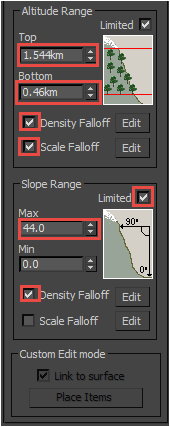
- Open the Surface rollout. Enable Limited in the Altitude Range group and set the Top to 1.544km and the Bottom to 0.46km.
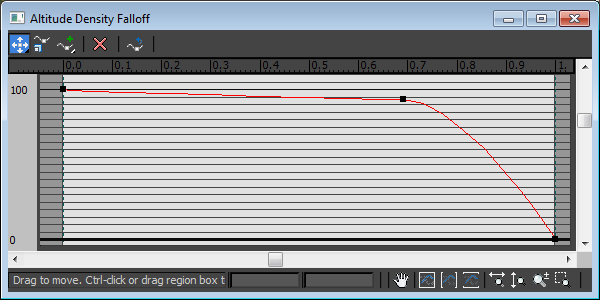
- Turn on the Density Falloff and Scale Falloff functions and reduce the scale and density as the trees ascend the mountain by adjust the curves as follows:
![library]()
- Turn on Limited by Slope Range and change the Max value to 44 degrees. This will prevent trees from growing half way up the cliffs.
![library]()
Next we'll use similar techniques to add some boulders on the shoreline
- Create a new Forest Pack object by selecting the Terrain surface.
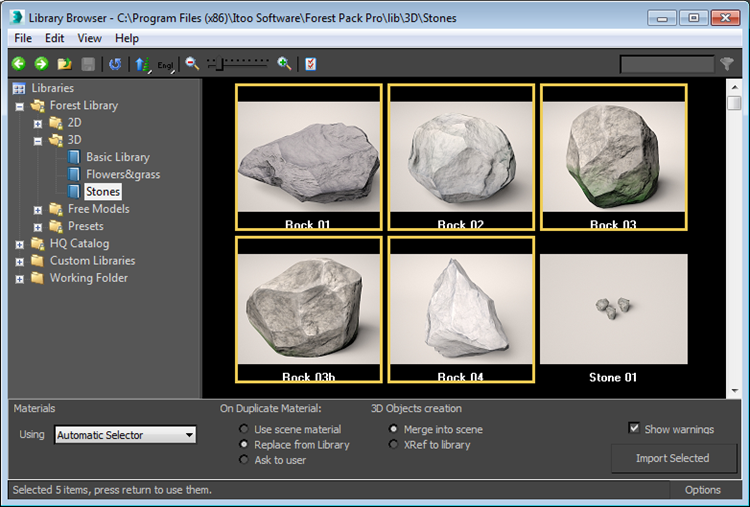
- From the Geometry rollout, click the Library button. Go to Forest Library > 3d > Stones, select Rock 01, Rock 02, Rock 03, Rock 03 and Rock 04 and click Import Selected.
![library]()
- Lets turn these rocks into boulders! Turn up the Global Scale to 400%.
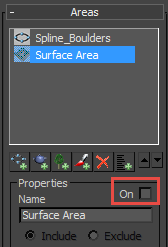
- We want these boulders to only appear around the lake, to limit them to roughly to this area open the Areas rollout, click on
![library]() to add a new spline area and pick Spline Boulders from the scene. Turn Off the Surface area layer to restrict the scatter to within the spline. Note that although the surface has been switched off in the Areas rollout, it is still used to position the objects on the Z axis.
to add a new spline area and pick Spline Boulders from the scene. Turn Off the Surface area layer to restrict the scatter to within the spline. Note that although the surface has been switched off in the Areas rollout, it is still used to position the objects on the Z axis.
![library]()
- Set the Distribution Map Type to Full and set the Density to 0.65km.
- Add some randomisation by going to the Transform rollout. Turn On Translation and enter -200% to 200% for the X and Y axis. Turn on Rotation and use the default settings. Turn on Scale and set the X Min value to 20%.
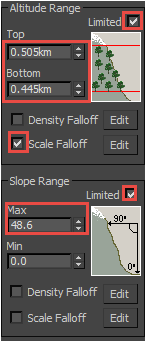
- For this example, we only want the boulders around the edges of the lake. We can achieve this using the Surface Falloff controls. Turn on Limited in the Altitude Range group and set the Top value to 0.505km and set the Bottom value to 0.445km.
![library]()
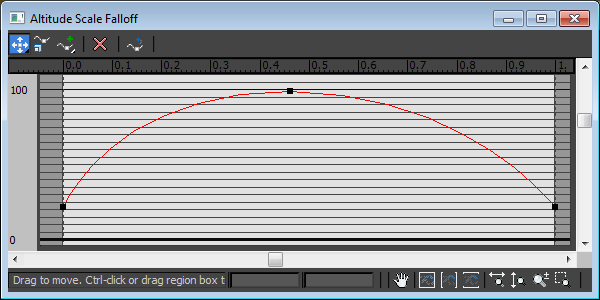
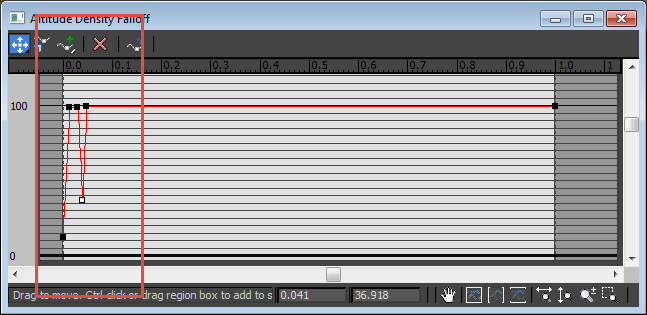
- To create some size variation based on altitude, turn on Scale Falloff and click on Edit to open the curve controller. Set the curve as shown below, this will create smaller rocks nearer the water and into the tree line.
![library]()
- We don't want rocks on steeper slopes (they'd roll off) so turn on Slope Range and decrease the Max value to 48.5.
 to add a new spline area and pick Spline Boulders from the scene. Turn Off the Surface area layer to restrict the scatter to within the spline. Note that although the surface has been switched off in the Areas rollout, it is still used to position the objects on the Z axis.
Finally, lets combine surfaces with spline painting layers and falloff to quickly add some grass the the shore near the camera.
- Create a new Forest object by assigning terrain as a surface.
- Go to the Areas rollout and turn Off the surface layer.
- For this example we'll use a preset. Go to the Geometry rollout and click on Library. Go to Presets > Wild Meadows and select a preset with the [large] suffix. These are optimised for large areas.
- Still in the Areas rollout click
![library]() to add a new Paint Area. Click
to add a new Paint Area. Click ![library]() to start painting, if necessary open the Brush Options by clicking
to start painting, if necessary open the Brush Options by clicking ![library]() to adjust the brush size.
to adjust the brush size. - Paint grass on the shore, don't worry about being too precise along the water line. We'll use Altitude limits to prevent the grass growing in the water.
![library]()
- Open the Surfaces rollout and turn on Scale to Fit Areas.
- Turn on Limited by Altitude Range and set the Top value to 0.616km and the Bottom value to 0.457km.
- Create a small falloff near the water by turning on Density Falloff and opening the Curve Editor. Add a narrow trough very near the right hand side as below. If you wanted to create a path around the lake you could also add a second trough immediately after the first.
![library]()
 to add a new Paint Area. Click
  to start painting, if necessary open the Brush Options by clicking
  to adjust the brush size.
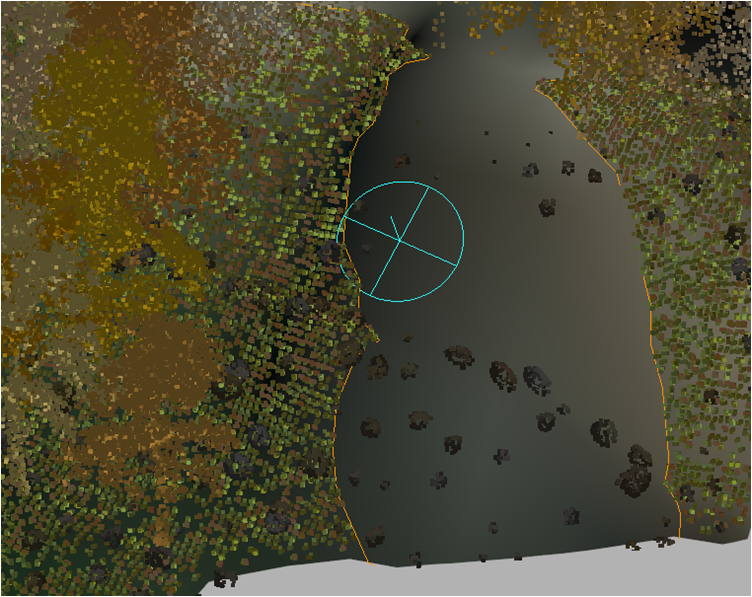
Conclusion
Using these techniques gives you a high level of control over the distribution of objects on surfaces. Though this example focused on trees in a landscape the same principles can easily be applied for myriad other less obvious uses. For example you may wish to use forest to distribute leaves on climbing vines, controlling leaf age and density based on height, or place beads of condensation on a glass using falloff to control their size and density as they move away from the cool liquid within.

Stay tuned for future Forest Pack tutorials, meanwhile for more information about many aspects of Forest Pack's features please see our reference section or visit the tutorials page for more Tips and Tricks videos as well as in-depth tutorials.